To install wood wall panels, firstly measure the area and gather the necessary tools and materials. Then, start by applying adhesive to the back of each panel and firmly press them against the wall, ensuring proper alignment.
Understanding Wood Wall Panels
If you’re looking to give your home a touch of elegance and warmth, wood wall panels are an excellent choice. Wood wall panels not only add character to your space but also provide functionality by insulating the room and protecting your walls. In this article, we will delve into the different types of wood wall panels, the benefits of using them, and the popular wood species that are commonly used for wall panels.
Types of wood wall panels
Wood wall panels come in a variety of styles, each with its distinct characteristics. Here are some popular types of wood wall panels:
| Type | Description |
|---|---|
| Tongue and groove panels | These panels have interlocking edges that fit together, resulting in a seamless and smooth finish. |
| Reclaimed wood panels | For those who appreciate eco-friendly options, reclaimed wood panels are made from salvaged wood, lending a rustic and weathered look to your walls. |
| Shiplap panels | Shiplap panels have overlapping rabbets, creating a distinct horizontal groove between each panel. This style adds a touch of coastal charm to any space. |
Benefits of using wood wall panels
Using wood wall panels in your home brings numerous advantages. Here are a few benefits you can enjoy:
- Enhanced aesthetics: Wood wall panels instantly elevate the appearance of any room, adding a touch of elegance and sophistication.
- Improved insulation: Wood is a natural insulator, which means that installing wood wall panels can help regulate the temperature in your home, preventing heat loss during the colder months and keeping your space cool during the summer.
- Durability: Wood is a durable material, known for its strength and longevity. When properly cared for, wood wall panels can last for decades.
- Easy installation: Wood wall panels are designed for easy installation, making it a suitable DIY project for homeowners who want to upgrade their space without hiring professionals.
Popular wood species for wall panels
When it comes to choosing the right wood species for your wall panels, it’s important to consider both the aesthetic appeal and durability. Here are some popular wood species often used for wall panels:
- Oak: Oak is a classic choice for wall panels, known for its beautiful grain pattern and strength.
- Walnut: Walnut wood panels bring a touch of luxury with their dark brown color and rich, natural look.
- Pine: For a more rustic and cozy feel, pine wood panels are an excellent option, with their light tones and distinctive knots.
- Maple: Maple wood panels offer a smooth and sleek appearance, making them a perfect choice for a contemporary setting.
With the understanding of the different types of wood wall panels, the benefits they offer, and the popular wood species available, you’re well-equipped to make an informed decision when it comes to installing wood wall panels in your home.

Essential Tools And Materials
Installing wood wall panels can be a rewarding DIY project that adds warmth and character to any space. Before you embark on this endeavor, gather all the essential tools and materials you’ll need for a successful installation. From measuring and cutting to securing the panels, having the right tools at hand will make the process smoother and more efficient.
List of tools needed for installation
Here is a comprehensive list of the tools you will require to install wood wall panels:
- Tape measure
- Level
- Pencil
- Saw (circular or miter)
- Nail gun or hammer
- Trim nail punch
- Chisel
- Pry bar
- Putty knife
- Sanding block
- Wood putty or filler
- Paintbrush or roller
- Paint or stain
Materials required for a successful installation
Aside from the tools, you’ll also need the following materials to ensure a successful installation of wood wall panels:
- Wood wall panels
- Panel adhesive or construction adhesive
- Nails or screws
- Caulk or wood filler
- Sandpaper (medium grit)
- Primer
- Paint or stain
Safety precautions to consider
When working with tools and materials, it is essential to prioritize safety. Here are a few precautions to consider during the installation process:
- Wear safety goggles to protect your eyes from flying debris.
- Use ear protection when operating loud power tools.
- Work in a well-ventilated area, as some adhesives and paints may emit strong fumes.
- Keep your work area clean and free from clutter to prevent accidents.
- Avoid wearing loose clothing or jewelry that can get caught in tools or machinery.
- Follow the manufacturer’s instructions for all tools and materials to ensure proper and safe usage.
By gathering the necessary tools and materials and adhering to safety precautions, you are one step closer to successfully installing wood wall panels. In the next section, we will dive into the important steps of preparation before installation.
Preparing For Installation
Before you begin the installation process for wood wall panels, it’s important to properly prepare the area so that the end result is both aesthetically pleasing and long-lasting. This involves measuring and planning the layout, choosing the right adhesive or fasteners, and preparing the wall surface for installation.
Measuring and planning the layout
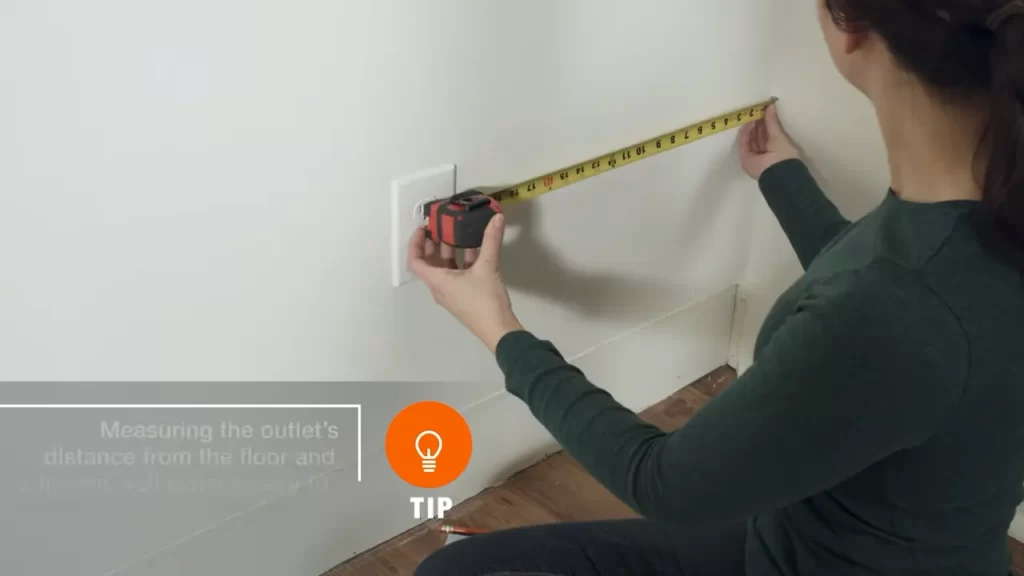
One of the first steps in preparing for the installation of wood wall panels is to accurately measure the area where you intend to install them. This will help you determine the quantity of panels needed, as well as ensure that they fit perfectly.
Start by measuring the height and width of the wall and calculate the total square footage. Take into account any doors, windows, or other obstacles that may require special measurement considerations. With these measurements in hand, you can then plan the layout of the panels.
Consider the desired pattern and placement of the panels. Will you be installing them horizontally or vertically? Do you want a uniform look or a more creative arrangement? These decisions will help you create a well-thought-out and visually appealing design.
Choosing the right adhesive or fasteners
Once you have measured and planned the layout of your wood wall panels, the next step is to select the appropriate adhesive or fasteners. The choice will depend on the type of wood you are using, the condition of the wall surface, and your personal preferences.
If you opt for an adhesive, make sure to choose one that is specifically designed for wood panel installations. Look for an adhesive that offers strong bonding capabilities and is moisture-resistant. It’s a good idea to check the manufacturer’s recommendations for application instructions and drying time.
If you prefer fasteners, such as nails or screws, ensure that they are suitable for the type of wood paneling you are using. Use corrosion-resistant fasteners to prevent rusting or staining. Consider using a stud finder to locate and mark the studs in the wall for secure fastening.
Preparing the wall surface for installation
Before installing the wood wall panels, it’s crucial to properly prepare the wall surface. This helps ensure a smooth and even installation that will last for years to come.
Start by cleaning the wall surface to remove any dirt, dust, or grease. This will help the adhesive or fasteners adhere more effectively. Fill any holes or cracks in the wall with a suitable filler and sand them down for a flush finish.
If the wall is painted, consider roughening the surface with sandpaper to promote better adhesion. However, if the wall has wallpaper or any other type of covering, it may need to be removed prior to installation. Consult the manufacturer’s instructions for specific requirements.
Lastly, take the time to ensure that the wall is flat and level. Use a level tool to check for any uneven areas and make any necessary adjustments. A flat and level surface will contribute to a seamless and professional-looking installation.

Installing Wood Wall Panels
Step-by-step guide to installing the panels
Installing wood wall panels can transform any space and give it a warm and inviting feel. Whether you want to add depth to your living room or create a cozy atmosphere in your bedroom, wood wall panels are a great choice. In this step-by-step guide, we will walk you through the process of installing wood wall panels, so you can have a beautiful and durable installation that you can enjoy for years to come.
- Prepare the wall: Before installing the panels, it is important to prepare the wall surface. Ensure that the wall is clean, dry, and free from any dust or debris. If there are any existing wall finishes, such as wallpaper or paint, remove them and sand the wall surface to create an even base.
- Measure and cut the panels: Measure the wall area where you will be installing the wood panels. Take precise measurements and transfer them onto the wood panels. Using a circular saw or a jigsaw, carefully cut the panels to fit the measurements. It is advisable to wear safety goggles and gloves during this step.
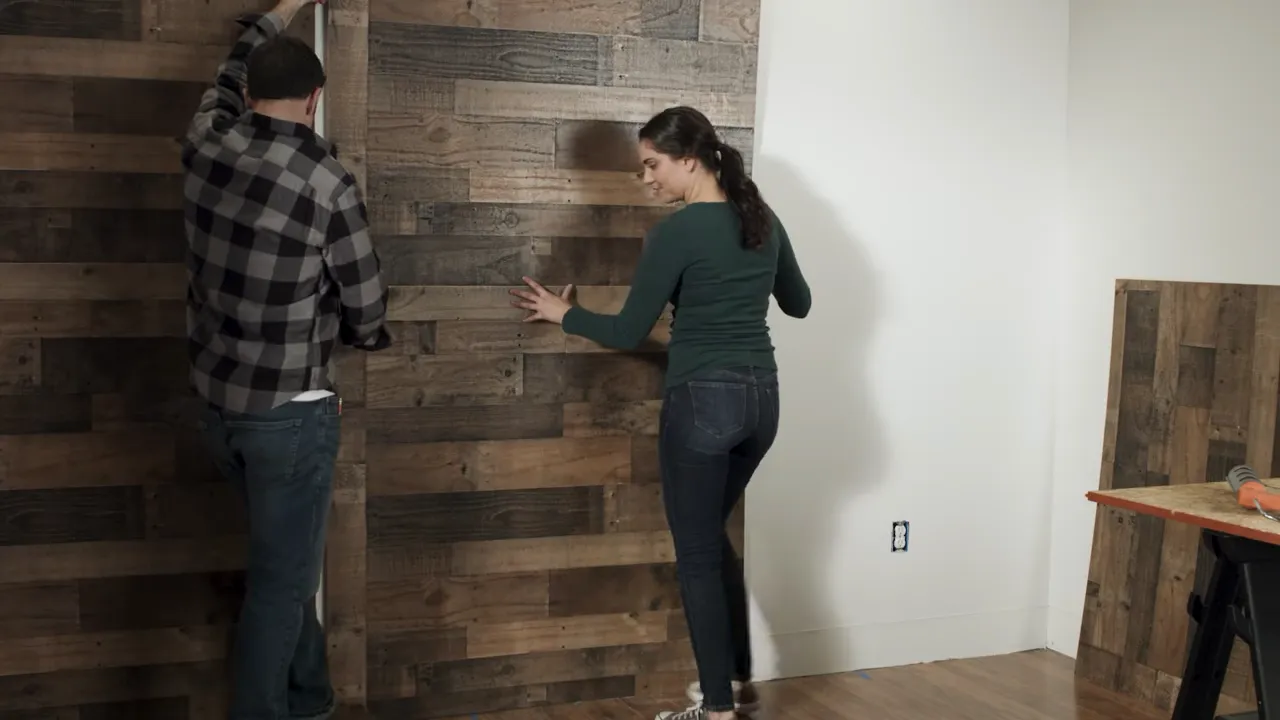
- Apply adhesive: Apply a generous amount of construction adhesive to the back of each wood panel. Start at one corner of the wall and work your way across, ensuring that the adhesive is applied evenly. This will help secure the panels and prevent any movement or shifting over time.
- Align and level the panels: As you place each wood panel onto the wall, make sure to align it properly with the previous panel. Use a level to ensure that the panels are straight and plumb. This will create a seamless and professional-looking installation. Adjust the panels as necessary until they are perfectly aligned.
- Secure the panels: Once the panels are aligned and leveled, use finishing nails or a pneumatic nail gun to secure them to the wall. Place the nails at a slight angle along the edges of the panels, ensuring that they penetrate the panels and into the wall studs. This will provide additional stability and ensure a durable installation.
Tips for aligning and leveling the panels
- Use a laser level: A laser level can be a helpful tool when aligning and leveling the wood panels. It provides a straight reference line that can be easily followed, ensuring that the panels are installed accurately.
- Check for gaps: While aligning the panels, be sure to check for any gaps or unevenness between them. If any gaps are found, use shims or spacers to fill them in and create a smooth and consistent surface.
- Work in small sections: Instead of trying to install all the panels at once, it is advisable to work in small sections. This will help you maintain control and ensure that each panel is properly aligned and leveled before moving on to the next section.
Securing the panels for a durable installation
Securing the wood panels properly is essential for a durable and long-lasting installation. Here are a few tips to ensure that the panels stay securely in place:
- Use the right nails: Choose nails that are appropriate in length and gauge for the thickness of the wood panels. Using nails that are too short may not provide enough holding power, while nails that are too long may penetrate through the panels.
- Consider adhesive: In addition to nailing the panels, using construction adhesive will provide added strength and stability. The adhesive creates a strong bond between the panels and the wall surface, ensuring that the panels stay in place for years to come.
- Space the nails evenly: When securing the panels with nails, make sure to space them evenly along the edges. This will distribute the holding power evenly across the panels, preventing any warping or bowing.
By following this step-by-step guide and applying these tips, you can install wood wall panels with confidence and achieve a professional-looking result. So go ahead and give your space a touch of elegance and warmth with the timeless beauty of wood wall panels.
Finishing Touches And Maintenance
Once you have installed your wood wall panels, it’s time to add the finishing touches and ensure proper maintenance to keep them looking their best. This includes sanding and refinishing the panels, applying a protective finish or sealant, as well as regular cleaning and maintenance.
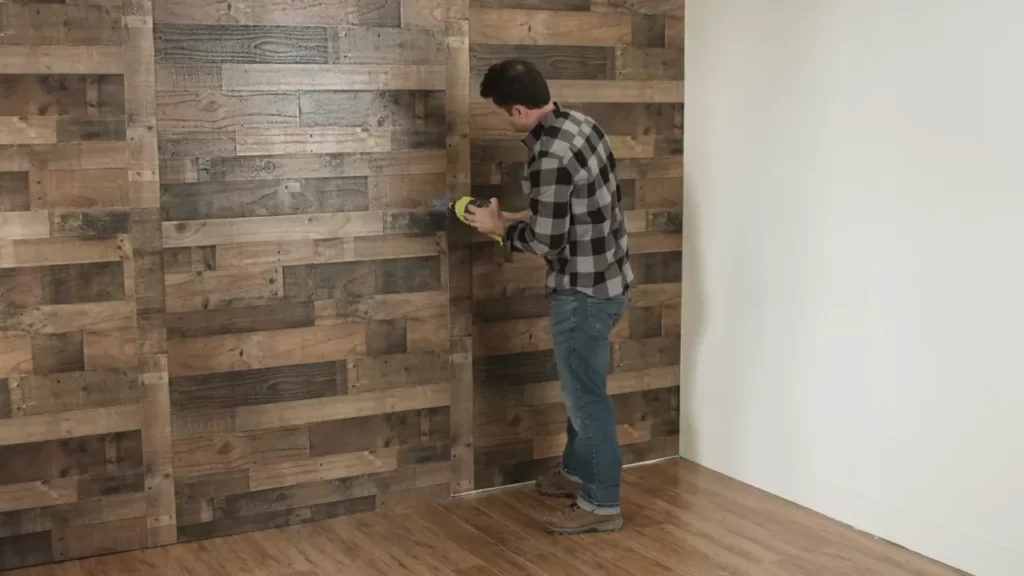
Sanding and Refinishing the Panels
To maintain the beauty of your wood wall panels, it’s important to periodically sand and refinish them. This process helps to remove any imperfections, such as scratches or stains, and gives the panels a fresh look. Here’s a step-by-step guide on how to sand and refinish your wood wall panels:
- Start by inspecting the panels for any visible damages or rough areas.
- Use sandpaper with a medium grit to sand the panels gently in the direction of the grain. This will help to smoothen out the surface and remove any imperfections.
- After sanding, wipe down the panels with a damp cloth to remove any dust or particles.
- Next, choose the desired finish or stain for your wood wall panels. Apply the finish as per the manufacturer’s instructions, using a brush, roller, or sprayer.
- Allow the finish to dry completely before applying additional coats, if necessary. Make sure to follow the recommended drying time between coats.
- Once the final coat is dry, step back and admire your beautifully sanded and refinished wood wall panels.
Applying a Protective Finish or Sealant
Applying a protective finish or sealant to your wood wall panels is essential to enhance their durability and protect them from moisture and other environmental factors. Here’s a simple guide on how to apply a protective finish or sealant:
- Before applying any finish or sealant, ensure that the panels are clean and free from any dust or debris.
- Select a suitable protective finish or sealant for your wood wall panels. This can be in the form of a varnish, lacquer, or oil-based finish.
- Using a brush or roller, apply a thin and even coat of the protective finish or sealant, following the instructions provided by the manufacturer.
- Allow the first coat to dry completely before applying additional coats, if required. Ensure to follow the recommended drying time between coats.
- Once the final coat is dry, you can enjoy the added protection and longevity of your wood wall panels.
Cleaning and Maintaining the Wood Wall Panels
Regular cleaning and maintenance are crucial to preserve the beauty and longevity of your wood wall panels. Follow these simple tips to keep them looking their best:
- Dust the panels regularly using a soft, dry cloth or a feather duster to remove any surface debris. Avoid using harsh chemicals or abrasive cleaning tools that can damage the panels.
- In case of spills or stains, clean them immediately with a mild soap or wood cleaner and a damp cloth. Avoid using excessive water that can seep into the panels and cause damage.
- Protect your wood wall panels from direct sunlight by using curtains or blinds, as prolonged exposure to sunlight can fade the color and deteriorate the wood.
- Inspect the panels periodically for any signs of damage, such as cracks or warping. Address these issues promptly to prevent further damage or deterioration.
- Consider applying a fresh coat of protective finish or sealant every few years to maintain the integrity of the wood and extend its lifespan.
By following these simple steps for sanding and refinishing, applying a protective finish or sealant, and regular cleaning and maintenance, you can ensure that your wood wall panels remain a stunning focal point in your space for years to come.
Troubleshooting And Common Issues
While installing wood wall panels can dramatically enhance the aesthetics of a space, it’s not uncommon to encounter a few hiccups along the way. In this section, we will discuss some common issues that may arise during the installation process and provide effective solutions to address them.
Dealing with warped or damaged panels
If you come across warped or damaged panels during the installation, it’s essential to rectify the issue before proceeding. Ignoring such panels can result in an uneven and unsightly finished product. Here are a few steps you can take to tackle this problem:
- Inspect the damaged panel and evaluate the extent of the damage.
- If the panel is slightly warped, you may be able to salvage it by applying pressure in the opposite direction of the warp. This can be done by placing heavy objects on top of the panel for a period of time.
- In the case of severe warping or irreparable damage, it’s best to replace the panel altogether. Remove the damaged panel carefully, ensuring that adjacent panels remain intact.
- Measure and cut a replacement panel to fit the vacant spot. Sand the edges smooth to ensure a proper fit.
- Install the new panel using the same method as the rest of the panels, ensuring it aligns seamlessly with the surrounding panels.
Addressing gaps or uneven panels
One of the most common issues during wood wall panel installation is the presence of gaps or uneven panels. Such gaps can detract from the overall appearance of the wall. Here are a few steps to help you address this problem:
- Inspect the affected area and identify the sections with gaps or unevenness. Use a level to ensure accuracy.
- If the gap is small, you may be able to fill it using wood filler or caulk. Apply the filler with a spatula or putty knife, making sure to smooth the surface for a seamless finish.
- For larger gaps or uneven panels, it may be necessary to dismantle and reposition the affected section. Use a pry bar or chisel to carefully remove the panels.
- Trim or sand the panels to size if needed, ensuring they fit snugly without any gaps.
- Reinstall the panels, making sure to align them properly and secure them firmly in place.
Solutions for panels that don’t adhere properly
Occasionally, some panels may not adhere properly during the installation, causing them to sag or fall off. This can be a frustrating issue, but it can be resolved with the following steps:
- Clean the installation surface thoroughly, removing any dust, grease, or debris that might hinder adhesion.
- Apply a strong adhesive to the back of the panel, ensuring full coverage.
- Press the panel firmly against the wall, using a
Enhancing The Aesthetics
Choosing the right stain or paint color
One of the key factors that can greatly enhance the aesthetics of your wood wall panels is choosing the right stain or paint color. The right color can bring out the natural beauty of the wood while also complementing the overall design of your space.
When selecting a stain or paint color, consider the existing color scheme of the room, as well as the mood you want to create. For a contemporary look, you might opt for a sleek, dark stain. On the other hand, if you want to create a light and airy atmosphere, a light-colored paint or stain can do the trick. You can even try experimenting with different shades or a mix of colors to create a unique and personalized effect.
Additionally, remember to take into account the type of wood you are working with. Some types of wood, like oak or mahogany, have distinct natural hues that can be accentuated with a clear or light stain. Others, such as pine or cedar, can be painted to match your desired color scheme.
Adding decorative elements or accents
To further enhance the aesthetics of your wood wall panels, consider adding decorative elements or accents. These can include anything from trim pieces and moldings to decorative brackets or artistic carvings.
The key is to choose elements that complement the style of your wood wall panels and the overall theme of the room. If your panels have a simple and minimalist design, you might prefer clean and understated trim pieces. On the other hand, if your panels have a more ornate look, decorative carvings or moldings can add a touch of elegance and sophistication.
When selecting decorative elements, pay attention to the details. Consider the shape, size, and finish of the accents to ensure they harmonize with the panels and contribute to the overall aesthetic appeal.
Creatively arranging the wood wall panels
Another way to enhance the aesthetics of your wood wall panels is through creative arrangement. Instead of simply installing the panels in a traditional horizontal or vertical pattern, experiment with different layouts to create a unique and eye-catching design.
For example, you could try creating a herringbone or chevron pattern by angling the panels in a diagonal arrangement. Alternatively, you could mix and match different sizes or widths of panels to create a dynamic and visually interesting effect.
Before finalizing your layout, it’s a good idea to create a mock-up or use design software to visualize how the panels will look once installed. This will help you make any necessary adjustments and ensure that the final arrangement creates the desired impact.
Expert Tips For A Successful Installation
Expert Tips for a Successful Installation
When it comes to installing wood wall panels, following expert recommendations can make all the difference. Achieving a seamless installation requires attention to detail and precision. In this section, we will discuss some expert tips that can help you successfully install wood wall panels with professional-looking results.
Expert recommendations for a seamless installation
Before you start the installation process, it is crucial to prepare the wall surface properly. This ensures that the panels adhere well and provide a smooth finish. Here are some expert recommendations:
- Start by inspecting the wall for any cracks, dents, or imperfections. Fill and sand them to create a level surface.
- If you are installing the panels on drywall, apply a primer to ensure better adhesion.
- Measure and mark the installation area accurately. Use a level and chalk line to create vertical guidelines that will help you align the panels.
- Apply an adhesive specifically designed for wood panels, evenly spread on the back of each panel. This will ensure a strong bond with the wall.
- Leave a small gap between each panel to allow for expansion and contraction. Use spacers or coins to maintain uniform spacing.
Common mistakes to avoid
Even with careful planning, some common mistakes can hinder a successful installation. By being aware of them, you can avoid potential issues. Here are some mistakes you should steer clear of:
- Avoid using too much adhesive as it can cause the panels to slide or buckle. Follow the manufacturer’s instructions for the appropriate amount.
- Do not rush the installation process. Take your time to ensure each panel is properly aligned and adhered.
- Don’t forget to seal the edges and corners with a suitable trim or caulk to prevent moisture infiltration.
- Be mindful of the panel orientation. Installing panels upside down or in the wrong direction can affect the overall aesthetic.
- Do not overlook proper ventilation in the room to prevent moisture build-up, which can lead to warping or damage to the panels.
Tips for achieving a professional-looking result
To achieve a professional-looking result, keep these additional tips in mind:
- Make sure you have the necessary tools and equipment before starting the installation. This includes a saw, tape measure, adhesive applicator, and a level.
- Consider using panel clips or nails for added stability, especially for larger panels or in high-traffic areas.
- After the installation is complete, wipe down the panels with a damp cloth to remove any adhesive residue and ensure a clean finish.
- Regularly maintain and care for your wood wall panels by using suitable cleaning products and avoiding excessive moisture or direct sunlight exposure.
By following these expert tips and recommendations, you can achieve a successful wood wall panel installation that transforms your space with a professional and polished look.
Faqs And Additional Resources
If you’re considering installing wood wall panels in your home, you may have some questions or need additional resources to guide you through the process. We’ve compiled a list of frequently asked questions about wood wall panel installation, as well as some helpful resources to ensure your project goes smoothly.
Frequently asked questions about wood wall panel installation
If you’re new to wood wall panel installation, you may have a few questions. Here are some frequently asked questions to help address any concerns or uncertainties you may have:
-
- What tools will I need for wood wall panel installation?
Before you get started, make sure you have the necessary tools on hand. Here are some common tools you may need:
-
-
- List 1
- List 2
- List 3
- List 4
- Can wood wall panels be installed on any type of wall?
-
Wood wall panels can typically be installed on different types of walls, such as drywall, plaster, or even concrete. However, it’s important to prepare the wall surface properly before installation. Make sure to clean the wall and remove any loose paint or wallpaper for optimal adherence.
-
- Do I need to hire a professional for wood wall panel installation?
The installation of wood wall panels can be done as a DIY project if you have the necessary skills and tools. However, if you’re unsure or uncomfortable with the process, it’s always a good idea to consult a professional to ensure a flawless installation.
-
- How do I properly maintain wood wall panels?
To keep your wood wall panels looking their best, regular maintenance is essential. Here are some tips to help you maintain your panels:
-
- Regularly dust the surface with a soft cloth or duster.
- Avoid using harsh chemicals or abrasive cleaners on the panels.
- Wipe off spills or stains immediately with a damp cloth.
- Periodically check for any signs of damage or wear and take appropriate action.
Where to find additional resources and support
If you need additional guidance or support during your wood wall panel installation project, there are several resources available:
- List 1
- List 2
- List 3
- List 4
Whether you prefer video tutorials, step-by-step guides, or online forums, these resources can provide valuable information and assistance.
Remember, proper installation is key to achieving a stunning and long-lasting wood wall panel look. By utilizing the FAQs and additional resources mentioned above, you’ll be well-equipped to tackle your installation project with confidence.
Frequently Asked Questions
How Do You Attach Wood Paneling To The Wall?
Attach wood paneling to the wall by following these steps: 1. Measure and cut panels to fit the wall. 2. Apply adhesive or nails to secure panels in place. 3. Start at the bottom and work upward, ensuring each panel aligns properly.
4. Use a level to ensure panels are straight. 5. Fill any gaps and sand panels for a smooth finish.
What Is The Best Way To Attach Wood Paneling?
The best way to attach wood paneling is by using nails or screws. Make sure to align the panels properly before securing them. Additionally, ensure that the fasteners are driven at regular intervals and are flush with the panel’s surface.
Do You Nail Or Glue Wood Paneling?
Wood paneling can be nailed or glued. Nailing is a common method using nails or brads to secure the panels to the wall. Gluing with construction adhesive is another option, providing a strong bond. Both methods have their advantages and it ultimately depends on your preferences and the specific project requirements.
Is Wood Paneling Hard To Install?
Wood paneling installation is not difficult. It can be done easily with basic tools and some DIY skills.
Conclusion
Installing wood wall panels can transform the look of any space, adding warmth and texture. By following the steps outlined in this post, you can ensure a successful and seamless installation process. Remember to prepare the wall surface properly, measure and cut the panels accurately, and use the correct tools and materials.
Whether you are a DIY enthusiast or a professional, with a little patience and attention to detail, you can achieve stunning results with wood wall panels. So go ahead, get creative, and enjoy the beauty and elegance that wood panels bring to your home or office.