
To install a wax ring on a toilet bowl, first, turn off the water supply and remove the old wax ring. Place the new wax ring in the proper position, aligning it with the toilet flange.
Press the toilet bowl firmly onto the wax ring, making sure it is properly seated.
Gathering The Necessary Tools And Materials
Before you embark on the task of installing a wax ring on a toilet bowl, it is essential to gather all the necessary tools and materials. By having everything ready and within reach, you can complete the installation smoothly and efficiently. In this section, we will discuss the required tools and materials, as well as important safety precautions to consider.
Required Tools and Materials
To install a wax ring on a toilet bowl, you will need the following:
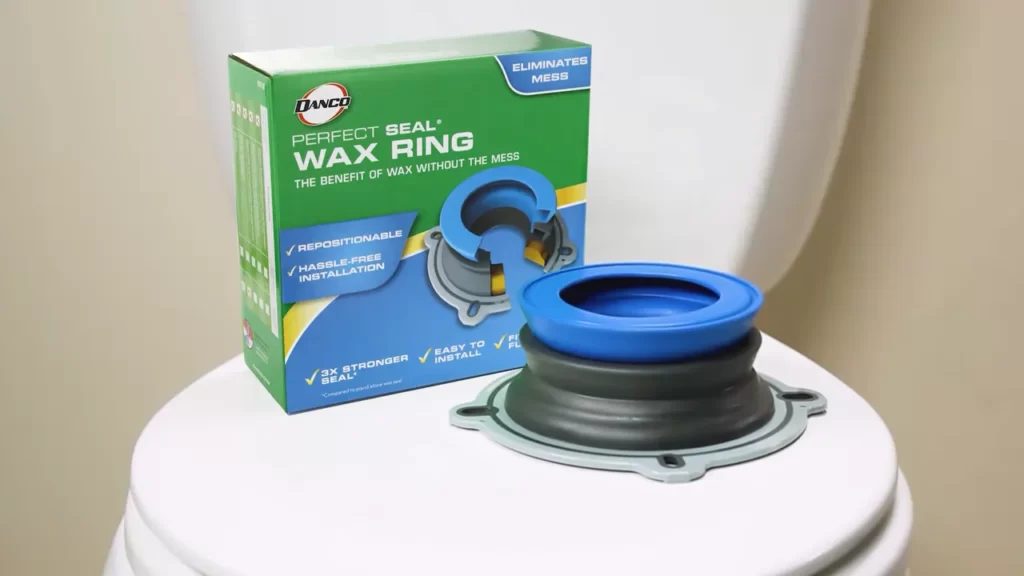
- Wax ring: This is the primary material that creates a watertight seal between the toilet bowl and the drain pipe.
- Bucket or towel: This will come in handy to catch any water that may spill during the installation process.
- Toilet bowl bolts: These bolts secure the toilet bowl to the floor.
- Wrench: A wrench is necessary to tighten the bolts.
- Screwdriver or drill: Depending on the type of screws or bolts used, you will need either a screwdriver or a drill to remove and tighten them.
- Plumber’s putty: Plumber’s putty is used to create a watertight seal on certain areas of the toilet bowl.
- Rubber gloves: It is recommended to wear rubber gloves throughout the installation process to protect your hands.
- Drop cloth or plastic sheet: This will help protect the floor from any debris or water.
Safety Precautions to Consider
While installing a wax ring on a toilet bowl may seem like a straightforward task, it is important to prioritize safety. Here are some safety precautions to consider:
- Turn off the water supply: Before starting the installation, locate and turn off the water supply valve to the toilet. This step prevents any accidental water leakage.
- Wear safety goggles: Protect your eyes from any debris or dust that may be dislodged during the installation process.
- Be cautious when handling tools: Ensure you handle all tools with care, paying attention to sharp edges or moving parts.
- Use proper lifting techniques: To avoid strain or injury, use proper lifting techniques when moving the toilet bowl or any heavy objects.
- Follow manufacturer’s instructions: Always refer to the manufacturer’s instructions for any specific safety guidelines or recommendations.
By gathering the necessary tools and materials and adhering to the safety precautions, you are well-prepared to install a wax ring on a toilet bowl. The next section will guide you through the step-by-step process of the installation itself.
Step 1: Removing The Old Wax Ring
Before installing a new wax ring on your toilet bowl, you’ll need to remove the old wax ring. This crucial step ensures a proper seal when installing the new one. Follow these three essential sub-steps to successfully remove the old wax ring:
Shutting off the water supply
The first step in removing the old wax ring is to shut off the water supply to the toilet. This prevents any unwanted water flow during the removal process. Here’s how you can do it:
- Locate the shut-off valve located behind the toilet, usually positioned near the wall.
- Rotate the valve handle clockwise until it stops. This action shuts off the water supply to the toilet.
- Flush the toilet to drain any remaining water from the tank and bowl.
Emptying the toilet bowl
After shutting off the water supply, it’s important to empty the toilet bowl before proceeding with the removal. This prevents any possible mess and makes it easier to access and remove the old wax ring. Here’s what you need to do:
- Put on a pair of rubber gloves to protect your hands.
- Use a small container or a scoop to remove as much water as possible from the toilet bowl.
- Dispose of the water in a suitable drain or toilet.
Removing the toilet and old wax ring
Now that the water in the toilet bowl has been emptied, you can proceed with removing the toilet and the old wax ring. Here’s a step-by-step guide on how to do it:
- Start by unscrewing the nuts or bolts securing the toilet to the floor. These can typically be found on either side of the base of the toilet.
- Gently rock the toilet back and forth to break the wax seal. Be cautious not to apply excessive force to avoid damaging the plumbing or the toilet itself.
- Lift the toilet straight up to detach it from the floor flange. Have someone assist you with this step if necessary, as toilets can be heavy.
- Place the toilet on an old towel or a piece of cardboard to protect the floor.
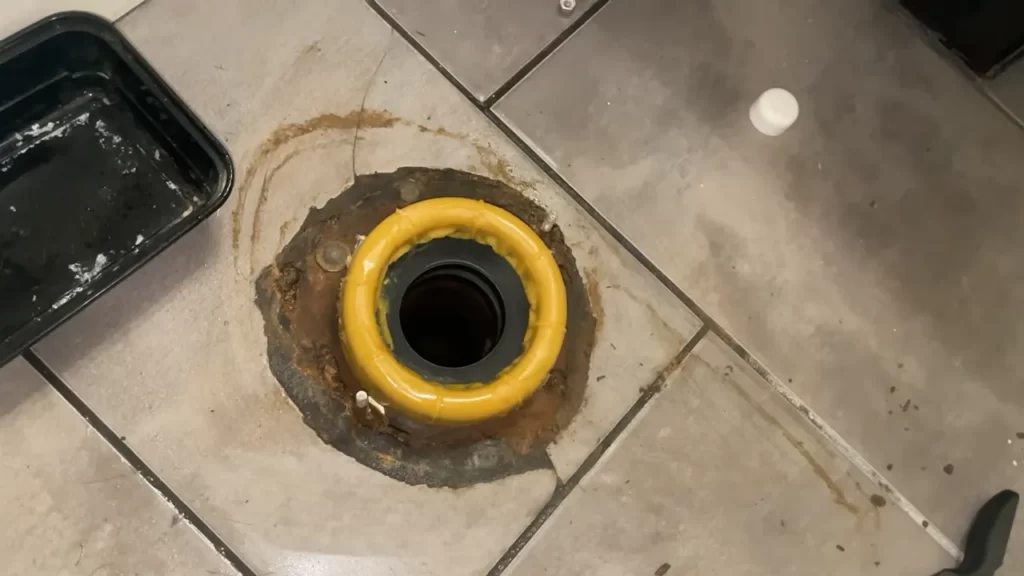
- Remove the old wax ring from the flange and the toilet base. Inspect it for any damage or debris that may prevent a proper seal. Discard the old wax ring.
By following these steps, you can successfully remove the old wax ring from your toilet bowl. This process sets the stage for installing a new wax ring, ensuring a tight and secure seal.
Step 2: Preparing The Toilet Bowl
Before installing the wax ring on the toilet bowl, it is crucial to properly prepare the toilet bowl to ensure a secure and leak-free seal. This step involves inspecting the flange and toilet base for any damage, cleaning the flange and toilet base, and checking the toilet anchor bolts.
Inspecting the Flange and Toilet Base for Damage
Inspecting the flange and toilet base is an essential step in preparing the toilet bowl for the wax ring installation. It helps identify any potential issues that could cause leaks or instability. Take the following steps to inspect the flange and toilet base:
- Start by visually examining the flange to check for any cracks, chips, or other signs of damage.
- Inspect the toilet base for any cracks, leaks, or damage. Ensure that the base is stable and securely mounted on the floor.
Cleaning the Flange and Toilet Base
Cleaning the flange and toilet base is essential to remove any dirt, debris, or old wax residue that could hinder the wax ring’s proper installation. Here’s how to clean the flange and toilet base:
- Using a damp cloth or sponge, wipe away any visible dirt or debris from the flange and toilet base.
- Mix a mild cleaning solution (such as dish soap and water) and apply it to the cloth or sponge.
- Gently scrub the flange and toilet base to remove any stubborn stains or residue.
- Rinse the flange and toilet base thoroughly with clean water and dry them completely using a clean towel.
Checking the Toilet Anchor Bolts
The toilet anchor bolts play a crucial role in securing the toilet bowl to the floor. Checking these bolts ensures that the toilet is stable and properly aligned. Here’s how to check the toilet anchor bolts:
- Inspect the anchor bolts to ensure they are firmly attached to the floor and not loose.
- If any of the anchor bolts are loose, tighten them using an adjustable wrench. Make sure not to overtighten them as it could damage the toilet bowl or the flange.
- Verify that the anchor bolts are aligned properly and evenly spaced, allowing the toilet bowl to sit flush on the flange.
By following these steps to inspect the flange, clean the flange and toilet base, and check the toilet anchor bolts, you are now ready to move on to the next step of installing the wax ring on the toilet bowl. Properly preparing the toilet bowl ensures a secure and leak-free seal, providing you with a functioning and reliable toilet for years to come.
Step 3: Placing The New Wax Ring
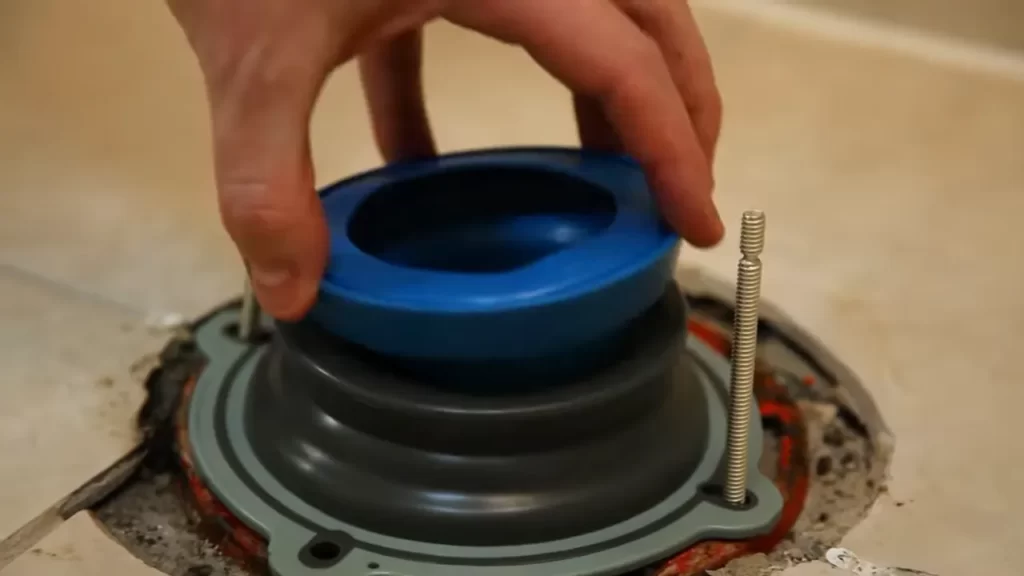
Positioning the new wax ring on the flange
Once you have removed the old wax ring from the toilet bowl and cleaned the flange thoroughly, it is time to position the new wax ring. The wax ring forms a watertight seal between the toilet bowl and the flange, preventing any leaks or odors from escaping. Properly positioning the wax ring is crucial for ensuring a secure and tight fit.
Ensuring proper alignment and fit
When positioning the new wax ring on the flange, make sure it is properly aligned. The flange should sit flush with the floor, and the wax ring should be centered over the flange opening. This ensures a proper fit and guarantees that the toilet bowl will sit level and stable.
If the toilet flange is lower than the finished floor, you may need to use an extender to raise the flange to the correct height. This will help ensure a proper alignment and fit of the wax ring.
Applying pressure to secure the wax ring
Once the wax ring is positioned correctly, it’s time to apply pressure to secure it in place. This can be done by gently lowering the toilet bowl onto the wax ring. Make sure to align the mounting bolts on the bottom of the bowl with the holes on the flange.
Apply downward pressure evenly on both sides of the toilet bowl to compress the wax ring and create a tight seal. This will help prevent any leaks or odors from escaping. Use caution not to overtighten, as this can damage the toilet bowl or flange.
After applying pressure, check if the toilet bowl sits level and stable. If necessary, adjust the positioning of the bowl slightly to ensure a proper fit. Once you’re satisfied with the alignment and fit, you can proceed with connecting the water supply and securing the toilet bowl to the floor.
By following these steps and properly positioning the new wax ring on the flange, you can ensure a secure and leak-free installation of your toilet bowl. Taking the time to do it correctly will save you from future headaches and potential water damage. Remember, if you’re unsure or uncomfortable with the process, it’s always best to consult a professional plumber.
Step 4: Reinstalling The Toilet Bowl
Lowering the toilet onto the wax ring
Once the wax ring is properly installed on the flange, it’s time to lower the toilet bowl back onto it. This step requires careful alignment to ensure a secure and leak-free fit. Follow these steps to complete this task:
- With the help of a friend, carefully lift the toilet bowl and position it over the flange.
- Slowly lower the toilet bowl, ensuring that the anchor bolts align with the corresponding holes on the base of the toilet.
- Apply gentle downward pressure to compress the wax ring and create a tight seal.
Aligning the toilet with the anchor bolts
Proper alignment of the toilet with the anchor bolts is crucial for stability and support. Follow the steps below to ensure a correct alignment:
- Check that the toilet is centered over the flange and align the anchor bolt holes with the bolts sticking out of the flange.
- Make any necessary adjustments by carefully shifting the toilet bowl until it is perfectly aligned with the bolts.
- Double-check the alignment from different angles to ensure it is accurate before proceeding.
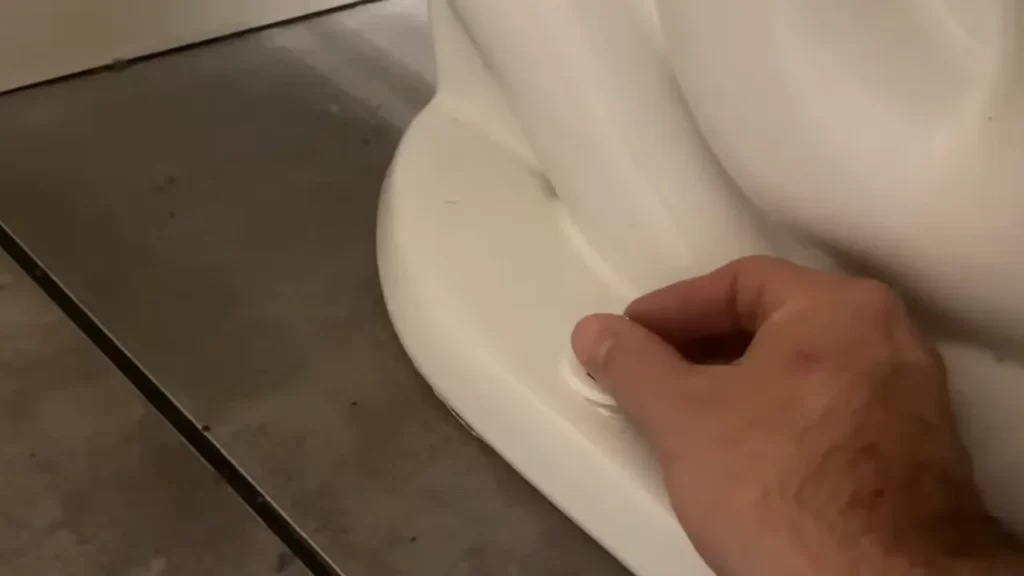
Securing the toilet to the floor
Securing the toilet to the floor is the final step in reinstalling your toilet bowl. This will provide stability and prevent any movement or rocking. Follow these steps to complete the process:
- Take a wrench or a socket set and tighten the nuts onto the anchor bolts. Start by hand tightening them, then use the wrench to ensure they are snug.
- Be careful not to overtighten the nuts, as this can crack the toilet base. Use gentle pressure to achieve a secure fit.
- Once the nuts are tightened, use a level to check if the toilet bowl is stable and sits evenly on the floor. Make any adjustments if needed.
Congratulations! You have successfully reinstalled your toilet bowl onto the wax ring and secured it to the floor. Remember to test for any leaks by flushing the toilet a few times and inspecting the base for water. If you spot any leaks, you may need to reevaluate the installation or seek professional assistance.
Step 5: Testing For Leaks And Proper Seal
Congratulations! You’re almost done with your toilet installation. The last crucial step is to ensure there are no leaks and that the wax ring has formed a proper seal. Proper testing at this stage will prevent any potential water damage and give you peace of mind. Follow these simple steps to test for leaks and check the seal before you call it a job well done.
Reconnecting the water supply
To start the testing process, it’s essential to reconnect the water supply to the toilet. Begin by turning the shut-off valve clockwise to allow the water to flow into the tank. Make sure the valve is fully open to ensure the proper water pressure needed for testing.
Checking for any leaks
Once the water supply is reconnected, carefully inspect every connection for leaks. Start by checking the plumbing connections at the base of the toilet and ensure they are secure and tight. Look for any signs of water dripping or pooling around the base or on the floor. Remember, even a small leak can lead to major damage over time, so pay attention to even the tiniest drops.
Testing the seal by flushing the toilet
Now it’s time to put the wax ring’s seal to the test. While flushing the toilet, observe if there is any water leaking from the base or around the connection points. Flush the toilet a few times to ensure consistent results. Keep an eye out for any water seepage that persists or worsens with each flush.
If you notice any leaks or the seal doesn’t appear to be working correctly, it’s important to address the issue as soon as possible. This may require either tightening the connections or, in some cases, reinstalling the wax ring. Don’t ignore any signs of leakage or an improper seal, as these problems can lead to costly repairs and potential water damage.
Remember, proper testing for leaks and a secure seal is essential for a successful toilet installation. By following these steps, you can ensure that your toilet functions properly and avoid any future problems. Take the time to carefully inspect your work and make any necessary adjustments. With a little patience and attention to detail, you’ll have a fully functional toilet that will serve you well for years to come.
Additional Tips And Considerations
Installing a wax ring on a toilet bowl is a crucial step in ensuring a leak-free and properly functioning toilet. However, there are additional tips and considerations that can help make the installation process even more effective and prevent common problems from arising later on. In this section, we will discuss some common problems and troubleshooting tips, the importance of regular maintenance to prolong the wax ring’s lifespan, and when it may be necessary to seek professional help.
Common Problems and Troubleshooting Tips
Even with careful installation, issues can sometimes occur with the wax ring. Here are some common problems and troubleshooting tips:
- Leaking: If you notice water around the base of the toilet, it could be a sign of a leaking wax ring. In this case, check if the toilet is properly mounted and tightened. If not, ensure that the toilet is properly aligned and securely fastened to the floor. If the problem persists, it may be necessary to replace the wax ring.
- Odor: A foul odor coming from the toilet area may indicate a problem with the wax ring’s seal. Check if the toilet is properly secured to the floor. If the seal appears damaged or worn out, replacing the wax ring should eliminate the odor.
- Uneven Toilet: If the toilet wobbles or sits unevenly on the floor, it may indicate an issue with the wax ring. Check if the wax ring is properly aligned and centered around the toilet’s drain opening. Adjust the position as needed and ensure that the toilet is securely fastened to the floor.
Regular Maintenance to Prolong the Wax Ring’s Lifespan
To ensure the longevity of the wax ring and prevent potential problems, it is important to perform regular maintenance. Here are some tips to help prolong the wax ring’s lifespan:
- Inspect the wax ring annually: Regularly check the condition of the wax ring to ensure there are no signs of wear, damage, or deterioration. If any issues are detected, it is advisable to replace the wax ring promptly.
- Keep the area clean: Regularly clean the base of the toilet and the surrounding area to prevent the buildup of dirt, debris, or moisture, which can lead to damage and deterioration of the wax ring.
- Be cautious with cleaning products: Avoid using harsh chemicals or abrasive cleaners directly on the wax ring, as they can cause damage. Instead, use mild cleaners and follow the manufacturer’s instructions.
- Monitor toilet usage: Be mindful of excessive force or weight applied to the toilet, as it can lead to damage or displacement of the wax ring. Encourage gentle usage and avoid placing heavy items on the toilet tank.
When to Seek Professional Help
While many individuals can successfully install a wax ring themselves, there are instances when it may be necessary to seek professional help. Consider the following situations:
- Repeated problems: If you consistently experience issues with leaking, odor, or an uneven toilet despite proper installation and maintenance, it may indicate an underlying problem that requires professional assessment and repair.
- Uncertainty about installation: If you lack the confidence or knowledge to install the wax ring correctly, it is advisable to hire a professional plumber who can ensure a proper seal and prevent future problems.
- Extensive damage or renovation: If you are performing extensive toilet repairs or renovations that involve removing the toilet, it may be wise to consult a professional plumber to ensure the wax ring is properly replaced and the toilet is reinstalled correctly.
By following these additional tips and considerations, you can enhance the effectiveness of your wax ring installation, maintain its lifespan, and address any potential problems that may arise. Remember, regular maintenance and prompt troubleshooting can save you from costly repairs in the long run.
Frequently Asked Questions
How Do You Get A Wax Ring To Stick To The Toilet?
To make a wax ring stick to the toilet, follow these steps: 1. Remove the old ring and clean the area. 2. Warm the wax ring in your hands to make it pliable. 3. Place the ring on the toilet flange, aligning the bolt holes.
4. Press the ring firmly to create a seal. 5. Secure the toilet on top, tightening the bolts evenly.
How Should A Wax Ring Sit On A Toilet Flange?
The wax ring should sit flat on top of the toilet flange. Make sure it is centered properly to form a watertight seal between the toilet and the flange.
Do You Take The Plastic Off The Wax Ring On A Toilet?
Yes, it is recommended to remove the plastic from the wax ring on a toilet before installation. This ensures a proper seal between the toilet and the floor. Removing the plastic allows the wax to adhere to the toilet and the floor for a secure and leak-free connection.
Can You Put A Toilet Back On The Same Wax Ring?
Yes, you can put a toilet back on the same wax ring. It is a common practice and can help save time and money during toilet installation. Just make sure the wax ring is in good condition and properly aligned before reattaching the toilet.
Conclusion
To sum up, installing a wax ring on a toilet bowl is a crucial step in ensuring a tight seal and preventing leaks. By following the simple steps described you can confidently complete the installation process and have a fully functional toilet.
It’s important to remember the key points discussed, such as preparing the flange, aligning the bolts, and applying the wax ring evenly. With these guidelines in mind, you’ll have a properly secured toilet that functions efficiently for years to come.