To install a washer drain pipe, measure the distance from the washer to the main drain, cut the pipe to size, and attach it securely using a clamp or screw-on connector. Additionally, ensure that the pipe has a proper slope for efficient draining.
Understanding The Basics Of Washer Drain Pipes
Installing a washer drain pipe correctly is crucial for the efficient functioning of your washing machine. Understanding the basics of washer drain pipes is essential to ensure a smooth installation process. In this section, we will discuss the different components of a washer drain system, the importance of proper installation, and common problems you may encounter along with their solutions.
Different Components of a Washer Drain System
A washer drain system consists of several components that work together to remove wastewater from your washing machine. Here are the main parts you need to know:
- Drain hose: This flexible hose connects your washing machine to the drain pipe or standpipe.
- Standpipe: Also known as a washing machine drain pipe, it is a vertical pipe that carries wastewater from your washing machine to the main drain line.
- P-trap: The P-trap is a U-shaped pipe located below the sink or in the wall. It prevents sewer gases from entering your home by trapping a small amount of water.
- Vent pipe: The vent pipe allows air to flow through the drainage system, preventing airlock and enabling smooth water flow.
Importance of Proper Installation
Proper installation of your washer drain pipe is essential for a few reasons:
- Prevents leaks and water damage: A well-installed drain pipe ensures that wastewater flows properly into the drainage system without any leaks or spills that could cause water damage to your home.
- Prevents clogs: If the drain pipe is not installed correctly, it can lead to frequent clogs, hindering the proper drainage of your washing machine.
- Protects your washing machine: A correctly installed drain pipe ensures that your washing machine does not experience excessive strain or stress, maximizing its lifespan and performance.
Common Problems and Solutions
Even with proper installation, you may encounter some common problems with your washer drain pipe. Here are a few issues you might face along with their solutions:
| Problem | Solution |
|---|---|
| Clogging | Regularly clean and maintain the drain pipe, removing any debris or build-up. Use a plumber’s snake to clear any stubborn clogs. |
| Overflowing | Ensure that the drain hose is not inserted too far into the standpipe, as this can cause water to overflow. Adjust the height of the standpipe if needed. |
| Odors | Check the vent pipe for blockages or obstructions, ensuring proper airflow. Cleaning the P-trap can also help eliminate any unpleasant odors. |
Understanding the basics of washer drain pipes, knowing the different components of a drain system, and ensuring proper installation will help you avoid common problems and keep your washing machine running smoothly.

Preparing For Installation
In order to install a washer drain pipe, it is important to properly prepare for the installation process. This involves selecting the right drain pipe, gathering the necessary tools and materials, and ensuring proper ventilation. By following these steps, you can ensure a smooth and successful installation.
Selecting the Right Drain Pipe
Before beginning the installation process, it is crucial to choose the correct drain pipe for your washer. The drain pipe needs to be compatible with your washer’s specifications and the plumbing system in your home.
To select the right drain pipe, consider the following:
- Size: Measure the diameter of your washer’s drain outlet to determine the size of the drain pipe you need. It is important to choose a pipe that matches the diameter of the outlet to ensure a proper fit.
- Material: Drain pipes are available in a variety of materials, including PVC, ABS, and copper. Consider the advantages and disadvantages of each material, such as durability and cost, before making your final decision.
- Length: Measure the distance between your washer’s drain outlet and the existing plumbing system. This will help you determine the length of the drain pipe you need. It is important to ensure that the pipe is long enough to reach the plumbing system without any kinks or bends.
Gathering the Necessary Tools and Materials
Once you have selected the right drain pipe, it is time to gather the necessary tools and materials for the installation process. Having everything you need before you begin will help streamline the process and prevent any delays.
Here are the essential tools and materials you will need:
| Tools | Materials |
|---|---|
| – Wrench | – Drain pipe |
| – Screwdriver | – Pipe fittings |
| – Pipe cutter | – PVC glue |
| – Measuring tape | – Teflon tape |
| – Plumber’s putty | – Rubber gaskets |
Make sure you have all of these tools and materials on hand before starting the installation process to avoid any unnecessary interruptions.
Ensuring Proper Ventilation
Proper ventilation is crucial when installing a washer drain pipe. This helps prevent odors and gases from accumulating in your laundry area and ensures the smooth flow of wastewater.
To ensure proper ventilation, follow these steps:
- Check local building codes: Review the building codes in your area to determine the specific ventilation requirements for washer drain pipes. These codes may vary depending on your location.
- Install a vent pipe: A vent pipe allows air to enter and exit the drain system, promoting proper drainage. Make sure you have a vent pipe installed to ensure adequate ventilation.
- Check for blockages: Before installing the drain pipe, check the vent system for any blockages. Remove any obstructions to ensure proper airflow.
- Seal connections: Use rubber gaskets or plumber’s putty to seal the connections between the drain pipe and the washer and the vent pipe to minimize the leakage of gases and odors.
By ensuring proper ventilation, you can create a safe and odor-free environment in your laundry area.
Step 1: Locating The Drain Pipe
When it comes to installing a new washer drain pipe, the first and most crucial step is finding the right location for it. This step sets the foundation for a properly functioning and efficient drain system. In this section, we will explore the key aspects to consider when evaluating the layout of your laundry room, determining the most suitable drain location, and ensuring accessibility and adequate space for the drain pipe.
Evaluating the Layout of the Laundry Room
Evaluating the layout of your laundry room is a vital starting point. This assessment ensures that you’ll be able to install the drain pipe in the most convenient and efficient way possible. Consider the following factors:
- Plumbing Accessibility: Examine the current plumbing infrastructure in your laundry room. Take note of the existing drain lines and determine if they are easily accessible. This will help you assess whether you can tap into an existing drain or if a new drain needs to be installed.
- Space Constraints: Take a close look at the available space in your laundry room. Measure the dimensions and consider any obstacles such as cabinets, fixtures, or appliances that may limit your options for the drain pipe location. Ensure that you have sufficient space to accommodate the drain pipe and any necessary connections.
- Proximity to the Washing Machine: It is important to position the drain pipe in close proximity to the washing machine for optimal functionality. Keeping the distance short reduces the risk of clogs and ensures smooth drainage during each wash cycle.
- Flooring and Slope: Evaluate the type of flooring in your laundry room. If the floor is concrete, it may require cutting and patching to accommodate the drain pipe. Additionally, check the slope of the floor to ensure proper drainage towards the drain location.
Determining the Most Suitable Drain Location
Once you have completed an assessment of the layout, it’s time to determine the most suitable location for your washer drain pipe. Consider the following guidelines:
- Choose a Path of Least Resistance: Look for existing vertical pipes or drain lines nearby that you can easily tap into. This will minimize the amount of new plumbing work required and simplify the installation process.
- Avoid Obstructions: Make sure the selected drain location is clear of any obstacles or obstructions, such as electrical wiring or structural components. This will prevent any damage to the existing infrastructure and provide easy access for future maintenance or repairs.
- Consider Ventilation: Determine if the chosen location allows for proper ventilation of the drain pipe. Proper ventilation helps to prevent unpleasant odors and ensures efficient drainage throughout the washing machine’s cycles.
- Follow Local Building Codes: It’s essential to adhere to your local building codes and regulations when determining the drain location. Check with your local authorities to ensure that your planned installation meets the necessary requirements.
Ensuring Accessibility and Adequate Space
Accessibility and adequate space are vital considerations when installing a washer drain pipe. Follow these guidelines to ensure seamless installation:
- Easy Access for Maintenance: Select a location that allows for easy access to the drain pipe for maintenance and repairs. Avoid placing the pipe in hard-to-reach or hidden areas that would make it difficult to address any issues that may arise.
- Clearance from Other Components: Ensure that there is enough clearance between the drain pipe and other components of your laundry room, such as electrical outlets, appliances, or utility sinks. This prevents interference and allows for convenient use of the space.
- Space for Drain Connections: Consider the space required for connecting the drain pipe to the washing machine and any additional plumbing connections. Leave ample space to ensure that the connections are secure and free from any restrictions.
- Accessibility for Inspection: It’s important to ensure that the drain pipe installation is easily accessible for inspection purposes. This ensures compliance with building codes and allows for examination of the system’s functionality and integrity.
By carefully evaluating the layout of your laundry room, determining the most suitable drain location, and ensuring accessibility and adequate space for the drain pipe, you’ll be well on your way to a successful installation. In the next step, we’ll delve into the process of preparing the installation area and gathering the necessary tools and materials.
Step 2: Gathering Measurements And Adapting The Drain Pipe
Before installing a washer drain pipe, it’s crucial to gather accurate measurements and adapt the pipe accordingly. This step ensures a proper fit and compatibility with your existing plumbing system. In this section, we’ll guide you through the process of measuring the drain height and diameter, cutting and assembling the drain pipe, as well as using adapters and connectors for compatibility.
Measuring the Drain Height and Diameter
Firstly, it’s necessary to measure the height and diameter of your existing drain pipe. This will help you determine the appropriate size and length needed for the new drain pipe. Follow these steps for accurate measurements:
- Using a measuring tape or ruler, measure the height from the floor to the top of the existing drain pipe. Take note of this measurement (in inches or centimeters).
- Next, measure the diameter of the existing drain pipe. This can typically be done using a caliper or by comparing the pipe’s circumference to a known measurement. Write down the diameter measurement (in inches or centimeters).
Cutting and Assembling the Drain Pipe
Once you have the measurements, it’s time to cut and assemble the new drain pipe. Follow these steps to ensure a proper fit:
- Start by selecting a PVC drain pipe that matches the diameter measurement you took earlier. A hacksaw or PVC cutter can be used to cut the new pipe to the desired length.
- Smooth the cut edges of the pipe using a file or sandpaper to remove any roughness.
- Attach any necessary fittings, such as elbows or T-connectors, to create the desired configuration. Use PVC primer and cement to securely join the pieces together, following the manufacturer’s instructions.
Using Adapters and Connectors for Compatibility
It’s common for the new drain pipe to have a different diameter or connection type than the existing plumbing system. In such cases, adapters and connectors are used to ensure compatibility. Follow these steps for a proper adaptation:
- Identify the type of adapter or connector needed based on the measurements and connection types involved.
- Purchase the appropriate adapter or connector from a hardware store or plumbing supply retailer.
- Apply PVC primer and cement to both ends of the drain pipe and the adapter/connector.
- Join the pieces together, making sure they are firmly connected and aligned correctly.
By gathering accurate measurements and adapting the drain pipe as necessary, you’re ensuring a secure and compatible installation of your washer drain pipe.
Step 3: Connecting The Washer To The Drain Pipe
Now that you have positioned the washer correctly and hooked up the necessary hoses, it’s time to connect the washer to the drain pipe. This step is crucial to ensure proper drainage and prevent any leaks or water damage. Follow these instructions to securely and effectively connect your washer to the drain pipe.
Positioning the Washer Correctly
Before connecting the washer to the drain pipe, make sure it is positioned correctly. It should be placed near the water source and within reach of the drain pipe. Ensure that there is enough space for the washer to function properly and for you to access the drain pipe easily. Placing the washer on a level surface will also prevent any drainage issues.
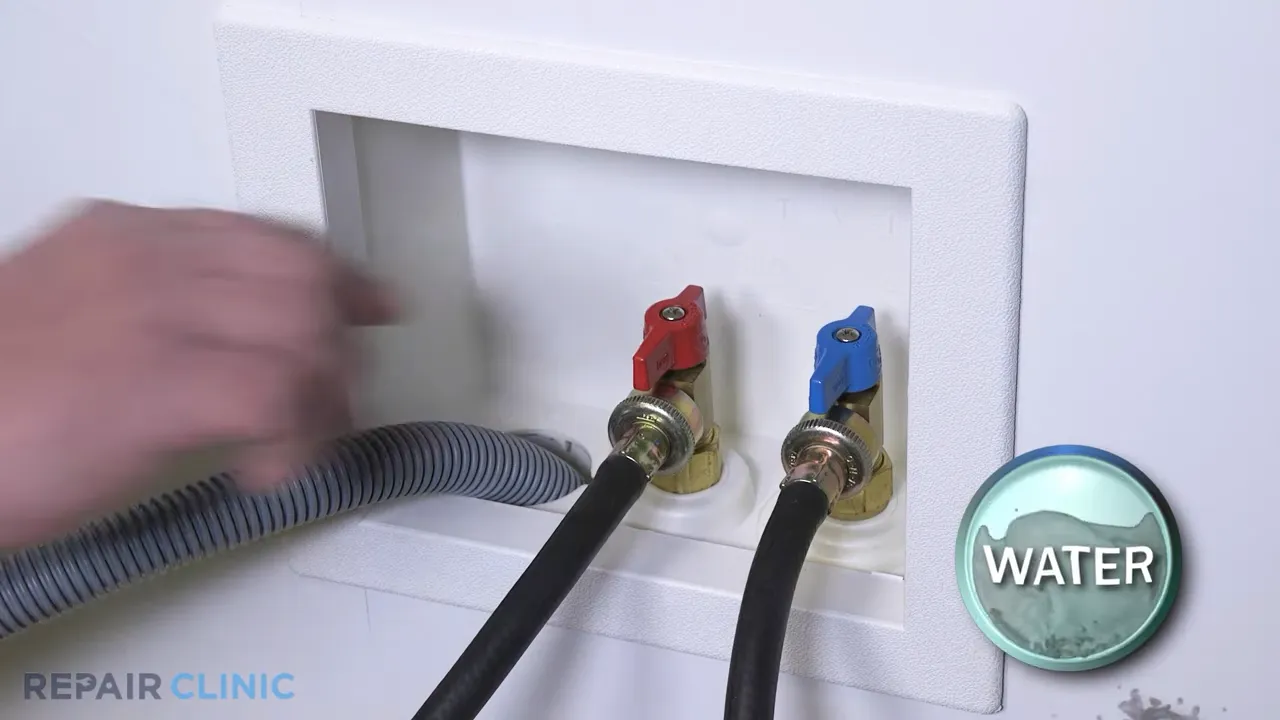
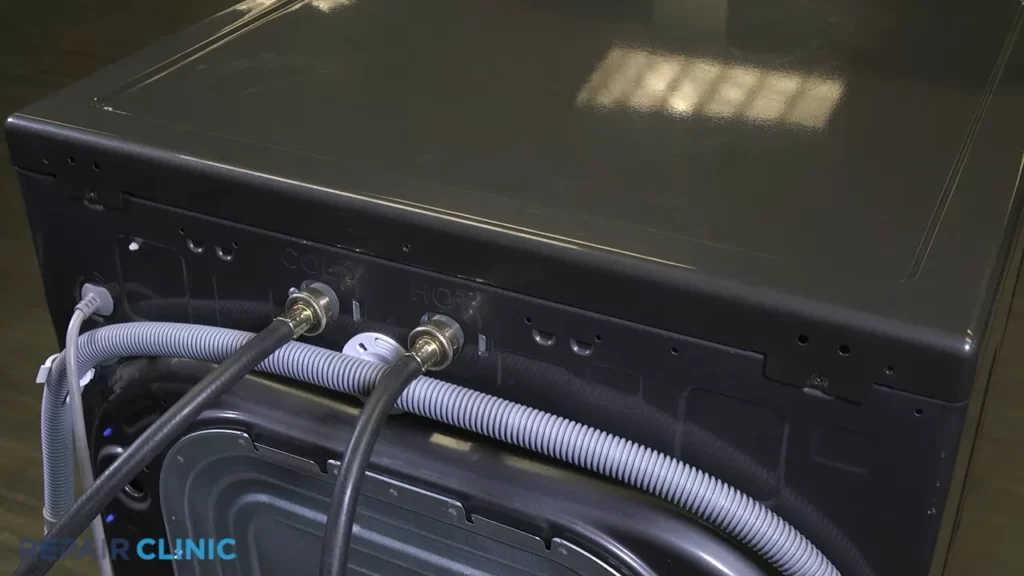
Hooking up the Washer Hose to the Drain Pipe
Once the washer is positioned correctly, it’s time to connect the washer hose to the drain pipe. Here’s how to do it:
- Locate the washer hose, usually located at the back of the washer.
- Ensure that the washer hose is clean and free from any debris or blockages.
- Insert the washer hose into the drain pipe, making sure it fits securely.
- Tighten any connections or clamps to ensure a snug fit.
By following these steps, you will create a secure connection between the washer hose and the drain pipe, preventing any leaks or water backup.
Ensuring a Secure and Leak-free Connection
Now that you have connected the washer hose to the drain pipe, it’s important to ensure that the connection is secure and leak-free. Here are some tips to guarantee a hassle-free connection:
- Check for any loose connections or clamps and tighten them if necessary.
- Inspect the washer hose and drain pipe for any signs of damage or wear, such as cracks or leaks.
- If any issues are found, replace the damaged parts before using the washer.
- Test the connection by running a small load of laundry and observing for any leaks or drainage problems.
By taking these additional steps, you can ensure that the connection between your washer and drain pipe is secure, leak-free, and ready for use.
By following these simple guidelines for connecting your washer to the drain pipe, you can ensure a hassle-free laundry experience. Proper positioning, hooking up the hoses correctly, and ensuring a secure connection will not only prevent any leaks or water damage but also optimize the performance of your washer. Now that you’re confident in connecting your washer to the drain pipe, you’re one step closer to enjoying clean clothes without any worries.
Step 4: Securing The Drain Pipe
Securing the drain pipe is a crucial step in the installation process to ensure a reliable and efficient water drainage system for your washing machine. By using appropriate fasteners and brackets, ensuring stability and proper alignment, and avoiding stress on the drain pipe, you can safeguard against potential leaks, blockages, and other issues that could disrupt the functioning of your washer. Let’s delve into each aspect in detail:
Using Appropriate Fasteners and Brackets
When securing the drain pipe, it’s important to use the right type of fasteners and brackets to hold it firmly in place. This will prevent any unnecessary movement or dislodgment that can lead to leaks or instability. Depending on your specific setup, you may need to use metal or plastic fasteners, as well as brackets designed for wall mounting or floor attachment. Be sure to choose fasteners and brackets that are compatible with the size and material of your drain pipe, and follow the manufacturer’s instructions for proper installation.
Ensuring Stability and Proper Alignment
Proper stability and alignment of the drain pipe are essential to maintain the smooth flow of wastewater from your washing machine. Ensure that the pipe is securely attached to the wall or floor, and check for any sagging or misalignment. Use a level to make sure the drain pipe is perfectly straight and aligned with the outlet of your washing machine. This will prevent any potential clogs caused by improper alignment and allow the water to flow freely, minimizing the risk of backflow and blockages.
Avoiding Stress on the Drain Pipe
To ensure the longevity and reliability of your drain pipe, it’s crucial to avoid putting unnecessary stress on it. Excessive bending or pulling on the pipe can weaken the connections and lead to leaks or breakages over time. Make sure the pipe has enough slack to accommodate any movement or vibrations from the washing machine, without being stretched or strained. Additionally, avoid placing heavy objects on or near the drain pipe to prevent it from being crushed or damaged. By minimizing stress on the drain pipe, you can maintain a secure and dependable water drainage system for your washing machine.
Securing the drain pipe is a vital step in the installation process, as it ensures the proper functioning of your washer and prevents potential water damage. By using appropriate fasteners and brackets, ensuring stability and proper alignment, and avoiding unnecessary stress on the drain pipe, you can enjoy a hassle-free laundry experience with a reliable and efficient water drainage system.
Step 5: Testing The Drain System
After completing the installation of your washer drain pipe, it’s essential to test the drain system to ensure it functions properly. This step is crucial as it allows you to identify any issues or leaks before you start using your washing machine. By following these simple tests, you can have peace of mind that your drain system is working efficiently.
Running a Test Load of Laundry
Once the installation is complete, it’s time to put your drain system to the test. Start by running a small test load of laundry. You can include a few towels or garments to simulate a typical load. Ensure the washing machine is set to the appropriate water level and washing cycle for the load you’re testing.
As the washing machine fills with water, keep a close eye on the drain system. Look for any signs of water leaking from the pipes, connections, or joints. If you spot any leaks, use a wrench to tighten the connections or apply plumber’s tape to create a secure seal. It’s essential to address leaks promptly to prevent water damage and ensure the longevity of your drain system.
Checking for Proper Drainage and Backup Prevention
Next, observe the draining process to ensure proper drainage and backup prevention. As the washing machine enters the spin cycle, pay attention to how quickly the water drains from the machine. Ideally, the water should flow smoothly and drain without any resistance or backup.
One common issue that may arise is a slow or clogged drain. If you notice the water is not draining effectively or is backing up, it’s important to address the problem. Start by checking for any blockages in the washer drain pipe, including lint, debris, or foreign objects. Use a drain snake or a plunger to clear any clogs gently. If the issue persists, consider seeking professional plumbing assistance.
Addressing Any Issues or Leaks
If you encounter any issues or leaks during the testing process, it’s crucial to address them promptly. Ignoring problems can lead to more significant issues down the line, such as water damage or mold growth. Take a proactive approach to maintain the efficiency of your drain system.
For leaks, tighten any loose connections or apply plumber’s tape as necessary. If the problem persists, consider contacting a professional plumber for assistance. It’s also advisable to perform regular maintenance on your drain system to prevent any issues from arising in the future.
Completing step 5 ensures the drain system is working optimally, allowing you to use your washing machine without any concerns. By following these simple tests and addressing any issues promptly, you can ensure the longevity and efficiency of your washer drain pipe.
Maintenance And Troubleshooting Tips
Regularly maintaining and troubleshooting your washer drain pipe can help ensure the proper functioning of your washing machine and prevent costly repairs. By following a few simple practices and knowing how to deal with common issues, you can keep your drain pipe in optimal condition. In this section, we will explore some maintenance tips for your washer drain pipe as well as provide guidance on troubleshooting common drain problems.
Regular Cleaning and Maintenance Practices
Proper cleaning and maintenance are crucial for keeping your washer drain pipe free from debris and obstructions. Here are some key practices to incorporate into your routine:
- Inspect the drain pipe regularly to check for any visible clogs or build-up.
- Remove lint, hair, and other debris from the drain pipe using a pipe brush or a plumber’s snake.
- Flush the drain pipe with hot water to help break down any accumulated detergent or fabric softener residue.
- Consider using a drain cleaner specifically designed for washing machines to keep the pipe clear from any lingering build-up.
- Ensure that the drain pipe is securely connected to both the washing machine and the main sewer line to prevent leaks or disconnections.
Dealing with Clogs and Blockages
Clogs and blockages in the washer drain pipe can lead to water backup and potential damage to your washing machine. If you encounter a clog or blockage, try these steps:
- First, turn off the washing machine and unplug it to prevent any accidents.
- Inspect the drain pipe for visible clogs or blockages. If you can see the obstruction, carefully remove it using a tool like pliers or a pipe snake.
- In case the clog is not visible or easily removable, try using a mixture of baking soda and vinegar. Pour the mixture down the drain pipe and let it sit for about 15 minutes. Then, flush the pipe with hot water to clear the remaining debris.
- If the clog persists, you may need to disassemble the drain pipe or seek professional help. Attempting to disassemble the drain pipe requires caution and may be best left to a professional plumber.
Identifying and Fixing Common Drain Issues
Occasionally, you may encounter drain issues that require more in-depth troubleshooting. Here are some common problems you may experience and steps to address them:
| Issue | Possible Cause | Solution |
|---|---|---|
| Water pooling around the washing machine | Blocked or improperly installed drain pipe | Check for clogs or blockages in the drain pipe and ensure proper installation. If necessary, consult a plumber to address any pipe installation issues. |
| Slow draining | Clog in the drain pipe or main sewer line | Attempt to remove the clog using a plunger or a drain snake. If the issue persists, consider professional plumbing assistance. |
| Unpleasant odors | Build-up of bacteria or mold in the drain pipe | Clean the drain pipe thoroughly using a mixture of baking soda and vinegar. Follow up with hot water or a specialized drain cleaner to eliminate any lingering odors. |
By regularly maintaining your washer drain pipe and promptly addressing any issues, you can ensure the smooth operation of your washing machine. Remember to use caution when troubleshooting and seek professional assistance if needed.
Frequently Asked Questions
How Should Washing Machine Drain Pipe Be Installed?
To install the washing machine drain pipe, follow these steps: 1. Locate a suitable drainage point near the washing machine. 2. Attach a flexible hose to the machine’s drain outlet. 3. Connect the other end of the hose to a standpipe or a floor drain.
4. Ensure the hose is securely fastened to avoid leaks. 5. Test the drainage by running a cycle.
Does A Washing Machine Drain Pipe Need A Trap?
Yes, a washing machine drain pipe needs a trap. The trap helps prevent unpleasant odors from coming up through the pipe and into your home. It also catches debris that could potentially clog your plumbing system. A trap is an essential component of a properly functioning washing machine drainage system.
How High Does A Washing Machine Drain Pipe Need To Be?
The washing machine drain pipe should be at a height of around 3 feet or higher for effective drainage.
What Kind Of Pipe Do You Use For A Washing Machine Drain?
For a washing machine drain, you should use a dedicated drain pipe with a diameter of at least 2 inches. This pipe should be made of PVC or another durable material to withstand the water flow and prevent leakage. Ensure proper installation and slope for effective drainage.
Conclusion
With these simple steps, you can easily install a washer drain pipe in your home. By ensuring the right materials and tools are on hand, following the necessary guidelines for measurement and positioning, and connecting everything securely, you can have a functional and efficient washer drain pipe in no time.
Remember to always prioritize safety and consult a professional if needed. Happy washing!