To install a wall faucet, first, turn off the water supply. Then, position and secure the faucet on the wall, connecting the water lines and ensuring proper alignment.
Finally, turn on the water supply and check for any leaks. Installing a wall faucet requires a few simple steps but can make a significant difference in your bathroom or kitchen. It provides a sleek and space-saving option for those who prefer a wall-mounted faucet over a traditional countertop one.
We will guide you through the process of installing a wall faucet, making it a hassle-free experience. With the right tools and instructions, you can easily complete this DIY project and enjoy the benefits of a wall faucet. So, let’s get started!
Gather The Necessary Tools And Materials
Before starting the installation of your wall faucet, it is essential to gather all the necessary tools and materials. Having everything ready will make the installation process smoother and more efficient. By being prepared, you can avoid any delays or disruptions that may occur if you have to search for tools or purchase additional items during the installation process.
List of tools and materials required:
- Adjustable wrench
- Plumber’s tape (Teflon tape)
- Phillips screwdriver
- Level
- Drill
- Measuring tape
- Pencil
- Wall anchors and screws
- Putty knife
- Silicone caulk
- Towel or rag
Importance of having everything ready before starting the installation process:
Having all the tools and materials ready before starting the installation process ensures that you can complete the task smoothly and efficiently. It saves you from any unnecessary interruptions or delays, allowing you to focus on the task at hand and complete it in a timely manner.
When you have all the necessary tools and materials by your side, you can work with confidence, knowing that you won’t have to pause the installation to purchase something or search for a missing tool. This preparedness also helps in maintaining the installation flow and reduces the chance of any mistakes or errors.
In addition, having everything ready beforehand allows you to have a clear understanding of the steps involved in the installation process. You can refer to the instructions or guides without any hindrance and proceed with confidence, knowing that you have all the necessary components within reach. It enhances your overall experience and gives you a sense of control over the project.
Moreover, by gathering all the tools and materials before starting the installation, you ensure that you have everything you need to properly secure the wall faucet. This includes items such as wall anchors and screws, plumber’s tape, and silicone caulk, which play a crucial role in the stability and longevity of the faucet. With everything in place, you can install the wall faucet correctly, minimizing the chances of leaks or future issues.
Overall, preparing yourself with all the necessary tools and materials for installing a wall faucet is a wise approach. It saves time, improves efficiency, and allows for a smoother installation process. By being organized and ready, you can complete the installation with confidence and enjoy the benefits of your new wall faucet.

Turn Off The Water Supply
Before you begin installing your new wall faucet, it is essential to turn off the water supply. This step is crucial to prevent any accidents or water damage during the installation process. In this section, we will guide you on how to locate the main water shut-off valve and properly turn off the water supply.
Locate the main water shut-off valve
The main water shut-off valve in your home is typically located near the water meter or where the main water line enters your property. It is essential to know the exact location of this valve to be able to turn off the water supply effectively. Here’s how you can find it:
- Start by locating your water meter, which is usually found in the basement or crawl space. It might also be located outside near the street.
- Once you have located the water meter, look for the main water line that is connected to it.
- Follow the main water line until you find a valve. This valve is usually a round wheel or lever.
Remember, the main water shut-off valve can vary in appearance depending on your plumbing system, so it’s essential to familiarize yourself with what it looks like in your home.
How to properly turn off the water supply
Now that you have located the main water shut-off valve, it’s time to turn off the water supply. Follow these steps to ensure proper shut-off:
- Locate the handle or wheel of the main water shut-off valve.
- If it’s a handle, turn it clockwise until it is fully closed. If it’s a wheel, rotate it clockwise to shut off the water supply.
- To confirm that the water supply is off, turn on a faucet inside your home. If no water comes out or the pressure is significantly reduced, you have successfully turned off the water supply.
It’s important to note that some homes may have multiple shut-off valves, such as individual valves for different areas of the house or specific fixtures. If you are installing a wall faucet in a bathroom or kitchen, make sure to turn off the valves dedicated to those areas as well.
By following these steps and properly turning off the water supply, you can proceed with confidence to the next steps of installing your wall faucet without any worries about water leakage or damage.
Disconnect The Existing Faucet
Steps to Remove the Old Faucet
When it comes to installing a new wall faucet, the first step is to disconnect the existing faucet. Follow these simple steps to remove the old faucet:
- Turn off the water supply: Locate the shutoff valves beneath the sink or in the basement and turn them clockwise to shut off the water supply completely. This will prevent any leaks or water damage during the removal process.
- Prepare a container: Place a bucket or a towel beneath the sink to catch any residual water that may drain out when disconnecting the faucet.
- Disconnect the supply lines: Use an adjustable wrench to loosen and disconnect the flexible supply lines that are connected to the faucet. Turn the nuts counterclockwise until they’re loose enough to remove by hand. Be careful not to damage the threads.
- Remove the mounting nuts: Locate the mounting nuts that secure the faucet to the sink or countertop. Depending on the type of faucet, you may need a basin wrench or a regular wrench to loosen the nuts. Turn them counterclockwise until they’re loose enough to remove by hand.
- Detach the faucet: Once the nuts are loosened, carefully lift the old faucet upwards to detach it from the sink or countertop. Be mindful of any remaining water or debris that may fall out.
Common Challenges and How to Overcome Them
During the process of disconnecting the existing faucet, you may encounter a few common challenges. Here’s how to overcome them:
| Challenge | Solution |
|---|---|
| Tight or corroded supply line nuts | Use a penetrating oil, such as WD-40, to loosen tight or corroded nuts. Let the oil sit for a few minutes before attempting to loosen the nuts with a wrench. |
| Difficult access to mounting nuts | If the mounting nuts are hard to reach due to limited space, consider using a basin wrench with a swiveling head. This tool is designed to access tight spaces and make the removal process easier. |
| Stubborn faucet handles | If the faucet handles are difficult to remove, try applying a small amount of heat to the handles using a hairdryer. The heat will expand the metal slightly, making it easier to loosen the handles. |
By following these steps and overcoming common challenges, you’ll be successfully disconnected the existing faucet in preparation for installing a new wall faucet. Remember to take your time and be cautious throughout the process to avoid any unnecessary accidents or damage.
Locate The Ideal Position
When installing a wall faucet, one of the most crucial steps is to locate the ideal position. This ensures that the faucet is not only aesthetically pleasing but also functional. Proper positioning is essential to prevent unnecessary strain on the piping system and to facilitate optimal water flow. In this section, we will explore some of the key factors to consider when determining the placement of the faucet.
Factors to consider when determining the placement of the faucet
1. Height: The height of the faucet plays a significant role in its functionality and convenience. The ideal position should take into account the average height of the users and ensure easy access to the water flow. A recommended height range for standard faucets is between 38 to 42 inches from the floor.
2. Spout Reach: Another crucial factor to consider is the spout reach, which refers to the distance between the faucet’s base and the tip of the spout. This measurement is vital for determining the distance the water will be projected into the sink. It is essential to ensure that the faucet is positioned in such a way that the water flow reaches the center of the sink bowl to avoid splashing.
3. Sink Placement: The position of the sink in relation to other fixtures in the bathroom or kitchen should also be considered. The faucet should be conveniently located near the sink, allowing for easy access to water and efficient use of the space available.
4. Wall Structure: It is crucial to take into account the wall structure when determining the ideal position of the faucet. The faucet should be securely anchored to a load-bearing wall or reinforced with proper support to prevent any damage or instability over time.
5. Plumbing Connections: Lastly, it is important to consider the location of the plumbing connections. The faucet should be positioned in close proximity to the water supply lines to ensure optimal water flow and minimize the risk of leaks or other plumbing issues.
By carefully considering these factors, you can ensure that your wall faucet is installed in the ideal position, providing both functionality and aesthetic appeal to your space. Take the time to plan and measure before installing your faucet to avoid any potential issues down the line.
Prepare The Wall
Before you can install a wall faucet, it’s crucial to make sure the wall is prepared properly. This will ensure a clean and smooth installation process and help avoid any potential issues down the line. Follow these necessary preparations to get started:
Necessary Preparations Before Installing the New Faucet
To ensure a successful installation, it’s important to make sure certain preparations are made beforehand. Here’s what you need to do:
- Turn off the water supply: Locate the main water valve and shut it off to prevent any water from flowing during the installation process. This will ensure your safety and make the installation easier.
- Remove the existing faucet: Before installing the new wall faucet, you’ll need to remove the old one. Start by turning off the supply valves under the sink and then disconnect the water supply lines. Using a wrench or pliers, carefully loosen and remove the mounting nuts that hold the old faucet in place. Once the nuts are removed, gently pull the faucet away from the wall.
- Inspect the wall surface: After removing the old faucet, take a close look at the wall surface. Ensure it is clean and free from any debris or residue. If necessary, use a mild detergent or cleaning solution to remove any dirt or grime. If you notice any signs of damage or water leakage, it’s essential to address these issues before proceeding with the installation.
- Measure and mark the new faucet placement: Using a measuring tape, determine the desired height and location for your new wall faucet. Mark the center point on the wall using a pencil. Double-check the measurements and make any adjustments if needed. This step is crucial to ensure your faucet is installed at the right height and position.
- Prepare the mounting holes: Using a drill and the appropriate-sized drill bit, carefully create the mounting holes according to the specifications provided by the manufacturer. Be cautious and ensure the holes are aligned correctly and at the right depth. Clean any debris or dust resulting from drilling to ensure a secure and stable installation.
- Consider additional support: If your wall surface is weak or prone to movement, it may be necessary to provide additional support for the faucet. This can be done by installing blocking between the wall studs or using an adhesive-mounted support plate. Follow the manufacturer’s instructions for proper support installation.
Tips to Ensure a Clean and Smooth Installation Process
A clean and smooth installation process is essential to achieve a professional and long-lasting outcome. Here are some tips to help you along the way:
- Gather all necessary tools and materials before you start the installation. This will prevent any unnecessary delays or interruptions.
- Read and understand the manufacturer’s instructions thoroughly. Each faucet may have specific requirements and recommendations that you need to follow.
- Work systematically and take your time. Rushing through the installation can lead to mistakes or subpar results.
- Use Teflon tape or pipe joint compound on the threaded connections to ensure a watertight seal. This step will help prevent any leaks or drips.
- Check for any leaks or drips once the installation is complete. Tighten any loose connections and address any issues promptly.
- Consider seeking professional help if you have limited plumbing experience or if you encounter any difficulties during the installation process. It’s better to be safe than sorry.
By following these necessary preparations and tips, you are well on your way to installing your new wall faucet with ease and confidence. Remember to prioritize safety and take your time to ensure a successful outcome. Stay tuned for the next part of this series where we will guide you through the actual installation process.
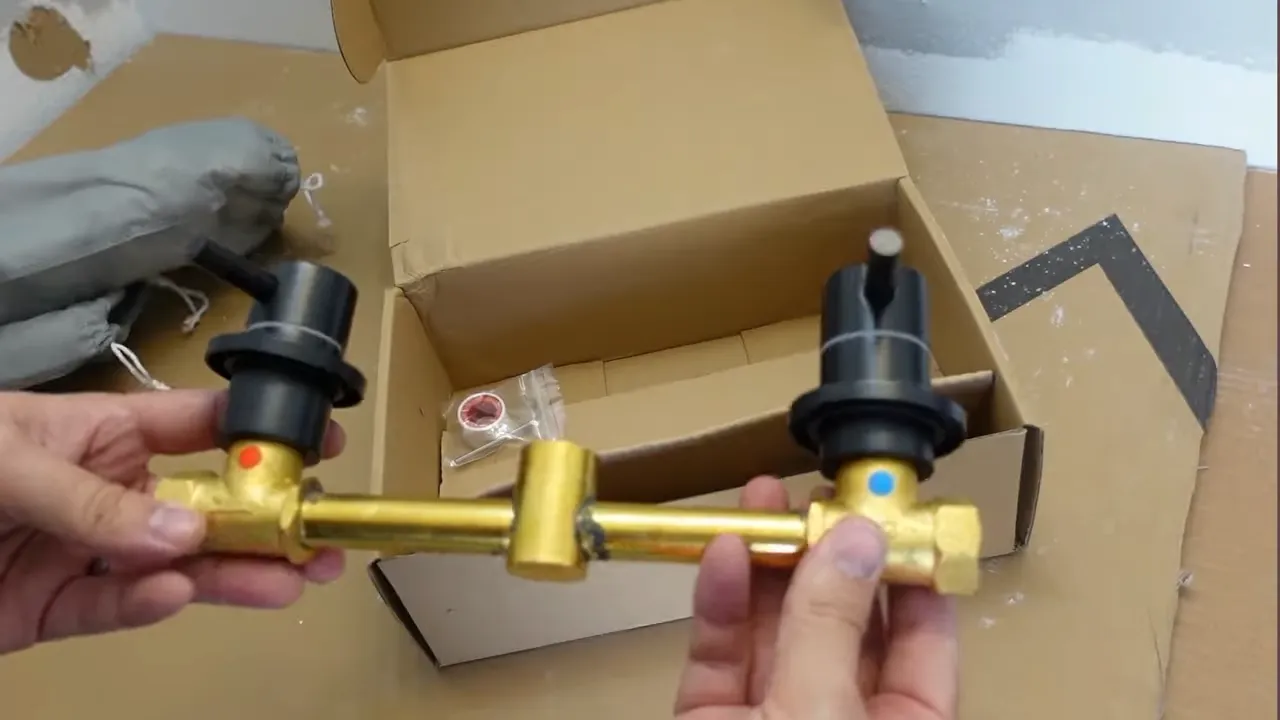
Install The Wall Faucet
Installing a wall faucet can be a great way to update your bathroom or kitchen. Whether you’re replacing an old fixture or installing a new one, proper installation is crucial for ensuring the faucet functions optimally. In this guide, we’ll walk you through the step-by-step process of installing a new wall faucet. Remember, it’s important to carefully follow the manufacturer’s instructions to avoid any potential issues.
Step-by-step guide on how to install the new faucet
Follow these steps to successfully install your new wall faucet:
- Turn off the water supply: Begin by turning off the water supply to the faucet. Locate the shut-off valves under the sink or behind the wall and turn them clockwise to close off the water flow.
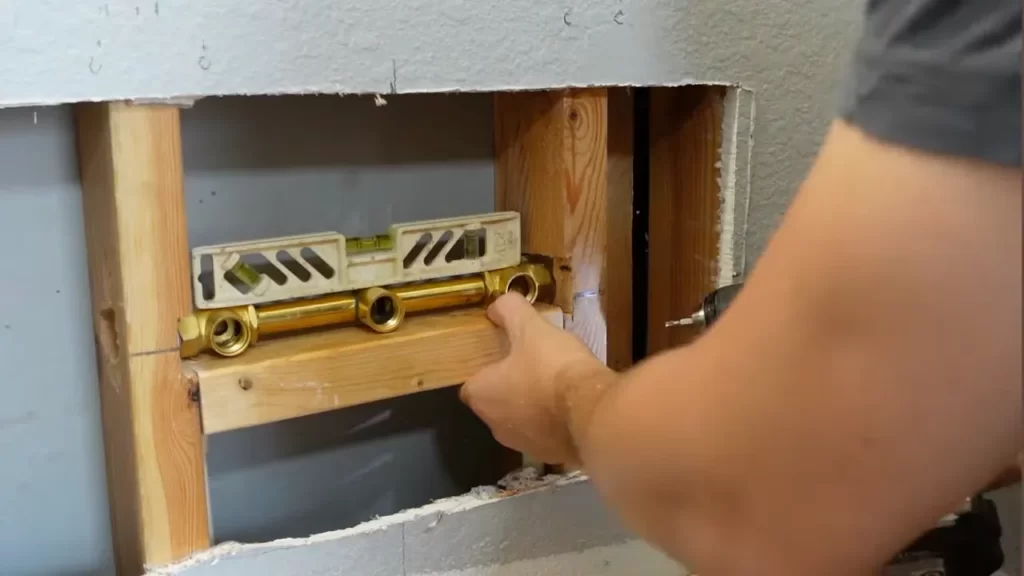
- Prepare the wall: Remove any old plumbing fixtures, including the previous faucet and any associated piping. Clear the area and ensure the wall surface is clean and ready for installation.
- Attach the mounting plate: Take the mounting plate provided with the faucet and position it on the wall. Use a level to ensure it is straight and mark the screw hole locations. Drill pilot holes at the markings. Secure the mounting plate to the wall using screws.
- Connect the mounting hardware: Attach the necessary mounting hardware, such as a brass nipple, into the wall. Follow the manufacturer’s instructions on how to securely fasten the hardware to the wall plate.
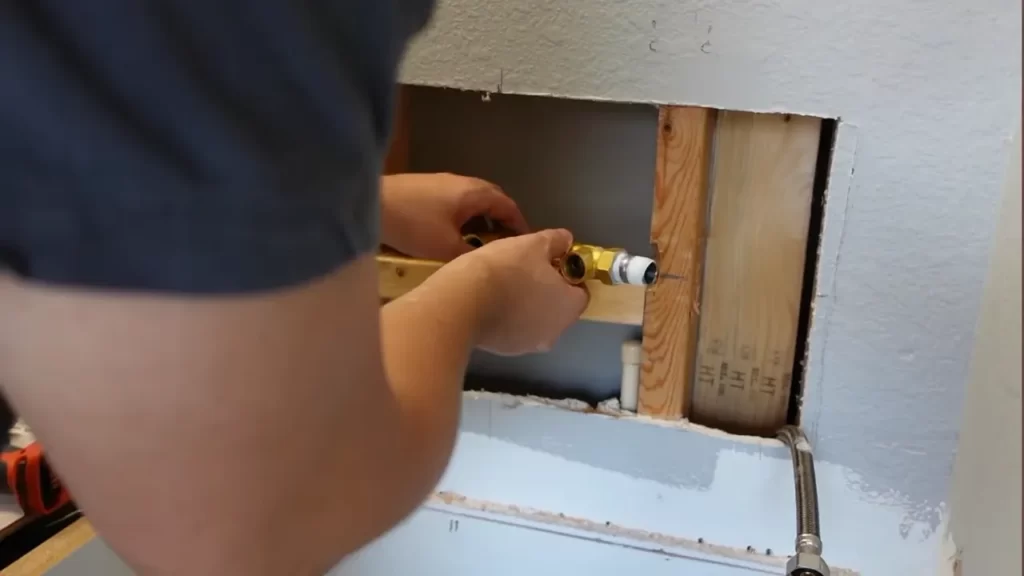
- Connect the water supply lines: Take the flexible water supply lines attached to the faucet and connect them to the water supply. Ensure the connections are tight and leak-free by using adjustable wrenches or pliers.
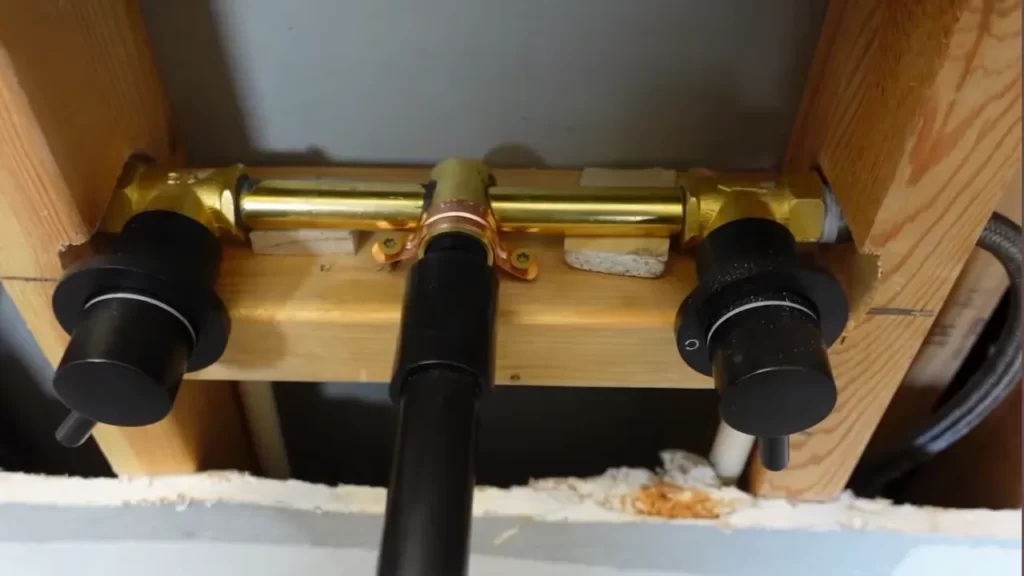
- Install the faucet body: Carefully insert the faucet body through the wall opening and align it with the mounting hardware. Secure the faucet body in place by tightening the mounting hardware screws.
- Attach the handles and trim: Install the faucet handles according to the manufacturer’s instructions. Place any decorative trim pieces provided with the faucet onto the handles.
- Turn on the water supply: Slowly turn on the water supply by opening the shut-off valves underneath the sink or behind the wall. Check for any leaks and ensure the faucet is functioning properly.
Importance of following the manufacturer’s instructions
The manufacturer’s instructions are an essential reference when installing a new wall faucet. They provide specific guidelines and recommendations tailored to the particular faucet model you have purchased. By following these instructions, you ensure that the installation is done correctly and that the faucet operates as intended.
Manufacturers often include important details, such as recommended tools, specific installation steps, and any additional precautions that need to be taken. Following these instructions also helps maintain the warranty on your faucet, as improper installation can void the warranty.
So, always take the time to carefully read and understand the manufacturer’s instructions before beginning the installation process. If you have any questions or concerns, don’t hesitate to reach out to the manufacturer or seek professional assistance.
Test For Proper Functionality
How to check if the faucet is working correctly
After successfully installing a wall faucet, it’s essential to ensure that it is working properly. Testing the functionality of your new faucet will give you peace of mind and help identify any potential issues early on. Follow these simple steps to check if your wall faucet is working correctly:
- Turn on the water supply: Before testing the faucet, make sure to turn on the water supply valve fully. This will allow water to flow freely through the faucet.
- Check for leaks: Look closely at the base of the faucet, handles, and any connections to see if there are any visible leaks. Leaks can indicate improper installation or faulty components.
- Test the hot and cold water handles separately: One by one, turn on the hot and cold water handles to see if water flows smoothly. Observe whether the water pressure is consistent, and if any unusual sounds or vibrations occur.
- Check for temperature control: Adjust the temperature control handle and observe if the water becomes hotter or colder accordingly. This is particularly important if your wall faucet has a mixer valve for blending hot and cold water.
- Test the aerator: Remove the aerator from the faucet spout and turn on the water. If water flows evenly without splashing, it indicates that the aerator is functioning correctly. Clean the aerator if any blockages are present.
By performing these checks, you can verify that your wall faucet is working as expected, ensuring a smooth and hassle-free experience.
Troubleshooting tips for any issues that may arise
While installing a wall faucet, you may encounter certain issues that can affect its functionality. Here are some troubleshooting tips to help you address common problems:
- Low water pressure: If you notice low water pressure, there may be a blockage in the supply lines. Check for debris or sediment and clean the lines if necessary. Additionally, ensure that the shut-off valves are fully open.
- Leaking faucet: If you observe leaks from the faucet, it could be due to loose connections or worn-out seals. Tighten the connections properly, and if the problem persists, consider replacing the seals.
- Inadequate temperature control: If you struggle to achieve the desired temperature, the thermostat or mixer valve may require adjustment or replacement. Consult the manufacturer’s instructions for guidance on adjusting these components.
- Unusual noises or vibrations: If your faucet produces strange noises or vibrations when in use, there may be an issue with the water pressure or air trapped in the lines. Bleed excess air from the system and ensure the pressure is within the recommended range.
By implementing these troubleshooting techniques, you can address common issues that may arise during the installation or operation of a wall faucet, ensuring efficient performance and satisfaction.
Secure Connections And Finish
Ensuring all connections are properly secured is essential for the successful installation of a wall faucet. A secure connection not only prevents leaks but also provides optimal water flow. From connecting the supply lines to attaching the wallplate, every step should be executed with precision and care. Here are some guidelines to follow when it comes to securing the connections:
Ensuring all connections are properly secured
1. Start by applying a layer of plumber’s tape on the threaded ends of the supply lines. This will create a tight seal and prevent any water leakage at the connections.
2. Using a wrench, tighten the supply line connections to the wall faucet. It’s crucial not to over-tighten as it can damage the threads or cause leaks. A snug fit is sufficient to ensure a secure connection.
3. Check for any potential leaks by turning on the water supply. Carefully inspect each connection point for any signs of dripping water. If you notice any leaks, tighten the connections further or replace the faulty parts.
4. Ensure the wallplate is correctly positioned and aligned with the wall faucet. Use a level to make sure it is straight. Secure the wallplate to the wall using screws or other applicable hardware.
5. Mount the faucet assembly onto the wallplate, following the manufacturer’s instructions. This step may involve tightening additional screws or bolts to ensure stability.
Final touches to complete the installation
With the connections secure, it’s time to focus on the finishing touches that will complete the installation. Here are some key steps to consider:
- Clean the wall faucet with a mild, non-abrasive cleaner to remove any dirt or residue.
- Apply a thin layer of silicone caulk around the edges of the wallplate to create a watertight seal and enhance the overall appearance.
- Install any additional accessories or trim pieces that come with the wall faucet, such as handles or decorative cover plates, according to the manufacturer’s instructions.
- Double-check all connections and ensure they are still secure after completing the final touches.
Completing these final touches will not only ensure a visually appealing installation but also add that extra layer of protection to keep your wall faucet in top-notch condition for years to come.
Cleaning And Maintenance
Welcome to the “Cleaning and Maintenance” section of our blog post on how to install a wall faucet. When it comes to ensuring the longevity and optimal performance of your wall faucet, proper cleaning techniques and regular maintenance are essential. In this section, we will discuss the proper cleaning techniques to keep your faucet in top condition, as well as the frequency of maintenance and the recommended products to use.
Proper cleaning techniques to keep the faucet in top condition
To maintain the pristine condition of your wall faucet, it is important to employ proper cleaning techniques. By following these steps, you can ensure that your faucet stays shiny and functional:
- Start by turning off the water supply to the faucet.
- Use a soft cloth or sponge to gently wipe away any dirt or grime on the surface of the faucet.
- Mix a solution of warm water and mild soap.
- Dip the cloth or sponge into the soapy water and gently scrub the faucet, paying extra attention to areas with buildup or stains.
- Rinse the faucet thoroughly with clean water to remove any soap residue.
- Dry the faucet with a soft, lint-free cloth to prevent water spots.
- For any stubborn stains or mineral deposits, you can use a non-abrasive cleaner specifically designed for faucets. Follow the manufacturer’s instructions for safe usage.
Frequency and recommended products for maintenance
Maintaining your wall faucet regularly will ensure its longevity and optimal performance. Here is a guide for the frequency of maintenance and the recommended products to use:
| Maintenance Task | Frequency | Recommended Products |
|---|---|---|
| Cleaning | Once a week | Mild soap and warm water |
| Removing mineral deposits | Once every few months or as needed | Non-abrasive cleaner for faucets |
| Inspecting for leaks or drips | Once a month | No special products required, just visual inspection |
| Checking water pressure | Once every six months | No special products required, just visual inspection |
Following these maintenance guidelines will help keep your wall faucet in top condition, ensuring its longevity and providing you with a reliable and functional fixture in your home. By incorporating these steps into your regular cleaning routine, you can enjoy the benefits of a well-maintained and visually appealing wall faucet.
Troubleshooting Common Issues
Common Problems That May Occur with Wall Faucets
If you are planning to install a wall faucet, it’s essential to be prepared for the possibility of encountering some common issues. These problems can range from minor inconveniences to more significant challenges that may require troubleshooting and resolution.
Here are some of the most common problems that you may encounter while installing a wall faucet:
- Leaks and Drips: One of the most common issues with wall faucets is leaks and drips. These can occur due to loose connections, worn-out gaskets, or faulty valves. A leaky faucet not only wastes water but can also lead to water damage if left unaddressed.
- Low Water Pressure: If you notice a decrease in water pressure when using your wall faucet, it can be quite frustrating. Low water pressure can be caused by various factors, such as mineral buildup or a clogged aerator. It’s important to identify the root cause of the low water pressure to restore the faucet’s performance.
- Uneven Temperatures: Another potential issue with wall faucets is uneven water temperatures. This can happen when the hot and cold water lines are not properly balanced or if the temperature control valve is malfunctioning. It’s crucial to address this problem to ensure a comfortable and consistent water temperature.
- Noises and Vibrations: Sometimes, you may hear strange noises or experience vibrations when using your wall faucet. These can be caused by water hammering, loose pipes, or worn-out washers. Ignoring these noises can lead to more significant plumbing issues down the line.
- Mounting and Installation Challenges: Installing a wall faucet may present certain challenges, especially if you’re dealing with an old or uneven wall surface. Ensuring proper mounting and a secure installation is essential to avoid future problems.
Steps to Troubleshoot and Resolve These Issues
Thankfully, most common problems with wall faucets can be resolved with some simple troubleshooting steps. Here’s how you can address these issues:
Leaks and Drips:
1. Check all connections and tighten them if necessary. Be careful not to overtighten as it can lead to damage.
2. Replace the gaskets or O-rings if they are worn-out or damaged.
3. Inspect the valve and replace it if it’s faulty or worn-out.
Low Water Pressure:
1. Remove the aerator from the faucet spout and clean it thoroughly to remove any mineral buildup.
2. Inspect the water supply lines for any kinks or obstructions and remove them if necessary.
3. If the low water pressure persists, it may be worth consulting a professional plumber to identify and address the underlying cause.
Uneven Temperatures:
1. Adjust the temperature control valve to ensure a balanced mix of hot and cold water.
2. If the issue persists, consult a professional plumber to check for any underlying problems with the valve or water lines.
Noises and Vibrations:
1. Inspect the pipes and ensure they are securely fastened. Tighten any loose fittings or straps.
2. Consider installing water hammer arrestors to eliminate water hammering noises.
3. If the issue persists, consult a professional plumber to identify and resolve the root cause of the problem.
Mounting and Installation Challenges:
1. Ensure the wall surface is clean, smooth, and level before installing the faucet.
2. Use appropriate mounting hardware and follow the manufacturer’s instructions for installation.
3. If you encounter significant challenges or uncertainties during installation, it’s wise to hire a professional plumber to ensure a proper and secure installation.
By addressing these troubleshooting steps, you can resolve common issues with wall faucets and enjoy smooth and efficient operation. However, if you encounter more complex or persistent problems, it’s always recommended to seek the assistance of a professional plumber to ensure a lasting solution.
Frequently Asked Questions
Is It Hard To Install A Wall Mount Faucet?
Installing a wall mount faucet is not difficult. Just follow the instructions provided with the faucet and make sure you have the necessary tools. First, shut off the water supply. Then, attach the valve to the wall and connect the faucet.
Finally, connect the water supply lines and test for any leaks.
Do You Need Tile Behind Wall Mounted Faucet?
Yes, it is recommended to have tile behind a wall-mounted faucet. The tile protects the wall from water damage and provides a stable surface for the faucet. It also enhances the overall look of the faucet installation.
Where Do You Mount A Wall Mount Faucet?
Mount a wall mount faucet at a suitable height on the wall above the sink. Ensure it aligns with the center of the sink basin for optimal functionality and aesthetic appeal.
How Do You Install Wall Taps?
To install wall taps, follow these steps: – Turn off the power supply to the area – Mark the location for placement – Drill holes for the mounting screws – Attach the tap to the wall using the screws – Connect the wiring and secure it in place Remember to follow proper safety precautions and consult a professional if needed.
Conclusion
Installing a wall faucet may seem like a daunting task, but with the right tools and step-by-step guidance, it can be easily accomplished. By following our comprehensive guide, you can ensure a successful installation process and enjoy the convenience and functionality of a wall faucet in your home.
Remember to always prioritize safety and take your time to complete each step carefully. Happy installation!