Install a vinyl shower pan by following these steps: prepare the area, remove the old pan, clean the subfloor, choose the right pan size, test-fit the pan, apply adhesive, and secure the pan in place. Ready to give your bathroom a fresh update?
Installing a vinyl shower pan can be a simple and cost-effective way to improve the look and functionality of your shower. Whether you’re replacing an old pan or starting from scratch, with the right tools and a methodical approach, you can have a new vinyl shower pan installed in no time.
In this guide, we’ll walk you through the process step-by-step, so you can tackle this DIY project with confidence.
Understanding The Importance Of Vinyl Shower Pan Installation
Installing a proper shower pan is a crucial step in creating a functional and long-lasting shower. A vinyl shower pan can provide multiple benefits, making it an excellent choice for your shower installation project. In this section, we will explore why a proper shower pan installation is crucial and the benefits of using a vinyl shower pan.
Why a Proper Shower Pan Installation is Crucial
A proper shower pan installation is vital for several reasons. Here are some key reasons why you should not overlook this important step:
1. Prevents Water Damage: A shower pan acts as a barrier, preventing water from seeping into the subfloor and causing damage. Without a properly installed shower pan, you may encounter issues like water leaks, rotting wood, and mold growth. These can be not only expensive to repair but also harmful to your health.
2. Ensures Structural Integrity: A well-installed shower pan provides structural support to the shower floor. It helps distribute the weight of the shower base and the person using it, preventing any potential cracks or sagging. This ensures the longevity and stability of your shower.
3. Enhances Leak Protection: When installed correctly, a shower pan offers superior leak protection. It seals the area where the shower floor meets the walls, preventing water from infiltrating and causing damage to the surrounding areas. Proper installation includes using the right adhesives and sealants to create a watertight barrier.
4. Reduces Maintenance Hassles: Investing time and effort in a proper shower pan installation can save you from frequent maintenance issues in the long run. By preventing leaks and water damage, you can enjoy a shower that requires minimal repairs and maintenance, giving you peace of mind.
The Benefits of Using a Vinyl Shower Pan
Now that we understand the importance of a proper shower pan installation, let’s explore the benefits of using a vinyl shower pan:
1. Waterproof: Vinyl shower pans are designed to be completely waterproof, providing excellent protection against leaks and water damage. This ensures that water stays within the shower area and does not seep into the underlying layers.
2. Flexible and Durable: Vinyl shower pans are known for their flexibility and durability. They can withstand constant use, resisting cracks and damage over time. Their flexibility also allows for easy installation, especially in custom shower configurations.
3. Easy Maintenance: Vinyl shower pans are easy to clean and maintain. They can be wiped down with a mild cleaner or simply rinsed off, keeping them looking fresh and new. Unlike other materials, vinyl does not require extensive cleaning or sealing.
4. Cost-Effective: Vinyl shower pans are a cost-effective option compared to other materials like tile or stone. They offer excellent value for money without compromising on quality and performance.
In conclusion, understanding the importance of vinyl shower pan installation is key to ensuring a functional and long-lasting shower. By investing in a proper installation and utilizing a vinyl shower pan, you can prevent water damage, enhance leak protection, and enjoy a low-maintenance and durable shower. Consider the benefits of using a vinyl shower pan when planning your next bathroom renovation project.

Preparing For The Installation
Before installing a vinyl shower pan in your bathroom, it’s essential to properly prepare for the installation process. This includes gathering the necessary tools and materials and measuring the shower area accurately. Following these steps will help ensure a successful installation of your vinyl shower pan.
Gathering the necessary tools and materials
Having the right tools and materials at hand is crucial when preparing for the installation of a vinyl shower pan. Here is a list of items you’ll need:
| Tools | Materials |
|---|---|
|
|
Measuring the shower area accurately
Accurate measurements are crucial to ensure the proper fit of your vinyl shower pan. Follow these steps to measure the shower area:
- Use a measuring tape to determine the width and length of the shower area. Measure from wall to wall, accounting for any recessed areas or irregularities.
- Take note of any obstacles, such as plumbing fixtures or slopes, that may affect the installation.
- Use a level to check for any high or low spots on the floor, ensuring that it is even and flat.
Once you have gathered the necessary tools and materials and accurately measured the shower area, you are ready to proceed with the installation. Following these steps will set you on the path to a successful vinyl shower pan installation.
Removing The Old Shower Pan (If Applicable)
Before you can install a new vinyl shower pan, you’ll need to remove the old one (if applicable). This step is crucial to ensure a smooth and successful installation process. Whether you’re replacing a damaged shower pan or simply upgrading to a newer model, these step-by-step instructions will guide you through safely removing the old shower pan.
Step-by-step instructions for safely removing the old shower pan
Follow these steps to carefully remove the old shower pan:
- Start by turning off the water supply to the shower.
- Remove the shower head and any other fixtures attached to the shower pan. Ensure all connections and screws are properly detached before proceeding.
- Locate and remove the drain cover. Use a screwdriver or a wrench, depending on the type of cover.
- Use a utility knife to cut along the edges of the shower pan where it meets the surrounding tiles or walls. This will break any caulking or sealing that may be holding the old pan in place.
- Next, carefully lift the old shower pan out of the shower area. This may require some force and may be easier with the assistance of another person.
- Inspect the area where the old pan was installed. Clean any debris or residue left behind and ensure the surface is clean and smooth before proceeding with the installation of the new vinyl shower pan.
Tips for dealing with any repair issues that may arise during the removal process
During the process of removing the old shower pan, you may encounter some unexpected repair issues. Here are a few tips to help you deal with them:
- If you discover any water damage or mold growth beneath the old shower pan, it’s important to address these issues before proceeding with the installation of the new one. Consult a professional if necessary to ensure proper remediation and prevent future problems.
- In case you encounter any plumbing problems, such as leaking pipes or loose connections, it’s advisable to fix them before installing the new shower pan. This will help prevent any further damage and ensure a watertight installation.
- Keep a close eye on the surrounding tiles or walls as you remove the old shower pan. If you notice any loose or cracked tiles, take the time to repair or replace them to ensure a seamless and visually appealing final result.
By following these step-by-step instructions and keeping these tips in mind, you’ll be well-prepared to remove an old shower pan (if applicable) and move on to the exciting process of installing a new vinyl shower pan.
Installing The Vinyl Shower Pan
Installing a vinyl shower pan is an essential step in creating a waterproof and sturdy base for your shower. A vinyl shower pan not only prevents water damage to the subfloor but also ensures that your shower remains leak-free.
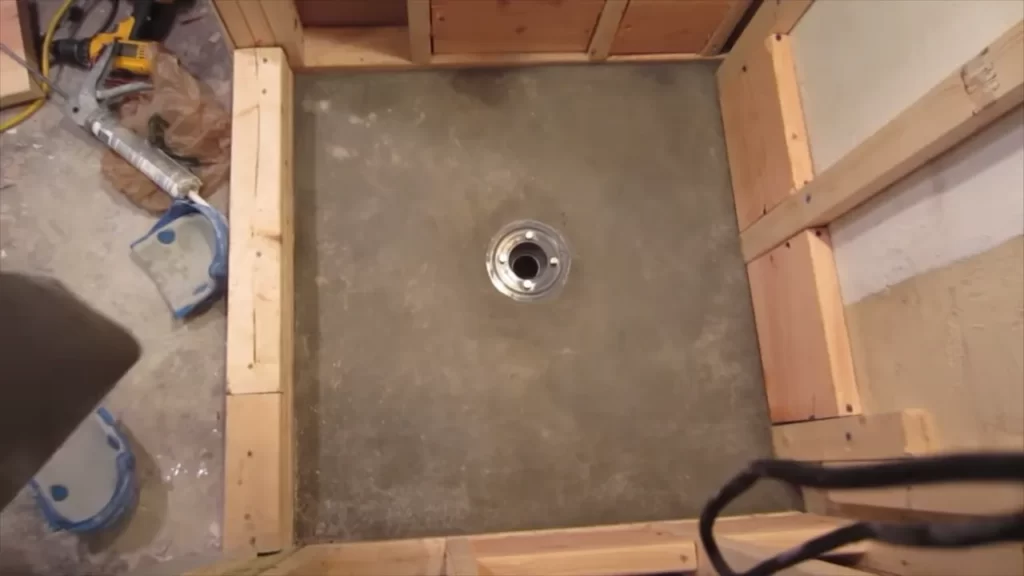
Preparing the subfloor for installation
Before you start installing the vinyl shower pan, you need to prepare the subfloor properly. Follow these steps to ensure a smooth installation:
- Remove the existing flooring material from the shower area, taking care not to damage the subfloor.
- Inspect the subfloor for any signs of damage or rot. If you notice any issues, repair or replace the affected areas.
- Clean the subfloor thoroughly, removing any dust or debris. A clean surface will help the adhesive bond better to the subfloor.
- If necessary, apply a waterproofing membrane to the subfloor. This extra layer of protection will further safeguard against water damage.
Cutting the vinyl shower pan to the desired size
Once the subfloor is prepared, it’s time to cut the vinyl shower pan to fit the dimensions of your shower space. Here’s how:
- Measure the length and width of the shower area, ensuring accurate measurements.
- Using a utility knife, carefully cut the vinyl shower pan according to the measurements. Be sure to include cutouts for the drain and any other fixtures.
- Double-check the cut vinyl shower pan against the shower space to ensure a precise fit. Make any necessary adjustments before proceeding.
Positioning and securing the vinyl shower pan in place
With the vinyl shower pan cut to size, it’s time to position and secure it in place. Follow these steps:
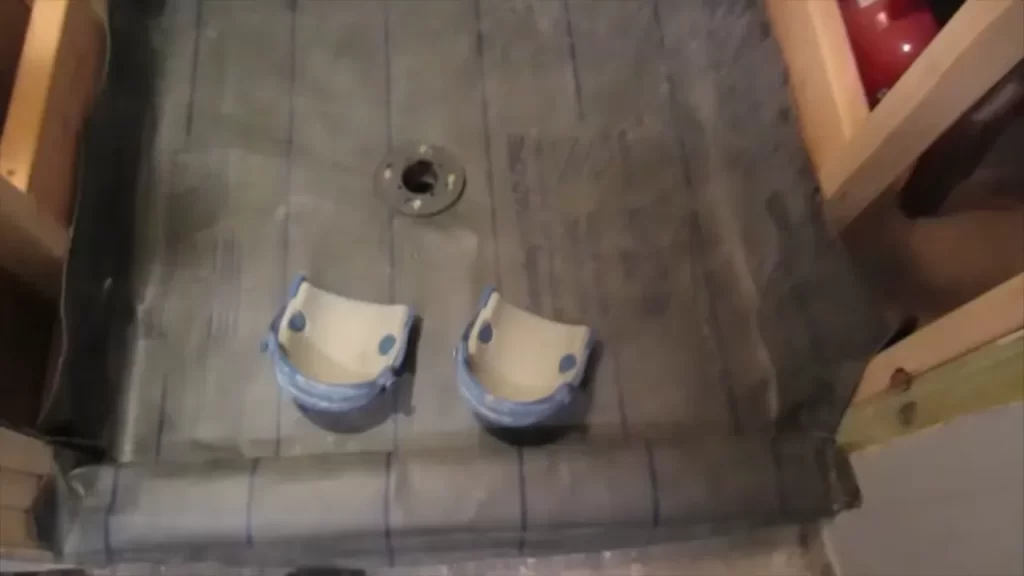
- Apply a layer of adhesive to the subfloor, ensuring to cover the entire area where the vinyl shower pan will sit.
- Carefully place the vinyl shower pan onto the adhesive, aligning it with the walls and ensuring it fits snugly.
- Press down on the vinyl shower pan to ensure proper adhesion to the subfloor. Smooth out any wrinkles or air bubbles using a roller.
- Secure the edges of the vinyl shower pan by stapling or nailing them to the subfloor. This will ensure a tight and secure fit.
By following these steps, you can successfully install a vinyl shower pan and create a strong foundation for your shower. Remember to take your time and pay attention to detail to ensure a professional-looking and leak-free installation.
Ensuring A Watertight Seal
Installing a vinyl shower pan is a crucial step towards creating a durable and leak-free showering experience. However, to achieve complete peace of mind, it is essential to ensure a watertight seal. By following these simple steps, you can guarantee a shower pan that is not only aesthetically pleasing but also keeps water where it belongs – inside the shower.
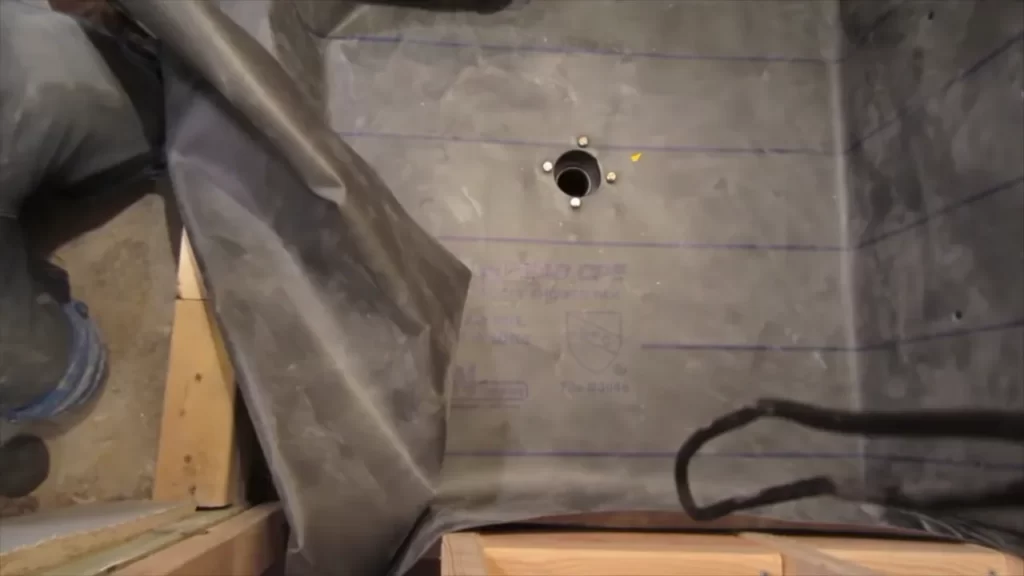
Applying a waterproofing membrane to the shower pan
One of the first steps to ensure a watertight seal is to apply a waterproofing membrane to the shower pan. This membrane acts as an additional layer of protection by preventing water from seeping through to the subfloor. To apply the membrane, follow these steps:
- Clean and dry the surface of the shower pan.
- Apply a thin coat of waterproofing primer using a paintbrush or roller. Let it dry completely.
- Next, cut a piece of waterproofing membrane to fit the dimensions of the shower pan. Leave some excess material around the edges to ensure full coverage.
- Using a paintbrush or trowel, apply a layer of waterproofing adhesive to the shower pan, making sure to cover the entire surface area.
- Place the waterproofing membrane onto the adhesive, starting from one end and working your way towards the other. Use a roller to remove any air bubbles and ensure proper adhesion.
- Trim off the excess membrane using a utility knife.
- Allow the membrane to dry for the recommended time, usually 24 hours, before proceeding with further installation.
Sealing the edges and corners of the shower pan
While applying the waterproofing membrane provides a base layer of protection, sealing the edges and corners of the shower pan is essential to create a truly watertight seal. Follow these steps to ensure proper sealing:
- Using a caulking gun, apply a bead of silicone caulk along the edges of the shower pan, making sure to cover any gaps or seams.
- Smooth the caulk with a caulk smoothing tool or your finger to create a neat and even seal.
- Repeat the process for the corners, focusing on the joint between the shower pan and the walls.
- Inspect the edges and corners for any missed spots or areas that may require additional sealing. Fill in these gaps with more silicone caulk.
- Allow the caulk to dry completely before proceeding with the installation.
Testing for leaks and making any necessary adjustments
To ensure that your shower pan is truly watertight, it is essential to perform a leak test before using the shower. Follow these steps to test for leaks:
- Fill the shower pan with water, ensuring that the water level is above the drain.
- Allow the water to sit for at least 15 minutes.
- Observe the area around the shower pan for any signs of leaks or water seepage.
- If you notice any leaks, mark the area and drain the water from the pan.
- Make any necessary adjustments, such as applying additional caulk or waterproofing membrane, to fix the leaks.
- Repeat the leak testing process until no leaks are detected.
By following these steps and ensuring a watertight seal, you can install a vinyl shower pan with confidence, knowing that your showering experience will be free from leaks and water damage. Take your time during the installation process and pay attention to detail, as a properly installed shower pan will provide you with years of worry-free enjoyment.
Completing The Installation
After preparing the area and assembling the vinyl shower pan, it’s time to complete the installation and bring your shower to life. In this section, we will go through the remaining steps of connecting the drain and plumbing fixtures, installing the shower walls and enclosure, and adding the final touches. Let’s dive in!
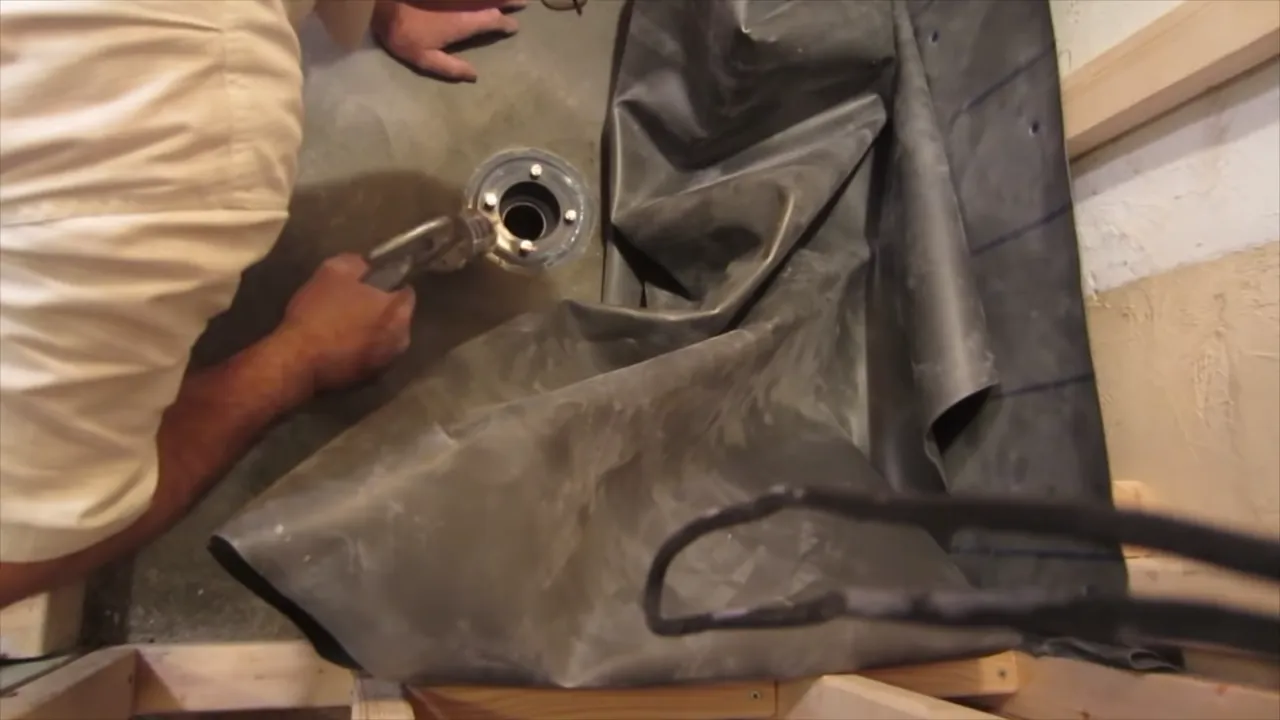
Connecting the drain and plumbing fixtures
Now that the shower pan is securely in place, it’s essential to connect the drain and plumbing fixtures. This step ensures proper water drainage and functionality of your shower. Follow these simple steps:
- Attach the drain assembly by aligning it with the pre-drilled holes in the shower pan. Make sure it fits securely and tightly.
- Connect the drainpipe to the drain assembly, ensuring a snug fit without any leaks.
- Attach the showerhead and faucet handles according to the manufacturer’s instructions. Check for any leaks and tighten as necessary.
- Test the water flow and drainage to ensure everything is working smoothly.
Installing the shower walls and enclosure
With the plumbing fixtures in place, it’s time to install the shower walls and enclosure. This step not only provides privacy but also adds a stylish touch to your bathroom. Follow these steps:
- Start by measuring and cutting the shower wall panels to fit your shower area. Ensure precise measurements for a seamless fit.
- Apply adhesive to the back of each panel and press them firmly against the wall, starting from the bottom and working your way up.
- Secure the panels in place using finishing nails or screws, following the manufacturer’s recommendations.
- Seal the seams between the panels with silicone caulk to prevent water leakage.
- Install the shower enclosure, such as a sliding glass door or shower curtain, according to the manufacturer’s instructions.
Final touches and clean-up
With the shower walls and enclosure in place, it’s time for the final touches and clean-up to complete the installation. Pay attention to these details:
- Ensure all connections are secure and tightened to prevent any water leakage.
- Check for any gaps or imperfections in the shower pan, walls, or enclosure and make necessary adjustments or repairs.
- Give your shower a thorough clean-up, removing any excess adhesive or grout.
- Test the functionality of the shower by running water and checking for any leaks or malfunctions.
- Finish off by caulking around the base of the shower and any other areas that may require additional sealing.
Congratulations! You have successfully completed the installation of your vinyl shower pan and transformed your bathroom into a functional and stylish space. Now it’s time to enjoy your newly installed shower!
Maintenance And Care Tips
Maintaining and caring for your vinyl shower pan is essential to ensure its longevity and functionality. By following a few simple maintenance and care tips, you can keep your shower pan clean and in excellent condition for years to come. In this section, we will discuss proper cleaning and maintenance techniques, as well as common issues to watch out for and how to address them.
Proper cleaning and maintenance of a vinyl shower pan
Regular cleaning is vital in maintaining the cleanliness and appearance of your vinyl shower pan. Here are some steps you can follow:
- Start by rinsing the shower pan with warm water to remove any loose dirt or debris.
- Mix a solution of mild dish soap and water in a bucket or spray bottle.
- Using a soft sponge or cloth, gently scrub the surface of the shower pan with the soapy solution. Avoid using abrasive cleaners or scrub brushes as they can damage the vinyl.
- Rinse off the soap residue thoroughly with warm water.
- Dry the shower pan using a clean towel or allow it to air dry completely.
Regular maintenance is also crucial in preventing potential issues with your vinyl shower pan. Here are a few maintenance tips to keep in mind:
- Inspect the shower pan regularly for any signs of cracks, leaks, or discoloration.
- Check the sealant around the edges of the shower pan and reseal if necessary.
- Keep the shower pan free from excessive soap scum and mineral deposits by cleaning it regularly.
- Avoid using harsh chemicals or abrasive cleaning tools that can damage the vinyl.
- If you notice any issues with your shower pan, it’s best to address them promptly to prevent further damage.
Common issues to watch out for and how to address them
While vinyl shower pans are generally durable, some common issues may arise over time. Here are a few problems you should watch out for and how to address them:
| Issue | Solution |
|---|---|
| Cracks or holes | Fill the cracks or holes with a vinyl patch repair kit. Follow the instructions provided by the manufacturer for best results. |
| Discoloration | Mix a solution of equal parts water and white vinegar. Scrub the discolored area with this solution using a soft sponge or cloth. Rinse thoroughly with water. |
| Leaking | Inspect the shower pan for any loose or damaged seals. Apply a waterproof sealant or replace the seals as necessary. |
By taking proactive measures and promptly addressing any issues that arise, you can ensure that your vinyl shower pan remains in optimal condition for years to come.
Frequently Asked Questions
What Is The Proper Way To Install A Shower Pan?
To install a shower pan properly, follow these steps: 1. Start by preparing the subfloor and ensuring it is level and clean. 2. Apply a layer of waterproof membrane to protect against leaks. 3. Install the shower pan, ensuring it fits securely and is level.
4. Connect the drain properly to ensure proper water drainage. 5. Test the installation by running water to check for any leaks.
Do I Need Mortar Under Shower Pan?
Yes, you need mortar under the shower pan. It helps provide stability, prevent leaks, and support the weight of the pan. Using mortar ensures a durable and long-lasting installation.
Do You Need To Put Anything Under A Shower Pan?
Yes, it is necessary to put a waterproof barrier or a shower pan liner underneath a shower pan. This helps prevent water leakage and protects the underlying structure from moisture damage. A suitable material, such as PVC or CPE, should be used for the liner to ensure effective waterproofing.
How Do You Fasten A Shower Pan Liner?
To fasten a shower pan liner, follow these guidelines: 1. Use a waterproof adhesive to secure the liner to the shower base. 2. Overlap and seam the liner according to the manufacturer’s instructions. 3. Install a second layer of protection, such as a cement backer board, over the liner.
4. Secure the backer board with screws or nails. 5. Finally, check for any leaks and ensure proper drainage.
Conclusion
Installing a vinyl shower pan is a relatively simple process that can greatly enhance the functionality and aesthetics of your bathroom. By carefully following the steps outlined in this guide, you can ensure a successful installation that will provide long-lasting durability and waterproofing.
With the right tools and materials, anyone can achieve professional-looking results. So go ahead and tackle this DIY project with confidence, knowing that you have the knowledge and skills to get the job done right.