
To install a valve cover gasket, first, remove the old gasket by loosening the bolts, cleaning the surface, and scraping away any debris. Then, place the new gasket onto the valve cover and reattach it using the bolts in a crisscross pattern, tightening them evenly until secure.
The valve cover gasket is an essential component of any engine, as it prevents oil leaks and keeps the engine running smoothly. Over time, the gasket can become worn or damaged, resulting in leaks and potential engine damage. Replacing the valve cover gasket is a relatively simple task that can be done at home with a few basic tools.
We will provide step-by-step instructions on how to replace a valve cover gasket to ensure that your engine stays in optimal condition.
Understanding Valve Cover Gaskets
Valve cover gaskets may seem like a small and insignificant part of your engine, but they play a crucial role in ensuring its proper functioning. These gaskets are positioned between the valve cover and the cylinder head, preventing oil leakage and maintaining the necessary pressure within the engine. In this section, we will dive deeper into the importance of valve cover gaskets and discuss how to identify signs of a faulty gasket.
What is a valve cover gasket?
A valve cover gasket, also known as a rocker cover gasket, is a thin piece of material, typically made of rubber or cork, that seals the gap between the valve cover and the cylinder head. Its primary function is to prevent oil leaks, keeping the engine oil contained within its designated channels and preventing it from seeping into other engine components. A well-functioning valve cover gasket is crucial for maintaining the proper functioning of your engine.
Importance of a properly functioning valve cover gasket
A properly functioning valve cover gasket is essential for maintaining the optimal performance of your engine and preventing engine damage. Here are a few reasons why a functioning valve cover gasket is of utmost importance:
- Oil leakage prevention: The valve cover gasket acts as a seal, preventing oil from leaking out of the engine. Oil leaks can not only create a mess under the hood but can also lead to a significant loss of oil. Low oil levels can result in engine overheating and potentially cause serious damage.
- Ensuring proper oil pressure: Valve cover gaskets help maintain the necessary oil pressure within the engine. Any leakage or malfunctioning of the gasket can disrupt the pressure balance, which can lead to inefficient lubrication, increased engine friction, and accelerated wear and tear of engine components.
- Protection against external elements: Valve cover gaskets prevent dirt, debris, and other contaminants from entering the engine. These foreign particles can cause blockages, affecting the engine’s performance and leading to potential engine damage.
Signs of a faulty valve cover gasket
Identifying signs of a faulty valve cover gasket is crucial to prevent further engine damage. If you notice any of the following symptoms, it may indicate a faulty valve cover gasket:
- Oil leaks: One of the primary signs of a faulty valve cover gasket is oil leakage. You may notice oil puddles or drips under your car, typically near the engine area. Inspect the valve cover and surrounding areas for any signs of oil seepage.
- Burning oil smell: If you detect a strong burning oil smell while driving or when you open the hood, it could signify a leaking valve cover gasket. The leaking oil may come into contact with hot engine components and create a distinct odor.
- Engine misfires: A faulty valve cover gasket can lead to engine misfires or rough idling. The leaking oil can disrupt the spark plug operation, causing misfires and affecting the engine’s overall performance.
If you notice any of these signs, it is important to address the issue promptly and replace the valve cover gasket to prevent further damage to your engine.
Understanding valve cover gaskets, their importance, and the signs of a faulty gasket can help you maintain your engine’s health and performance. In the next section, we will discuss the step-by-step process of installing a valve cover gasket to ensure a proper seal and minimize the risk of future issues.
Preparing For The Installation
Before you begin installing a new valve cover gasket, it’s important to properly prepare for the task at hand. This involves gathering the necessary tools and materials, taking safety precautions, and ensuring the engine and valve cover area are clean. By following these steps, you’ll be well-prepared to successfully install a valve cover gasket and keep your engine running smoothly.
Gathering the necessary tools and materials
Before diving into the installation process, it’s essential to gather all the tools and materials you’ll need. Here’s a handy checklist to help you get started:
| Tools | Materials |
|---|---|
| Socket wrench set | New valve cover gasket |
| Torque wrench | RTV sealant |
| Extensions and swivels | Gasket cleaner |
| Torque specifications for your specific engine | Shop towels |
| Small scraper or putty knife | Protective gloves |
| Socket or wrench for removing fasteners | Eye protection |
Having these tools and materials ready in advance will save you time and hassle during the installation process.
Safety precautions before starting the installation
Working on an engine can be dangerous if proper safety precautions are not taken. Here are some important safety measures to keep in mind:
- Ensure the engine is turned off and has cooled down before beginning the installation.
- Wear protective gloves and eye protection to prevent any accidental injuries or exposure to harmful chemicals.
- Follow all safety guidelines outlined in your vehicle’s manual.
- Be cautious of any hot surfaces and take necessary precautions to avoid burns.
By prioritizing safety, you can prevent accidents and work on your vehicle with confidence.
Cleaning the engine and valve cover area
Before installing the new valve cover gasket, it’s crucial to clean the engine and valve cover area thoroughly. This will help ensure a proper seal and prevent any debris or contaminants from interfering with the installation. Here’s how to clean the area:
- Start by removing the old valve cover gasket, taking care not to introduce any debris into the engine.
- Use a small scraper or putty knife to gently remove any remaining gasket material from the valve cover.
- Apply a gasket cleaner to remove any oil or residue from the valve cover and engine surfaces.
- Wipe down the surfaces with shop towels until they are clean and dry.
By following these steps, you will ensure a clean surface for the new gasket to adhere to, increasing the chances of a successful installation and preventing future leaks.
With the necessary tools and materials in hand, safety precautions taken, and the engine and valve cover area cleaned, you’re now ready to move on to the next steps of the valve cover gasket installation process.
Step-By-Step Installation Process
Installing a valve cover gasket is an essential maintenance task that ensures the optimal performance of your vehicle’s engine. A good valve cover gasket prevents oil leaks and maintains the right pressure within the engine. In this step-by-step guide, we will walk you through the process of installing a valve cover gasket, so you can keep your engine running smoothly.
Removing the old valve cover gasket
The first step in replacing a valve cover gasket is to remove the old one. To do this, locate the valve cover and carefully remove any components obstructing its access. Then, using a wrench or socket set, loosen and remove the bolts securing the valve cover in place. Take your time, ensuring that you do not strip or damage the bolts.
Draining engine oil (if necessary)
If your vehicle’s engine oil level is above the maximum mark or the oil is dirty, it is recommended to drain the engine oil before proceeding. To do this, locate the oil drain plug, usually located on the underside of the engine. Place a drain pan beneath the plug, and using a wrench or socket set, loosen and remove the plug, allowing the oil to drain completely.
Removing the valve cover
Once the old gasket has been removed and the engine oil drained (if necessary), it’s time to remove the valve cover. Carefully lift the valve cover off the engine, making sure not to damage any surrounding components. Set the old valve cover aside to be inspected or replaced if necessary.
Scrape off the old gasket
With the valve cover removed, use a scraper or a gasket removal tool to carefully scrape off the old gasket material. Take care not to scratch or damage the valve cover surface while doing so. Ensure that all traces of the old gasket are removed, leaving a clean and smooth surface.
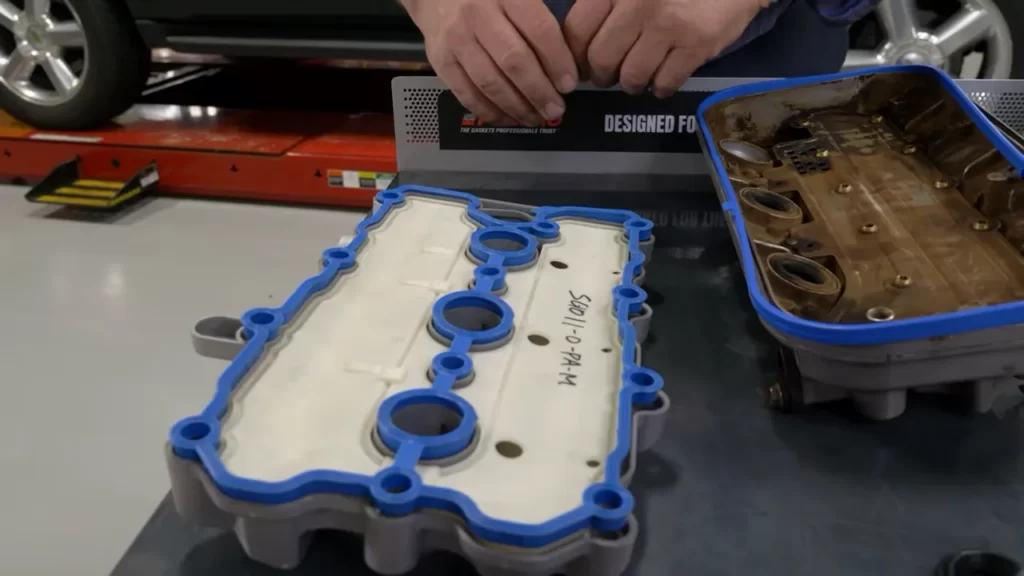
Preparing the new valve cover gasket
Before installing the new valve cover gasket, ensure its compatibility with your vehicle’s make and model. It is recommended to purchase a gasket that is specifically designed for your engine. Lay the new gasket on a clean surface and inspect it for any damage or defects.
Choosing the right type of gasket
When selecting a new valve cover gasket, it is crucial to choose the right type. Different engines may require different gasket materials, such as rubber, cork, or silicone. Refer to your vehicle’s manual or consult a professional to determine the correct type of gasket for your engine.
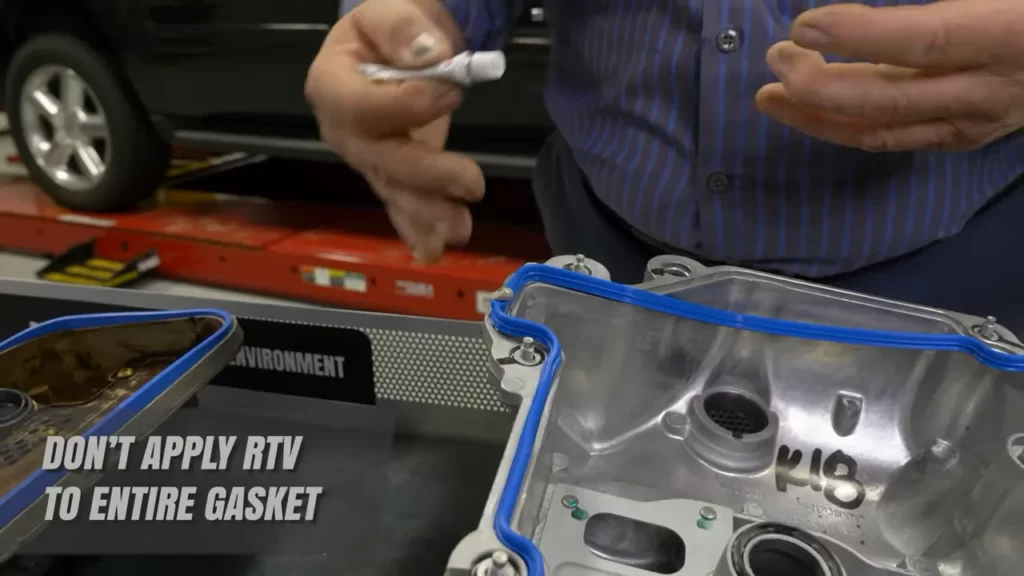
Applying sealant (if required)
In some cases, depending on the engine and gasket type, it may be necessary to apply a sealant or adhesive to ensure a proper seal. Follow the manufacturer’s instructions for applying the sealant, being careful not to apply too much, as excess sealant can interfere with the gasket’s effectiveness.
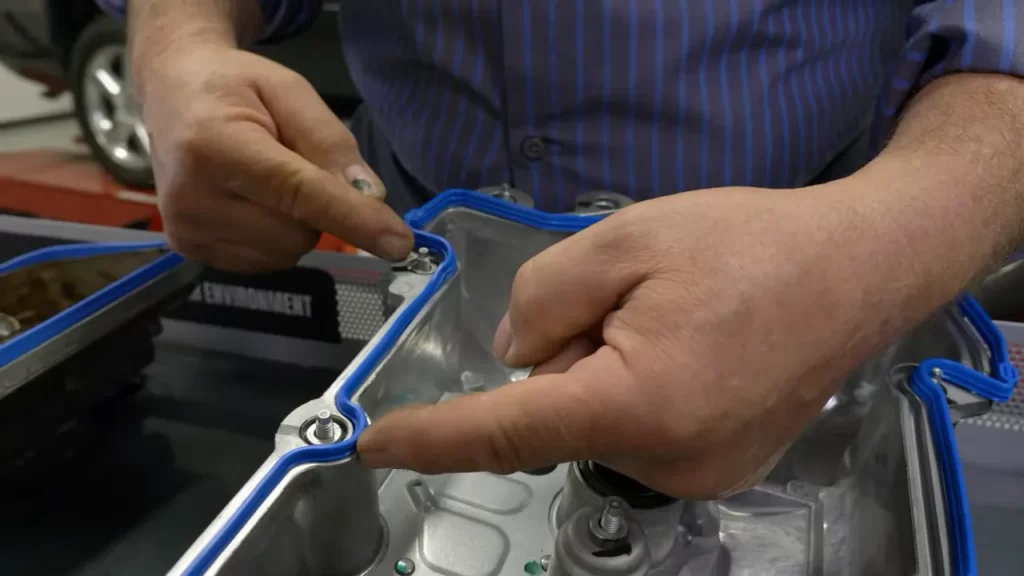
Installing the new valve cover gasket
Place the new gasket on the valve cover, ensuring that it aligns with the screw holes and other necessary openings. Take care to position the gasket correctly, as any misalignment can lead to leaks or improper sealing.
Properly aligning the valve cover
With the new gasket in place, carefully align the valve cover with the engine. Ensure that the cover sits evenly and is properly aligned with any alignment pins or guides that may be present. Double-check the gasket’s alignment, making any necessary adjustments before proceeding.
Tightening the bolts in the correct sequence
Using a wrench or socket set, begin tightening the bolts that secure the valve cover to the engine. It is important to tighten the bolts gradually and in the correct sequence to ensure even and proper alignment of the valve cover and gasket. Refer to your vehicle’s manual for the recommended tightening sequence and torque specifications.
Checking for leaks and proper installation
Once the valve cover is securely fastened, it’s time to check for leaks. Inspect every part of the valve cover and the surrounding areas for any signs of oil leakage. Start the engine and let it run for a few minutes, then carefully inspect again for any leaks. If you notice any leaks, immediately stop the engine and double-check the installation and the gasket’s alignment.
Inspecting for any leaks
After running the engine, inspect the valve cover and surrounding areas one final time to ensure there are no leaks. If no leaks are detected and everything appears to be in order, you can proceed with reattaching any components that were removed during the installation process.
Replacing any damaged components (if needed)
If any components were found to be damaged during the inspection, such as the valve cover itself or any seals or grommets, it is essential to replace them before completing the installation. Damaged components can lead to future leaks or engine malfunctions, so it’s better to address them immediately.
Congratulations! You have successfully installed a new valve cover gasket, ensuring the optimal performance and longevity of your vehicle’s engine.
Tips And Tricks For A Successful Installation
Double-checking the valve cover gasket specifications
Before starting the installation process, it is crucial to double-check the valve cover gasket specifications. This ensures that you have the correct gasket for your specific engine model and make. Refer to your vehicle’s manual or consult with a professional mechanic to confirm the right part.
Using a torque wrench for proper bolt tightening
Proper bolt tightening is essential for a successful valve cover gasket installation. To avoid under or over-tightening the bolts, it is recommended to use a torque wrench. This tool allows you to apply the correct amount of pressure, ensuring a secure fit without causing any damage to the gasket or the engine.
Applying a thin layer of sealant for better sealing
To enhance the sealing properties of the valve cover gasket, applying a thin layer of sealant can be beneficial. This step adds an extra level of protection against oil leaks and improves the gasket’s overall performance. Always ensure the sealant is compatible with your gasket material and follow the manufacturer’s instructions for proper application.
Avoiding overtightening the bolts
One common mistake during valve cover gasket installation is overtightening the bolts. Over-tightening can lead to gasket deformation, and in some cases, even damage to the valve cover. To prevent this, follow the torque specifications recommended by the manufacturer, and remember not to exceed the specified limit.
Testing the functionality after installation
After completing the installation process, it is essential to test the functionality of the valve cover gasket. Start the engine and observe for any signs of leaks or unusual noises. Additionally, check for proper engine performance and ensure that the gasket is effectively sealing the valve cover. If any issues are detected, consult with a professional mechanic to ensure a proper fix.
Maintenance And Longevity Of Valve Cover Gaskets
Maintenance and Longevity of Valve Cover Gaskets
Regular inspection and maintenance routine
One of the key factors in ensuring the longevity of valve cover gaskets is to implement a regular inspection and maintenance routine. By periodically checking the condition of the gasket, you can identify any signs of wear or damage early on, preventing further issues down the line.
Some common signs that indicate a need for maintenance include oil leaks around the valve cover, increased oil consumption, and a strong smell of burning oil. If any of these signs are present, it is crucial to address the issue promptly.
Replacing valve cover gaskets at recommended intervals
Another important aspect of maintaining valve cover gaskets is replacing them at the recommended intervals. This ensures that they are functioning optimally and prevents any potential leaks or damage. The specific interval may vary depending on the make and model of your vehicle, so it’s advisable to consult the manufacturer’s guidelines or seek professional advice.
Factors affecting the longevity of valve cover gaskets
Various factors can impact the longevity of valve cover gaskets. Understanding these factors can help you take appropriate measures to extend their lifespan.
| Factors | Impact on Longevity |
|---|---|
| Quality of the gasket | High-quality gaskets tend to last longer and provide better sealing, reducing the risk of leaks. |
| Proper installation | A correctly installed gasket ensures a secure fit and minimizes the chances of oil leaks. |
| Engine temperatures | Excessive heat or extreme temperature fluctuations can cause gaskets to deteriorate more quickly. |
| Chemical exposure | Exposure to certain chemicals, such as oil additives or harsh cleaners, can degrade the gasket material over time. |
Tips to extend the lifespan of valve cover gaskets
- Ensure regular oil changes and use the correct oil viscosity recommended by the manufacturer. This helps maintain optimal engine conditions and reduces strain on the gasket.
- Be cautious during maintenance or repair work that involves the valve cover gasket. Avoid over-tightening the bolts, as it can lead to gasket damage.
- Keep the engine clean to minimize the accumulation of dirt and debris that can contribute to gasket deterioration.
- Avoid using abrasive or harsh chemicals when cleaning the valve cover or gasket, as these can weaken the material.
- If you notice any signs of gasket wear or damage during routine inspections, address the issue promptly to prevent further deterioration and potential leaks.
By following these tips and adhering to a regular inspection and maintenance routine, you can significantly increase the lifespan of valve cover gaskets, ensuring proper engine functionality and minimizing the risk of oil leaks.
Frequently Asked Questions
Do You Need Sealant For Valve Cover Gasket?
Yes, a sealant is needed for the valve cover gasket. It helps ensure a proper seal between the valve cover and the engine block, preventing oil leaks and maintaining engine performance. Applying the sealant correctly can extend the life of the gasket and prevent future issues.
Do You Install Valve Cover Gaskets Dry?
No, valve cover gaskets are typically not installed dry. It is recommended to apply a small amount of gasket sealant or silicone to ensure a proper seal and prevent oil leaks. This helps to maintain the functionality and longevity of the gasket.
How Many Hours Does It Take To Replace A Valve Cover Gasket?
Replacing a valve cover gasket typically takes about 1-2 hours. The exact time can vary depending on the vehicle model and the level of experience of the mechanic. It is recommended to consult a professional for an accurate estimate.
What Is The Best Glue For Valve Cover Gasket?
The best glue for a valve cover gasket is silicone adhesive. Silicone adhesive is highly durable and provides a strong bond that can withstand high temperatures and engine vibrations. It is important to choose a silicone adhesive that is specifically designed for use on rubber gaskets to ensure proper sealing.
Conclusion
In a nutshell, installing a valve cover gasket is a straightforward procedure that can save you from potential engine damage and costly repairs. By following the step-by-step guidelines provided in this blog post, you can achieve a leak-free seal and ensure optimal performance of your vehicle.
Remember to gather all the necessary tools, take your time, and consult your vehicle’s manual for specific instructions. With a little patience and attention to detail, you’ll have a successfully installed valve cover gasket in no time. Happy DIY-ing!