
To install an upflush toilet in the basement, you need to follow these steps: First, find a suitable location for the toilet and ensure proper access to plumbing and electrical connections. Next, install the macerating unit and connect it to the existing sewer line.
Then, attach the toilet bowl and connect the water supply. Finally, test the system for any leaks or malfunctions before use. Overall, installing an upflush toilet in the basement requires careful planning and proper execution to ensure an efficient and functional system in your home.
Understanding The Benefits Of An Upflush Toilet
When it comes to basement renovations or adding a bathroom in your basement, one of the crucial considerations is the plumbing installation. Traditional plumbing systems may not always be feasible due to their reliance on gravity for drainage. This is where an upflush toilet proves to be a game-changer.
Advantages of Installing an Upflush Toilet
1. Flexibility in Location:
An upflush toilet provides the flexibility to install a bathroom practically anywhere in your home, including the basement. Unlike traditional toilets that require a connection to the main sewer line, an upflush toilet relies on a macerator pump system to efficiently move waste and water upwards.
2. Cost-Effective:
Installing traditional plumbing systems can be expensive and time-consuming, especially in basements. You may need costly trenching and significant disruptions to your home during installation. On the other hand, an upflush toilet can be installed quickly and at a fraction of the cost, making it an economical solution for adding a bathroom in the basement.
3. Minimal Disruption to Existing Plumbing:
If your home already has existing plumbing lines, retrofitting them to accommodate a traditional toilet in the basement can be a complex process. Upflush toilets eliminate the need for major plumbing modifications, as they can be easily connected to existing pipes or even run independently.
How an Upflush Toilet Works
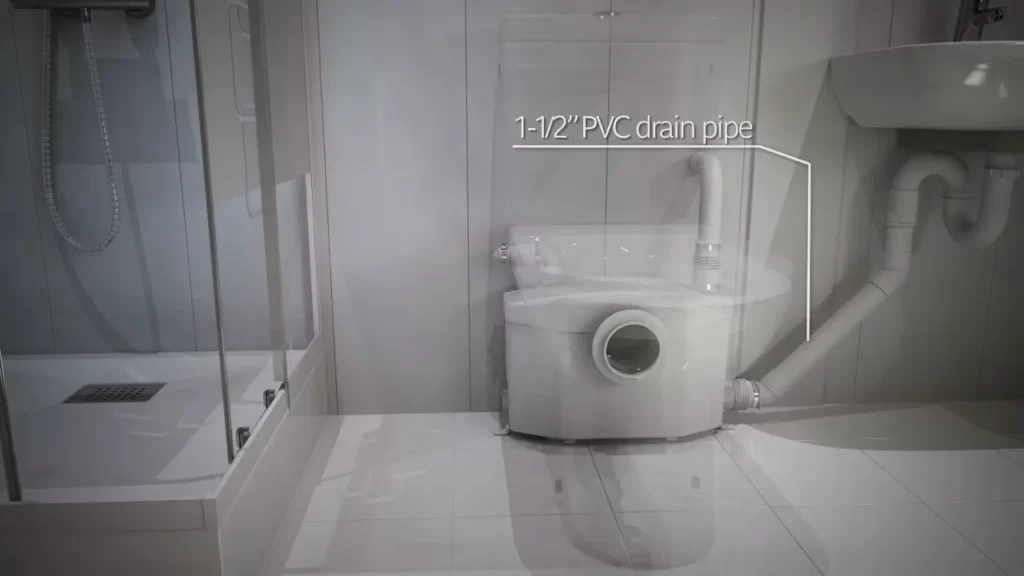
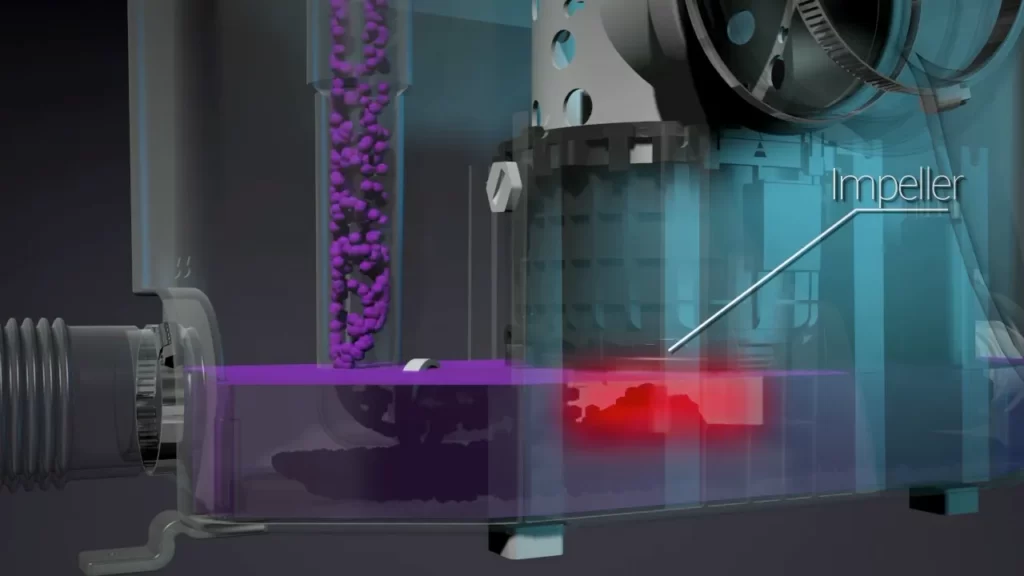
An upflush toilet operates on a simple yet efficient principle. The macerator pump, integrated within the unit, grinds solid waste and toilet paper into fine slurry. This slurry is then pumped through a small-diameter discharge pipe into the main sewer line or septic tank.
This pump system is equipped with a powerful motor capable of handling waste efficiently and effectively. Moreover, modern upflush toilets are designed with noise-reducing technology, ensuring quiet operation without disturbing your peaceful environment.
Additionally, upflush toilets come equipped with backflow prevention valves, guaranteeing the prevention of wastewater from backing up into your bathroom. This added layer of safety and hygiene makes upflush toilets ideal for basement installations.
When installing an upflush toilet, it is essential to ensure the pump system is connected to an electrical outlet dedicated to the toilet. This ensures reliable operation and avoids overloading the electrical circuit.
In conclusion, an upflush toilet is an excellent choice for basement bathrooms due to its flexibility, cost-effectiveness, and minimal disruption to existing plumbing. Understanding how an upflush toilet works gives you the confidence to choose this convenient and innovative solution for a hassle-free basement bathroom installation.
Gathering The Necessary Tools And Materials
Before you begin the installation process for an upflush toilet in your basement, it is essential to gather the necessary tools and materials. This step will ensure a smooth and efficient installation, saving you time and frustration. Here are the key tools and materials you will need:
Essential Tools for the Installation
To successfully install an upflush toilet in your basement, make sure you have the following tools:
- Adjustable wrench: This tool will come in handy for tightening and loosening nuts and bolts.
- Hammer: You’ll need a hammer to help with removing any existing plumbing fixtures or to adjust pipes and connections.
- Hacksaw: Use a hacksaw to cut through pipes or remove any unwanted parts during the installation.
- Screwdriver set: Ensure you have a variety of screwdrivers, both flathead and Phillips, as different screw types may be encountered.
- Tape measure: Accurate measurements are crucial during the installation process, so having a tape measure nearby will be helpful.
- Level: This tool will assist you in ensuring that the toilet and other components are level and straight.
- Plunger: Keep a plunger on hand in case you encounter any clogs or plumbing issues.
- Plumber’s putty: Plumber’s putty is necessary for creating watertight seals and preventing leaks.
- Caulk and caulk gun: A caulk gun and caulk are needed to seal gaps and prevent water from seeping between the toilet and the floor or wall.
Shopping for the Right Upflush Toilet System
Once you have gathered all the essential tools, the next step is to shop for the right upflush toilet system. Consider the following factors when choosing a system:
- Size and capacity: Determine the size of the toilet and its capacity to ensure it fits well in your basement space and meets your requirements.
- Noise level: Look for a system that operates quietly to minimize disturbances.
- Water usage: Consider the water consumption of the upflush toilet system and choose one that is eco-friendly and efficient.
- Brand reputation: Research different brands and their reputations to ensure you select a reliable and trusted upflush toilet system.
- Additional features: Some upflush toilets come with additional features such as built-in macerators, alarms, or battery backups. Assess your needs and preferences to choose a system with the right features for you.
Take your time to research and find the ideal upflush toilet system that fits your basement’s requirements. With the right tools and materials, as well as the proper upflush toilet system, you’ll be well-equipped to begin the installation process with confidence.
Preparing The Basement For The Installation
Preparing the basement for the installation of an upflush toilet is a crucial step in ensuring a successful plumbing project. Assessing the plumbing and drainage system, as well as identifying the ideal location for the upflush toilet, are two essential aspects that need careful consideration. By taking these necessary steps, you can ensure that your basement is ready for the installation process, and that the upflush toilet functions efficiently.
Assessing the Plumbing and Drainage System
Before installing an upflush toilet in your basement, it’s important to assess the existing plumbing and drainage system. This will help you determine if any modifications or upgrades are needed to accommodate the new toilet. Here are some key points to consider:
- Check the condition of the existing plumbing pipes and fixtures. Look for any signs of leaks, cracks, or corrosion.
- Ensure that the basement has proper drainage in place. Confirm that there is a functioning drain or sewer line available nearby.
- Consider the slope of the existing plumbing pipes. If they are not properly sloped, it may be necessary to reroute or adjust the pipes for efficient drainage.
Identifying the Ideal Location for the Upflush Toilet
Choosing the right location for your upflush toilet is crucial for its optimal performance and convenience. Here are some factors to keep in mind:
- Locate an area in your basement that is easily accessible and provides enough space for the toilet and necessary fixtures.
- Consider proximity to existing plumbing lines and electrical outlets. Locating the upflush toilet near these connections can simplify the installation process.
- Take into account any restrictions or regulations imposed by local building codes or homeowners’ association guidelines.
Installing The Upflush Toilet System
When it comes to installing an upflush toilet system in your basement, one of the primary steps is to assemble the upflush toilet components. This process involves gathering all the necessary parts and putting them together before you can start connecting the system to your existing plumbing. Let’s dive into the details of how to assemble the upflush toilet components:
Step 1: Gather the necessary components
The first step in assembling the upflush toilet system is to gather the necessary components. These include the upflush toilet unit, the upflush pump, the toilet tank, the toilet bowl, gaskets, bolts, and washers. Make sure you have all the required parts to avoid any delays during the assembly process.
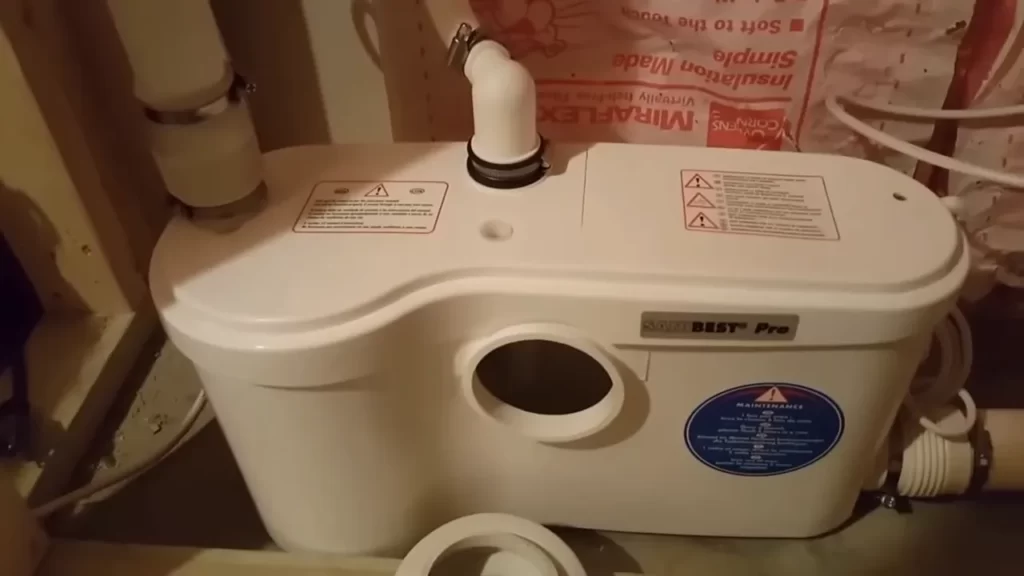
Step 2: Install the upflush pump
Start the assembly process by installing the upflush pump. This pump is responsible for macerating waste and pushing it through the discharge pipe. Follow the manufacturer’s instructions to securely attach the upflush pump to the designated location. Use provided screws or brackets to ensure the pump is firmly secured.
Step 3: Attach the toilet tank
Once the upflush pump is securely installed, it’s time to attach the toilet tank. Position the tank on top of the upflush pump, ensuring a tight connection. Use the provided bolts, washers, and gaskets to secure the tank in place. Tighten the bolts until they are snug, but be careful not to overtighten and damage the tank.
Step 4: Connect the toilet bowl
With the toilet tank in place, the next step is to connect the toilet bowl. Align the bowl with the mounting holes on the tank and gently lower it into position. Insert the provided bolts through the mounting holes and secure them with washers and nuts. Tighten the bolts evenly to ensure a stable connection between the bowl and the tank.
Step 1: Locate the existing plumbing connection
Before connecting the upflush toilet to the existing plumbing system, you need to locate the existing plumbing connection in your basement. This is typically an exposed drainpipe or a sewer line. Ensure that the connection point is accessible and in close proximity to the upflush toilet system.
Step 2: Install the rubber gasket
With the existing plumbing connection identified, it’s time to install the rubber gasket. This gasket serves as a watertight seal between the upflush toilet system and the existing plumbing. Slide the rubber gasket onto the discharge pipe of the upflush pump, ensuring a snug fit.
Step 3: Connect the discharge pipe
After installing the rubber gasket, connect the discharge pipe of the upflush pump to the existing plumbing. Insert the discharge pipe into the exposed drainpipe or sewer line, making sure it fits securely. Use hose clamps or other provided connectors to ensure a tight connection.
Step 4: Secure the connections
Finally, secure all the connections you’ve made between the upflush toilet system and the existing plumbing. Double-check that all connections are tightened properly to prevent any leaks. This will help ensure the efficient operation of your upflush toilet system.
Securing the upflush pump and toilet is crucial to prevent any shifting or movement that could lead to leaks or malfunctions. Follow these steps to ensure a secure installation:
Step 1: Check for stability
Once all connections are made, check the stability of the upflush pump and toilet. Make sure both are level and secure on their respective mounts. This will prevent any unnecessary strain on the connections and maintain the integrity of the system.
Step 2: Use brackets or straps
If necessary, use brackets or straps to further secure the upflush pump and toilet. These additional supports will provide extra stability and minimize the risk of movement or wobbling. Follow the manufacturer’s instructions to properly install and tighten brackets or straps.
Step 3: Test for stability
After securing the upflush pump and toilet, give them a gentle shake to test their stability. If you notice any movement or instability, readjust and tighten the connections as needed. It’s important to ensure everything is securely in place to avoid future issues.
By following these steps, you can successfully install an upflush toilet system in your basement, providing a convenient and efficient plumbing solution. Remember to always refer to the manufacturer’s instructions for the specific components you’re working with, as installation details may vary slightly. With a properly assembled and connected upflush toilet system, you can enjoy a functional bathroom in your basement without the hassle of major plumbing renovations.
Testing And Troubleshooting
Once you have successfully installed your upflush toilet in the basement, it’s essential to conduct a series of tests and troubleshoot any potential issues that may arise. This will ensure that your new system is functioning effectively and efficiently. In this section, we will guide you through two crucial steps of testing and troubleshooting: conducting a test flush and water flow check, and addressing common installation issues.
Conducting a Test Flush and Water Flow Check
Before you can confidently rely on your upflush toilet system, it’s crucial to conduct a test flush and water flow check. This will help you identify any potential problems early on and make necessary adjustments if needed.
To conduct a test flush, follow these steps:
- Ensure that the water supply to the upflush toilet is turned on.
- Flush the toilet and observe the water flow. It should be strong and consistent.
- Wait for the toilet tank to fill up and observe that it stops filling when it reaches the appropriate level.
- If the flush is weak or the water flow is inadequate, there may be an issue with the water supply or the upflush pump. Check for any clogs or restrictions and address them accordingly. If necessary, consult the manufacturer’s troubleshooting guide or seek professional assistance.
Once you have conducted a test flush, it’s important to also perform a water flow check. This will ensure that water is being discharged properly and efficiently. To conduct a water flow check:
- Fill a bucket with water.
- Pour the water into the toilet bowl at a consistent rate.
- Observe how effectively the upflush pump evacuates the water from the bowl.
- If the water flow is slow or drain clogs occur, there may be an issue with the pump or the drain line. Inspect the drain line for any obstructions or damage and clear them if necessary. If the issue persists, consult the manufacturer’s troubleshooting guide or seek professional assistance.
Addressing Common Installation Issues
While the installation of an upflush toilet in your basement can provide numerous benefits, it’s not uncommon to encounter certain issues during the process. Here are some common installation issues you may come across and how to address them:
| Common Issue | Solution |
|---|---|
| Leakage around the toilet base | Ensure that the wax ring is properly installed and that the toilet base is tightly secured to the floor. If leakage persists, consider replacing the wax ring or consult a professional plumber. |
| Inadequate flushing power | Check the water supply and adjust the water level in the tank if necessary. Additionally, inspect the jet holes and toilet bowl for any mineral deposits or obstructions that may affect flushing power. Clean or unclog them as needed. |
| Frequent clogging | Make sure that only toilet paper and human waste are being flushed. Avoid flushing items that can easily cause clogs, such as paper towels, sanitary products, or excessive amounts of toilet paper. |
By troubleshooting these common installation issues, you can ensure that your upflush toilet system operates smoothly.
Now that you have successfully tested your upflush toilet and addressed any potential issues, you can enjoy the convenience and functionality it brings to your basement space. In the next section, we will provide some useful maintenance tips to keep your upflush toilet in optimal condition.
Finishing Touches And Maintenance
Proper insulation and soundproofing for the basement area
Regular maintenance tips for the upflush toilet system
Proper Insulation and Soundproofing for the Basement Area
Proper insulation and soundproofing are essential for creating a comfortable and peaceful environment in your basement. These measures not only help to control temperature and noise but also prevent moisture buildup and mold growth. Here are a few tips to ensure your basement is well-insulated and soundproofed:
- Insulate the Walls: Install insulation board or batt insulation in the walls to prevent heat loss and noise transmission. This will help maintain a consistent temperature and reduce the impact of sound on the upper floors.
- Use Acoustic Sealant: Seal any gaps or cracks with acoustic sealant to prevent air leakage and further sound transmission.
- Add Carpet or Rugs: Place carpets or rugs on the floor to absorb sound and minimize noise transfer between floors.
- Install Soundproofing Panels: Consider installing soundproofing panels on the walls or ceiling to further reduce noise transmission.
- Use Heavy Curtains: Hang heavy curtains over windows to block outside noise and provide additional insulation.
Regular Maintenance Tips for the Upflush Toilet System
To ensure the optimal performance and longevity of your upflush toilet system, regular maintenance is crucial. Here are some tips to keep your system running smoothly:
- Inspect and Clean the Pump: Periodically inspect the pump for any debris or clogs and clean it accordingly. This will help prevent malfunctions and maintain the efficiency of the system.
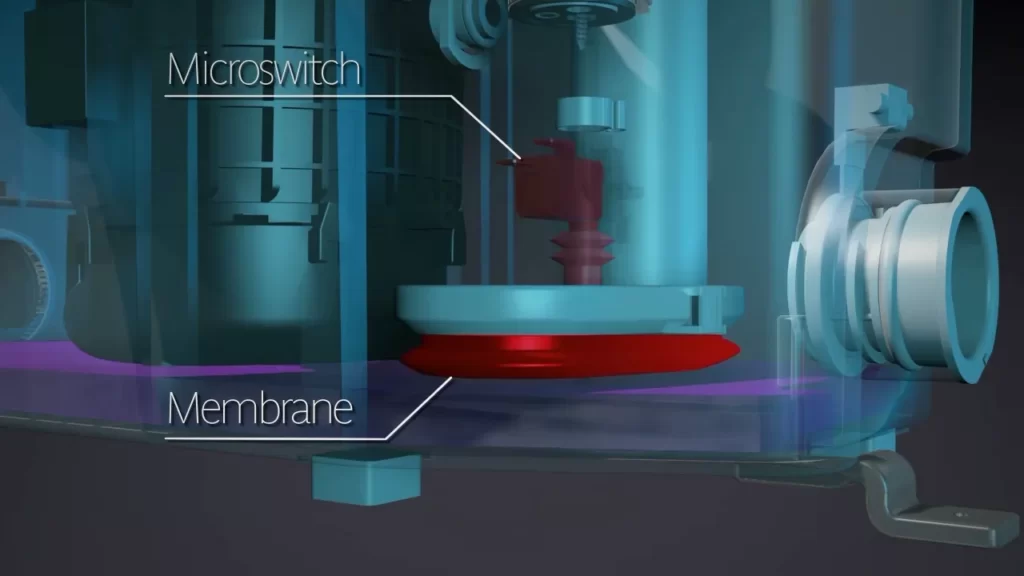
- Check the Float Switch: Make sure the float switch is functioning properly by testing it regularly. Adjust or replace it if necessary to avoid any flooding incidents.
- Monitor Water Pressure: Keep an eye on the water pressure and make sure it remains within the recommended range. High or low water pressure can affect the performance of the upflush toilet system.
- Inspect Plumbing Connections: Regularly inspect the plumbing connections to ensure there are no leaks or loose fittings. Tighten or repair as needed to prevent any water damage.
- Use Appropriate Cleaning Products: When cleaning the toilet and system components, make sure to use only compatible cleaning products recommended by the manufacturer. Harsh chemicals can damage the system and void the warranty.
- Flush Regularly: To avoid any blockages or buildup, flush the toilet regularly, even if it’s not in constant use. This will help keep the system functioning efficiently.
By following these simple steps, you can ensure that your upflush toilet system in the basement operates smoothly and remains in optimal condition for years to come.
Frequently Asked Questions
Are Upflush Toilets Worth It?
Yes, upflush toilets are worth it. They are a cost-effective and convenient solution for adding a toilet in areas without traditional plumbing. Upflush toilets use a macerating pump to move waste upward, making installation easier and more flexible. They are space-saving and require less construction work compared to traditional toilets.
How Much Does An Upflush System Cost?
An upflush system can range in cost, depending on factors like brand, features, and installation requirements. On average, you can expect to spend anywhere from $500 to $3,000 for a quality upflush system.
Do You Need To Vent An Upflush Toilet?
No, upflush toilets do not require venting. Unlike traditional toilets, upflush toilets use a macerator pump to push waste uphill, allowing for more flexibility in installation. The pump eliminates the need for a separate venting system, making it a convenient option for various spaces and locations.
Can You Hook A Shower To An Upflush Toilet?
Yes, you can connect a shower to an upflush toilet. The upflush toilet system allows for easy installation of additional fixtures like showers.
Conclusion
Installing an upflush toilet in your basement can provide you with a convenient and efficient plumbing solution. By following the step-by-step guide outlined in this blog post, you can easily overcome the challenges of basement plumbing and enjoy the benefits of having a functional bathroom in your lower level.
So, don’t let the lack of traditional plumbing prevent you from utilizing your basement space to its fullest potential. Install an upflush toilet and enjoy the convenience it brings.