
Installing a TV wall mount on brick can be done by first drilling pilot holes using a masonry bit, then attaching the mount using concrete screws. Are you planning to mount your TV on a brick wall?
As TVs are becoming sleeker and thinner, more and more people are opting to mount them on their walls for a modern and space-saving look. However, mounting a TV on brick requires a slightly different approach compared to drywall or wooden surfaces.
We will guide you on how to install a TV wall mount on brick, making sure your TV is securely attached to the wall while enhancing the aesthetics of your living space. Keep reading to learn the step-by-step process and the tools you’ll need to get the job done efficiently.
Factors To Consider When Selecting A Tv Wall Mount
Installing a TV wall mount on brick can be a daunting task, but with the right tools and a little know-how, it can be accomplished with ease. The first step in the process is selecting the right TV wall mount for your needs. There are several factors to consider when making your selection, including TV size and weight compatibility, wall material and strength, VESA mounting pattern, and swivel, tilt, and extension options.
TV size and weight compatibility
When selecting a TV wall mount for your brick wall, it is important to ensure that it is compatible with the size and weight of your television. A wall mount that is too small or too weak may not be able to support the weight of your TV, leading to a potential disaster. On the other hand, a wall mount that is too large or strong for your TV may be unnecessary and more expensive than needed. It is crucial to check the specifications of both your TV and the wall mount to ensure they are compatible.
Wall material and strength
The strength and material of your brick wall are important factors to consider when selecting a TV wall mount. Brick walls are generally sturdy and can support heavy loads. However, it is still important to assess the strength of your wall to determine whether additional reinforcement or special mounting hardware is needed. Make sure to choose a wall mount that is designed for use with brick walls and can securely attach to the surface.
VESA mounting pattern
Another important consideration is the VESA mounting pattern of your TV. VESA, which stands for Video Electronics Standards Association, is a standard used to ensure compatibility between TVs and wall mounts. The VESA mounting pattern refers to the arrangement of screw holes on the back of your TV. It is essential to choose a wall mount that matches the VESA mounting pattern of your TV to ensure a proper fit. Most wall mounts come with a range of VESA mounting options to accommodate various TV sizes.
Swivel, tilt, and extension options
Lastly, consider the swivel, tilt, and extension options offered by the TV wall mount. These features can greatly enhance your viewing experience by allowing you to adjust the angle and position of your TV. A mount with swivel capabilities enables you to angle the TV for optimal viewing from different areas of the room. Tilt options provide flexibility in adjusting the screen angle to reduce glare. Extension options allow you to extend the TV away from the wall, providing better access to the back of the TV for cable connections and adjustments.
By carefully considering these factors when selecting a TV wall mount, you can ensure a secure and functional installation on your brick wall. Take the time to assess your TV specifications, wall strength, VESA mounting pattern, and desired adjustability features. This will help you find the perfect wall mount that meets your needs and enhances your TV viewing experience.
Necessary Tools For The Installation Process
When it comes to installing a TV wall mount on brick, having the right tools is essential for a successful and secure installation. Whether you’re a DIY enthusiast or a professional, these tools will help you complete the installation process with ease and precision.
Here are the necessary tools you’ll need:
1. Drill with masonry bit
A drill with a masonry bit is a must-have tool when installing a TV wall mount on brick. The masonry bit is specifically designed to drill through tough materials like brick and concrete. It ensures that the holes for the screws are precisely placed and can hold the weight of the TV securely.
2. Screwdriver
A screwdriver will be required to attach the TV wall mount to the drilled holes on the brick. It is crucial to use the right type and size of screws that are compatible with both the wall mount and the brick to ensure a safe and secure installation.
3. Level
A level is necessary to ensure that the TV wall mount is installed perfectly straight. This tool will help you avoid any tilting or unevenness, resulting in a professional and aesthetically pleasing installation.
4. Stud finder
A stud finder is essential to locate the studs behind the brick wall. Finding the studs will provide extra support and stability to the TV wall mount, making sure it can handle the weight of the TV without any issues.
5. Tape measure
A tape measure is useful for taking accurate measurements of the wall and the TV wall mount. It allows you to determine the perfect height and positioning for the TV, ensuring optimal viewing angles and comfort.
6. Pencil or marker
Using a pencil or marker will help you mark the drilling points on the brick accurately. This step is crucial to ensure that the TV wall mount is securely attached to the wall without any miscalculations.
With these necessary tools at your disposal, you can confidently proceed with the installation of a TV wall mount on brick. Remember to always prioritize safety and follow the manufacturer’s guidelines for a successful installation.
Preparing The Wall And Measuring For Installation
Installing a TV wall mount on a brick wall can be a daunting task, but with the right preparation and careful measurement, you can ensure a secure and level installation. Before you start, it’s important to locate the wall studs, determine the ideal TV height and viewing angle, and mark the drilling points accurately.
Locating the Wall Studs
Before you begin the installation process, it’s crucial to locate the wall studs. These vertical supports within the wall provide the necessary strength to hold the TV securely in place. The easiest way to locate the studs on a brick wall is by using a stud finder. Simply place the stud finder against the wall and move it in a horizontal direction. The stud finder will indicate when it detects a stud, allowing you to mark the location accurately.
Determining the Ideal TV Height and Viewing Angle
The ideal TV height and viewing angle can greatly enhance your viewing experience. To determine the ideal height, start by measuring the height of your seated eye level when you are sitting in the location where you will be watching television. As a general rule, the center of the TV screen should be positioned at eye level. Taking into account the size of your TV and any furniture, mark the desired height on the wall for installation.
Next, determine the ideal viewing angle. This can vary depending on personal preference, but a common recommendation is to position the TV at a slight downward angle, around 15 degrees. This ensures a comfortable viewing experience without straining your neck. With these measurements in mind, mark the desired location on the wall to guide the installation process.
Marking the Drilling Points Accurately
Once you have located the wall studs and determined the ideal TV height and viewing angle, it’s time to mark the drilling points accurately. Using a pencil, mark the center of each stud on the wall. This will serve as a guide for placement when attaching the TV wall mount.
Next, mark the drilling points for the mount itself. The TV wall mount usually comes with a template that you can tape to the wall. Align the template with the previously marked stud locations and use a level to ensure it is straight. Once the template is in place, mark the position of each drilling point on the wall.
Now that you have accurately marked the drilling points, you are ready to proceed with the installation process and securely mount your TV on the brick wall. Keep in mind that it’s always recommended to follow the instructions provided by the TV wall mount manufacturer for the best results.
Drilling And Placing The Wall Mount Bracket
Mounting your TV on a brick wall not only saves valuable space but also adds a modern and sleek look to your living room. However, drilling and placing the wall mount bracket on brick can be a little tricky if you don’t have the right tools and techniques. In this section, we will guide you through the process of drilling and placing the wall mount bracket securely on your brick wall, ensuring a sturdy and safe installation.
Drilling pilot holes in the marked locations
Before you start drilling, make sure to mark the exact spots where you want to place your TV wall mount bracket. Use a pencil or a marker to mark the top and bottom holes of the bracket. This will serve as a guide during the drilling process.
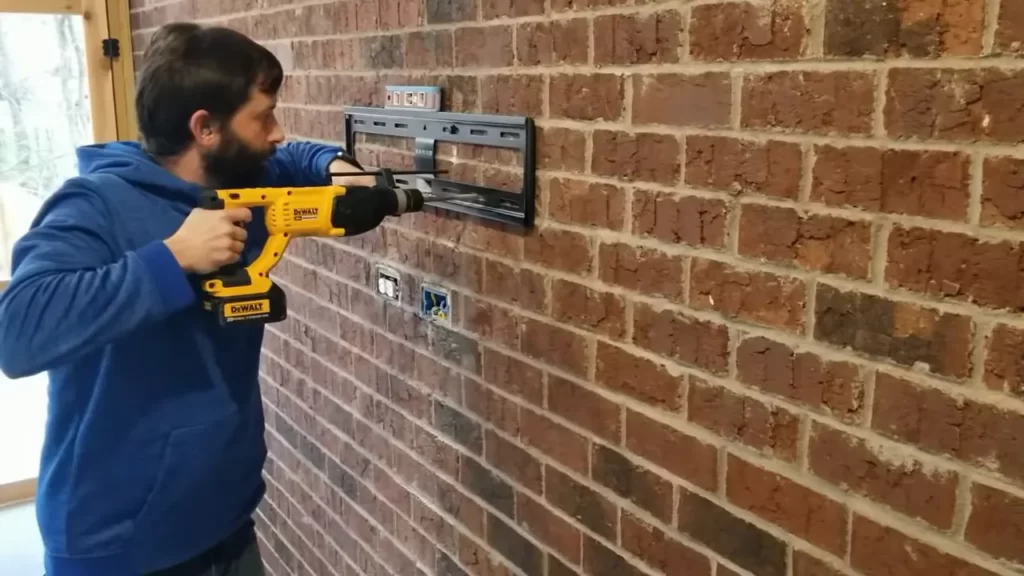
Once you have marked the locations, it is time to grab your power drill and a masonry drill bit suitable for drilling into brick. Start by inserting the drill bit into the chuck of your drill and tightening it securely. It is important to use a drill with a hammer function to effectively drill into the brick.
Next, position the drill bit on one of the marked locations and apply steady pressure as you begin drilling. Start with a lower speed to create a pilot hole, then progressively increase the speed to avoid damaging the brick. Make sure to keep the drill straight and perpendicular to the wall as you drill. Repeat this process for all the marked locations.
Inserting wall anchors
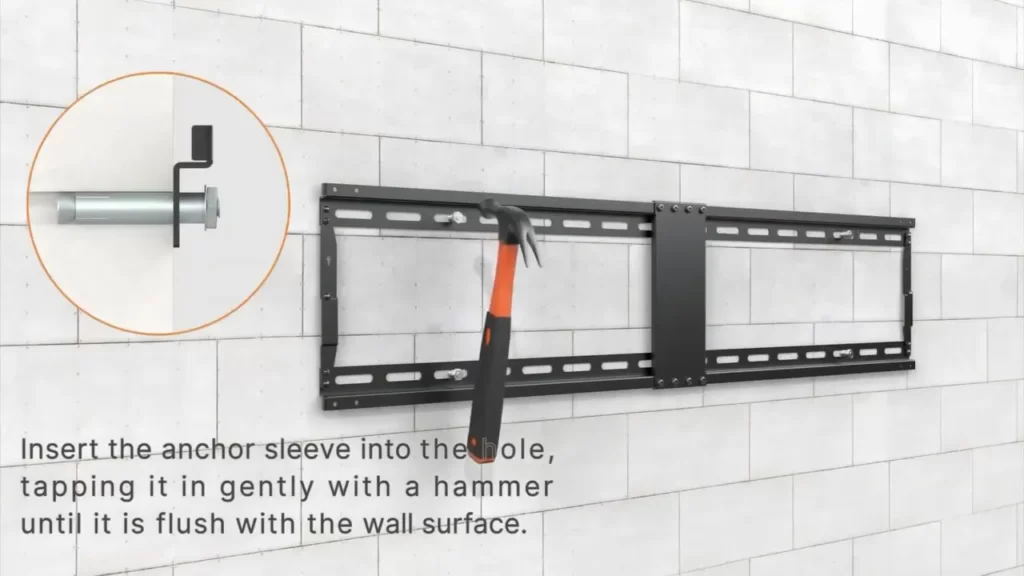
Now that you have drilled pilot holes into the brick, it is time to insert the wall anchors. Wall anchors provide extra support and stability to the wall mount bracket.
Take the wall anchors that came with your TV wall mount kit and align them with the pilot holes. Gently tap the wall anchors into the holes using a hammer until they are flush with the surface of the brick. This will ensure a tight and secure fit.
Securing the wall mount bracket to the wall
With the wall anchors in place, it is time to attach the wall mount bracket to the wall. Align the bracket with the wall anchors and insert the screws provided in the kit through the bracket holes and into the wall anchors. Use a screwdriver or a drill with a screwdriver bit to tighten the screws until the bracket is securely attached to the wall.
Make sure to check the level of the bracket using a spirit level to ensure it is perfectly straight. Adjust as needed before fully tightening the screws.
Once the bracket is securely attached to the wall, you can proceed with the remaining steps of mounting your TV on the bracket. Follow the instructions provided with your TV wall mount kit to complete the installation process.
By following these steps and using the right tools, you can successfully drill and place a TV wall mount bracket on a brick wall. Enjoy your favorite shows and movies with a professionally mounted TV that adds both style and functionality to your living space.
Attaching The Tv To The Wall Mount Bracket
Once you have securely mounted the wall bracket on your brick wall, it’s time to attach the TV to the mount. This step requires careful alignment of the TV’s VESA mounting holes with the bracket and using the appropriate screws to ensure the TV is securely held in place.
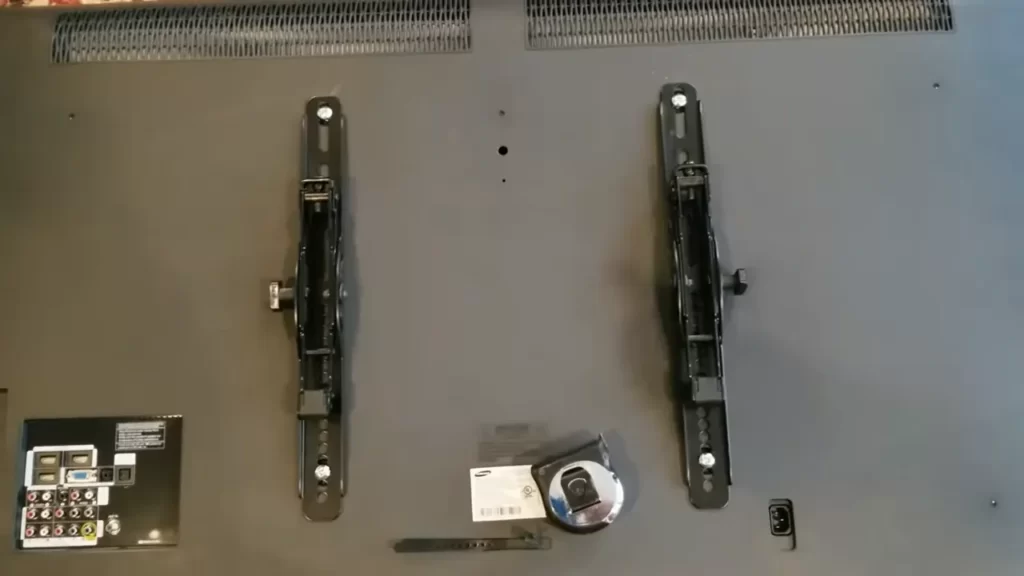
Aligning the TV’s VESA mounting holes with the bracket
The first step in attaching your TV to the wall mount bracket is aligning the VESA mounting holes. These holes are located on the back of your TV and correspond to the holes on the wall mount bracket. The VESA standard ensures compatibility between various TV models and wall mounts.
To align the VESA mounting holes:
- Place the TV face down on a soft surface, such as a blanket or towel, to avoid scratching the screen.
- Locate the VESA mounting holes on the back of the TV. These holes are usually arranged in a square or rectangular pattern.
- Hold the TV up to the wall mount bracket, making sure the bracket’s holes align with the TV’s VESA mounting holes.
- Once the holes are aligned, carefully lower the TV onto the bracket.
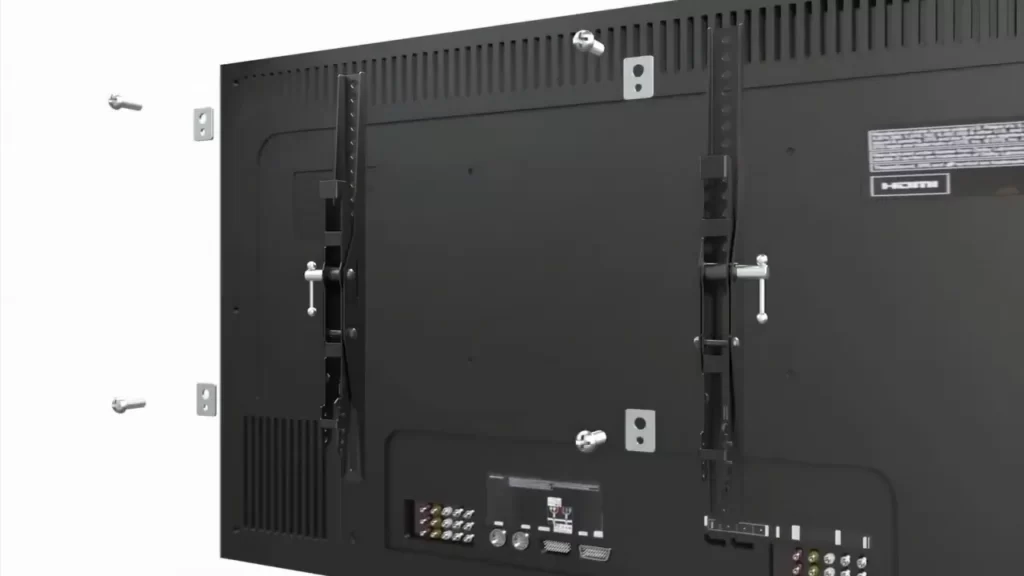
Using the appropriate screws to secure the TV in place
After aligning the VESA mounting holes, you need to use the appropriate screws to secure the TV in place. The type and size of screws required will vary depending on your specific TV and wall mount bracket, so be sure to consult the manufacturer’s instructions or refer to the hardware provided with your bracket.
To attach the TV to the wall mount bracket:
- Insert the screws through the VESA mounting holes on the TV and into the corresponding holes on the bracket.
- Tighten the screws using a suitable screwdriver or wrench, ensuring they are securely fastened.
- Double-check that the TV is securely attached to the bracket by gently shaking it. If there is any noticeable movement, recheck the screws and tighten them if necessary.
Once you have successfully attached your TV to the wall mount bracket, make sure to carefully follow the remaining installation steps, such as concealing cables and adjusting the tilt and swivel settings, to fully optimize your viewing experience.
Making Necessary Adjustments And Finalizing The Installation
Checking the levelness of the TV
Before finalizing the installation of your TV wall mount on brick, it’s important to ensure that your TV is level. This will not only enhance your viewing experience but also provide a visually pleasing look to your setup. To check the levelness of the TV, follow these steps:
1. Use a level tool: Place a level tool on top of the TV screen to determine if it is perfectly level. Adjust the position of the TV mount if necessary, making sure to tighten any screws or bolts securely.
2. Check from multiple angles: To be absolutely certain, step back and check the TV from different angles. This will allow you to spot any subtle deviations in levelness that may have been missed initially.
3. Use a measuring tape: Measure the distance between each side of the TV and the wall to ensure that it is evenly spaced. This will further confirm that your TV is mounted correctly and centered on the wall.
Testing swivel, tilt, and extension functionality
After securing the TV wall mount on brick and confirming its levelness, it’s time to test the swivel, tilt, and extension functionality of your TV mount. This step is crucial as it ensures that you will be able to adjust the TV to your desired viewing angle. Follow these steps to test the functionality:
1. Swivel: Gently hold the sides of the TV and try swiveling it from side to side. The TV should smoothly move without any resistance or sticking. Make sure it swivels to the desired angle.
2. Tilt: Adjust the tilt angle by carefully tilting the TV up and down. Ensure that the TV stays in place at the desired angle without any slippage or drooping.
3. Extension: If your TV mount allows for extension, fully extend the arm and check if it operates smoothly. Also, test if it can be easily retracted back to its original position without any difficulty.
Concealing cables and wires for a clean look
To achieve a clean and organized look for your TV wall mount on brick, it’s essential to conceal the cables and wires that connect your TV to other devices. Follow these steps to ensure a neat and tidy appearance:
1. Use cable management solutions: Invest in cable management solutions such as cable raceways, cord covers, or adhesive cable clips. These products help to organize and hide the cables, keeping them out of sight.
2. Measure and plan: Before attaching the cable management solutions, carefully measure the length of the cables and plan the best route for them. This will help you determine the most efficient way to conceal them.
3. Secure the cables: Attach the cable management solutions to the wall or TV mount and route the cables through them. Secure the cables in place using the provided adhesive or clips.
4. Test for functionality: After hiding the cables, check the functionality of the TV and its connected devices to ensure that they are working properly. Make sure all cables are securely connected and don’t interfere with the movement of the TV.
By following these steps, you can make necessary adjustments, test the functionality of your TV wall mount, and achieve a clean look by concealing cables and wires. This will result in a professional and polished installation of your TV wall mount on brick.
Ensuring Safety And Stability
When it comes to mounting a TV on a brick wall, ensuring safety and stability is of utmost importance. A securely mounted TV not only enhances the viewing experience but also prevents any unforeseen accidents.
Double-checking the stability of the wall mount and TV attachment
Before you start drilling holes into your brick wall, it’s crucial to double-check the stability of both the wall mount and the TV attachment. Here’s what you need to do:
- Inspect the wall mount: Carefully examine the wall mount to ensure that it is sturdy and in good condition. Check for any signs of wear and tear, such as loose screws or bent brackets. If you notice any issues, it’s best to replace the wall mount before proceeding.
- Check the TV attachment: Take a close look at the TV attachment mechanism, whether it’s VESA mounts or brackets. Ensure that all screws are tightened securely and that the TV is well-supported. If there are any loose connections, tighten them before moving forward.
Using additional support if required (e.g., wall straps)
In some cases, additional support may be necessary to ensure the stability of your TV wall mount on a brick wall. Here are some options to consider:
- Wall straps: If you have concerns about the weight or size of your TV, it’s wise to use wall straps for added security. These straps can be attached between the TV and the wall, providing extra stability and minimizing the risk of accidental tipping.
- Professional installation: If you’re unsure about the stability of the wall mount or TV attachment, or if you simply want peace of mind, hiring a professional to install the TV wall mount is a great option. They have the expertise and knowledge to ensure a secure installation.
By double-checking the stability of the wall mount and TV attachment and using additional support if required, you can ensure that your TV wall mount on a brick wall is safe and secure. Prioritizing safety not only protects your investment but also provides a worry-free viewing experience.
Enhancing The Aesthetics Of The Installation
When it comes to mounting a TV on a brick wall, there is more to consider than just the functionality. Enhancing the aesthetics of the installation can help create a seamless and visually appealing look in your space. By incorporating cable management solutions, wall art or decorative coverings, you can elevate the overall design and make your TV wall mount the centerpiece of the room.
Using cable management solutions
One of the key factors in achieving a clean and organized look is effectively managing the cables that connect your TV to various devices. With the advancement of technology, many TVs and wall mounts come with built-in cable management features. However, if your TV wall mount doesn’t have this feature, don’t worry! There are plenty of cable management solutions available in the market that can help.
Here are a few popular options:
- Cable raceways: These are plastic or metal channels that can be easily mounted on the wall, hiding the cables from sight. They come in various sizes and colors, allowing you to choose the one that matches your wall and TV.
- Cable sleeves: These are flexible sleeves that can hold multiple cables together, providing a neat and organized appearance. They are easy to install and can be cut to the desired length.
- Cable clips or adhesive hooks: These small clips or hooks can be attached to the wall to hold the cables securely in place. They are perfect for keeping the cables tidy and preventing them from dangling.
Incorporating wall art or decorative coverings
Another way to enhance the aesthetics of your TV wall mount is by incorporating wall art or decorative coverings. This not only adds a visual element to the installation but also helps camouflage the TV when it’s not in use.
Here are a few ideas to consider:
| Wall art | Decorative coverings |
|---|---|
|
|
By carefully selecting the right cable management solution and incorporating wall art or decorative coverings, you can ensure that your TV wall mount not only provides a great viewing experience but also adds to the overall aesthetics of your space.
Troubleshooting Common Challenges During The Installation Process
Mounting a TV on a brick wall can be a great way to save space and create a sleek and modern look in your living room. However, the installation process can sometimes present unexpected challenges. In this section, we will address some of the most common obstacles you may encounter and offer solutions to help ensure a successful installation.
Dealing with Uneven or Damaged Brick Surfaces
One of the main issues you might encounter when installing a TV wall mount on brick is an uneven or damaged surface. This can make it difficult to achieve a secure and level installation. Here are some steps you can take to address this challenge:
- Inspect the brick surface for any visible damage or irregularities. Look for cracks, chips, or rough areas that could affect the mount’s adhesion.
- If you notice any severe damage, such as large cracks or loose bricks, it is advisable to consult a professional to assess the situation and make any necessary repairs before proceeding with the installation.
- If the surface is relatively smooth but uneven, you can use a masonry drill bit to create pilot holes in the wall. This will provide a more secure anchor for the mount.
- Consider using wall anchors or brick clips to ensure a stable installation. These devices can provide additional support and help distribute the weight of the TV more evenly.
- Lastly, if the surface is extremely uneven or damaged, you may want to explore alternative mounting options, such as a freestanding TV stand or an adjustable wall mount that can accommodate the irregularities.
Addressing Issues with Stud Placement or Availability
Another common challenge during TV wall mount installation is dealing with stud placement or availability on the brick wall. Studs are essential for securely anchoring the mount and ensuring it can support the weight of your TV. Here are some strategies to overcome this challenge:
- Start by using a stud finder to locate any wooden or metal studs behind the brick surface. While finding studs on brick walls can be challenging, it’s worth the effort for a more secure installation.
- If you cannot find studs in your desired mounting location, you may need to adjust the position slightly or consider using alternative mounting methods, such as toggle bolts or masonry anchors.
- Alternatively, you can use a ledger board, which is a wooden plank securely attached to the studs. This provides a level and stud-friendly surface for mounting your TV wall bracket.
- Remember to always use the appropriate hardware for your specific installation, considering the weight and size of your TV. Consult the manufacturer’s guidelines or seek professional advice if needed.
By being proactive and prepared for these common challenges, you can ensure a successful TV wall mount installation on your brick wall. With a stable and secure mounting solution in place, you’ll be able to enjoy your favorite shows and movies in style and comfort.
Cleaning And Dusting The Wall Mount Regularly
Keeping your TV wall mount clean and free from dust and debris is essential for ensuring optimal performance and longevity. Regular cleaning not only improves the overall appearance but also prevents potential damage caused by accumulation of dirt and grime. In this section, we will discuss the best practices for cleaning and dusting your TV wall mount on brick, so you can enjoy a crystal-clear TV viewing experience.
Using a soft cloth to remove dust and debris
When it comes to cleaning your TV wall mount, using a soft cloth is key. A microfiber or lint-free cloth is ideal for gently wiping away dust and debris without scratching the surface. Start by removing your TV from the wall mount to gain better access to the mount itself.
Once the TV is removed, take your soft cloth and lightly dust the entire surface of the wall mount. Be sure to pay special attention to any crevices or hard-to-reach areas where dust can easily accumulate. By regularly removing dust, you can prevent it from settling and potentially clogging important mechanisms within the mount.
Avoiding harsh cleaning agents that may damage the mount
Harsh cleaning agents, such as abrasive cleaners or solvents, should be avoided when cleaning your TV wall mount. These can damage the surface and finish of the mount, leading to potential corrosion or discoloration. Instead, opt for mild cleaning solutions or simply dampen your soft cloth with warm water.
If you encounter stubborn stains or spots on your wall mount, try using a mixture of gentle soap and warm water. Apply the solution to your cloth and gently scrub the affected area. Remember to always test the cleaning solution on a small, inconspicuous area of the mount to ensure it does not cause any damage or discoloration.
Once you have finished cleaning the wall mount, be sure to dry it thoroughly with a clean, dry cloth. This will prevent any water spots or residue from forming, ensuring a streak-free finish.
By following these simple cleaning and dusting practices, you can prolong the lifespan of your TV wall mount and keep it looking as good as new. Regular maintenance will not only enhance the visual appeal of your TV setup, but also help maintain optimal performance for an immersive viewing experience.
Periodic Inspection And Re-Securing
Properly installing a TV wall mount on brick ensures stability and safety for your television. However, over time, there is a possibility that the screws and bolts may become loose due to various factors like wall settling or vibrations. To maintain optimal performance and prevent any potential accidents, it is essential to periodically inspect and re-secure your TV wall mount. In this section, we will discuss two crucial steps: Checking the tightness of screws and bolts, and re-securing any loose components.
Checking the Tightness of Screws and Bolts
Regularly checking the tightness of screws and bolts is a simple yet effective way to ensure the stability of your TV wall mount. To perform this step, follow these easy steps:
- Using a screwdriver or wrench, go through each screw and bolt on the wall mount and ensure they are properly tightened.
- Check for any signs of looseness or wobbling. If you notice any, tighten the corresponding screws or bolts until everything feels secure.
- Pay extra attention to the screws and bolts connecting the TV bracket to the wall plate, as this is a critical area for stability.
- If you come across any damaged or stripped screws, replace them promptly to maintain the wall mount’s integrity.
By regularly checking the tightness of screws and bolts, you can catch any potential issues early on and prevent further complications.
Re-Securing Any Loose Components
In addition to checking the tightness of screws and bolts, it is important to re-secure any loose components that may affect the stability of your TV wall mount. Follow these steps to ensure all components are secure:
- Carefully examine the wall mount, paying attention to joints, brackets, and any moving parts.
- If you notice any loose components, use the appropriate tools to tighten them. This might include tightening screws or re-aligning brackets.
- Inspect the cables and make sure they are properly connected and tucked away for a clean and organized look.
- If you have an articulated or tilting wall mount, ensure that all moving parts are functioning smoothly and securely locked in place.
Regularly performing these inspections and re-securing any loose components will help maintain the stability and functionality of your TV wall mount, ensuring a worry-free viewing experience.
Safe Removal And Relocation Of The Tv Wall Mount
Once you have successfully installed a TV wall mount on your brick wall, there may come a time when you need to remove it or relocate it to a different position. While this may seem like a daunting task, following proper removal procedures is essential to prevent any damage to your wall or TV. In this section, we will cover the important steps you should take to ensure the safe removal and relocation of your TV wall mount.
Following Proper Removal Procedures to Prevent Damage
Before you start the removal process, it is crucial to gather all the necessary tools and equipment. This will ensure a smooth and hassle-free experience. Here is a list of items you will need:
| Tools and Equipment |
|---|
| Phillips screwdriver |
| Wrench or pliers |
| Level |
| Tape measure |
| Stud finder |
Once you have gathered all the necessary tools, it’s time to begin the removal process. Follow these steps:
- Start by removing the TV from the wall mount. Carefully disconnect any cables or wires connected to the TV, ensuring that no damage is caused in the process.
- Using a Phillips screwdriver, remove the screws that secure the TV brackets to the wall mount. Keep the screws safely aside.
- Next, detach the wall mount from the wall by unscrewing the anchor bolts. Take your time and ensure that all the bolts are properly removed, as leaving any behind could cause damage to your wall.
- Once the wall mount is detached, inspect the brick wall for any possible damage. Look out for any cracks or holes that may have been caused during the installation process. If you notice any damage, it is recommended to repair it before proceeding with the new installation.
Ensuring the New Installation Location Meets Necessary Requirements
Before relocating the TV wall mount, it is important to ensure that the new installation location meets the necessary requirements. This will ensure the safety and stability of your TV. Here are a few things to consider:
- Use a level to make sure that the new installation location is properly aligned. This will prevent any tilting or unevenness.
- Use a stud finder to locate the studs in your wall. Mounting your TV wall mount on studs will provide the necessary support and stability.
- Measure the distance between the studs to ensure that the new wall mount will fit properly.
By following these steps, you can safely remove and relocate your TV wall mount without any damage to your wall or TV. Taking the time to ensure that the new installation location meets the necessary requirements will result in a secure and stable mounting for your TV.
Frequently Asked Questions
Can You Drill Into Brick Fireplace For Tv Mount?
Yes, it is possible to drill into a brick fireplace for TV mount. However, it is recommended to hire a professional for this task to ensure proper installation and to avoid any damage to the fireplace.
How Do You Install A Tv Wall Mount On Brick?
To install a TV wall mount on brick, start by drilling pilot holes with a masonry bit. Insert wall anchors into the holes and attach the mount using screws. Make sure to use a level to ensure the mount is straight and secure before mounting the TV.
Conclusion
Mounting a TV on a brick wall may seem challenging, but with the right tools and techniques, it can be done easily. By following the step-by-step instructions mentioned in this blog post, you can ensure a secure and professional installation.
Remember to take measurements accurately, choose the right wall mount, and use the appropriate anchors and screws. With proper planning and execution, you’ll have a stylish and space-saving TV setup in no time.