To install a toilet wax ring, remove the old wax ring, clean the flange and toilet base, then place the new wax ring on the flange. Installing a toilet wax ring is an essential step in ensuring a proper seal between the toilet and the waste pipe.
Over time, the wax ring can become worn or damaged, leading to leaks or odors. By following a few simple steps, you can easily replace the wax ring and restore the seal. In this guide, we will walk you through the process of installing a toilet wax ring from start to finish.
By the end, you will have the knowledge and confidence to tackle this project successfully and prevent any future issues with your toilet. Read on to learn more!
Understanding The Importance Of A Properly Installed Wax Ring
Having a leak-free bathroom is absolutely essential for maintaining a clean and comfortable space. There’s nothing worse than discovering a surprise puddle of water seeping out from under your toilet. The culprit behind these dreaded bathroom leaks is often a poorly installed wax ring. Understanding the role of a wax ring and the importance of its proper installation can save you from future plumbing headaches and costly repairs.
Why a leak-free bathroom is essential
A leak-free bathroom is not just about keeping your floors dry and preventing unsightly water stains. It goes beyond aesthetics and plays a crucial role in protecting your home’s structure from water damage. Persistent leaks can lead to rotting of the subfloor, weakening the structural integrity of your bathroom. Additionally, water seepage can create an ideal environment for mold and mildew growth, posing health risks to you and your family. Therefore, it is vital to maintain a leak-free bathroom by ensuring your toilet’s wax ring is properly installed.
The role of a wax ring in preventing leaks
The wax ring acts as a waterproof seal between the base of the toilet and the floor drain. Its purpose is to create a barrier that prevents any water or sewage from leaking out when you flush your toilet. A properly installed wax ring ensures a tight and secure connection, eliminating the risk of any unwelcome leaks. Without this essential seal, water can easily seep through the gap between the toilet base and the floor, leading to damage that can extend far beyond the bathroom.
When the wax ring is properly positioned and compressed, it forms a watertight seal that stops any waste or water from escaping. This not only protects your bathroom from damage but also helps maintain a clean and sanitary environment. By ensuring a tight seal, a properly installed wax ring prevents any foul odors and bacteria from entering your living space, keeping your bathroom fresh and hygienic.
Remember, a properly installed wax ring plays a vital role in preventing costly water damage and maintaining a leak-free bathroom. Investing the time and effort into correctly installing this small but crucial component will go a long way in ensuring the integrity of your bathroom and the comfort of your home.
Assessing Your Toilet And Identifying The Right Wax Ring
Before installing a wax ring on your toilet, it is important to assess your toilet and identify the right wax ring that will ensure a proper seal. This step is crucial in preventing leaks and potential damage to your bathroom floor. In this section, we will walk you through two key factors to consider: measuring the rough-in size and considering the toilet flange height.
Measuring the Rough-In Size
The rough-in size refers to the distance between the toilet flange bolts and the wall behind the toilet. It is essential to measure this distance accurately to ensure you choose the correct wax ring. Here’s how you can measure the rough-in size:
- Start by locating the center of the rear bolts on your toilet. These bolts secure the toilet to the floor.
- Measure the distance from the center of one bolt to the wall behind the toilet. This measurement will give you the rough-in size.
- Common rough-in sizes are 10, 12, and 14 inches, but it is always best to measure to guarantee accuracy.
Once you have determined the rough-in size, you can proceed to the next step of assessing your toilet for the correct wax ring.
Considering the Toilet Flange Height
The toilet flange height is the distance between the flange and the floor. This measurement is crucial as it determines the thickness of the wax ring you will need. Here are the steps to consider when assessing the toilet flange height:
- Remove the toilet’s tank lid and carefully set it aside.
- Inspect the toilet flange by removing the snap-on bolt caps and unscrewing the nuts holding the toilet in place.
- Measure the distance from the top of the flange to the floor. This measurement will determine the thickness of the wax ring you should choose.
- Common flange heights are 1/4 inch, 1/2 inch, and 3/4 inch, but it is important to measure for accuracy.
By considering the rough-in size and toilet flange height, you can be confident in choosing the right wax ring for your toilet installation. It is always recommended to double-check any measurements before purchasing a wax ring to ensure a proper fit. Properly assessing your toilet and selecting the correct wax ring will help prevent any future leaks and ensure your toilet functions effectively.
Essential Tools For Installing A Wax Ring
When it comes to installing a toilet wax ring, having the right tools is essential. The process may seem daunting at first, but with the proper tools and a little know-how, you can easily complete the installation. In this section, we will walk you through the essential tools needed to install a wax ring for your toilet.
Wrench
To start off, a wrench is an indispensable tool when it comes to installing a wax ring for your toilet. A wrench allows you to securely fasten the bolts that hold the toilet in place, ensuring a tight seal. In addition, a wrench can be used to remove the old wax ring, if necessary. When choosing a wrench, it’s important to select one that is the appropriate size for the bolts on your toilet.
Screwdriver
Another tool that you’ll need for the installation is a screwdriver. This tool is essential for removing the screws that hold the toilet in place. It’s important to choose a screwdriver with a comfortable handle and a sturdy, well-fitting tip to ensure ease of use. By using a screwdriver, you can easily detach the toilet from the floor and gain access to the old wax ring.
Putty Knife
Lastly, a putty knife is an essential tool for installing a wax ring. This tool allows you to effectively scrape away any residue left behind by the previous wax ring. A putty knife can also be used to smooth out any excess wax, ensuring a clean and secure seal. When selecting a putty knife, look for one with a sharp, flexible blade that can easily maneuver in tight spaces.
With the right tools in hand, installing a wax ring for your toilet becomes an easier task. By having a wrench, screwdriver, and putty knife at your disposal, you can efficiently remove the old wax ring and install a new one, ensuring a proper seal and preventing any leaking or damage. So, before you dive into the installation process, make sure to gather these essential tools for a successful wax ring installation.
Materials Needed For A Leak-Free Installation
Properly installing a toilet wax ring is essential to prevent leaks and maintain a secure connection between the toilet and the floor. To ensure a successful installation, you will need a few key materials. Let’s take a closer look at each of these:
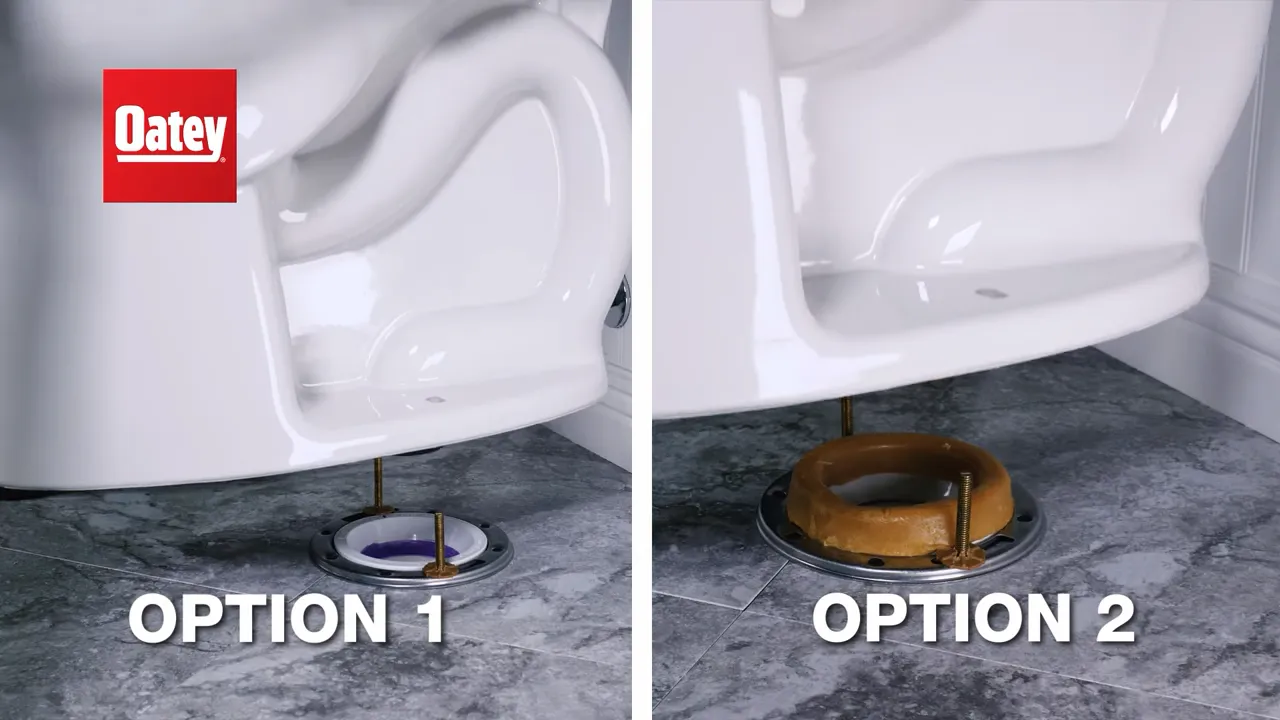
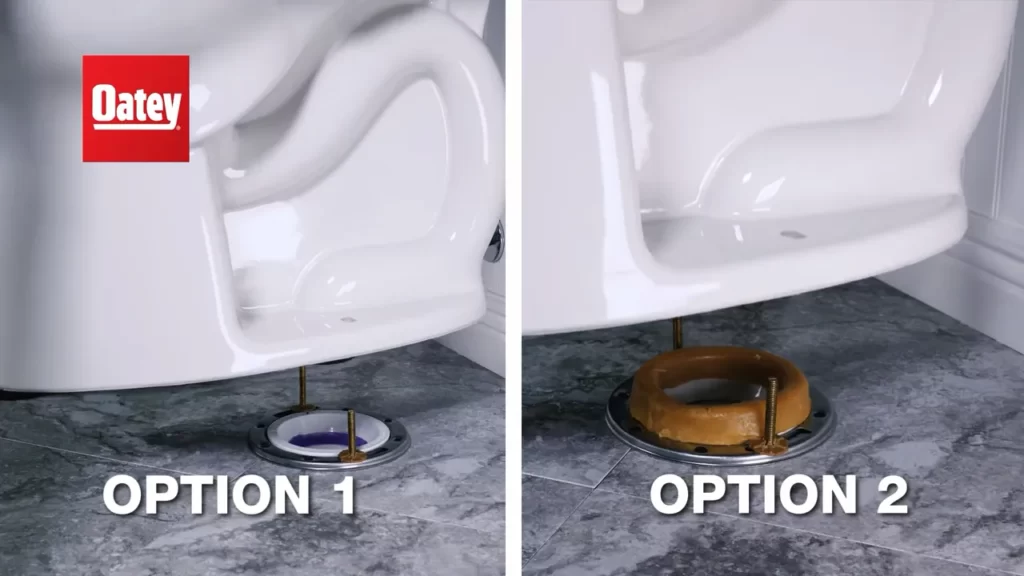
Wax Ring
The wax ring is the primary component required for a leak-free installation. This ring plays a crucial role in creating a watertight seal between the toilet bowl and the waste pipe. It is made of moldable wax that compresses when the toilet is tightened down, preventing any leakage. It is important to choose a high-quality wax ring that suits your specific toilet model. While most wax rings are universal, some toilets require special designs. Note that wax rings are single-use only and must be replaced every time the toilet is removed or replaced.
Bolts and Washers
Another vital aspect of a leak-free installation are the bolts and washers. These hardware components secure the toilet to the flange, anchoring it to the floor and creating a stable connection. Bolts are typically made of brass or stainless steel, as they are resistant to rust and corrosion. They have flat heads that sit flush against the toilet base, preventing any wobbling or movement. Washers, on the other hand, act as a barrier between the bolt head and the porcelain toilet, ensuring a secure and watertight fit. It is recommended to use new bolts and washers when installing a wax ring to guarantee a tight connection.
Toilet Bowl Wax Ring Gasket
The toilet bowl wax ring gasket is an additional seal that can be used for added protection against leaks. This gasket is placed between the toilet bowl and the wax ring, providing an extra layer of security. Made of high-quality rubber or foam, the gasket acts as a cushion and helps to ensure a watertight seal. It is particularly useful in cases where the toilet flange is in poor condition or slightly uneven, as it helps to bridge any gaps and prevent any potential leakage. It is important to choose a gasket that is compatible with your wax ring and toilet model to achieve the best results.
By having these essential materials on hand, you can confidently tackle the installation of a toilet wax ring, knowing that you have everything necessary to create a leak-free connection. Remember, investing in high-quality materials will not only provide better performance but also ensure a longer-lasting and more reliable seal.

Removing The Old Wax Ring And Cleaning The Toilet Flange
When it comes to installing a new toilet wax ring, the first and most crucial step is to remove the old wax ring and thoroughly clean the toilet flange. This ensures a tight seal and prevents any leaks or odors from escaping. In this section, we will guide you through the process, step by step.
Shutting off the water supply
To begin, it is important to shut off the water supply to the toilet before attempting to remove it. This can usually be done by turning the shut-off valve, located behind the toilet, in a clockwise direction. Once the water supply is shut off, flush the toilet to drain any remaining water in the tank and bowl. This will make it easier to remove the toilet without any mess.
Removing the toilet
Next, you will need to remove the toilet from the floor to gain access to the old wax ring. Start by disconnecting the water supply line from the bottom of the toilet tank. Use an adjustable wrench to loosen the nut and carefully remove the line. Make sure to place a towel or bucket beneath the connection to catch any water that may still be in the line.
Once the water supply line is disconnected, you can proceed to remove the bolts that secure the toilet to the floor. These bolts are usually located at the base of the toilet, on either side. Use a wrench to loosen the nuts and then lift the toilet straight up, being careful not to tip it over or damage the floor.
Cleaning the toilet flange
With the toilet removed, you will now have access to the toilet flange and the old wax ring. Take a moment to inspect the flange for any signs of damage or wear. If necessary, replace the flange to ensure a proper and secure fit for the new wax ring.
Next, use a scraper or putty knife to carefully remove any remnants of the old wax ring from both the flange and the underside of the toilet. Make sure to clean the surfaces thoroughly, removing any old wax, debris, or residue. This will ensure a clean and smooth surface for the new wax ring to adhere to.
You can use a mild cleaner or a mixture of vinegar and water to help with the cleaning process. Wipe down the flange and the toilet bowl, paying extra attention to any areas that may have accumulated dirt or grime.
Once the flange and toilet are clean and dry, you are ready to proceed with installing the new wax ring. This step is covered in detail in the next section of this blog post.
Preparing And Placing The New Wax Ring
Installing a new wax ring is an essential step when replacing a toilet or fixing a leak. A properly installed wax ring creates a watertight seal between the toilet base and the floor, preventing any unpleasant leaks or odors. In this section, we will guide you through the process of preparing and placing the new wax ring, ensuring a secure and effective installation.
Checking and Adjusting the Toilet Flange
The first step in preparing for the installation of a new wax ring is to check the condition of the toilet flange. The toilet flange is a circular piece that connects the toilet to the floor and provides stability. Ensure that the flange is securely fastened to the floor and is level. If the flange is damaged or not at the correct height, it will need to be repaired or adjusted before proceeding.
To check the level of the flange, place a carpenter’s level on top of it. If there are any uneven areas, you may need to use shims to level it out. These shims can be easily inserted between the flange and the floor to ensure a stable base for the toilet. Be sure to remove any old wax residue or debris from the flange before proceeding.
Properly Positioning the Wax Ring
Once the toilet flange is in good condition and level, it’s time to properly position the new wax ring. The wax ring acts as a seal between the toilet and the flange, ensuring a leak-proof connection. Follow these steps to ensure the wax ring is properly positioned:
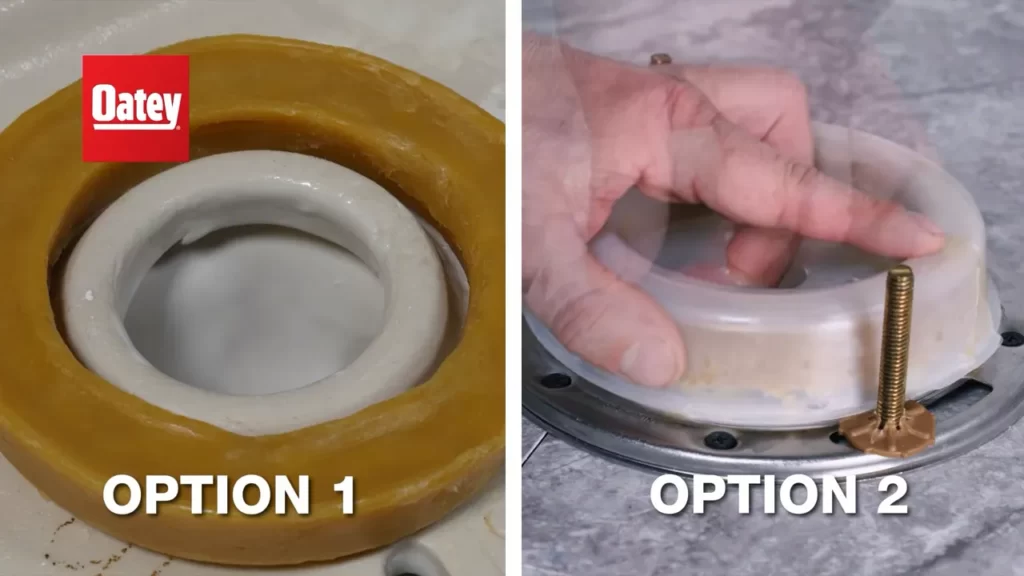
- Take the new wax ring and remove any packaging. Place it on a clean surface.
- Locate the horn on the wax ring, which is the raised circular part in the center. This horn should face the toilet to create a proper seal.
- Carefully lift the toilet and align the bolts on the base with the holes in the flange.
- Lower the toilet, ensuring that the wax ring is positioned over the flange and the bolts go through the holes.
It’s important to note that the wax ring should be centered on the flange to ensure an even seal. Apply gentle pressure to the toilet, rocking it back and forth slightly to properly compress the wax ring. This will help create a tight seal and prevent any future leaks.
Once the toilet is properly positioned, it’s time to secure it to the floor. Tighten the nuts on the bolts evenly, alternating sides, until the toilet is firmly in place. Avoid over-tightening, as this could crack the toilet or damage the wax ring.
With the new wax ring installed and the toilet securely in place, you can now move on to the final steps of reconnecting the water supply and testing for leaks. Ensuring a properly installed wax ring will give you peace of mind, knowing that your toilet is securely sealed and won’t cause any plumbing issues in the future.
Reinstalling And Securing The Toilet
Reinstalling and Securing the Toilet
Once you have successfully removed the old wax ring and cleaned the flange, it’s time to reinstall and secure the toilet. This step is crucial to ensure a watertight seal and prevent any leaks or damage in the future. In this section, we will guide you through aligning the toilet with the flange and tightening the bolts without over-tightening.
Aligning the Toilet with the Flange
Before placing the toilet back on the flange, it is important to ensure proper alignment. Follow these steps to align your toilet correctly:
- Carefully lift the toilet bowl and position it directly over the flange, making sure the bolts protruding from the floor align with the corresponding holes on the base of the toilet.
- Once properly aligned, slowly lower the toilet bowl onto the flange, guiding the bolts through the holes.
- Apply slight pressure to evenly distribute the weight and ensure the toilet sits flush on the floor. Check if the toilet is level using a spirit level.
- If the toilet is not level, you can use shims to adjust the height. Place the shims under the toilet base to stabilize and level it. Remember that shims should only be used to level the toilet, not to fix an uneven flange.
Tightening the Bolts without Over-Tightening
Now that the toilet is properly aligned, your next step is to secure it by tightening the bolts appropriately. Follow these tips to avoid over-tightening:
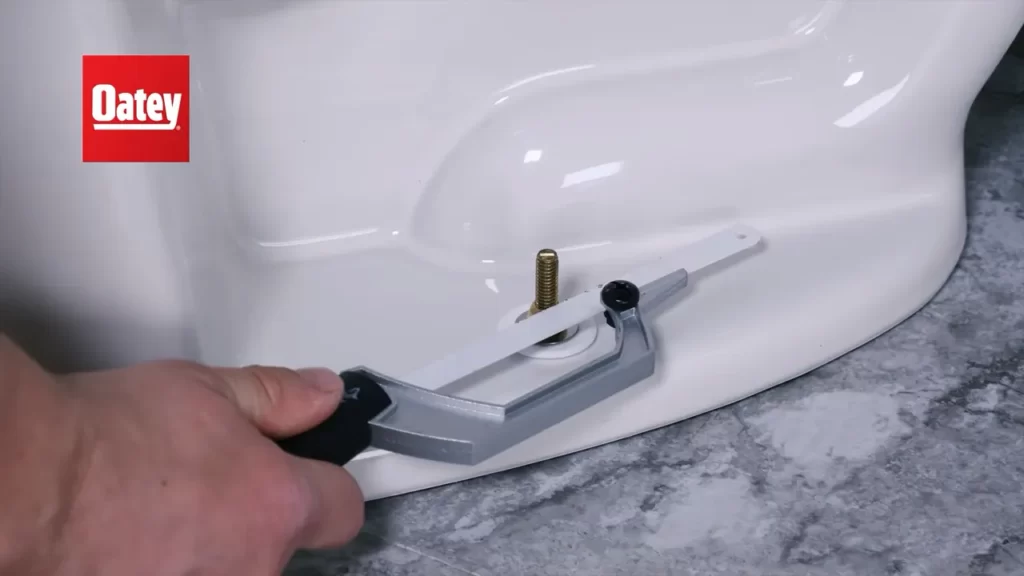
- Start by placing washers onto each bolt, followed by the nuts.
- Using a wrench, alternate tightening each bolt in small increments, ensuring even pressure on both sides. This will prevent the toilet from rocking or cracking.
- Take care not to overtighten the bolts, as this can damage the toilet or cause the wax ring to squeeze out, leading to leaks.
- Stop tightening the bolts as soon as you feel resistance and the toilet feels secure.
By aligning the toilet with the flange and tightening the bolts properly, you can ensure a secure and leak-free installation. Taking the time to complete these steps correctly will give you peace of mind and protect your bathroom from potential water damage. Remember to check for any leaks after reinstalling the toilet and make any necessary adjustments.
Turning On The Water Supply And Checking For Leaks
Once you have successfully installed the wax ring and securely positioned the toilet base, it’s time to turn on the water supply and check for any potential leaks. This step is essential to ensure that your toilet functions properly and doesn’t cause any water damage to your bathroom. Follow the steps below to complete this process:
Refilling the toilet tank
The first step in turning on the water supply is refilling the toilet tank. To do this, locate the water supply valve, which is typically located behind the toilet. It can be either a lever or a knob. Turn it in a clockwise direction until the water starts flowing into the tank. Allow the tank to fill up completely, which usually takes about a minute or two.
Inspecting for any signs of leakage
Once the toilet tank is refilled, it’s crucial to inspect for any signs of leakage. Leaks can occur at various points, such as the wax ring seal, water supply line, or connections between the tank and bowl. Carefully examine around these areas for any visible water or moisture. Feel around the base of the toilet to check for any dampness, as this could indicate a leak.
If you notice any leaks or suspect a problem, it’s important to address it immediately. Turn off the water supply valve and assess the situation. Check if the wax ring is properly sealed and if any connections are loose. Tighten any loose connections and consider replacing the wax ring if necessary. Ignoring leaks can lead to costly water damage and potential structural issues.
Additionally, it’s a good idea to perform a dye test to detect any hidden leaks. Simply add a few drops of food coloring into the toilet tank and wait for a few minutes. If the color appears in the bowl without flushing, it indicates that there is a leak somewhere in the toilet system.
By following these steps to turn on the water supply and checking for leaks, you can ensure that your newly installed toilet functions properly and remains leak-free. Remember to double-check all connections and address any issues promptly to avoid potential damage in the future.
Making Adjustments For A Perfect Seal
Using shims to level the toilet
When it comes to installing a toilet wax ring, achieving a level fit is crucial for ensuring a perfect seal. Uneven surfaces can lead to leaks and instability. If you find that your toilet is wobbly or slanted, don’t worry – you can easily fix it using shims. These small, wedge-shaped pieces of material are specifically designed to level out the toilet and provide a stable foundation.
To use shims, follow these steps:
- Before getting started, make sure you have all the necessary tools and materials within reach: a wrench, shims, and a level.
- Start by removing the toilet tank cover and flushing the toilet to empty the tank.
- Next, disconnect the water supply line from the bottom of the tank. Use the wrench to loosen the nut and carefully remove the line.
- Once the water supply line is disconnected, use the wrench to remove the bolts securing the toilet to the floor. Gently rock the toilet back and forth to break the seal created by the wax ring.
- Once the toilet is free, place a level on top of the toilet base to determine which side needs leveling. Use the shims to fill the gaps between the toilet base and the floor, ensuring a stable and level surface.
- Continue adding shims until the toilet is level in all directions. Make sure to check the level multiple times to ensure accuracy.
- Once the toilet is level, tighten the bolts back into place. Be careful not to overtighten, as this can crack the toilet base.
- Reattach the water supply line and turn on the water to refill the tank. Check for any leaks around the base or at the connection points.
- Finally, flush the toilet and check for any wobbling or instability. If everything looks and feels secure, you’ve successfully leveled the toilet using shims.
Applying caulk for a finished look
In addition to providing a secure and watertight seal, caulking around the base of the toilet adds a finished look to the installation. Caulk fills any gaps between the toilet base and the floor, creating a clean and professional appearance.
Follow these steps to apply caulk:
- Start by gathering all the necessary tools and materials: caulk gun, caulk tube, caulk smoothing tool, and a utility knife.
- Ensure the area around the toilet base is clean and dry. Remove any old caulking or debris using the utility knife or a scraper.
- Cut the tip of the caulk tube at a 45-degree angle to create a small opening. Insert the tube into the caulk gun.
- Apply a thin, continuous line of caulk around the base of the toilet, ensuring complete coverage of the gap.
- Once the caulk is applied, use the caulk smoothing tool to smooth out the surface, removing any excess caulk and creating a neat finish.
- Allow the caulk to dry completely according to the manufacturer’s instructions before using the toilet.
By following these steps, you’ll not only achieve a perfect seal with the toilet wax ring, but also ensure a level fit and a finished appearance using shims and caulk, respectively. With these adjustments made, you can confidently enjoy your newly installed toilet, knowing that it will provide years of reliable use.
Regular Cleaning And Inspection
Regular cleaning and inspection of your toilet wax ring is essential to maintain the proper functioning of your bathroom plumbing. Over time, debris and buildup can accumulate around the wax ring, causing leaks and unpleasant odors. Additionally, wear and tear can weaken the seal of the wax ring, leading to potential water damage. By following these simple steps, you can ensure the longevity of your toilet wax ring and prevent costly repairs in the future.
Removing Debris and Buildup
One of the first steps in maintaining your toilet wax ring is to regularly remove any debris and buildup that may accumulate around it. This can be done by following these steps:
- Turn off the water supply: Locate the shut-off valve near the base of your toilet and turn it clockwise to stop the flow of water.
- Remove the toilet: Before you can clean the wax ring, the toilet needs to be removed. Begin by disconnecting the water supply line and removing the bolts securing the toilet to the floor.
- Inspect the wax ring: With the toilet removed, inspect the wax ring for any signs of damage or wear. If the wax ring appears brittle or broken, it is time to replace it.
- Clean the wax ring: Using a gentle brush or sponge, carefully remove any debris and buildup from the wax ring. Be sure to clean both the upper and lower surfaces to ensure a proper seal.
- Replace the toilet: Once the wax ring is clean, carefully place the toilet back in its original position. Make sure to align the bolts with the holes in the base of the toilet and tighten them securely.
Checking for Wear and Tear
In addition to removing debris and buildup, it is important to regularly check the wax ring for any signs of wear and tear. This can help detect potential leaks before they become major problems. To check for wear and tear, follow these steps:
- Visually inspect the wax ring: Use a flashlight to carefully examine the wax ring for any cracks or breaks. Pay particular attention to the area where the toilet meets the wax ring.
- Check for water leaks: After flushing the toilet, observe the base for any signs of water leakage. If you notice water pooling around the base or dampness on the floor, it may indicate a damaged wax ring.
- Test the seal: Gently press down on the toilet bowl to check the seal of the wax ring. If you feel any movement or hear a squishing sound, it may be a sign of a faulty seal.
- Replace if necessary: If you notice any signs of wear and tear or suspect a faulty seal, it is recommended to replace the wax ring as soon as possible to prevent water damage.
By regularly cleaning and inspecting your toilet wax ring, you can ensure its longevity and prevent any potential plumbing issues. Remember, a well-maintained wax ring is essential for a properly functioning toilet, so don’t overlook this important step in your bathroom maintenance routine.
Recognizing Signs Of A Failing Wax Ring
When it comes to our toilets, the wax ring may not be the first thing that comes to mind. However, this small component plays a crucial role in maintaining a watertight seal between the toilet and the floor, preventing leaks and potential damage. Over time, the wax ring can deteriorate, resulting in a faulty seal. It’s important to be able to recognize the signs of a failing wax ring so that you can take action before any major issues arise.
Common signs of a faulty seal
If you notice any of the following signs, it may indicate that your wax ring is failing:
- Water leaks around the base of the toilet – If you spot water pooling around the base of your toilet, especially after flushing, it’s a strong indication that the wax ring is no longer creating a proper seal. Water can seep through the compromised wax ring and cause damage to the flooring, subfloor, and even the ceiling below in multi-story buildings.
- Unpleasant odor – A foul smell emanating from your bathroom could be a sign of a deteriorated wax ring. As the wax breaks down, sewage gases can escape, resulting in unpleasant odors that linger in the room.
- Rocking or instability – A toilet should be stable and firmly anchored to the floor. If you notice any movement or rocking when sitting on the toilet, it may indicate that the wax ring has become compromised. The wax ring helps secure the toilet in place, and without a proper seal, the toilet may shift or wobble.
When to replace the wax ring
Once you’ve identified any of the signs mentioned above, it’s crucial to replace the wax ring as soon as possible. Ignoring a failing wax ring can lead to more severe damage and costly repairs down the line. Additionally, if you’re planning to install a new toilet or have recently removed the toilet for repairs, it’s essential to replace the wax ring to ensure a proper seal.
Remember, replacing a wax ring is a relatively simple and inexpensive task that can save you from major headaches in the future. By recognizing the signs of a failing wax ring and taking prompt action, you can maintain a leak-free and odor-free bathroom for years to come.
Frequently Asked Questions For How To Install Toilet Wax Ring
Should I Put The Wax Ring On The Toilet Or The Flange?
The wax ring should be placed on the flange, not on the toilet.
How Do You Get A Wax Ring To Stick To The Toilet?
To get a wax ring to stick to the toilet, remove the old wax ring, scrape off any residue, and clean the toilet flange and bottom of the toilet. Place the new wax ring on the flange, align the bolt holes, and press down firmly to create a seal.
How Should A Wax Ring Sit On A Toilet Flange?
The wax ring should fully cover the toilet flange, sitting evenly and securely. Make sure it is centered and pressed firmly in place, providing a proper seal.
Do You Take The Plastic Off The Wax Ring On A Toilet?
Yes, the plastic should be removed from the wax ring on a toilet. It ensures proper sealing and prevents any leaks.
Conclusion
To sum up, installing a toilet wax ring is a crucial step in ensuring a leak-free and properly functioning toilet. By following the step-by-step guide outlined in this blog post, you can confidently tackle this task yourself. Remember to turn off the water supply, remove the old wax ring, place the new one properly, and secure the toilet in place.
With a little patience and attention to detail, you’ll have a reliable and efficient bathroom fixture in no time. Happy DIY-ing!