
Installing a toilet tank lever is a straightforward process. Here’s a concise guide to help you install a toilet tank lever.
If your bathroom is in need of a toilet tank lever replacement or installation, you will be pleased to know that it is a relatively simple task. Installing a toilet tank lever can be done with a few basic tools and minimal effort.
By following a step-by-step process, you can have your toilet tank lever installed and functioning properly in no time. We will outline the necessary steps to successfully install a toilet tank lever, including loosening the tank lever nut, attaching the new lever, and tightening the nut to secure it in place. So, let’s get started on this DIY project and improve the functionality of your toilet.
Choosing The Right Toilet Tank Lever: A Buying Guide
When it comes to upgrading your bathroom, small details can make a big difference. One such detail is the toilet tank lever. While it may seem insignificant, the right tank lever can add a touch of elegance and functionality to your toilet. In this buying guide, we will discuss the factors you should consider when choosing a toilet tank lever, including compatibility with your toilet model, material and durability, and style and design options.
Factors to Consider When Selecting a Toilet Tank Lever
When selecting a toilet tank lever, there are a few factors that you should take into consideration to ensure compatibility and functionality.
- Compatibility with Your Toilet Model
- Material and Durability
- Style and Design Options
Compatibility with Your Toilet Model
Before purchasing a toilet tank lever, it is essential to check its compatibility with your toilet model. Different toilets have different mechanisms and mounting styles, so it is crucial to find a lever that fits securely and functions properly with your toilet.
You can determine the compatibility by checking the product specifications or consulting the manufacturer’s website. Additionally, some levers have adjustable or universal designs that can fit a wide range of toilet models, providing you with more flexibility in your selection.
Material and Durability
The material and durability of a toilet tank lever are essential for ensuring its long-term functionality. You want a lever that can withstand regular use and is resistant to corrosion and wear.
Common materials for toilet tank levers include plastic, metal, and brass. Plastic levers are lightweight and often less expensive, but they may be less durable than metal or brass options. Metal levers, such as stainless steel or chrome-plated brass, are more robust and resistant to corrosion. Brass levers offer an elegant and timeless look, combining durability with style.
When considering the material, also take into account the finish of the lever. Some popular finishes include polished chrome, brushed nickel, and oil-rubbed bronze. Choose a finish that complements the existing fixtures in your bathroom for a cohesive look.
Style and Design Options
Finally, the style and design of the toilet tank lever can enhance the overall aesthetic of your bathroom. It is an opportunity to add a touch of personal flair and coordinate with your existing décor.
There are various design options available, from traditional levers with simple, straight handles to more ornate levers with decorative accents. Consider the style of your bathroom and select a lever that matches the overall theme. Whether you prefer a classic, modern, or vintage look, there is a toilet tank lever to suit your taste.
Moreover, some levers come with additional features like a dual-flush option or a soft-close mechanism. These added functionalities can enhance your bathroom experience and provide convenience.
Take your time exploring the different style and design options, and find a toilet tank lever that not only meets your functional needs but also adds a touch of elegance to your bathroom.
In conclusion, when choosing a toilet tank lever, consider factors such as compatibility, material and durability, and style and design options. By selecting the right lever for your toilet model and personal style, you can elevate the look and functionality of your bathroom.
Step 1: Gather The Necessary Tools And Materials
Before you embark on the process of installing a toilet tank lever, it is essential to gather all the tools and materials you will need. Having everything ready will save you time and ensure a smooth installation process. Here are the essential tools and additional materials you may need:
Essential tools for installing a toilet tank lever
- Adjustable wrench: You will need an adjustable wrench to loosen and tighten the nuts and bolts during the installation. Make sure to choose one that fits the size of the nuts on your toilet tank.
- Screwdriver: Depending on the type of lever you are installing, you may need either a flathead or Phillips screwdriver. Check the lever’s instructions or the existing lever to determine which type you need.
- Pliers (optional): In some cases, the bolts securing the lever may be stubborn or difficult to remove. Having a pair of pliers on hand can help you apply extra force to loosen them.
Additional materials you may need
- Replacement tank lever: If you are installing a new toilet tank lever, make sure you have the replacement lever ready. Ensure that it is compatible with your toilet model before proceeding with the installation.
- Gasket or washer: Some replacement levers come with a gasket or washer included, but if not, you may need to purchase one separately. This gasket or washer helps create a watertight seal between the lever and the tank.
- Teflon tape: To ensure a watertight seal, you may need Teflon tape. This tape is wrapped around the threads of the bolts to prevent any leaks.
Gathering these tools and materials in advance will help make your toilet tank lever installation process easier and more efficient. Now that you have everything you need, let’s move on to the next step and start installing the lever!
Step 2: Prepare The Toilet Tank
Now that you have successfully shut off the water supply to your toilet, it’s time to move on to the next step: preparing the toilet tank. This step is crucial to ensure a smooth installation of the new toilet tank lever. By following the simple instructions below, you’ll have your toilet tank ready and raring to go in no time!
Shut off the water supply to the toilet
The first thing you need to do is locate the water supply valve, which is usually located near the bottom of the toilet tank, behind the toilet bowl. Once you have found it, turn the valve clockwise until it is fully closed. This will stop the flow of water to the toilet tank and prevent any accidents or leaks during the installation process.
Empty the tank by flushing and removing any remaining water
With the water supply turned off, you can proceed to empty the toilet tank. Start by flushing the toilet once or twice to remove most of the water. After flushing, use a small container or a sponge to scoop out any remaining water in the tank. Be careful not to spill any water on the bathroom floor to avoid slipping hazards.
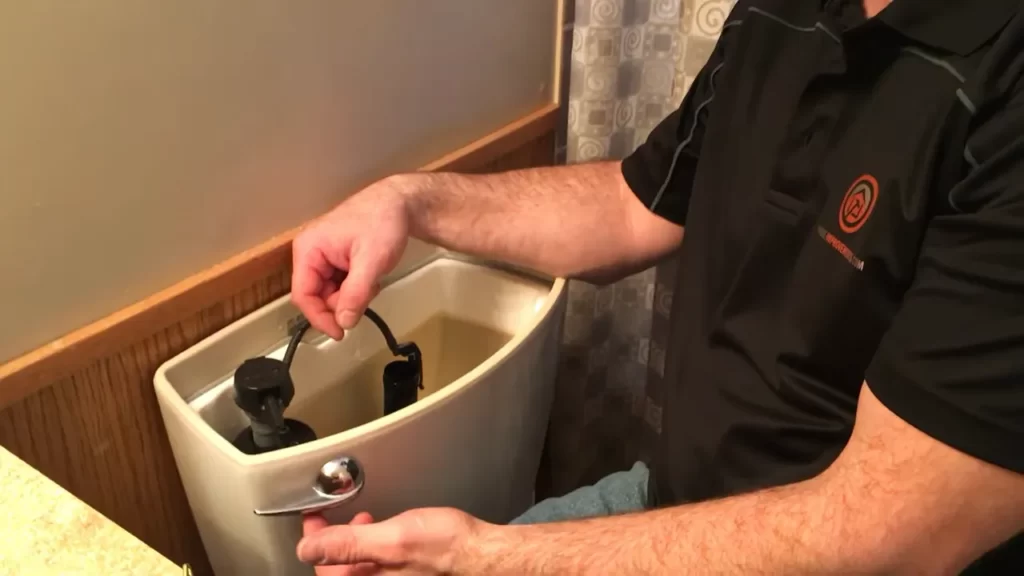
Locate the existing tank lever and remove it by disconnecting the chain or rod
The final step of preparing the toilet tank is to locate the existing tank lever and remove it. The tank lever is the handle that you usually push or pull to flush the toilet. Look for the lever on the side of the toilet tank and inspect how it is connected to the flush valve. In most cases, you will need to disconnect the chain or rod attaching the lever to the flushing mechanism.
With a pair of pliers or an adjustable wrench, loosen the nut or clip that is holding the chain or rod in place. Once you have disconnected the lever from the flushing mechanism, remove it carefully from the tank. Keep these parts aside as you may need them if you ever decide to reinstall the old lever.
By following these simple instructions, you have successfully prepared your toilet tank for the installation of a new tank lever. In the next step, we will guide you through the process of attaching the new lever and ensuring it functions properly. Stay tuned!
Step 3: Remove The Old Lever And Install The New Lever
Now that you have gathered the necessary tools and familiarized yourself with the basic steps, it’s time to move on to the actual installation process. In this step, you will be removing the old lever from the toilet tank and installing the new lever. Follow the instructions below carefully to ensure a successful installation.
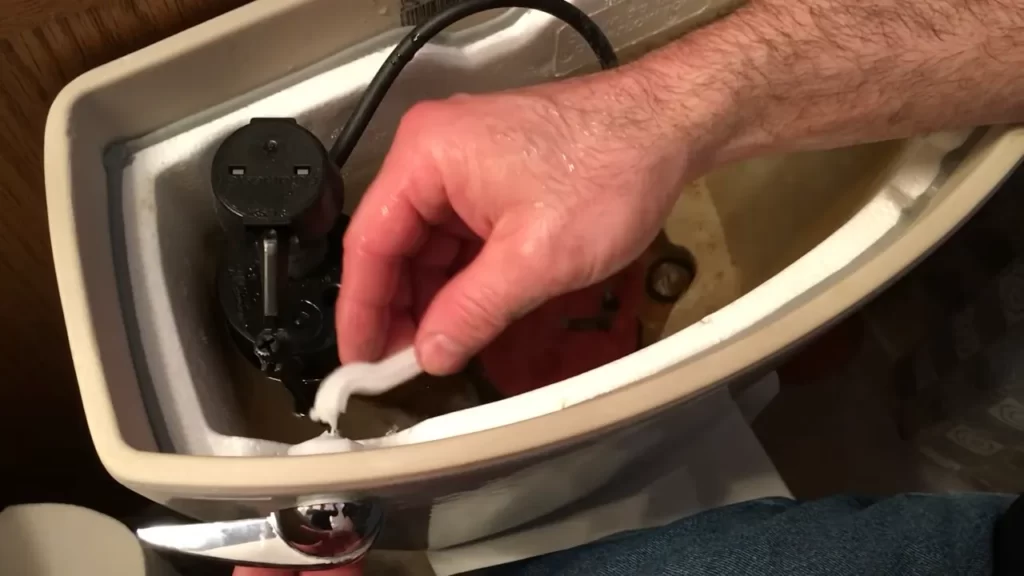
Detach the old lever by unscrewing or unclipping it from the tank
The first task is to remove the old lever from the toilet tank. This can usually be accomplished by either unscrewing it or unclipping it, depending on the specific design of your toilet. Refer to the manufacturer’s instructions or follow these general steps:
- Locate the retaining nut or clip that is keeping the old lever in place.
- Using pliers or a wrench, carefully loosen the nut or unclip the lever from the tank.
- Once the nut is loose or the lever is unclipped, pull the old lever out of the tank. Set it aside for disposal or future use, if applicable.
Be cautious not to damage any surrounding components, as you will need to reuse them or install new ones with the new lever.
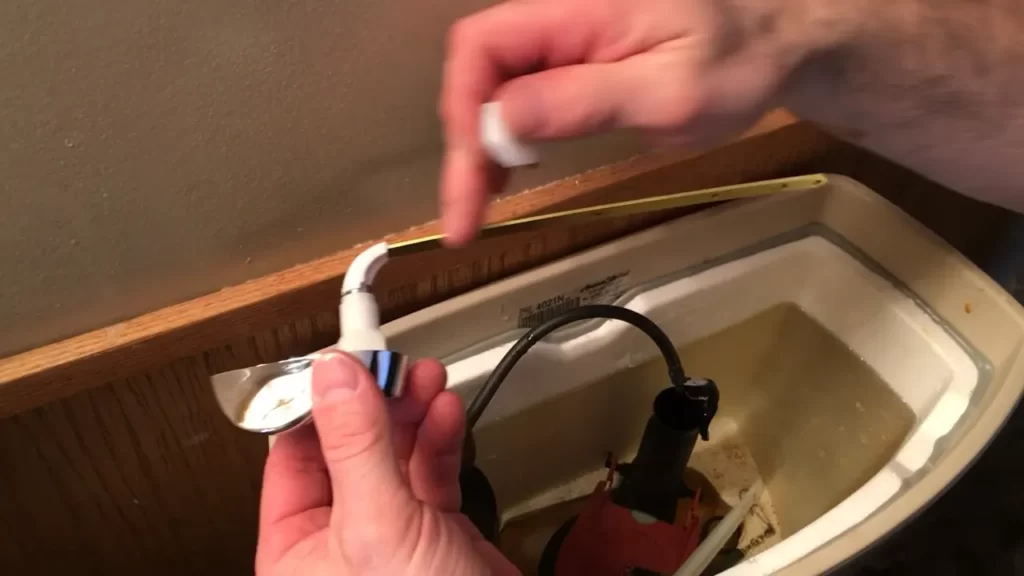
Position the new lever in place, aligning it with the flush valve opening
Now that the old lever has been successfully removed, it’s time to position the new lever in place. Follow these steps:
- Take the new lever and hold it in the same orientation as the old lever.
- Align the flush valve opening on the toilet tank with the corresponding opening on the new lever.
- Make sure the lever is positioned securely, allowing for smooth operation when flushing the toilet.
Ensure the lever is aligned properly to prevent any potential issues with the flushing mechanism. This step is critical for the overall functionality of your toilet.
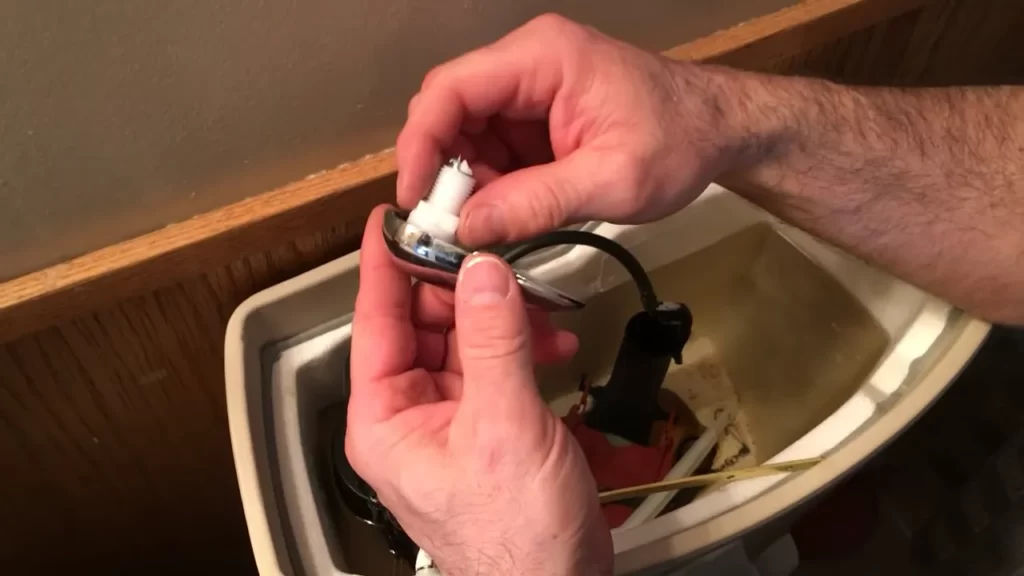
Secure the lever by tightening the retaining nut or screw
Finally, you need to secure the new lever in place. Follow these instructions:
- Locate the retaining nut or screw that was provided with the new lever.
- Position the nut or screw over the lever and tighten it using pliers or a wrench.
- Ensure the lever is tightly secured, but be careful not to overtighten, as this could cause damage to the toilet tank.
By properly tightening the retaining nut or screw, you are ensuring that the lever remains in place during use, providing a reliable and smooth flushing experience.
Congratulations! You have successfully completed the third and final step of installing a toilet tank lever. In the next step, we will go over some additional tips and troubleshooting advice to help you make sure everything is functioning properly. Stay tuned!
Step 4: Reconnect The Chain Or Rod
Step 4: Reconnect the Chain or Rod
After removing the old toilet tank lever and attaching the new one, it’s time to reconnect the chain or rod. This step is crucial in ensuring proper flushing function and smooth operation of the toilet. Follow these instructions to effectively complete this step:
Attach the chain or rod from the lever to the flapper or flush valve
Once you have positioned the new toilet tank lever in place, locate the chain or rod that connects it to the flapper or flush valve. This chain or rod is responsible for lifting the flapper or opening the flush valve, allowing water to flow into the toilet bowl for flushing.
- Inspect the chain or rod for any damage or wear. If necessary, consider replacing it with a new one to ensure optimal performance.
- Hook one end of the chain or rod onto the lever arm. If your toilet utilizes a rod instead of a chain, insert one end of the rod into the lever arm’s slot.
- Next, attach the other end of the chain or rod to the flapper or flush valve. Ensure that the connection is secure to prevent any potential leaks or malfunction.
Adjust the length to ensure proper flushing function
Proper adjustment of the chain or rod length is vital in guaranteeing the toilet flushes efficiently and effectively. An improperly adjusted length can lead to incomplete flushing or continuous running of water, both of which can result in wasted water and higher utility bills. Follow these steps to adjust the length:
- Start by testing the lever’s operation to determine if it flushes the toilet correctly. If the lever doesn’t lift the flapper or open the flush valve fully, it indicates that the chain or rod length needs adjustment.
- Gradually shorten or lengthen the chain or rod as needed. Experiment by making small adjustments until the flushing function is optimal.
- Ensure that there is just enough slack in the chain or rod to allow the flapper or flush valve to close fully after each flush. Too much slack can result in water continuously leaking into the toilet bowl.
- Remember to secure the chain or rod in its new position once the desired length is achieved to avoid further adjustments.
Test the lever to ensure smooth operation and proper flushing of the toilet
With the chain or rod properly attached and adjusted, it’s time to test the lever and ensure that it operates smoothly and enables proper flushing of the toilet. Follow these steps to conduct the test:
- Gently press down on the toilet tank lever to initiate a flush.
- Observe the flapper or flush valve as it opens and closes. Ensure that it opens fully and closes tightly to prevent any leaks or continuous running of water.
- Make sure that the lever returns to its original position after flushing, ready for the next use.
- If any issues arise during the test, double-check the chain or rod for proper attachment and adjustment, making any necessary corrections.
By properly reconnecting the chain or rod, adjusting the length, and thoroughly testing the lever, you can ensure a smoothly operating toilet with an efficient flushing mechanism. This improves overall water usage and prevents any unnecessary leaks or malfunctions.
Step 5: Adjust The Lever’S Position And Functionality
Now that you have successfully installed the toilet tank lever, it’s time to fine-tune its position and functionality. This step is crucial to ensure comfortable and ergonomic use, as well as proper activation of the flush mechanism. Follow the steps below to adjust the lever:
Fine-tune the lever’s position to ensure comfortable and ergonomic use
The comfort and ergonomics of the toilet flush lever play a significant role in ensuring a pleasant user experience. You want to position the lever in a way that feels natural and easy to reach for everyone using the toilet. To fine-tune the lever’s position:
- Start by sitting on the toilet seat and imagining yourself reaching for the flush lever.
- Make sure that the lever is easily accessible and within comfortable reach for your hand.
- Pay attention to the angle at which you need to extend your arm to engage the lever. Adjust the lever’s position, if required, to minimize strain and discomfort.
Check for any wobbling or loose connections and tighten if necessary
Once you have adjusted the position of the lever, it’s important to ensure that it is securely fastened to the toilet tank to avoid any wobbling or potential accidents. Follow these steps:
- Carefully examine the connection points between the tank lever and the tank.
- If you notice any wobbling or loose connections, tighten the mounting nut or screws using adjustable pliers or a screwdriver.
- Be careful not to overtighten, as it may cause damage. Aim for a secure connection without excessive force.
Test the lever again to ensure it properly activates the flush mechanism
With the lever in its final position and all connections tightened, it’s time to test its functionality once again. Testing the lever will ensure that it properly activates the flush mechanism, allowing for an efficient flush. Follow these steps:
- Gently press the lever down and observe if it smoothly activates the flushing mechanism.
- If the lever feels stiff or difficult to push, release it and double-check the connections and adjustments made in the previous steps.
- If necessary, make additional adjustments to the lever or re-tighten any loose connections until the lever operates smoothly.
By fine-tuning the lever’s position and ensuring its proper functionality, you can enjoy a comfortable and efficient flushing experience with your newly installed toilet tank lever.
Troubleshooting Common Issues And Tips For Success
Installing a toilet tank lever may seem like a simple task, but like any DIY project, it can come with its fair share of challenges. In this section, we will explore some common problems you may encounter during the installation process and provide you with tips to ensure a successful outcome.
Common problems encountered during toilet tank lever installation
When installing a toilet tank lever, there are a few common issues that you may come across. These can include a sticky or non-responsive lever, the chain or rod getting caught or tangled, and water leakage around the lever area. Let’s take a closer look at each of these problems and how to address them:
Sticky or non-responsive lever:
If you find that your toilet tank lever is difficult to push down or release, it may be sticky or not responding properly. This can be due to a buildup of mineral deposits or debris in the lever mechanism. To resolve this, follow these steps:
- Turn off the water supply to the toilet.
- Remove the toilet tank lid.
- Gently clean the lever and its surrounding area using a mild detergent and a soft cloth.
- Inspect the lever for any signs of damage or wear. If necessary, consider replacing it with a new one.
- Reassemble the lever and test its functionality before reattaching the tank lid.
Chain or rod getting caught or tangled:
Another common issue during toilet tank lever installation is the chain or rod getting caught or tangled, preventing the lever from properly flushing the toilet. This can result in a weak or incomplete flush. Here’s what you can do to fix it:
- Ensure that the chain or rod is properly aligned and not twisted or entangled with other components.
- Adjust the length of the chain if necessary, allowing for proper tension when flushing.
- If the chain is frequently getting caught or tangled, consider replacing it with a stronger or more flexible chain.
Water leakage around the lever area:
If you notice water leakage around the lever area after installation, it is essential to address it promptly to avoid water damage and potential mold growth. Follow these steps to fix the issue:
- Turn off the water supply to the toilet.
- Inspect the area around the lever for any cracks or gaps where water could be seeping through.
- If you find any cracks or gaps, apply a waterproof sealant or plumber’s tape to seal the area tightly.
- Wait for the sealant to dry completely before turning on the water supply and testing for any signs of leakage.
Tips for a successful installation and reliable performance
Now that we have covered some common issues, let’s go over some tips to ensure a successful installation and reliable performance of your toilet tank lever:
- Regular maintenance and cleaning of the lever and tank components are essential to prevent mineral deposits and debris buildup. This can be done using a mild detergent and a soft cloth or sponge.
- If you want to upgrade your toilet’s efficiency and conserve water, consider installing a dual-flush lever. This allows you to choose between a partial flush for liquid waste and a full flush for solid waste, reducing overall water usage.
- If you encounter major difficulties during installation or have a complex toilet system, don’t hesitate to seek professional help. They have the expertise and tools to handle more challenging situations and ensure a proper installation.
By following these troubleshooting tips and implementing our suggestions, you can overcome common installation issues and have a toilet tank lever that functions efficiently and reliably.
Wrapping Up
Recap of the step-by-step guide to easily install a toilet tank lever
Now that you have learned the step-by-step process of installing a toilet tank lever, let’s recap the entire procedure to ensure you are well equipped when it comes to giving your bathroom a functional and stylish upgrade.
Step 1: Start by turning off the water supply to your toilet tank. Locate the shut-off valve usually positioned below the tank and twist it clockwise to shut off the water.
Step 2: Next, carefully remove the lid of the toilet tank by lifting it upwards and placing it aside on a stable surface to avoid any accidental damage.
Step 3: Once the lid is safely removed, locate the existing lever in the tank. Depending on the style of your toilet, you might need to remove the chain or lift arm attached to it.
Step 4: With the old lever removed, it’s time to install the new one. Take your new toilet tank lever and insert it into the hole on the side of the tank, ensuring that the lever is properly aligned.
Step 5: Secure the new lever by tightening the retaining nut from the inside of the tank. Use an adjustable wrench if necessary, but be careful not to overtighten.
Step 6: Reattach the chain or lift arm to the new lever, making sure it has enough slack to allow for proper flushing.
Step 7: Lastly, turn the water supply back on by twisting the shut-off valve counterclockwise. This will allow water to fill the tank, and you can now test your newly installed toilet tank lever for smooth and efficient operation.
Importance of a functional and visually pleasing toilet tank lever
While a toilet tank lever may seem like a small component in your bathroom, it plays a crucial role in the overall functionality and aesthetics of your toilet. A functional lever ensures smooth flushing, preventing any frustrating mishaps that can disrupt your daily routine. Moreover, a visually pleasing lever adds a touch of elegance to your bathroom decor, elevating its style and appeal.
Final thoughts on the ease and convenience of DIY installation
With the step-by-step guide provided above, installing a toilet tank lever has become a hassle-free DIY project that anyone can accomplish with a little bit of patience and basic tools. Not only does DIY installation save you time and money spent on professional help, but it also gives you the satisfaction of enhancing your bathroom’s functionality and visual appeal on your own. So, go ahead and take the plunge – upgrade your toilet tank lever and enjoy the convenience it brings to your daily routine.
Frequently Asked Questions
How Do You Install A Toilet Handle Lever?
To install a toilet handle lever, follow these steps: 1. Turn off the water supply to the toilet. 2. Remove the lid of the toilet tank. 3. Unscrew the nut holding the old handle lever. 4. Attach the new handle lever and tighten the nut.
5. Turn on the water supply and test the handle.
How Do You Replace A Toilet Tank Handle?
To replace a toilet tank handle, follow these steps: 1. Shut off the water supply to the toilet. 2. Remove the old handle by unscrewing or unclipping it. 3. Install the new handle by screwing or clipping it in place.
4. Turn the water supply back on. 5. Test the handle to ensure it flushes the toilet properly.
Are All Toilet Tank Levers The Same?
Toilet tank levers may vary in design, size, and operation. However, they all serve the same purpose of flushing the toilet.
How Do You Install A Side Mount Toilet Flush Lever?
To install a side mount toilet flush lever, follow these steps: 1. Turn off the water supply to the toilet. 2. Remove the tank lid and locate the flush handle inside. 3. Unscrew the nut holding the old lever in place.
4. Insert the new lever into the hole and secure with the nut. 5. Turn the water supply back on and test the flush lever.
Conclusion
Updating your toilet tank lever may seem like a daunting task, but with the right tools and a little bit of patience, it can be done. Remember to turn off the water supply before starting the installation process and follow the step-by-step guide mentioned in this blog post.
By doing so, you’ll have a properly functioning toilet lever in no time. Enjoy the satisfaction of a job well done!