To install a toilet seal, first, remove the old seal and clean the flange thoroughly. Then, place the new seal over the flange and align it with the toilet mounting holes before pressing firmly to ensure a tight seal.
When it comes to installing a toilet seal, it’s important to follow the right steps for a proper and leak-free installation. The toilet seal, also known as a wax ring, creates a watertight seal between the toilet and the sewer pipe flange.
Over time, the seal can deteriorate or get damaged, causing leaks and unpleasant odors. By replacing the seal, you can ensure a secure connection and prevent any potential water damage. In this guide, we will walk you through the process of installing a toilet seal correctly, so you can enjoy a reliable and hassle-free toilet experience.
Understanding The Role Of A Toilet Seal
A toilet seal is an essential component of any toilet installation. It plays a crucial role in creating a watertight seal between the toilet bowl and the sewer pipe, preventing leaks and ensuring the efficient disposal of waste. Understanding the role of a toilet seal is imperative for anyone looking to install or replace one in their bathroom.
What is a Toilet Seal?
A toilet seal, also known as a wax ring or a flange gasket, is a round-shaped device made of wax or rubber that fits tightly between the base of the toilet bowl and the sewer pipe. Its shape allows it to create a secure seal, preventing water and waste from leaking out into your bathroom.
The Purpose of a Toilet Seal
The primary purpose of a toilet seal is to create a watertight barrier between the toilet bowl and the sewer pipe. When you flush the toilet, water and waste are pushed down the drain, through the sewer pipe, and into the sewage system. Without a properly functioning seal, water and sewage could leak out, causing damage to your bathroom floor and potentially leading to unpleasant odors.
Additionally, the toilet seal also helps stabilize the toilet bowl, keeping it securely in place and preventing any undesirable movement or wobbling during use. This ensures a comfortable and stable experience for anyone using the toilet.
Common Issues Caused by a Faulty Toilet Seal
A faulty toilet seal can lead to a variety of problems if not addressed promptly. Some common issues caused by a faulty seal include:
- Water leaks: A damaged or worn-out toilet seal can lead to water leaks around the base of the toilet. This can cause structural damage to your bathroom floor, leading to costly repairs.
- Unpleasant odors: If the toilet seal is not creating a tight seal, sewage gas can escape into your bathroom, resulting in foul odors that can be unpleasant and unhygienic.
- Rock or wobble: A loose or improperly sealed toilet seal can cause the toilet bowl to rock or wobble when in use. This can be both uncomfortable and potentially dangerous.
To avoid these issues, it is crucial to regularly inspect and replace your toilet seal when necessary. Proper installation and maintenance of the toilet seal will help ensure the longevity and performance of your toilet, providing you with a reliable and leak-free bathroom experience.

Preparing For The Toilet Seal Installation
Before you dive into installing a new toilet seal, it’s essential to adequately prepare your workspace and gather the necessary tools and materials. Preparing upfront can help prevent any unnecessary delays or issues during the installation process. In this section, we will outline the key steps you need to take in preparing for a smooth and successful toilet seal installation.
Gathering the Necessary Tools and Materials
The first step in preparing for the toilet seal installation is to gather all the tools and materials you will need. Having everything within reach will save you time and frustration. Here’s a list of the essential tools and materials:
| Tools | Materials |
|---|---|
|
|
Make sure all the tools are in good condition and the materials are readily available. It’s always a good idea to have extra wax rings and toilet bolts on hand, just in case.
Removing the Existing Toilet
The next step in preparing for the toilet seal installation is to remove the existing toilet. This will give you access to the flange and drain pipe where the new seal will be installed. Follow these steps to remove the toilet:
- Shut off the water supply to the toilet by turning the valve clockwise.
- Flush the toilet to remove as much water as possible from the tank and bowl.
- Use an adjustable wrench to disconnect the water supply line from the bottom of the toilet tank.
- Remove the nuts that secure the toilet to the floor bolts using an adjustable wrench.
- Gently rock the toilet back and forth to break the seal between the toilet and the floor. Once the seal is broken, lift the toilet straight up and place it on a towel or old newspaper.
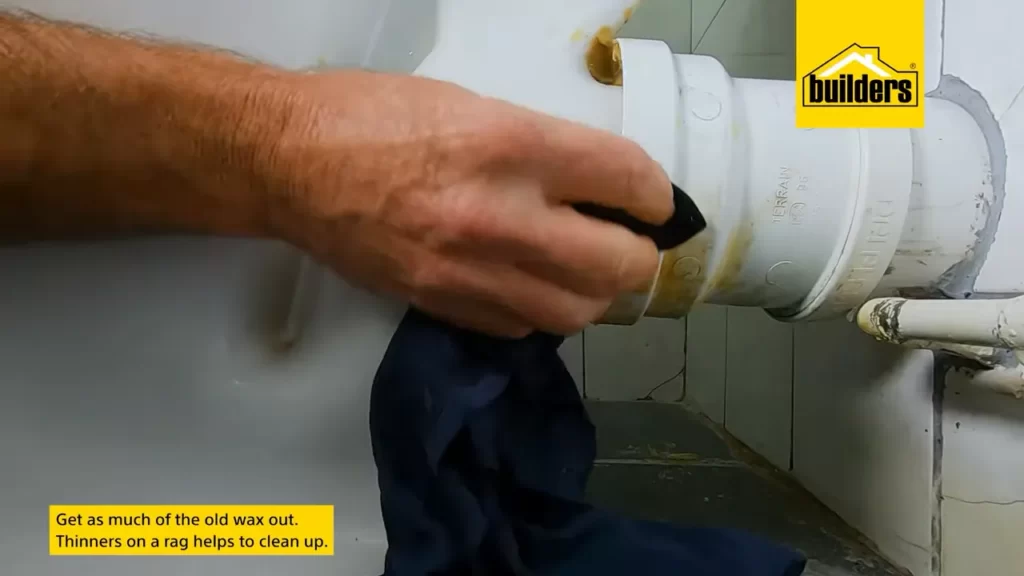
- Scrape off the old wax ring and any residue from both the toilet and the flange using a putty knife. Dispose of the wax ring and residue properly.
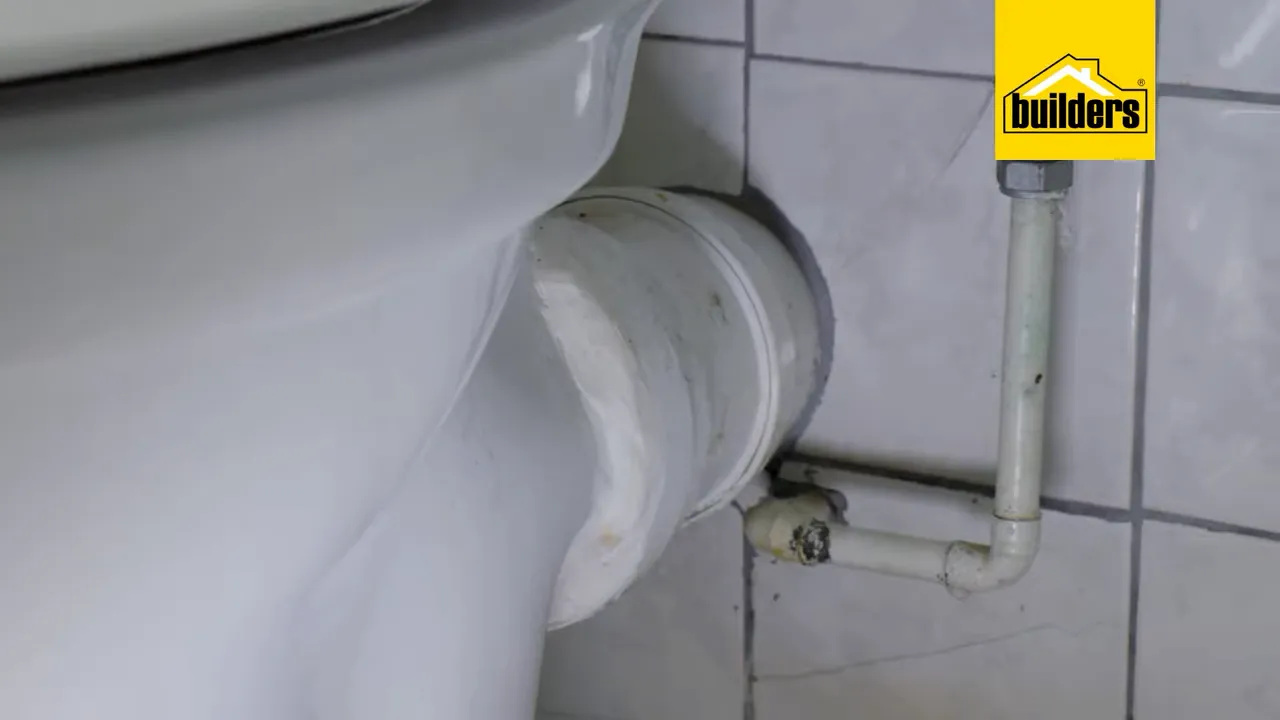
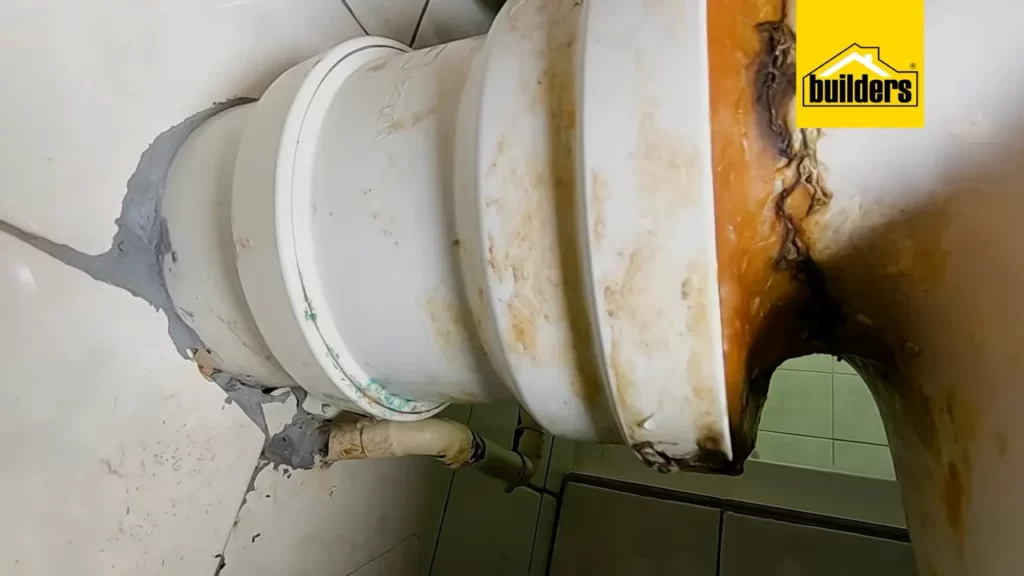
Inspecting the Flange and Drain Pipe
After removing the toilet, take the time to closely inspect the flange and drain pipe. Look for any signs of damage or corrosion, which could affect the installation of the new toilet seal. A damaged or corroded flange should be repaired or replaced before continuing with the installation. If the flange and drain pipe are in good condition, you can proceed to install the new toilet seal.
By following these steps and properly preparing for the toilet seal installation, you’ll be well on your way to successfully installing a new seal and ensuring a watertight connection for your toilet. The next section will focus on how to install the new toilet seal, so keep reading!
1. Cleaning And Preparing The Flange And Drain Pipe
Before installing a toilet seal, it is crucial to ensure that the flange and drain pipe are clean and free from any debris or residue. Cleaning and preparing these parts properly will help to guarantee a secure and leak-free installation. In this section, we will go through the steps to remove debris and residue, inspect for damage or corrosion, and apply sealant.
Removing Debris and Residue
The first step in preparing the flange and drain pipe is to remove any debris or residue that may be present. This can include old wax seals, dirt, or other materials that may have accumulated over time. To do this, follow these simple steps:
- Put on a pair of gloves and protective eyewear to protect yourself from any sharp objects or harmful substances.
- Using a putty knife or scraper, gently scrape away any visible debris or residue from the flange and drain pipe surfaces. Be careful not to scratch or damage these parts.
- Once the visible debris has been removed, use a damp cloth or sponge to wipe down the flange and drain pipe, making sure to remove any remaining residue.
- Dry the cleaned surfaces thoroughly with a clean cloth or allow them to air dry before moving on to the next step.
Inspecting for Damage or Corrosion
After cleaning the flange and drain pipe, it is important to inspect them for any signs of damage or corrosion. Identifying and addressing these issues before installing the toilet seal will help prevent future leaks and potential problems. Here’s how you can inspect these parts:
- Visually examine the flange and drain pipe for any cracks, chips, or other visible damage. Pay close attention to the areas where the seal will be in contact with these parts.
- If there are any signs of damage, consider replacing the affected parts or consulting a professional plumber for further assistance.
- Additionally, check for any signs of corrosion, such as rust or discoloration. Corrosion can weaken the structural integrity of the flange and drain pipe, making them more prone to leaks.
- If corrosion is present, it is recommended to clean the affected areas with a mild household cleaner and a non-abrasive cloth. However, if the corrosion is extensive, it may be necessary to replace the damaged parts.
Applying Sealant
Now that the flange and drain pipe are clean and in good condition, it’s time to apply sealant. Sealant helps create a watertight seal between the toilet and the waste pipe, ensuring a leak-free installation. Follow these steps to apply sealant properly:
- Choose a high-quality sealant that is specifically designed for toilet installations. Make sure it is compatible with the materials used in your flange and drain pipe.
- Apply a generous amount of sealant directly to the flange, making sure to cover the entire circumference. Use a caulk gun or your fingers to spread the sealant evenly.
- For added protection against leaks, consider applying a thin layer of sealant to the bottom of the toilet bowl as well.
- Once the sealant is applied, carefully lower the toilet bowl onto the flange, aligning it properly with the drain pipe.
- Apply gentle pressure to the toilet bowl to ensure a secure seal between the sealant and the flange.
- Allow the sealant to cure according to the manufacturer’s instructions before using the toilet.
By following these steps to clean, inspect, and apply sealant to the flange and drain pipe, you will have a solid foundation for installing the toilet seal. Taking the time to properly prepare these parts will help ensure a secure and leak-free toilet installation, giving you peace of mind and saving you from potential headaches in the future.
2. Placing The Wax Ring Or Alternative Seal
When it comes to installing a toilet, properly placing the wax ring or alternative seal is of utmost importance. This step ensures a watertight seal between the toilet bowl and the drain flange, preventing leaks and potential water damage. In this section, we will guide you through the process of choosing the right type of seal, positioning the wax ring properly, and exploring alternatives to traditional wax rings.
Choosing the Right Type of Seal
Before you start the installation process, it’s crucial to choose the right type of seal for your toilet. There are two primary options: the traditional wax ring and alternative seal options.
If you opt for the traditional wax ring, it’s essential to select a high-quality ring that is compatible with your toilet and drain flange. Look for a ring that has a durable construction and is thick enough to create a watertight seal.
Alternative seals have gained popularity in recent years due to their ease of installation and versatility. These alternatives include options like rubber seals, foam gaskets, and wax-free rings. They offer a reliable seal and are an excellent choice if you are looking for a mess-free installation process.
Positioning the Wax Ring Properly
The correct positioning of the wax ring is crucial for a successful installation. Improper placement can lead to leaks and unpleasant odors. Follow these steps to ensure the proper positioning of the wax ring:
- Remove the toilet bowl by carefully lifting it off the flange.
- Clean any wax residue from the flange and inspect it for damage. Replacement may be necessary if the flange is cracked or corroded.
- Place the wax ring flat on the flange, ensuring it is centered.
- Press down firmly on the wax ring to create a secure seal.
Note: Be cautious not to overtighten the toilet bolts, as this may cause the wax ring to compress too much, compromising the seal.
Exploring Alternatives to Wax Rings
If you prefer to explore alternatives to traditional wax rings, several options are worth considering:
| Alternative Seal Option | Advantages |
|---|---|
| Rubber Seals | No mess installation, reusable, and resistant to cracking. |
| Foam Gaskets | Easy to install, excellent compression resistance, and water-resistant. |
| Wax-Free Rings | Mess-free installation, flexible, and suitable for various floor types. |
Each alternative seal option has its advantages, so choose the one that best fits your needs and preferences.
By following the steps mentioned above and choosing the right type of seal, you will ensure a secure and leak-free toilet installation. Now that the wax ring or alternative seal is properly placed, you are ready to move on to the next step of installing your toilet.
3. Reinstalling The Toilet
Aligning the Toilet with the Flange
Before you can secure the toilet to the floor, it is crucial to ensure that it is properly aligned with the flange. The flange is the round opening in the bathroom floor where the waste pipe is connected. Misalignment can lead to leaks and an improper seal, so it’s essential to get this step right.
To align the toilet, follow these steps:
- Place the wax ring on the flange. The wax ring acts as a seal between the toilet and the floor, preventing any leaks.
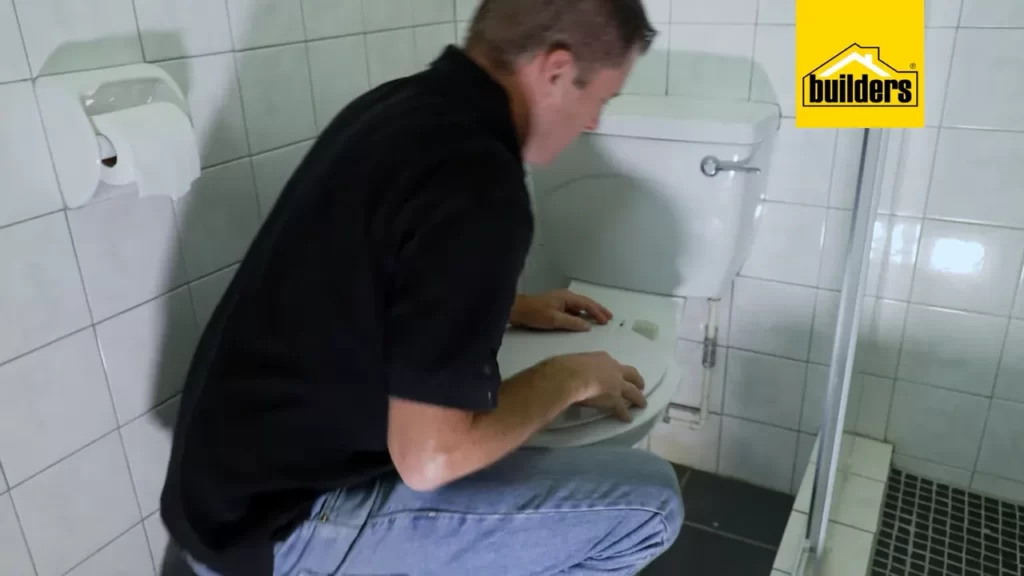
- Once the wax ring is in place, carefully lower the toilet onto the flange, ensuring that the bolts on the base of the toilet align with the holes in the flange.
- Apply even pressure, pressing down firmly on the toilet, to compress the wax ring and create a tight seal.
Properly Securing the Toilet to the Floor
Now that the toilet is aligned with the flange, it’s time to secure it to the floor. This step is crucial for the stability of the toilet and to prevent any wobbling or movement.
Follow these steps to properly secure the toilet:
- Tighten the nuts onto the bolts sticking out of the flange, using a wrench. Make sure to tighten them evenly, alternating between the two nuts, until the toilet is tightly secured to the floor.
- Be careful not to overtighten the nuts, as this could crack the toilet.
Remember, a stable and properly secured toilet is not only safer but also helps maintain the integrity of the toilet seal and prevents leaks.
Testing for Leaks and Ensuring a Proper Seal
Once the toilet is securely fastened to the floor, it’s crucial to test for leaks and ensure that there is a proper seal. This step is essential to prevent any water damage to the floor or surrounding areas.
Follow these steps to test for leaks and ensure a proper seal:
- Turn the water supply back on by opening the shut-off valve.
- Flush the toilet several times and check for any signs of leakage around the base and connections.
- If you notice any leaks, tighten the bolts slightly. Be careful not to overtighten, as this could cause damage.
- If there are no signs of leaks, inspect the seal around the base of the toilet. Ensure that there are no gaps or spaces between the toilet and the floor. If necessary, you can add a bead of caulk around the base for extra security.
By following these steps and checking for leaks, you can ensure that your toilet seal is properly installed, preventing any future water damage and maintaining the functionality and cleanliness of your bathroom.
Tips For Troubleshooting And Maintenance
Tips for Troubleshooting and Maintenance
Proper maintenance and troubleshooting is essential to ensure that your toilet seal remains in good condition and does its job effectively. In this section, we will discuss some important tips to help you recognize signs of a faulty toilet seal, address common issues, and perform regular maintenance practices to extend the life of the seal.
Recognizing Signs of a Faulty Toilet Seal
A faulty toilet seal can lead to various issues, including water leaks and unpleasant odors. It’s important to be able to recognize the signs of a faulty seal so that you can take prompt action. Here are some indicators to look out for:
- Water leaks around the base of the toilet
- Visible water staining on the floor or walls near the toilet
- Unpleasant sewage-like odors in the bathroom
If you notice any of these signs, it’s likely that your toilet seal needs attention. Addressing the issues promptly will prevent further damage and potential health hazards.
Addressing Common Issues
When it comes to dealing with common issues related to toilet seals, there are a few steps you can take to resolve them. Here are some tips:
- Replace the wax ring: If you notice water leaks or odors, it may be necessary to replace the wax ring. To do this, turn off the water supply to the toilet, empty the tank and bowl, remove the toilet from the floor, and then remove the old wax ring. Install a new wax ring, ensuring it is properly aligned. Finally, carefully place the toilet back in its position and secure it.
- Tighten the closet bolts: Loose closet bolts can cause water leaks. To tighten them, use a wrench to ensure they are snugly secured. Avoid over-tightening, as this may damage the toilet or the flange.
- Check the flange: A damaged or broken flange can cause issues with the toilet seal. If you suspect a problem with the flange, contact a professional plumber to assess the situation and recommend the appropriate repairs.
Regular Maintenance Practices to Extend the Life of the Seal
To prevent future problems with your toilet seal, it’s important to perform regular maintenance. Here are some practices that will help extend the life of the seal:
- Regularly clean around the base of the toilet: Use a mild cleaner and a soft cloth to clean the area around the base of the toilet. This will help prevent the buildup of grime and debris that can affect the seal.
- Inspect the seal periodically: Check the condition of the seal every few months. Look for any signs of wear or damage, such as cracks or breaks. If necessary, replace the seal to ensure optimal performance.
- Do not use excessive force: When tightening bolts or removing the toilet for maintenance, avoid applying excessive force. This can lead to damage to the seal and other components.
By following these troubleshooting tips and regularly maintaining your toilet seal, you can ensure that it functions properly and lasts for a long time. This will help you avoid costly repairs and keep your bathroom clean and odor-free.
Frequently Asked Questions
How Do You Install A Rubber Seal On A Toilet Tank?
To install a rubber seal on a toilet tank, follow these steps. First, turn off the water supply at the shut-off valve. Then, remove the old seal and clean the tank surface. Place the new rubber seal over the drain hole and ensure it is centered.
Finally, carefully tighten the tank screws to secure the seal in place.
Do You Put The Wax Ring On The Toilet Or The Flange First?
The wax ring is placed on the flange first, before the toilet is installed.
How Do You Install A Better Than Wax Toilet Seal?
To install a better than wax toilet seal, follow these steps: 1. Turn off the water supply to the toilet. 2. Remove the old seal and clean the flange. 3. Place the new seal on the flange. 4. Align the toilet bowl over the flange and press down firmly.
5. Reattach the bolts, turn on the water supply, and test for leaks.
How Do You Replace A Toilet Seal Ring?
To replace a toilet seal ring, follow these steps: 1. Turn off the water supply and flush the toilet to empty the tank. 2. Remove the toilet by unscrewing the bolts at the base. 3. Take out the old seal ring, clean the area, and inspect for any damage.
4. Install the new seal ring, aligning it properly with the drain. 5. Reattach the toilet securely, tighten the bolts, and turn on the water supply.
Conclusion
Installing a toilet seal is a simple yet crucial step in ensuring the smooth functioning of your bathroom. By following the steps outlined in this guide, you can easily replace or install a toilet seal without any hassle. Remember to gather all the necessary tools and materials, remove the old seal carefully, and properly install the new one.
With a sturdy and watertight toilet seal in place, you can enjoy a leak-free and hassle-free bathroom experience for years to come.