
To install a toilet flush valve, start by turning off the water supply and draining the tank. Remove the old valve and insert the new one, making sure it is properly aligned.
Tighten the retaining nut and reconnect the water supply line. Turn the water back on and test the flush valve for any leaks. Installing a toilet flush valve is an essential plumbing task that requires precision and attention to detail.
Whether you’re a seasoned DIYer or a beginner, knowing how to properly install a flush valve can save you time and money on potential repairs. In this guide, we will walk you through the step-by-step process of installing a toilet flush valve, ensuring a smooth and efficient flushing system in your bathroom. From shutting off the water supply to connecting the new valve, we will provide you with clear instructions and helpful tips along the way. So, roll up your sleeves and let’s get started!
Understanding The Toilet Flush Valve Anatomy
When it comes to taking care of your toilet, understanding its various components is crucial. One such component that plays a pivotal role in the smooth functioning of your toilet is the flush valve. A flush valve is responsible for flushing away waste and ensuring that your toilet bowl is cleared effectively. In this blog post, we will delve into the anatomy of a toilet flush valve, highlighting its components and discussing the importance of a properly functioning flush valve.
Components of a Toilet Flush Valve
A toilet flush valve consists of several components that work together to achieve an efficient flushing mechanism. Understanding these components is essential for troubleshooting and maintenance purposes. Here are the main components of a toilet flush valve:
- Flush Valve Seal: The flush valve seal is a rubber gasket that forms a watertight seal between the flush valve and the toilet tank. It prevents water from leaking into the toilet bowl when the tank is full.
- Flush Valve Flapper: The flush valve flapper is a hinged rubber or plastic disc that covers the flush valve opening. When the toilet is flushed, the flapper lifts, allowing water to flow into the toilet bowl.
- Overflow Tube: The overflow tube is a vertical tube that connects the flush valve to the toilet tank. It prevents the tank from overflowing by diverting excess water into the toilet bowl.
- Flush Lever: The flush lever is the mechanism that raises the flush valve flapper when you push down on it. This action initiates the flushing process.
- Refill Tube: The refill tube is a small tube that refills the toilet bowl with water after flushing. It directs water from the fill valve into the overflow tube, ensuring proper water level in the bowl.
- Flush Valve Seat: The flush valve seat is the smooth surface on which the flush valve seals. It provides a tight seal to prevent water from escaping into the toilet bowl when the tank is full.
Importance of a Properly Functioning Flush Valve
A properly functioning flush valve is vital for the overall performance and efficiency of your toilet. Here’s why:
- Effective Flushing: A properly functioning flush valve ensures that waste is swiftly and effectively flushed out of the toilet bowl. It prevents clogs and reduces the need for multiple flushes, saving water in the process.
- Water Efficiency: A faulty flush valve can lead to continuous water leaks or running toilets, wasting a significant amount of water over time. By maintaining a properly functioning flush valve, you can conserve water and reduce your utility bills.
- Prevention of Damage: A malfunctioning flush valve can result in water leakage, leading to water damage in your bathroom. Regular maintenance and ensuring a proper seal of the flush valve can help protect your home from potential water-related issues.
- User Convenience: A properly functioning flush valve provides a seamless flushing experience for users. It eliminates the need for multiple flushes and ensures that waste is disposed of effectively, promoting a hygienic bathroom environment.
Now that we have explored the anatomy of a toilet flush valve and understand its importance, it’s crucial to keep it well-maintained. Regular inspection and proper cleaning can help prolong the life of the flush valve and keep your toilet operating smoothly.
Step 1: Removing The Old Flush Valve
Removing the old flush valve is the first step towards installing a new one and ensuring your toilet functions smoothly. In this section, we will guide you through the process of removing the old flush valve step by step.
Tools required for the removal process:
Before you begin, gather the following tools:
- Adjustable wrench
- Bucket
- Towel or cloth
- Sponge
- Plumber’s tape
How to shut off the water supply to the toilet:
Before you start working on the flush valve, it’s essential to shut off the water supply to the toilet. Follow these simple steps:
- Locate the water shut-off valve: Typically, you can find the valve near the bottom of the toilet tank.
- Turn the valve clockwise: Use your adjustable wrench to turn the valve clockwise until it’s fully closed.
- Flush the toilet: After shutting off the water supply, flush the toilet to remove the remaining water in the tank. Hold down the handle to ensure all the water is drained.
- Soak up any remaining water: Use a sponge or cloth to soak up any remaining water in the tank and bowl. This will prevent any water from spilling out when you remove the flush valve.
Now that you have shut off the water supply and removed any excess water, you’re ready to move on to the next step of removing the old flush valve. Remember to wear protective gloves throughout the process to avoid contact with any harmful substances.
Step 2: Choosing A New Toilet Flush Valve
HTML FORMAT:
When it comes to installing a new toilet flush valve, one of the most important steps is choosing the right one for your toilet. The flush valve is responsible for controlling the water flow and ensuring efficient flushing. In this step, we will discuss the factors you need to consider when selecting a flush valve and the different types available in the market.
Factors to Consider When Selecting a Flush Valve
Before purchasing a new flush valve, there are a few key factors to consider:
- Compatibility: Ensure that the flush valve you choose is compatible with your toilet model. Look for information about the specific toilet brands and models that the flush valve is designed to fit.
- Size: Flush valves come in different sizes to fit various toilet tank openings. Measure the diameter of your current flush valve or consult the toilet’s manual to determine the correct size you need.
- Material: The longevity and durability of the flush valve can vary depending on the material it is made of. Common materials include plastic and brass. While plastic valves are inexpensive, brass valves are known for their durability and resistance to corrosion.
Different Types of Flush Valves Available in the Market
When selecting a flush valve, you will also come across different types. Each type serves a specific purpose and offers unique functionality. Here are some common types of flush valves:
| Flush Valve Type | Description |
|---|---|
| Flapper Valve | A flapper valve is the most common type, typically found in older toilets. It uses a rubber flapper that lifts and allows water to flow into the toilet bowl during flushing. Flapper valves are easy to install and replace. |
| Flush Piston Valve | A flush piston valve uses a piston mechanism to control water flow. It provides a strong and efficient flush, making it suitable for toilets that require more flushing power. |
| Dual Flush Valve | A dual flush valve gives you the option to choose between a partial flush and a full flush, depending on your needs. This type of valve can help conserve water by offering different flushing options. |
Consider the features and functionality of each type before making a decision. Choose a flush valve that suits your toilet’s requirements and offers the best performance.
Now that you have a better understanding of the factors to consider and the different types of flush valves available, you can proceed to the next step of installing the selected flush valve.
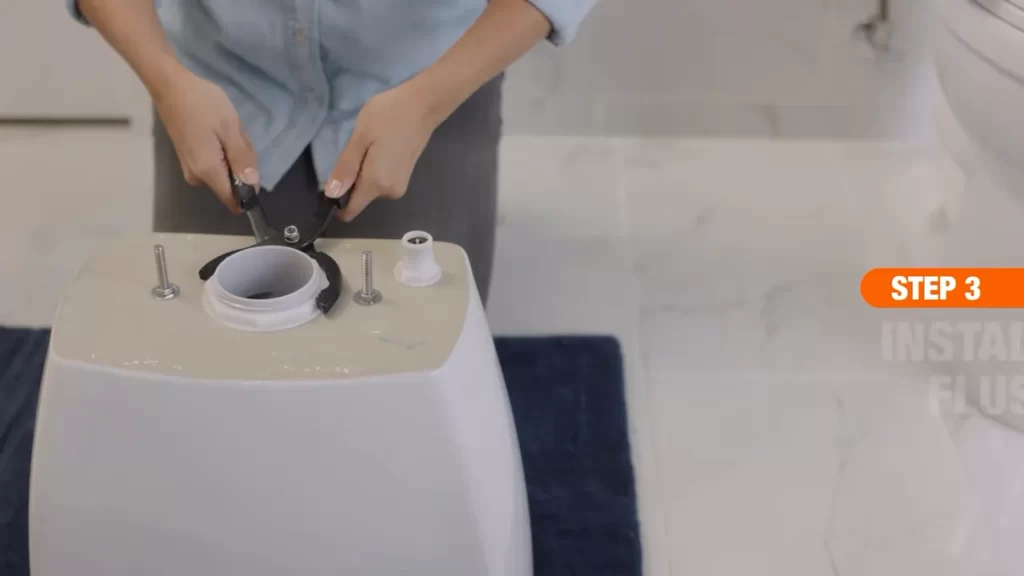
Step 3: Preparing The Toilet For Installation
Your toilet flush valve installation is just one step away from completion! Before you can proceed with the installation, it’s crucial to prepare the toilet properly. This step involves emptying the tank and removing any residual water, as well as cleaning the toilet tank for optimal installation. Let’s delve into each of these important tasks.
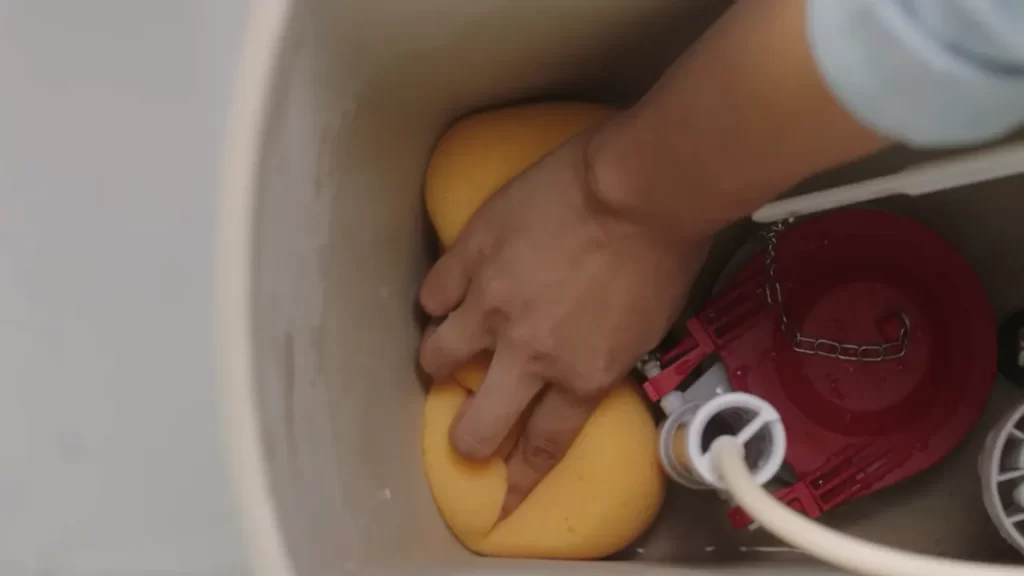
Emptying the tank and removing any residual water
Before you can start installing the new flush valve, you need to empty the toilet tank and remove any remaining water. Here’s how you can do it:
- Turn off the water supply to the toilet by shutting off the water valve located near the base of the toilet.
- Flush the toilet to drain as much water as possible. Dispose of this water appropriately.
- If there is still water remaining in the tank, use a sponge or a towel to soak it up. Squeeze out the water into a bucket or a sink. Ensure the tank is completely dry before proceeding.
By emptying the tank and removing any residual water, you’ll create a clean and dry environment for the next step of the installation process.
Cleaning the toilet tank for optimal installation
A clean toilet tank is essential for a successful flush valve installation. Here’s how you can ensure your toilet tank is free from dirt, debris, and mineral deposits:
- Inspect the inside of the tank for any buildup or deposits. If you notice any, this is the perfect time to clean them off.
- Mix a solution of equal parts water and vinegar. This natural cleaning solution will help dissolve mineral deposits.
- Using a sponge or a cloth, scrub the walls and bottom of the tank with the vinegar solution. Pay special attention to areas with buildup.
- Rinse the tank thoroughly with clean water to remove any residue from the cleaning solution.
- Dry the tank using a clean towel or allow it to air dry completely.
By following these cleaning steps, you’ll ensure that your toilet tank is free from any obstructions, allowing for a smooth and reliable flush valve installation.
Now that you’ve emptied the tank and cleaned it thoroughly, you’re ready to move on to the next step: installing the new toilet flush valve. Don’t worry; we’ll guide you through it in the next section. Stay tuned!
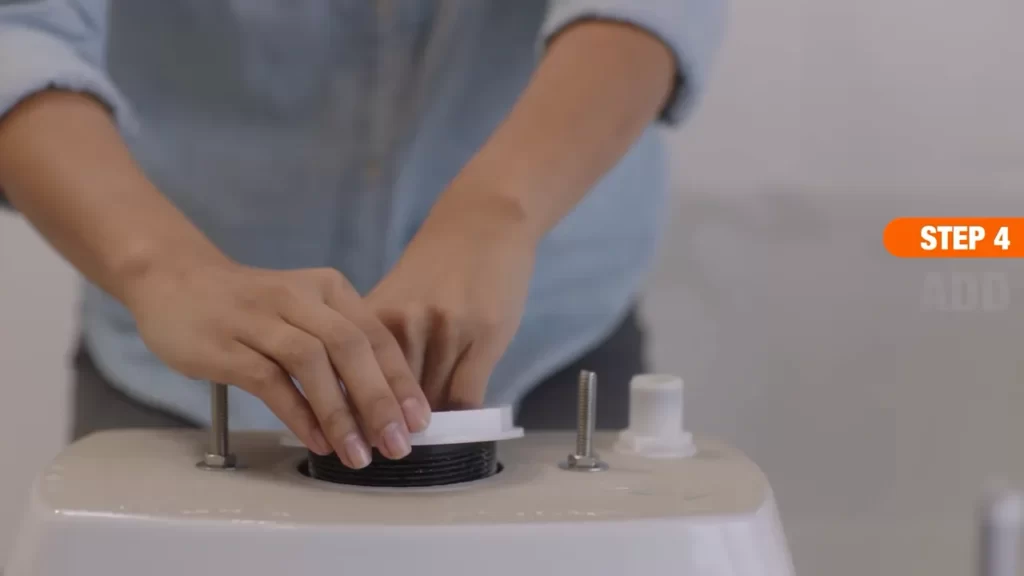
Step 4: Installing The New Flush Valve
Now that you have successfully removed the old flush valve, it’s time to install the new one. This step-by-step guide will walk you through the process of installing the flush valve, ensuring a proper alignment of its components.
Properly aligning the flush valve components
Before you start installing the flush valve, it’s crucial to ensure that all its components are properly aligned. This will help prevent any leaks and ensure the optimal functioning of your toilet. Follow these easy steps to ensure a proper alignment:
- Step 1: Take a close look at the new flush valve and familiarize yourself with its components. You will typically find a rubber seal, a locknut, and a flush valve tower.
- Step 2: Place the rubber seal onto the bottom of the flush valve tower. Make sure it fits snugly and is centered properly.
- Step 3: Insert the flush valve tower into the opening at the bottom of the toilet tank. Gently press it down until it is fully seated.
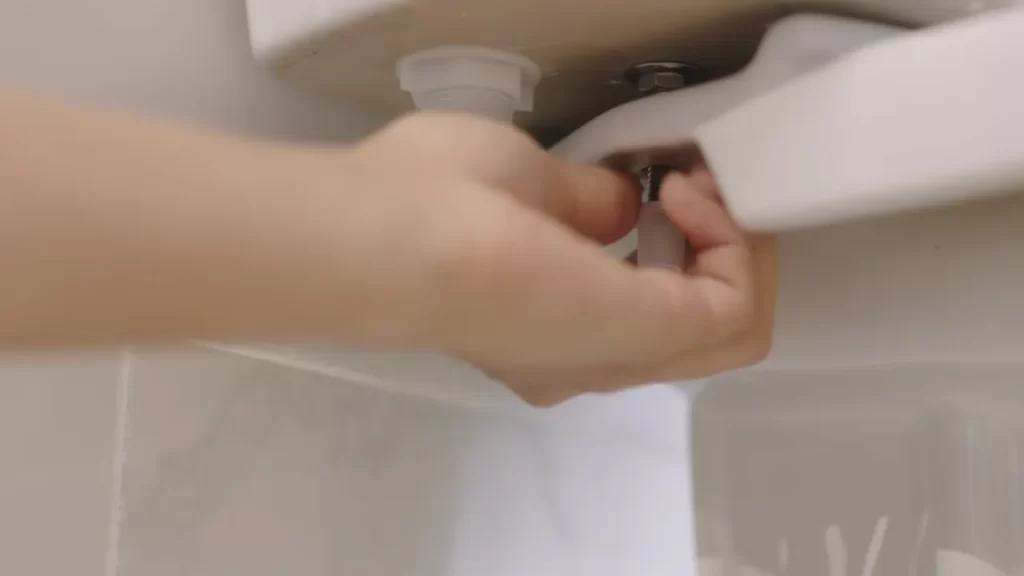
- Step 4: Once the flush valve tower is in place, hand-tighten the locknut onto the threaded portion of the flush valve from the underside of the tank. Use a wrench to give it a final tighten, ensuring a secure fit.
By properly aligning the flush valve components, you are taking a crucial step towards a successful installation. Moving on to the next step, let’s now focus on the installation procedure itself.
Installation Procedure
The following step-by-step guide will help you install the new flush valve correctly:
- Step 1: Make sure the toilet tank is empty by flushing it and removing any remaining water.
- Step 2: Place the new flush valve on the opening at the bottom of the tank.
- Step 3: Align the flush valve with the mounting holes on the toilet tank. Ensure it sits evenly and securely.
- Step 4: Insert the bolts through the mounting holes and tighten them with a screwdriver or a wrench.
- Step 5: Attach the flapper chain to the flush lever, allowing it to operate smoothly.
- Step 6: Connect the water supply line to the fill valve and tighten it securely.
- Step 7: Turn on the water supply and test the flush valve by flushing the toilet multiple times.
Congratulations! You have successfully installed the new flush valve. By following these steps and properly aligning the components, you can ensure a leak-free and efficient flushing system for your toilet.
Step 5: Testing And Adjusting The Flush Valve
How to test the newly installed flush valve
After successfully installing the flush valve, it’s important to ensure it is functioning correctly. Testing the newly installed flush valve will give you peace of mind and save you from any potential future issues. Here’s how to test the flush valve:
- Turn on the water supply: Begin by opening the water supply valve to allow water to flow into the toilet tank. Ensure that the valve is fully open to provide sufficient water pressure.
- Fill the tank: Let the tank fill up with water until the water level reaches the desired level, usually indicated by a marked line on the inside of the tank.
- Inspect for leaks: Carefully examine the area around the flush valve and the connections for any signs of leaks. Look for water dripping or pooling around these areas. If you notice any leaks, tighten the connections or replace any faulty parts.
- Press the flush lever: To test the flush valve, press the flush lever and observe the water flow. The flush valve should open completely, allowing a strong and steady stream of water to rush into the bowl. If you notice any weak flow or incomplete flushing, it may indicate a problem with the flush valve.
- Check the refill: After the flush, allow the tank to refill. Observe the refill process to ensure that the water stops filling when it reaches the correct level. If the water continuously flows into the tank, there may be a problem with the fill valve, which should be addressed.
By following these steps, you can effectively test the newly installed flush valve and identify any issues that need to be addressed. Remember, proper testing will ensure your toilet functions optimally and avoids any water wastage or potential damage.
Adjusting the flush valve for optimal flushing efficiency
After testing the flush valve, you may find that some adjustments are necessary to maximize its flushing efficiency. Here’s how you can adjust the flush valve:
- Water level adjustment: To optimize flushing efficiency, you can adjust the water level in the tank. This can typically be done by adjusting the float or the fill valve. A higher water level can improve flushing power, while a lower level can save water. Follow the instructions provided by the manufacturer for the specific adjustments applicable to your flush valve.
- Flapper adjustment: The flapper is a crucial component of the flush valve that controls the release of water into the bowl. Adjusting the flapper’s chain length can ensure a complete and timely flush. Too loose or too tight of a chain can cause improper flushing. Aim for a chain length that allows the flapper to open fully when the flush lever is pressed.
- Inspect for blockages: If you are still experiencing issues with flushing efficiency even after adjusting the water level and the flapper chain, there may be a blockage in the flush valve or the toilet trap. In this case, you may need to remove the flush valve and clean it thoroughly or seek professional assistance.
By following these adjustment steps, you can fine-tune your flush valve to ensure optimal flushing efficiency. A well-adjusted flush valve will not only provide a powerful flush but also conserve water, making your toilet more eco-friendly.
Troubleshooting Common Flush Valve Issues
Installing a toilet flush valve can be a straightforward process, but sometimes problems can arise. In this section, we will explore some common issues you may encounter and how to troubleshoot them effectively.
Fixing leaks and drips
One of the most frustrating problems with a toilet flush valve is leaks and drips. Not only do they waste water, but they can also cause damage to your bathroom floor and fixtures if left unchecked. Here are a few steps to help you fix these issues:
- Check the fill valve: Start by ensuring the fill valve is properly tightened. If it’s loose, use a wrench to tighten it.
- Inspect the flapper: The flapper is a rubber seal that controls water flow from the tank to the bowl. Check for any cracks or damage. If you notice any, replace the flapper.
- Adjust the chain: Improperly adjusted chains can prevent the flapper from sealing properly. Make sure there is enough slack in the chain to allow the flapper to close completely without being taut.
- Replace the gasket: If the above steps don’t resolve the issue, the gasket between the tank and bowl may be worn or damaged. Remove the tank from the bowl and replace the gasket.
Addressing insufficient flushing power
Another frustrating problem with a flush valve is insufficient flushing power. If your toilet doesn’t flush with the desired force, it can lead to clogs and incomplete waste removal. Follow these steps to address this issue:
- Check the water level: Ensure that the water level in the tank is at the recommended level. Adjust the float if necessary.
- Clean the rim jets: Mineral deposits and debris can clog the rim jets, resulting in weak flushing. Use a straightened paperclip or a small brush to clear any blockages.
- Inspect the flush holes: Flush holes beneath the rim of the toilet bowl can also get clogged. Clean them using a wire hanger or a small brush to improve water flow.
- Consider a dual-flush valve: If the above steps don’t improve flushing power, you may want to consider upgrading to a dual-flush valve. These valves offer two flushing options, one for liquid waste and one for solid waste, providing more control over water flow.
By addressing leaks, drips, and insufficient flushing power, you can ensure that your toilet flush valve works efficiently, saving water and preventing potential damage. Remember to follow the manufacturer’s instructions and stay patient as you troubleshoot these common issues. With a little effort, you’ll have your toilet functioning properly in no time!
Maintenance Tips For A Long-Lasting And Efficient Flush Valve
Regular Cleaning and Maintenance Practices
Maintaining a toilet flush valve is crucial for its long-lasting performance and efficiency. By regularly cleaning and performing maintenance tasks, you can ensure that your flush valve operates smoothly and remains in excellent condition. Here are some essential practices to follow:
- Inspect and clean the flapper: The flapper is a key component of the flush valve that controls the water flow. Over time, it may accumulate mineral deposits or debris, hindering its proper functioning. Regularly inspect the flapper and clean it using a soft brush or sponge to remove any buildup.
- Clean the valve seat: The valve seat is responsible for creating a watertight seal when the flush valve is closed. If it becomes dirty or damaged, it can result in water leaks. To prevent this, clean the valve seat regularly using a mild cleaner and a cloth. Ensure that there is no debris or residue left behind.
- Check and adjust the chain: The chain connects the flush handle to the flapper. If it is too loose or too tight, it can affect the flush valve’s performance. Ensure that the chain has the right amount of tension, allowing the flapper to close and open smoothly.
- Monitor water levels: If the water levels in your toilet bowl are consistently too high or too low, it could indicate an issue with the flush valve. Adjust the water level according to the manufacturer’s instructions to ensure optimal flushing performance.
Signs that Indicate a Need for Maintenance or Replacement
While regular cleaning and maintenance can prolong the life of your flush valve, there are certain signs that indicate it may need further attention or even replacement. Keep an eye out for the following:
- Slow or weak flushing: If your toilet takes longer than usual to flush or the water flow is weak, it could be a sign of a clogged or deteriorating flush valve. Cleaning or replacing the valve may be necessary to restore proper flushing.
- Continuous water running: If you notice water continuously running into the toilet bowl, even after flushing, it could indicate a problem with the flush valve. This can lead to wasted water and increased utility bills. Consider checking and repairing or replacing the flush valve if needed.
- Water leaks: Visible water leaks around the base of the toilet or inside the tank can indicate a faulty flush valve. Inspect the valve carefully for any cracks or damage, and address the issue promptly to prevent further leaks and potential water damage.
Frequently Asked Questions
How Do You Install A Toilet Flush Valve?
To install a toilet flush valve, follow these steps: 1. Turn off the water supply 2. Drain the tank and disconnect the flapper chain 3. Unscrew the old flush valve and remove it 4. Insert the new flush valve and secure it tightly 5.
Reconnect the flapper chain and turn on the water supply.
How Do You Install A Toilet Flush Valve Sealant Ring?
To install a toilet flush valve sealant ring, follow these steps: 1. Turn off the water supply. 2. Remove the old sealant ring. 3. Clean the area around the flush valve. 4. Place the new sealant ring over the flush valve.
5. Reassemble and secure the toilet tank. Turn on the water supply.
How Do You Install A 2 Inch Flush Valve?
To install a 2 inch flush valve, follow these steps: 1. Turn off the water supply to the toilet. 2. Remove the old flush valve and clean the area. 3. Install the new 2 inch flush valve by following the manufacturer’s instructions.
4. Connect the water supply line and turn it back on. 5. Test the flush valve for proper functioning.
How Do You Install A Fill Valve And Flapper Kit On A Toilet?
To install a fill valve and flapper kit on a toilet, follow these steps: 1. Turn off the water supply. 2. Flush the toilet and remove any remaining water. 3. Remove the old fill valve and flapper. 4. Install the new fill valve and flapper.
5. Turn on the water supply again. Done!
Conclusion
To effectively install a toilet flush valve, follow the step-by-step guide provided in this blog post. By understanding the process and acquiring the necessary tools, you can confidently take on this DIY project. Remember, a properly functioning flush valve is key to maintaining the functionality and efficiency of your toilet.
Keep these instructions in mind for future reference, and enjoy a well-functioning toilet for years to come. Happy installing!