
To install a toilet flange, first, remove the old flange and clean the area. Then, secure the new flange to the floor using the appropriate hardware.
Are you planning to install a toilet flange? Knowing how to properly install a toilet flange is essential for a leak-free and stable toilet connection. The toilet flange is a crucial component that connects the toilet bowl to the plumbing system, ensuring a secure and watertight seal.
In this guide, we will walk you through the necessary steps for a successful toilet flange installation. From removing the old flange to securing the new one, we will cover everything you need to know to complete this task with ease. So, let’s get started and ensure your bathroom is equipped with a sturdy and efficient toilet flange.
Understanding The Importance Of A Toilet Flange
When it comes to installing a toilet, one component that often goes unnoticed but plays a crucial role in its proper functioning is the toilet flange. A toilet flange is an essential part of the toilet installation process, as it provides a secure connection between the toilet and the drainpipe. By understanding the importance of a toilet flange, you can ensure a leak-free and stable toilet installation that will stand the test of time.
Explanation of the purpose and function of a toilet flange
The purpose of a toilet flange is to create a watertight seal between the toilet and the drainpipe. It acts as a sturdy base for the toilet to sit on and also helps in securing it firmly in place. A toilet flange is usually made of either PVC or cast iron materials and is designed to fit securely over the drainpipe opening. It has a raised lip on the top that ensures a proper seal and prevents any leakage from occurring.
Why a properly installed flange is essential for a leak-free toilet
A properly installed toilet flange is crucial for maintaining a leak-free toilet. When the flange is installed correctly, it prevents any water or waste from seeping out of the toilet and causing damage to your bathroom floor. Without a secure and tight connection between the toilet and the drainpipe, you may experience unpleasant odors, water leaks, and even potential structural damage to your home.
How a flange connects the toilet to the drainpipe
The toilet flange connects the toilet to the drainpipe by fitting over the pipe opening and providing a stable platform for the toilet to be mounted on. It has bolt holes that align with the toilet’s mounting holes, allowing you to secure the toilet firmly in place. The flange also has a tapered end that fits into the drainpipe, providing a smooth flow of waste into the plumbing system. By ensuring a proper connection between the toilet and the drainpipe, the flange helps maintain the integrity of your bathroom plumbing system.
Tools And Materials Required For Installation
Before you begin the process of installing a toilet flange, it’s essential to gather all the necessary tools and materials. Having everything on hand will make the installation process smoother and more efficient. In this section, we will discuss the tools you’ll need for the installation process as well as the required materials, such as the flange, wax ring, and screws.
List of tools needed for the installation process
When it comes to installing a toilet flange, you’ll need a variety of tools to ensure a proper and secure installation. Here is a list of the tools you will need:
- Adjustable wrench
- Hacksaw or reciprocating saw
- Screwdriver (Phillips or flathead)
- Level
- Tape measure
- Pencil or marker
- Hammer
- Putty knife
- Plumber’s putty
Required materials for the installation process
In addition to the necessary tools, you will also need specific materials to successfully install a toilet flange. These materials include:
- Toilet flange
- Wax ring
- Screws
- PVC pipe (if needed)
- Plumber’s tape (Teflon tape)
- Plumber’s glue (if using PVC pipe)
Importance of using high-quality materials for durability and longevity
When it comes to installing a toilet flange, using high-quality materials is crucial. By using durable materials, you can ensure the longevity and effectiveness of your flange installation. Investing in a sturdy and reliable toilet flange, a quality wax ring, and durable screws will prevent leakage and minimize the need for future repairs.
Using low-quality materials may save you some money upfront but can lead to costly issues down the road. Cheap flanges and inadequate wax rings can result in leaks, unpleasant odors, and potential water damage to your flooring or subfloor. It’s always better to invest in high-quality materials from trusted manufacturers to ensure the durability and longevity of your toilet flange installation.
Removing The Old Toilet Flange
Steps to Safely Remove the Existing Flange
Removing the old toilet flange is a crucial step in installing a new one. By following these steps, you can ensure a safe and efficient removal process:
- First, turn off the water supply to the toilet by locating the valve behind the toilet and turning it clockwise until it is fully closed. This will prevent any leaks or water damage during the flange removal.
- Next, remove the toilet by unscrewing the bolts securing it to the floor. Gently rock the toilet back and forth to break the seal between the toilet and the old flange.
- Once the toilet is removed, you can access the old flange. Use a scraper or putty knife to remove any wax or debris around the flange.
- Inspect the flange for any signs of damage or corrosion. If the flange is cracked, broken, or deteriorated, it will need to be replaced. Assessing the condition of the old flange is essential before proceeding with the installation of a new one.
How to Assess the Condition of the Old Flange
Assessing the condition of the old flange is crucial to determine whether it can be salvaged or if it needs to be replaced. Follow these steps to assess the condition:
- Carefully examine the flange for any cracks, breaks, or signs of wear and tear. These issues can compromise the flange’s strength and stability.
- Check the flange’s connection to the drainpipe. If it is loose or damaged, it may need to be repaired or replaced.
- Inspect the flange’s collar, which is the part that connects to the toilet. Any damage or corrosion in this area may hinder the proper installation of a new flange.
Potential Challenges and Troubleshooting Tips When Removing an Old Flange
Removing an old flange can present some challenges, but with the right approach, you can overcome them. Here are some potential challenges and troubleshooting tips:
| Challenge | Troubleshooting Tips |
|---|---|
| The flange is stuck or glued to the drainpipe. | Apply penetrating oil or a heat gun to loosen the seal. Use a wrench or pliers to twist and break the seal gradually. |
| The bolts securing the flange are rusted or stripped. | Use a hacksaw or reciprocating saw to cut the bolts. Replace them with new ones during the installation process. |
| The flange is too damaged to be removed. | If the flange cannot be removed without causing further damage, it may be necessary to call a professional plumber for assistance. |
By addressing these potential challenges and following the necessary steps, you can successfully remove the old toilet flange and prepare for the installation of a new one. Remember to prioritize safety and seek professional help if needed, ensuring a smooth and effective process.
Preparing The Drainpipe And Subfloor
Before installing a toilet flange, it is important to properly prepare the drainpipe and subfloor for a secure and durable installation. This involves cleaning and inspecting the drainpipe for any obstructions or damage, ensuring a level and stable subfloor, and making necessary repairs or reinforcements. Follow these steps to ensure a smooth installation process.
How to clean and inspect the drainpipe for any obstructions or damage
To prevent any future plumbing issues or leaks, it is crucial to clean and inspect the drainpipe before installing the toilet flange. Here’s how you can do it:
- Begin by removing any debris or foreign objects from the drainpipe using a plunger or a plumbing snake.
- Next, inspect the drainpipe visually to check for any signs of cracks, breakages, or obstructions such as tree roots or sediment buildup.
- If you notice any damage or blockages, it is recommended to consult a professional plumber to address the issue before proceeding with the flange installation.
Steps to ensure a level and stable subfloor for flange installation
A level and stable subfloor is essential for a secure and long-lasting toilet flange installation. Follow these steps to ensure your subfloor is ready:
- Start by measuring the height of the existing subfloor to determine if it requires leveling. Use a level tool to check for any unevenness.
- If the subfloor is uneven, use a floor leveling compound to fill in any low areas and create a smooth and even surface.
- Ensure that the subfloor is sturdy and free from any rot or water damage. If you encounter any issues, consider repairing or replacing the damaged sections.
- Secure any loose or squeaky floorboards with screws to provide extra stability.
Tips for repairing or reinforcing the subfloor if necessary
In some cases, the subfloor may require repairs or reinforcement before installing the toilet flange. Consider the following tips if you encounter any issues:
- If there is significant damage to the subfloor, it may be necessary to replace the affected area entirely. Use a circular saw to carefully cut out the damaged section and replace it with a new plywood board of the same thickness.
- Alternatively, if the subfloor is weak or sagging, you can reinforce it by adding additional support beams or sistering the existing floor joists.
- Make sure to use construction adhesive and screws to secure the subfloor properly and provide maximum stability.
- Finally, double-check the levelness of the subfloor before proceeding with the toilet flange installation.
By properly preparing the drainpipe and subfloor before installing the toilet flange, you can ensure a secure and reliable connection that will withstand years of use. Following these steps and tips will help you avoid common issues and achieve a successful installation.
Choosing The Right Toilet Flange For Your Installation
When it comes to installing a toilet, one of the most crucial steps is selecting the appropriate toilet flange. The toilet flange not only securely attaches the toilet to the floor but also ensures a proper seal to prevent any leaks. With numerous options available in the market, choosing the right flange can seem overwhelming. In this article, we will provide an overview of the different types of toilet flanges available, discuss the factors to consider when selecting the appropriate flange for your toilet and bathroom setup, and help you understand flange sizes, materials, and compatibility with different toilet models.
Overview of different types of toilet flanges available in the market
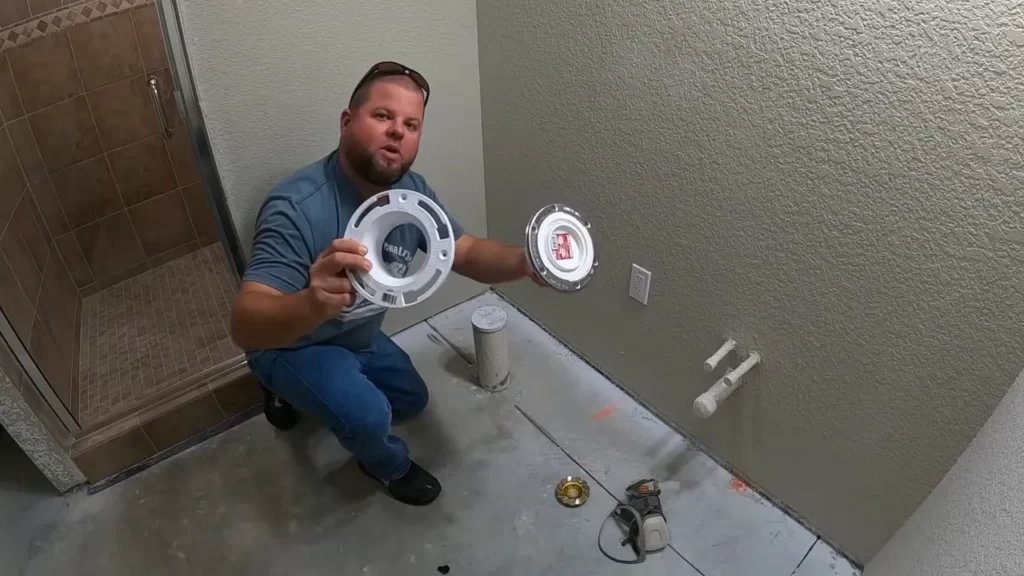
Before diving into the selection process, it is essential to understand the various types of toilet flanges available in the market. Here are the three most common types:
- Standard Toilet Flange: This is the traditional type of flange used in most residential installations. It features a circular ring with bolt slots that attach to the floor and a sleeve that extends into the drainpipe.
- Offset Toilet Flange: Offset flanges are designed to compensate for an offset or misaligned toilet outlet. They allow for adjustments in the horizontal or vertical position of the toilet to ensure a proper connection between the flange and the toilet waste outlet.
- Push-In Toilet Flange: Push-in flanges are relatively newer in the market and are preferred for their ease of installation. They feature a flexible gasket that fits into the drainpipe, eliminating the need for bolts and screws.
Factors to consider when selecting the appropriate flange for your toilet and bathroom setup
Choosing the right toilet flange involves considering several factors to ensure a proper fit and seal. Keep the following factors in mind during your selection process:
- Bathroom Flooring: The type of flooring in your bathroom, such as tile, laminate, or concrete, can affect the flange installation. Some flanges are specifically designed for certain types of flooring and may require additional steps or accessories for proper installation.
- Toilet Outlet Location: Determine the location of the toilet outlet in relation to the flange. If it is offset or not aligned properly, you may need to consider an offset flange for a secure connection.
- Flange Size: Flanges come in various sizes to accommodate different drainpipe dimensions. Measure the diameter of your drainpipe to ensure you select a flange that fits securely.
- Flange Material: Flanges are commonly made of PVC or cast iron. PVC flanges are lightweight, resistant to corrosion, and easy to work with. Cast iron flanges, on the other hand, are more durable and provide a secure connection. Consider the pros and cons of each material based on your specific needs.
- Toilet Model Compatibility: Check the compatibility of the toilet flange with your toilet model. Some flanges are designed for specific toilet brands or models, ensuring a proper fit and seal.
Understanding flange sizes, materials, and compatibility with different toilet models
Flange sizes and materials play a crucial role in selecting the appropriate toilet flange for your installation. It is important to ensure compatibility with your toilet model to avoid any installation issues. Refer to the following table for a quick overview:
| Flange Size | Drainpipe Diameter | Compatibility |
|---|---|---|
| 3-inch | 3.5 inches | Standard size for most residential toilets |
| 4-inch | 4 inches | Commonly used in commercial or high-efficiency toilets |
When selecting the flange material, consider the advantages and disadvantages of each:
- PVC Flanges: Lightweight, corrosion-resistant, easy to work with, and suitable for most residential installations.
- Cast Iron Flanges: Durable, provide a secure connection, and commonly used in commercial or heavy-duty applications.
Always refer to the toilet manufacturer’s specifications or consult a professional to determine the exact compatibility of the flange with your toilet model.
By considering the type of flange, the factors discussed earlier, and understanding flange sizes, materials, and compatibility with different toilet models, you can make an informed decision when choosing the right toilet flange for your installation. This ensures a successful and leak-free toilet installation that will stand the test of time.
Installing And Securing The New Toilet Flange
Step-by-step instructions for installing the new flange onto the drainpipe
Installing a new toilet flange is a crucial step when replacing or installing a toilet. The flange acts as a connecting piece between the toilet bowl and the drainpipe, ensuring a secure and leak-free connection. To install the new flange onto the drainpipe, follow these step-by-step instructions:
- Begin by removing the old flange, if necessary. Using a wrench, unscrew the bolts securing the old flange to the floor and carefully lift it off the drainpipe.
- Inspect the drainpipe to ensure it is clean and free from any debris or obstructions. Use a wire brush or pipe cleaner to remove any residue.
- Next, apply a layer of PVC primer to the outside of the drainpipe and the inside of the new flange. This will help create a strong bond between the two.
- Once the primer has dried, apply a thin layer of PVC adhesive to the same areas. Be sure to work quickly and carefully, as the adhesive sets quickly.
- Now, carefully align the new flange with the drainpipe, ensuring the holes for the bolts are properly positioned.
- With the flange aligned, firmly press it onto the drainpipe, making sure it is seated securely.
- Allow the adhesive to cure according to the manufacturer’s instructions before proceeding to the next step.
Proper alignment and positioning of the flange for a secure fit
Proper alignment and positioning of the flange are essential for a secure and leak-free installation. When aligning the flange, follow these guidelines:
- Ensure the flange sits level with the finished floor to provide a seamless connection between the toilet bowl and the drainpipe.
- Double-check that the flange is centered over the drainpipe, providing an even distribution of weight when the toilet is installed.
- Inspect the alignment from multiple angles to confirm the flange is straight and flush with the floor.
Securing the flange to the subfloor using screws or other recommended methods
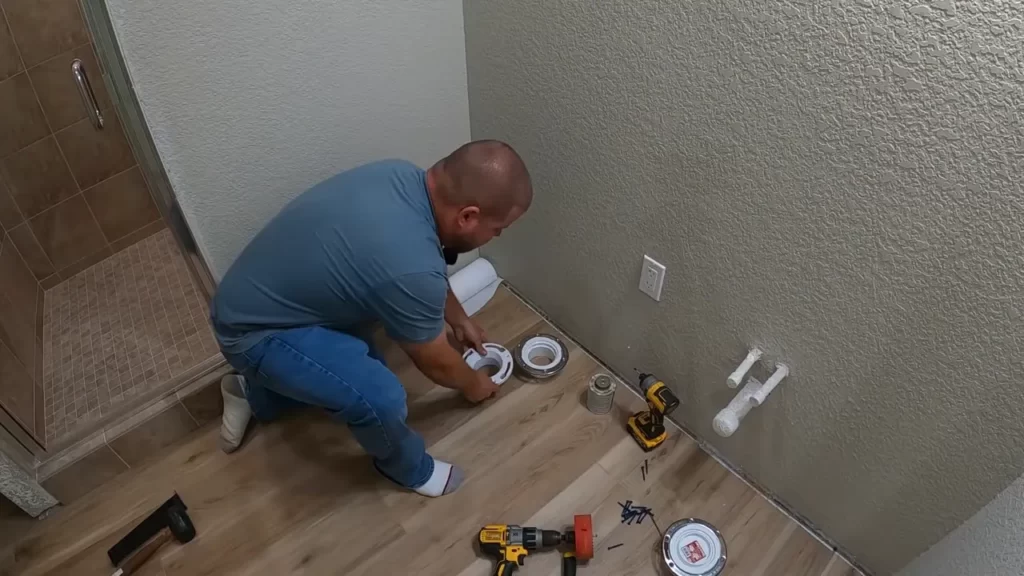
Securing the flange to the subfloor is crucial to prevent any movement or shifting during use. Here are some recommended methods for securing the flange:
- Using stainless steel or brass screws, attach the flange to the subfloor at the designated screw holes. Make sure the screws are snug but not overtightened, as this can cause damage to the flange.
- Alternatively, you can use flange repair brackets or repair kits specifically designed to reinforce the flange and secure it to the subfloor.
- Whichever method you choose, ensure that the flange is securely fastened to the subfloor, providing a stable base for the toilet.
Sealing The Toilet Flange With A Wax Ring
When it comes to installing a toilet, ensuring a proper seal between the toilet flange and the toilet base is crucial. A wax ring plays a vital role in achieving this watertight seal and preventing any leakage. In this section, we will explain the purpose and benefits of using a wax ring for sealing, as well as guide you on how to properly place and align the wax ring on the flange.
Explanation of the Purpose and Benefits of Using a Wax Ring for Sealing
A wax ring acts as a sealant between the toilet flange and the toilet base, creating a watertight connection that prevents any water or sewage from leaking onto your bathroom floor. Its purpose is to provide a secure and reliable barrier, eliminating any chance of leakage and possible damage. In addition to its primary function, a wax ring also offers several benefits:
- Easy installation: Wax rings are simple to install, making them an ideal choice even for beginners.
- Durable and long-lasting: The high-quality wax used in these rings ensures durability and longevity, allowing you to have a hassle-free toilet installation for years to come.
- Economical: Wax rings are affordable and cost-effective, making them a practical choice for anyone looking to install or replace a toilet flange.
How to Properly Place and Align the Wax Ring on the Flange
Proper placement and alignment of the wax ring are crucial for achieving an effective seal. Follow these steps to ensure accurate installation:
- After removing the old wax ring and cleaning the flange thoroughly, inspect the flange for any cracks or damage. If any issues are present, make sure to address them before proceeding.
- Take the wax ring and place it on the flange. Ensure that the tapered side of the ring is facing up, while the flat side is facing down towards the flange.
- Align the wax ring properly with the flange, making sure it sits centered and evenly around the drain opening.
- Apply gentle pressure to the wax ring, pressing it down until it adheres firmly to the flange. Take care not to press too hard as it may cause deformation of the ring.
By following these steps, you can ensure proper placement and alignment of the wax ring, setting the foundation for a watertight seal.
With the wax ring securely in place, you can continue with the installation of the toilet, knowing that you have taken the necessary steps to create a reliable seal between the flange and the toilet base. This will not only prevent any potential leakage but also provide peace of mind and a well-functioning toilet for years to come.
Attaching And Securing The Toilet Bowl
Once you have successfully installed the toilet flange, the next step is to attach and secure the toilet bowl to the flange. This is a crucial step in the installation process as it ensures the stability and functionality of your toilet. In this section, we will guide you through the step-by-step process for attaching the toilet bowl to the flange, how to properly align the bowl with the flange, and securing it in place without causing any damage.
Step-by-step process for attaching the toilet bowl to the flange
Follow these step-by-step instructions to attach the toilet bowl to the flange:
- Place the wax ring on the flange, ensuring it sits securely and centered. The wax ring will create a watertight seal between the bowl and the flange, preventing any leaks.
- Gently lower the toilet bowl onto the wax ring, making sure to align the bolt holes on the base of the bowl with the holes on the flange.
- Once the bowl is in position, insert the bolts into the holes on the flange, through the bolt holes of the toilet bowl. Make sure the bolts are straight and level.
- Hand-tighten the nuts onto the bolts, ensuring that the toilet bowl remains level and centered.
Properly aligning the bowl with the flange and securing it in place
Proper alignment of the toilet bowl with the flange is crucial for a stable and secure installation. Follow these tips to ensure proper alignment:
- Use a level to check that the toilet bowl is sitting evenly on the floor. Adjust the position if necessary.
- Align the bolt holes on the base of the bowl with the holes on the flange. This will ensure that the bolts can be inserted easily and securely.
- Once the bowl is aligned, tighten the nuts onto the bolts evenly and gradually. Alternate between the nuts, tightening them a little at a time, until the bowl is firmly secured to the flange.
Tips for tightening the bolts without damaging the toilet or flange
When tightening the bolts, it is important to avoid damaging the toilet or flange. Follow these tips to tighten the bolts properly:
- Use a wrench or pliers to tighten the nuts, but be careful not to overtighten them. Over-tightening can lead to cracks in the toilet bowl or damage to the flange.
- Make sure to alternate between the nuts when tightening to ensure even pressure and prevent any stress on one side of the bowl.
- If the nuts feel tight and secure, stop tightening. Overtightening can cause damage and result in leaks or an unstable toilet.
By following these steps and tips, you can successfully attach and secure the toilet bowl to the flange, ensuring a sturdy and leak-free installation. Remember to double-check the alignment and tightness of the bolts before using the toilet.
Testing For Leaks And Ensuring Proper Functioning
After successfully installing the toilet flange, the final step is to test for leaks and ensure proper functioning. This crucial step will help you avoid any unwanted surprises down the line and ensure that your toilet operates smoothly.
How to check for leaks after installation
Checking for leaks after installing the toilet flange is an essential part of the installation process. Here’s how you can do it:
- First, turn off the water supply to the toilet by closing the shut-off valve located behind the toilet.
- Next, flush the toilet to drain any remaining water from the tank and bowl.
- Inspect the area around the flange and the base of the toilet for any signs of water leakage.
- If you notice any water or moisture, carefully tighten the bolts connecting the toilet to the flange. Be careful not to overtighten them, as this may cause damage.
- Turn the water supply back on and wait for the tank to fill. Keep an eye on the base of the toilet for any new leaks.
- If you still notice leaks, it may be necessary to remove the toilet and reapply the wax ring or seek professional assistance.
Steps to ensure the toilet is securely connected to the flange and drainpipe
To ensure a secure connection between the toilet and the flange, follow these steps:
- Double-check that the flange is tightly secured to the floor using screws or bolts.
- Place the wax ring on the flange, making sure it is centered over the drainpipe.
- Lower the toilet onto the flange and apply downward pressure to compress the wax ring. Make sure the toilet aligns with the bolts on the flange.
- Secure the toilet to the flange by tightening the nuts on the bolts, alternating between sides to ensure even pressure.
- Do not overtighten the nuts, as this can crack the toilet or cause leaks.
Troubleshooting tips for resolving any leaks or issues post-installation
If you encounter any leaks or issues after installing the toilet flange, here are some troubleshooting tips to help you resolve them:
- Check the wax ring for any damage or improper installation. Replace the wax ring if necessary.
- Ensure that the toilet is level and sitting evenly on the flange. If not, use shims to adjust and stabilize the toilet.
- Inspect the floor and flange for any cracks or damage. Repair or replace as needed.
- If leaks persist, it may be best to seek professional help to identify and fix the underlying cause.
- Regularly inspect the toilet and the surrounding area for any signs of leakage to catch any potential issues early.
By following these steps and troubleshooting tips, you can test for leaks and ensure the proper functioning of your newly installed toilet flange. Taking the time to double-check everything will provide you with peace of mind and a reliable toilet for years to come.
Additional Tips And Best Practices
In addition to the step-by-step instructions on how to install a toilet flange, there are some additional tips and best practices that can ensure a successful installation. By keeping these key considerations in mind, avoiding common mistakes, and following regular maintenance and care tips, you can extend the lifespan of the flange and prevent any future issues. In this section, we will cover all of these aspects in detail.
Key considerations to keep in mind for a successful toilet flange installation
When installing a toilet flange, there are several key considerations that you should keep in mind to ensure a successful installation. These considerations include:
- Choose the right flange: Make sure to select a flange that is compatible with your toilet and the type of flooring you have. There are various types of flanges available, such as PVC, cast iron, and stainless steel, so choose the one that suits your needs best.
- Check for leaks: Before installing the flange, check for any leaks in the water supply line or the toilet bowl. It is essential to fix any leaks before proceeding with the installation to prevent any further damage.
- Proper alignment: Ensure that the flange is aligned correctly with the waste pipe. Any misalignment can cause leaks and instability in the toilet. Use a plumber’s putty or wax ring to create a watertight seal and secure the flange in place.
- Tighten securely: After properly aligning the flange, tighten the bolts securely to avoid any movement or wobbling of the toilet. This will prevent leaks and ensure a sturdy installation.
- Level the toilet: Use a level to ensure that the toilet is positioned correctly and sits level on the flange. This will prevent any rocking or instability when using the toilet.
Common mistakes to avoid during the installation process
While installing a toilet flange, there are some common mistakes that should be avoided to ensure a successful installation. These mistakes include:
- Uneven flange: Failing to properly align and level the flange with the floor can result in an uneven installation. This can lead to leaks and instability in the toilet.
- Over-tightening: It is important not to over-tighten the bolts when securing the toilet to the flange. Over-tightening can crack the toilet or damage the flange, leading to leaks.
- Using incorrect sealant: Choosing the wrong type of sealant or failing to use sealant altogether can result in leaks around the flange. Make sure to use a plumber’s putty or wax ring to create a watertight seal.
- Ignoring maintenance: Regular maintenance is essential for the longevity of the toilet flange. Ignoring maintenance can lead to corrosion, leaks, and other issues. Cleaning the flange regularly and inspecting for any signs of damage or wear can help prevent future problems.
Regular maintenance and care tips to extend the lifespan of the flange
To ensure the flange’s longevity and prevent any issues, regular maintenance and care are crucial. Here are a few tips to help extend the lifespan of the flange:
- Clean regularly: Clean the flange regularly using a mild cleaner or vinegar solution to remove any buildup or debris that can cause clogs or corrosion.
- Inspect for damage: Regularly inspect the flange for any signs of damage or wear, such as cracks, rust, or loose bolts. Promptly repair or replace any damaged components to prevent further issues.
- Avoid excessive force: When tightening or loosening bolts, avoid using excessive force as it can damage the flange or toilet. Use the appropriate tools and apply gentle pressure to prevent any accidental damage.
- Address leaks immediately: If you notice any leaks around the flange, address them promptly. Ignoring leaks can lead to water damage and further complications down the line.
- Consult a professional: If you are unsure about any aspect of the flange installation or maintenance, it is always best to consult a professional plumber. They can provide expert advice and ensure the job is done correctly.
By following these additional tips and best practices, you can make sure that your toilet flange installation is not only successful but also long-lasting and hassle-free.
Frequently Asked Questions
How Should A Toilet Flange Be Installed?
To install a toilet flange, follow these steps: 1. Turn off the water supply. 2. Remove the old flange and clean the area. 3. Align the new flange with the floor drain and secure it with screws. 4. Place a wax ring on the flange.
5. Attach the toilet bowl firmly to the flange. Remember to follow proper installation guidelines to ensure a leak-free and stable connection.
Should A Toilet Flange Be Flush With The Floor?
Yes, a toilet flange should be flush with the floor. Proper installation ensures a secure connection between the toilet and the waste pipe, preventing leaks or odors. A level, flat flange ensures a tight seal and stable support for the toilet.
Are You Supposed To Glue A Toilet Flange?
No, you are not supposed to glue a toilet flange. Gluing is not necessary as the flange is typically secured to the floor with screws. The flange provides a watertight seal between the toilet and the sewer pipe, and gluing can make future repairs or replacements difficult.
Should Toilet Flange Sit On Top Of Tile?
Yes, the toilet flange should sit on top of the tile. This ensures a proper seal and prevents leaks. It also helps to secure the toilet to the floor and provides stability. Make sure the flange is level with the tile surface for a flush and secure fit.
Conclusion
Installing a toilet flange can seem daunting at first, but with the right tools and steps, it is a manageable task. From preparing the area to securing the flange, we have covered everything you need to know in this guide.
Remember to take your time, follow instructions carefully, and seek professional help if needed. By following these steps, you’ll have a properly installed toilet flange that will ensure a secure and functional toilet for years to come. Happy DIY-ing!