To install a toilet bowl wax ring, first, remove the old wax ring and clean the flange. Then, place the new wax ring on the flange and carefully lower the toilet bowl onto the wax ring, making sure it is aligned with the mounting bolts.
Gently press down on the toilet bowl to compress the wax ring and create a watertight seal. Finally, secure the toilet bowl in place by tightening the mounting bolts and reconnecting the water supply. If you’re planning to install a toilet bowl wax ring, it’s essential to follow the correct steps to ensure a proper seal and prevent any potential leaks.
In this guide, we’ll walk you through the process of installing a toilet bowl wax ring, from removing the old wax ring to securing the new one and connecting the toilet bowl. By following these steps, you’ll have your toilet up and running smoothly in no time. So let’s get started!
Why A Properly Installed Wax Ring Is Essential For A Leak-Free Toilet
A properly installed wax ring is essential for a leak-free toilet. When it comes to plumbing issues, a leaking toilet can be a major hassle and can lead to costly repairs and potential water damage. That’s why it’s crucial to ensure that your toilet bowl has a correctly installed wax ring that creates a watertight seal. In this article, we will explore the importance of a correctly installed wax ring, how it creates a watertight seal, and the common issues that can arise from improper installation.
Importance of a correctly installed wax ring
A correctly installed wax ring plays a crucial role in keeping your toilet leak-free. It acts as a barrier between the toilet bowl and the sewer pipe, preventing any water or waste from seeping out. Without a properly installed wax ring, you run the risk of experiencing unpleasant leaks that can lead to water damage and unsanitary conditions.
How a wax ring creates a watertight seal
A wax ring is made from a pliable material that molds itself to the contours of the toilet base and the sewer pipe. This allows it to create a tight and secure seal, preventing any water or odors from escaping. When the toilet is properly installed, the wax ring compresses under the weight of the toilet, forming a watertight barrier that ensures a leak-free operation.
Common issues caused by improper installation
Improper installation of a wax ring can lead to various issues that may result in a leaking toilet. Some common problems include:
- Water leaks around the base of the toilet
- Unpleasant odors in the bathroom
- Water damage to the subfloor
- Potential mold and mildew growth
These issues not only create inconvenience but can also pose health risks and cause significant damage to your bathroom. Therefore, it is crucial to ensure that the wax ring is correctly installed to mitigate these problems.

Required Tools And Materials
When it comes to installing a toilet bowl, having the right tools and materials is crucial for a successful installation. In this section, we will discuss the required tools, necessary materials, and additional safety equipment that are essential for a seamless toilet bowl wax ring installation.
List of Tools Needed for Installation
To ensure a smooth installation process, make sure you have the following tools on hand:
- Adjustable wrench
- Putty knife
- Plunger
- Tape measure
- Hacksaw
- Screwdriver
- Cloths
Necessary Materials for a Successful Installation
Aside from the tools, you will also need the following materials for a successful toilet bowl wax ring installation:
- Toilet bowl wax ring
- Toilet bolts
- Toilet tank bolts
- Water supply line
- Closet bolts
- Wax sealant
- Gloves
Additional Safety Equipment Recommendations
While not mandatory, additional safety equipment can provide added protection during the installation process. Consider using the following safety equipment:
- Safety goggles to protect your eyes from debris
- Disposable gloves to keep your hands clean and prevent contamination
- Knee pads or a foam mat to provide comfort while working on the floor
Now that you have a comprehensive list of the required tools, necessary materials, and additional safety equipment, you are ready to proceed with the toilet bowl wax ring installation. Ensure you have everything prepared before starting the installation process to avoid any delays or interruptions.

Step-By-Step Guide: Installing A Toilet Bowl Wax Ring
Installing a toilet bowl wax ring may seem like a daunting task, but with the right approach and careful attention to detail, it can be a relatively straightforward process. In this step-by-step guide, we will walk you through each stage of the installation process, ensuring that you can successfully replace your old wax ring and create a secure seal for your toilet bowl.
Preparation for the installation process
Before beginning the installation process, it is important to gather all the necessary tools and materials. This includes a new wax ring, a putty knife, an adjustable wrench, and a pair of gloves for safety. Additionally, ensure that the water supply to the toilet is shut off to prevent any accidental leaks or spills.
Shutting off the water supply
To start the installation process, locate the shut-off valve near the base of the toilet and turn it clockwise to shut off the water supply. Once the valve is fully closed, flush the toilet to empty the tank and bowl of water. This will make it easier to remove the old toilet and wax ring.
Removing the old toilet and wax ring
Using a wrench, locate and loosen the nuts that secure the toilet to the floor. Once the nuts are loose, carefully lift the toilet bowl off the flange and place it aside. Take caution as the toilet may still contain some water.
Inspecting and cleaning the flange
With the toilet removed, inspect the flange for any signs of damage, rust, or wear. If necessary, clean the flange with a putty knife and remove any remnants of the old wax ring. This will ensure a clean and even surface for the new wax ring to be placed on.
Checking for damage or rust
While inspecting the flange, also check for any signs of damage or rust on the toilet bowl outlet. If any issues are found, it may be necessary to repair or replace these parts before continuing with the installation process.
Thoroughly cleaning the flange and surrounding area
Before placing the new wax ring, it is essential to thoroughly clean the flange and the surrounding area to remove any dirt, debris, or old wax residue. Use a cloth or a brush to scrub the surface clean, ensuring that it is free from any contaminants that could compromise the seal.
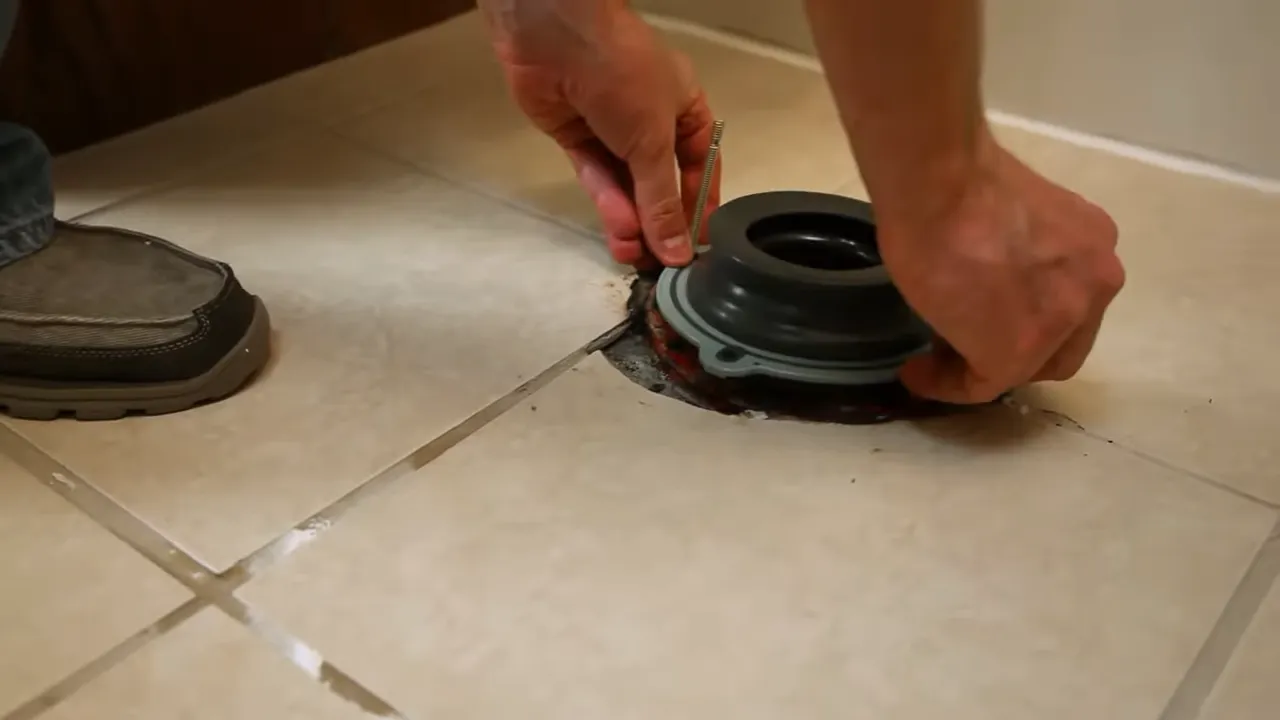
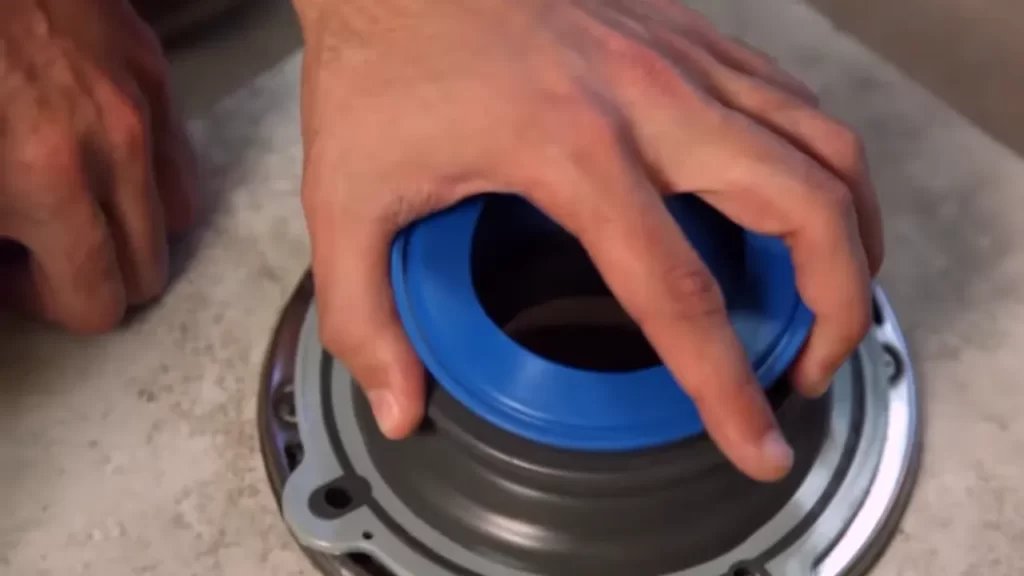
Placing and aligning the new wax ring
Take the new wax ring and carefully place it on the flange, ensuring that it is centered and aligned correctly. The wax ring should fit snugly around the toilet bowl outlet, forming a tight seal.
Proper positioning of the wax ring on the flange
Ensure that the wax ring is positioned properly on the flange, with the tapered end facing up. This will ensure a proper seal and prevent any leaks or water damage.
Ensuring the alignment with the toilet bowl outlet
Before setting the toilet on the flange, double-check the alignment of the wax ring with the toilet bowl outlet. It is crucial to ensure that the wax ring is centered and matches the shape and size of the toilet outlet to ensure a proper fit.
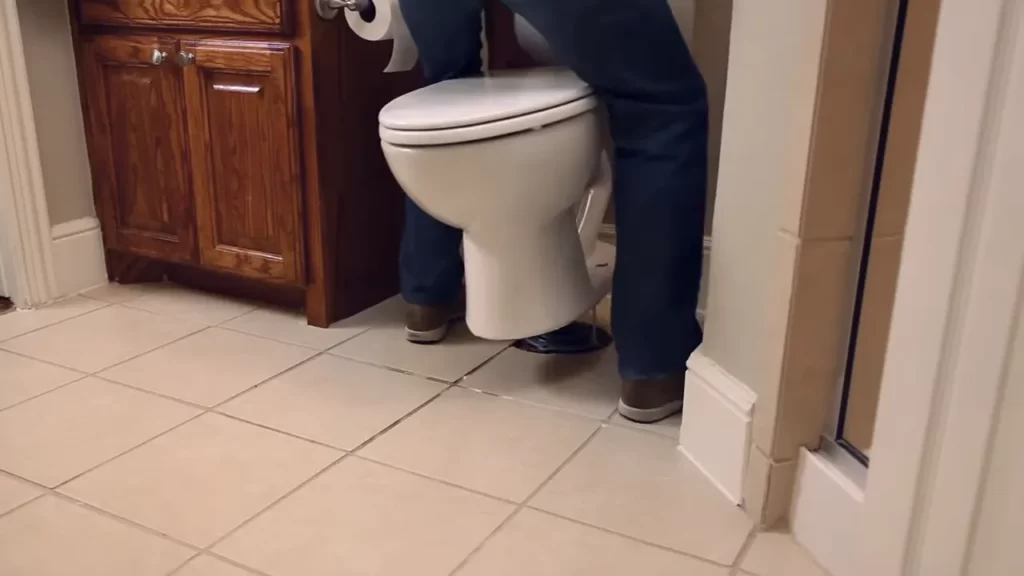
Setting the toilet onto the flange
Carefully lower the toilet bowl back onto the flange, ensuring that it aligns with the bolt holes on the floor. Take your time to align the toilet properly to prevent any damage to the wax ring or flange.
Carefully lowering the toilet bowl onto the wax ring
When lowering the toilet bowl, exercise caution to avoid crushing or shifting the wax ring. Lower it evenly and apply gentle pressure to ensure a secure and watertight seal.
Firmly pressing down to create a secure seal
Once the toilet is in place, firmly press down on the bowl to create a tight seal between the wax ring and the flange. This will ensure that the toilet is secure and will not wobble or leak.
Securing the toilet in place
With the toilet bowl in position, reattach and tighten the nuts onto the bolts to secure the toilet to the floor. Take care not to overtighten the nuts, as this can crack the toilet or damage the flange.
Checking for stability and adjusting if necessary
After securing the toilet, check for stability by gently rocking it from side to side. If there is any movement, adjust the position and tighten the nuts further until the toilet is stable and does not wobble.
Reconnecting the water supply and testing for leaks
Reconnect the water line to the bottom of the toilet tank and turn on the water supply. As the tank fills, carefully observe the area around the wax ring for any signs of leaks or water seepage. If any leaks are detected, tighten the connections or reposition the toilet until it is leak-free.
Conducting a thorough leak test to ensure a successful installation
Once the water supply is reconnected, flush the toilet several times to conduct a thorough leak test. Keep an eye out for any signs of water leakage from the base of the toilet or the flange. If everything is dry and secure, the installation is a success!
Troubleshooting Common Issues With Toilet Bowl Wax Ring Installation
Installing a toilet bowl wax ring may seem like a straightforward task, but like any home improvement project, it can come with its fair share of challenges. In this section, we will address some of the common issues that may arise during the installation process and provide you with tips and solutions to troubleshoot them effectively. Whether you are a seasoned DIY-er or a novice, this guide will help ensure that your toilet bowl wax ring installation is successful and leak-free.
Common Problems That May Arise During Installation
While installing a toilet bowl wax ring may seem simple, there are a few common problems that you may encounter. By being aware of these issues ahead of time, you can save yourself frustration and time during the installation process. Here are some of the challenges you may come across:
- Uneven or unstable toilet base
- Inadequate seal or leaking
- Difficulty aligning the toilet bowl with the bolts
- Broken or damaged wax ring
Tips and Solutions for Resolving Installation Challenges
While encountering these issues during your toilet bowl wax ring installation can be frustrating, there are several tips and solutions that you can try to overcome them. Here are some suggestions:
1. Uneven or Unstable Toilet Base
If you notice that your toilet base rocks or feels unstable, it can prevent the wax ring from creating a proper seal. To fix this issue, try the following:
- Check if the toilet flange is level. Use a level tool to ensure that it is properly aligned.
- Use shims to stabilize the toilet base if it is uneven or wobbly.
- Tighten the toilet bolts evenly, but be careful not to overtighten them as it may crack the base.
2. Inadequate Seal or Leaking
If you have installed the wax ring but notice leaks or an inadequate seal, you can try these solutions:
- Check if the wax ring is properly aligned with the toilet flange. If it is misaligned, remove the toilet and reposition the wax ring.
- Ensure that the wax ring is not damaged or flattened. If it is, replace it with a new one.
- Apply a thin layer of plumber’s putty around the base of the toilet as an additional sealant.
3. Difficulty Aligning the Toilet Bowl with the Bolts
Aligning the toilet bowl with the bolts can be tricky, especially if you are working alone. Here’s what you can do:
- Place a wax paper or plastic covering over the flange bolts to help guide the toilet bowl into place.
- Consider asking for assistance to hold the toilet bowl in position while you align it with the bolts.
- Use a flashlight to ensure that the bolts are properly aligned with the holes before tightening them.
4. Broken or Damaged Wax Ring
If you accidentally break or damage the wax ring during installation, don’t panic. Follow these steps:
- Carefully remove the broken wax ring and clean the flange.
- Replace the damaged wax ring with a new one, ensuring it is properly aligned.
- Proceed with the installation as normal, adhering to the instructions provided by the manufacturer.
When to Seek Professional Assistance
Despite your best efforts, there may be instances where it is best to seek professional assistance. Consider reaching out to a plumber or a professional toilet installation service if you experience any of the following:
- Persistent leaks or inadequate sealing, even after troubleshooting and re-installation attempts.
- Significant damage to the toilet, toilet flange, or floor during the installation process.
- Uncertainty or lack of confidence in your ability to complete the installation safely and effectively.
Remember, it’s always better to seek professional help if you are unsure or if the situation warrants it. Your peace of mind and a properly installed toilet are worth the investment.
Maintaining A Properly Installed Toilet Bowl Wax Ring
Maintaining a properly installed toilet bowl wax ring is crucial for ensuring the longevity of your toilet and preventing costly water damage. Regular cleaning and maintenance, knowing the signs of a wax ring that needs replacing, as well as taking preventive measures, can help you keep your toilet in optimal condition and avoid any potential issues. In this article, we will explore these important aspects of maintaining a toilet bowl wax ring, ensuring that your toilet remains leak-free and functioning efficiently.
Regular Cleaning and Maintenance Tips
Regular cleaning and maintenance play a key role in the upkeep of your toilet bowl wax ring. Here are some tips to keep in mind:
- Beware of using harsh chemicals that can deteriorate the wax ring. Stick to mild cleaners and avoid abrasive tools.
- Regularly scrub the exterior of the toilet bowl, including the area around the wax ring. This helps to prevent the buildup of grime and bacteria.
- Inspect the toilet bowl for any cracks, leaks, or loose bolts that could indicate a problem with the wax ring or the toilet itself.
- Check the tightness of the toilet bolts every few months and tighten them if necessary.
- Ensure the toilet is properly anchored to the floor to avoid unnecessary movement that can damage the wax ring over time.
- Consider using a toilet bowl cleaner that contains bleach to help eliminate stains and odors.
Signs That Indicate a Wax Ring Replacement is Needed
It’s important to be aware of the signs that may indicate it’s time to replace the wax ring. Look out for these common indicators:
- Water pooling around the base of the toilet: This can be a clear sign of a wax ring that has failed and is allowing water to leak onto the floor.
- Foul odors: If you notice persistent unpleasant odors coming from your toilet, it could be a result of a faulty wax ring.
- Visible damage or wear: Inspect the wax ring for any cracks, crumbling, or other signs of damage. These issues can compromise its effectiveness and require replacement.
- Loose toilet: If your toilet wobbles or moves when you sit on it, it may be an indication that the wax ring needs replacing.
Preventive Measures to Prolong the Lifespan of the Wax Ring
Taking preventive measures can significantly extend the lifespan of your toilet bowl wax ring and prevent the need for premature replacement. Here are a few tips:
- Avoid excessive use of plungers, as they can put unnecessary pressure on the wax ring and lead to damage.
- Ensure everyone in the household knows not to flush anything other than toilet paper down the toilet. Items like wipes, facial tissue, or feminine hygiene products can clog the pipes and put strain on the wax ring.
- Regularly inspect the toilet and the area around the wax ring for any signs of leaks or damage. Early detection can help prevent more severe issues.
By following these regular cleaning and maintenance tips, recognizing signs of a failing wax ring, and implementing preventive measures, you can effectively maintain a properly installed toilet bowl wax ring. This will not only help you avoid water damage and costly repairs but also ensure the efficiency and longevity of your toilet.
Frequently Asked Questions
Do I Put The Wax Ring On The Toilet Or The Flange?
The wax ring should be placed on the flange when installing a toilet.
Which Way Does A Wax Ring On Toilet Go?
The wax ring on a toilet goes between the toilet base and the floor drain. It provides a watertight seal to prevent leaks.
Can You Put A Toilet Back On The Same Wax Ring?
Yes, you can put a toilet back on the same wax ring if it is still in good condition and doesn’t leak.
Is Wax Seal Better Than Rubber Seal For Toilets?
Wax seals are better than rubber seals for toilets because they provide a tight and secure seal, preventing leaks and water damage. Wax seals create a watertight barrier, ensuring a reliable and long-lasting seal for your toilet.
Conclusion
Installing a toilet bowl wax ring may seem daunting at first, but with the right steps and precautions, it can be an easy task to accomplish. By following the instructions provided in this blog post, you will be able to successfully install a wax ring and ensure a watertight seal for your toilet.
Remember to take your time, be thorough, and seek professional help if needed. With these tips, you can confidently tackle this DIY project and enjoy a hassle-free toilet installation.