
To install tin ceiling tiles, follow these instructions: Measure and prepare the area, apply adhesive on the tiles, press them firmly onto the ceiling, and secure with nails or screws. Tin ceiling tiles can add a touch of elegance and vintage charm to any room.
Whether you are renovating your home or upgrading a commercial space, installing tin ceiling tiles is a relatively simple process. These tiles are lightweight, durable, and versatile, making them a popular choice for homeowners and interior designers alike. With the right tools and a few basic steps, you can transform your ceiling into a stunning focal point that will impress anyone who enters the space.
So, let’s dive in and learn how to install tin ceiling tiles.
Selecting The Right Tin Ceiling Tiles
Factors to Consider Before Purchasing
When it comes to installing tin ceiling tiles, selecting the right ones is crucial. Not only do they enhance the aesthetic appeal of your space, but they also serve as durable and long-lasting solutions. Before finalizing a purchase, consider the following factors to ensure you get the perfect tin ceiling tiles to suit your needs:
Dimensions and Patterns
One of the primary considerations when selecting tin ceiling tiles is their dimensions and patterns. Determine the size of the area you want to cover and choose tiles that fit seamlessly. Measure the length and width of the space, and make a note of any obstructions or irregularities that may affect the installation.
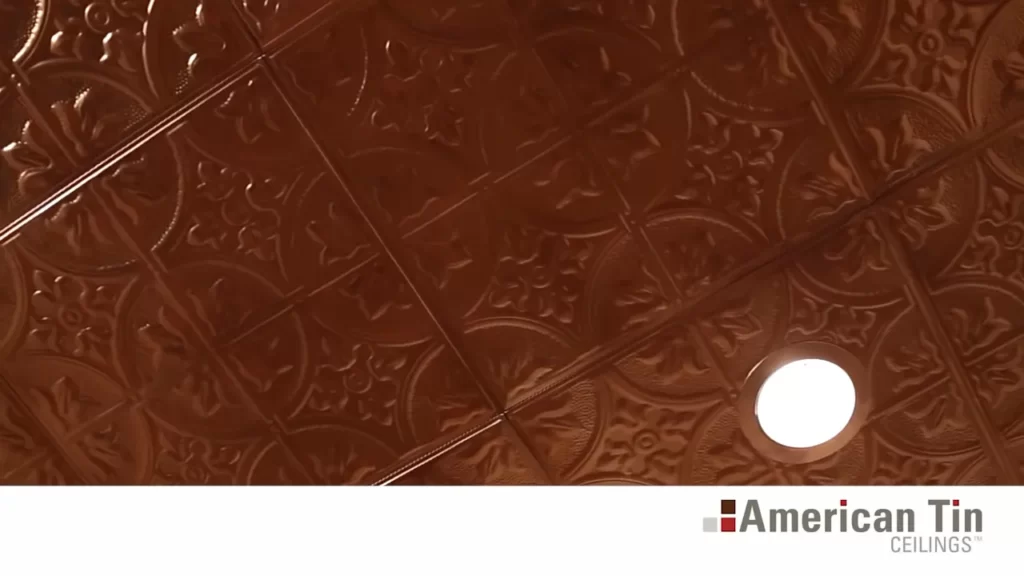
Next, consider the pattern of the tiles. Tin ceiling tiles come in a variety of designs, ranging from classic to contemporary. Choose a pattern that complements the overall style and theme of your space. Bold and intricate patterns can add a touch of drama, while simpler designs create a more understated look.
Material and Finish Options
Tin ceiling tiles are available in various materials, each with its own unique characteristics. Common options include tin-plated steel, aluminum, and solid copper. Consider the advantages and disadvantages of each material before making a decision.
Additionally, think about the finish of the tiles. Do you prefer a glossy or matte appearance? Depending on the look you want to achieve, choose a finish that suits your preference. Popular finishes include lacquered, vintage, and hand-painted.
In conclusion, selecting the right tin ceiling tiles involves considering factors such as dimensions, patterns, materials, and finishes. By carefully evaluating these aspects, you can choose tiles that not only enhance the visual appeal of your space but also meet your practical requirements.

Preparing The Surface
Before installing tin ceiling tiles, it is vital to properly prepare the surface to ensure a smooth and long-lasting result. This step-by-step guide will walk you through the essential tasks of cleaning the ceiling, checking for imperfections, and repairing any damage.
Cleaning the Ceiling
To start, clear the room of any furniture or fixtures that may obstruct your access to the ceiling. This will ensure an unobstructed workspace and help you avoid any accidental damage. Once the area is clear, follow these steps to clean the ceiling:
- Dust or vacuum the ceiling to remove any loose dirt or debris. This will create a clean and smooth surface for the adhesive.
- Mix a solution of mild dish soap and warm water in a bucket.
- Dip a sponge or soft cloth into the soapy solution and gently wipe down the entire ceiling. Pay extra attention to areas with stains or grime.
- Rinse the sponge or cloth with clean water and wipe the ceiling again to remove any soap residue.
- Allow the ceiling to air dry completely before moving on to the next step.
Checking for Imperfections
Before proceeding with the installation, it is crucial to inspect the ceiling for any imperfections that could affect the adhesion or overall finish of the tin ceiling tiles. Follow these steps to ensure a smooth surface:
- Examine the entire ceiling for cracks, dents, or other signs of damage. Use a flashlight or proper lighting to identify even the smallest imperfections.
- If you detect any imperfections, mark their location with a pencil or masking tape for easy reference during repairs.
- Document any larger issues or areas that require more extensive repairs. Having a clear understanding of the necessary repairs will help you plan accordingly.
Repairing Any Damage
Once you have identified the imperfections on your ceiling, it’s time to repair them. Follow these steps to ensure a seamless surface:
- For minor cracks or chips, apply a small amount of spackling compound directly onto the damaged area using a putty knife.
- Smooth out the spackling compound using the putty knife, ensuring it blends seamlessly with the surrounding surface. Allow it to dry completely according to the manufacturer’s instructions.
- If there are larger areas of damage, consider using joint compound or plaster to make the necessary repairs. Follow the instructions provided by the manufacturer and allow ample time for drying.
- Once all repairs have been made and the surface is dry, lightly sand the repaired areas to create a smooth finish.
- Finally, wipe away any dust or debris with a damp cloth, ensuring the repaired areas are clean and ready for the tile installation.
By properly preparing the surface, you can ensure a successful tin ceiling tile installation that will enhance the beauty and value of your space. Take the time to clean the ceiling, check for imperfections, and repair any damage before moving forward. These steps will help you achieve professional-looking results and a stunning finished project.
Installing The Tin Ceiling Tiles
Installing the tin ceiling tiles is an exciting project that can add a touch of vintage charm to any room. Whether you’re looking to revamp your home or add a unique style to a commercial space, the installation process is essential to achieving the desired result. In this section, we will walk you through the step-by-step process of installing tin ceiling tiles, from measuring and marking guidelines to cutting tiles to fit. Let’s dive in and learn how to transform your space with beautiful tin ceiling tiles.
Measuring and Marking Guidelines
Before you begin the installation process, it’s crucial to measure and mark your ceiling accurately. This ensures that your tiles will fit perfectly and look seamless once installed. Here are some guidelines to follow:
1. Measure the width and length of your ceiling using a tape measure.
2. Mark the center point of each wall using a pencil.
3. Connect the center points with a chalk line or string to create a guideline for the first row of tiles.
4. Use a level to ensure the guideline is straight.
Determining the Starting Point
Once you have your guidelines in place, it’s time to determine where to start installing the tiles. Consider the following:
1. Start in a corner of the room or at the center of the ceiling, depending on your preference.
2. Take into account any existing light fixtures or vents, and plan your starting point accordingly.
Establishing a Layout
Creating a layout before installing the tiles helps ensure a visually appealing result. Follow these steps:
1. Lay out the tiles on the floor to experiment with different patterns and designs.
2. Take pictures of the layouts you like for reference during the installation process.
3. Decide on a layout that suits your style and the dimensions of your ceiling.
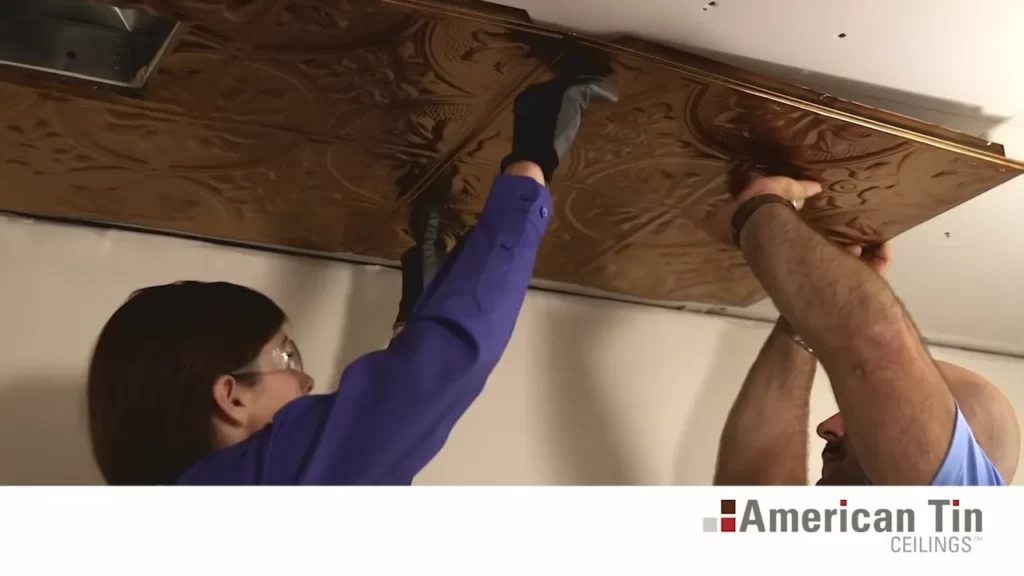
Applying Adhesive or Nails
When it comes to attaching the tiles to the ceiling, you have two options: using construction adhesive or nails. Let’s explore both methods:
Using Construction Adhesive
1. Apply a small amount of construction adhesive to the back of each tile using a caulk gun.
2. Press the tile firmly against the ceiling, aligning it with the guidelines.
3. Repeat this process for each tile, leaving a small gap between them for expansion.
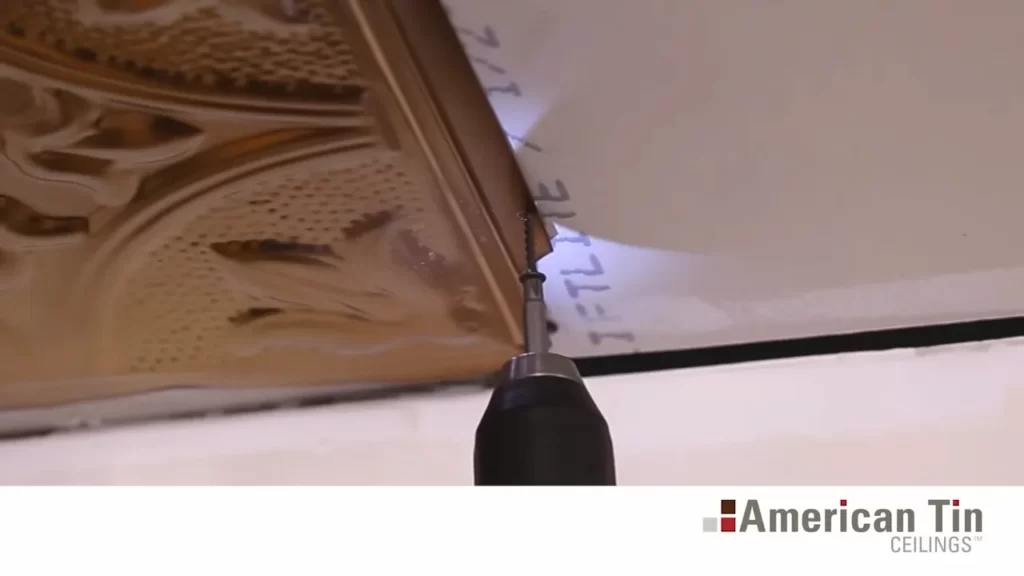
Nailing the Tiles in Place
1. Pre-drill small holes in each tile using a drill and drill bit.
2. Secure the tiles to the ceiling by nailing them in place using small-sized nails.
3. Ensure each tile is aligned with the guidelines before nailing.
Cutting Tiles to Fit
Inevitably, you will come across areas where the tiles need to be cut to fit. Here are two methods to achieve a precise fit:
Using Tin Snips
1. Measure the section of the tile that needs to be cut and mark it with a pencil.
2. Use tin snips to cut along the marked line, following a straight and steady motion.
3. Trim any rough edges with a file for a clean finish.
Using a Utility Knife
1. Score the tile along the marked line using a utility knife, applying firm and even pressure.
2. Snap the tile along the scored line, creating a clean break.
3. Smooth any rough edges with a file.
By following these step-by-step instructions, you’ll be well on your way to successfully installing tin ceiling tiles. Remember to take your time, measure accurately, and have fun experimenting with different layouts. With some patience and creativity, your space will be transformed into a stunning showcase of vintage elegance.
Finishing Touches
Once you’ve securely installed your tin ceiling tiles, it’s time to add the finishing touches to complete the transformation of your space. These final steps will not only enhance the overall appearance of your ceiling but also ensure a professional and polished finished look. In this section, we will cover how to fill in gaps and holes, apply decorative finishes, paint the ceiling tiles, and add a patina to achieve a truly stunning result.
Filling in Gaps and Holes
Before moving forward with the aesthetic aspects of your tin ceiling tiles, it is important to address any gaps or holes that may be present. While the installation process should have minimized such imperfections, it is not uncommon to have small gaps or holes that need to be filled. To do this, follow these simple steps:
- Carefully inspect your ceiling for any gaps or holes.
- Using a putty knife, fill the gaps or holes with a high-quality spackling compound.
- Smooth out the surface of the spackling compound with the putty knife, ensuring it is level with the rest of the ceiling.
- Allow the compound to dry completely, and then lightly sand it to achieve a smooth finish.
Applying Decorative Finishes
Adding a decorative finish to your tin ceiling tiles can create a unique and personalized touch in any space. Whether you want a vibrant and colorful look or a distressed and vintage feel, there are numerous options to choose from. Here are a few popular decorative finishes:
- Applying a faux finish: Use a sponge or rag to create a textured appearance by dabbing on paint in a random pattern.
- Aging with glaze: Apply a glaze mixture over the painted tiles and wipe away excess to achieve an antique look.
- Metallic finishes: Apply metallic paint or spray to give your ceiling a stunning, reflective sheen.
Painting the Ceiling Tiles
If you prefer a more traditional look, painting your tin ceiling tiles is a classic and timeless choice. Follow these steps to ensure a successful and professional paint job:
- Clean the surface of the tiles by wiping them down with a damp cloth to remove any dirt or dust.
- Apply a primer specifically designed for metal surfaces to ensure proper adhesion of the paint.
- Once the primer has dried, carefully apply your chosen paint color using a brush or roller.
- Allow the paint to dry completely before applying a second coat if necessary.
Adding a Patina
A patina can add character and depth to your tin ceiling tiles, giving them an aged and weathered appearance. To achieve this effect, consider these methods:
- Using a vinegar and salt mixture: Create a solution of vinegar and salt, and apply it to the surface of the tiles. Allow it to sit overnight, and then wipe it away to reveal a beautiful patina.
- Applying a patina solution: Purchase a patina solution from a local home improvement store and follow the instructions provided to achieve your desired result.
By incorporating these finishing touches into your tin ceiling tile installation project, you can truly elevate the overall aesthetic of your space. Don’t rush through these important steps – take the time to carefully complete each one, and you’ll be rewarded with a stunning, customized ceiling that will leave your guests in awe.
Maintenance Tips For Tin Ceiling Tiles
Maintenance Tips for Tin Ceiling Tiles
Regular Cleaning and Dusting
To keep your tin ceiling tiles looking their best, regular cleaning and dusting are essential. Dust, dirt, and grime can accumulate on the surface of the tiles over time, dulling their luster and beauty. To prevent this, make it a habit to dust your tin ceiling tiles at least once a week.
To clean the tiles, start by using a soft cloth or a duster to remove any loose dirt or dust. Avoid using abrasive materials or rough scrub brushes that can scratch the surface of the tiles. Once you have removed the loose dirt, you can lightly dampen a microfiber cloth with water or a mild, non-abrasive cleaner.
Gently wipe the tiles in a circular motion, paying special attention to any areas that may have more dirt or stains. Remember to always wring out the cloth thoroughly before cleaning to prevent excess moisture from seeping into the seams or joints of the tiles.
Addressing Any Damage
Over time, your tin ceiling tiles may experience some minor damage, such as dents or scratches. It is important to address these issues promptly to prevent further damage and maintain the overall appearance of your ceiling.
If you notice any dents on the tiles, you can try using a hairdryer on a low heat setting to gently heat the affected area. Then, using a soft cloth or your fingers, apply gentle pressure to push the dent back into place.
For deeper scratches, you may need to use touch-up paint that matches the color of your ceiling tiles. It is important to choose a paint that is specifically formulated for metal surfaces to ensure a seamless repair. Using a small brush, carefully apply the touch-up paint to the scratched area, following the instructions on the paint can.
Retouching and Repainting as Needed
Over time, the paint on your tin ceiling tiles may start to fade or chip. To keep your ceiling looking fresh and vibrant, you may need to retouch or repaint the tiles as needed.
Before you begin, make sure to thoroughly clean the tiles to remove any dirt, dust, or grease. This will help the paint adhere better to the surface. Next, lightly sand the areas that need to be repainted to create a smooth surface.
Using a small brush or a foam roller, apply a thin and even coat of paint to the tiles. Be sure to allow each coat to dry completely before applying additional layers. For best results, follow the manufacturer’s instructions on the paint can regarding curing times and recommended number of coats.
By following these maintenance tips for tin ceiling tiles, you can ensure that your ceiling remains in pristine condition for years to come. Regular cleaning and dusting, addressing any damage promptly, and retouching or repainting as needed will help preserve the beauty and longevity of your tin ceiling tiles.
Frequently Asked Questions
How Do You Hang Tin Ceiling Tiles?
To hang tin ceiling tiles, follow these steps: 1. Start by measuring and marking the layout of the tiles on the ceiling. 2. Install furring strips or a plywood base for support. 3. Use adhesive or nails to secure the tiles onto the furring strips or plywood.
4. Ensure the tiles are aligned properly and continue installing until the ceiling is covered. 5. If necessary, trim the tiles to fit edges and corners.
Can You Glue Tin Tiles To Ceiling?
Yes, you can glue tin tiles to the ceiling.
Can You Install Tin Ceiling Tiles Over Drywall?
Yes, you can install tin ceiling tiles over drywall. It is a popular choice due to its ease of installation and ability to enhance the aesthetics of a room. Mounting the tiles directly onto the drywall saves time and money, creating a beautiful and unique ceiling.
What Kind Of Nails For Tin Ceiling?
Use copper or stainless steel nails for tin ceilings to prevent corrosion. These nails are durable and resistant to moisture. Make sure they are the appropriate length and gauge for your specific tin ceiling installation.
Conclusion
Installing tin ceiling tiles can be a rewarding DIY project that adds a touch of elegance to any space. By following the step-by-step instructions provided in this blog post, you can easily transform your ceiling into a stunning feature. From measuring and preparing the surface to securing the tiles in place, the process is straightforward and achievable for beginners.
With the right tools and materials, you can create a beautiful tin ceiling that will impress your guests and enhance the overall aesthetic of your home. So, why wait? Start your tin ceiling installation project today!