
To install a timer switch, turn off the power, remove the existing switch, connect the timer switch wires to the corresponding wires, attach the switch to the electrical box, and restore the power. Installing a timer switch can be a simple and effective way to automate the timing of lights, appliances, or other electrical devices in your home.
By following a few basic steps, you can successfully install a timer switch and enjoy the convenience and energy-saving benefits it offers. We will provide you with a step-by-step guide on how to install a timer switch safely and efficiently.
So, let’s get started and learn how to make your home more efficient with a timer switch.
Why Install A Timer Switch?
Installing a timer switch can greatly improve the efficiency and convenience of managing your lights or appliances. Whether you want to save on energy costs, increase security, or simply streamline your daily routine, a timer switch is an essential addition to any modern home. By automating the operation of your lights or appliances, a timer switch allows you to control when they turn on and off, ensuring they are only used when needed. In this article, we explore the many benefits of using a timer switch and why it is a wise investment for any homeowner.
Benefits of using a timer switch for your lights or appliances
A timer switch offers a variety of benefits when it comes to managing the operation of your lights or appliances. Let’s take a closer look at some of these advantages:
- Convenience: With a timer switch, you no longer have to manually turn on or off your lights or appliances. Simply program the switch according to your desired schedule, and it will automatically take care of the rest.
- Increased security: By setting your lights to turn on and off at specific times, even when you’re away from home, a timer switch creates the impression of an occupied house, deterring potential intruders.
- Improved energy efficiency: One of the main advantages of using a timer switch is its ability to save energy. By only operating your lights or appliances when you need them, you can significantly reduce your energy consumption and lower your monthly utility bills.
- Extended lifespan: Constantly leaving your lights or appliances on can cause unnecessary wear and tear, shortening their lifespan. A timer switch can help prolong the life of these devices by ensuring they are only used when necessary.
Energy-saving advantages of timer switches
The energy-saving advantages of timer switches are truly remarkable. Here are some key reasons why they are an excellent choice for conserving energy:
- Automated scheduling: With timer switches, you have the flexibility to set specific times for your lights or appliances to turn on and off. This means you can avoid leaving them on all day or night, wasting energy when it is not needed.
- Reduced standby power: Many electrical devices consume standby power, even when they are not in use. By using a timer switch, you can ensure that these devices are completely switched off, eliminating unnecessary standby power consumption.
- Flexibility and customization: Timer switches allow you to customize the schedule according to your specific needs. Whether you want to create different schedules for different days or set random on/off times for increased security, a timer switch offers unparalleled flexibility.
Cost-effective solution for managing electrical usage
In addition to the energy-saving benefits, a timer switch also offers a cost-effective solution for managing your electrical usage. Here’s why:
- Lower utility bills: By reducing your energy consumption through efficient control of your lights or appliances, a timer switch can lead to significant savings on your monthly utility bills.
- No wasted electricity: With a timer switch, you can eliminate the risk of accidentally leaving lights or appliances on when they are not needed. This helps prevent unnecessary electricity waste and reduces your carbon footprint.
- Easy installation and maintenance: Installing a timer switch is a straightforward process that can be completed without professional assistance. Once installed, the switch requires minimal maintenance, making it a hassle-free solution for managing your electrical usage.
In conclusion, installing a timer switch offers numerous benefits for both homeowners and the environment. From increased convenience and security to improved energy efficiency and cost savings, a timer switch is a worthwhile investment to enhance your daily living experience. Make the switch today and enjoy the advantages that come with having full control over your lights and appliances.
Factors To Consider Before Installation
Types of Timer Switches Available in the Market
Before installing a timer switch, it is essential to understand the different types available in the market. Each type offers unique features and functionality, catering to specific needs. Here are a few common types of timer switches:
- Manual Timer Switch: This type requires manual control and operation. It is ideal for basic scheduling needs where you need to manually switch on/off certain electrical appliances.
- Programmable Timer Switch: This type allows you to set specific schedules for your lights or appliances in advance. It offers flexibility and convenience, especially when you have a routine that requires regularly turning on/off certain devices.
- Digital Timer Switch: This type provides advanced features with a digital interface. It offers precise scheduling options, multiple programs, and even random activation settings to enhance security and energy efficiency.
Compatibility of Timer Switch with Your Existing Electrical System
Prior to installation, it is crucial to check the compatibility of the timer switch with your existing electrical system to ensure seamless operation. Pay attention to the voltage requirements and connection type of the timer switch. It should be compatible with the voltage supplied by your electrical system, and the connection should match the wiring setup in your home.
If you are unsure about the compatibility, it is recommended to consult a professional electrician who can guide you in choosing the right timer switch for your electrical system.
Consideration of Electrical Load and Power Rating
Another important factor to consider is the electrical load and power rating. Different timer switches have varying capacities, and it is crucial to select one that can handle the electrical load of the appliances or lights you intend to control.
Check the power rating of the timer switch and match it with the total power consumption of the devices you plan to connect. It is always advisable to choose a timer switch with a higher power rating than your current load to avoid overloading the switch.
Deciding the Location for Installing the Timer Switch
The location where you install the timer switch plays a vital role in its effectiveness. Ensure that the switch is easily accessible and visible to easily monitor and program schedules. It should be away from any potential obstructions or water sources to prevent damage. Consider proximity to the electrical panel for ease of installation.
Suitable locations include near the main entrance, inside a utility room, or near the specific appliances or lights you want to control. Take note of any specific installation requirements mentioned in the timer switch’s user manual to ensure proper functionality.
Step-By-Step Guide To Install A Timer Switch
A timer switch is a convenient device that allows you to automate the operation of your lights or electrical appliances. It helps to save energy and enhance home security. If you’re considering installing a timer switch, follow this step-by-step guide to ensure a successful installation.
Gathering the necessary tools and materials:
Before you begin the installation process, gather all the required tools and materials. Here’s a list of what you’ll need:
- Timer switch
- Screwdriver
- Wire stripper
- Electrical tape
- Wire connectors
- Electrical tester
Turning off the power supply to the electrical circuit:
Caution: Safety should be your top priority when working with electrical circuits.
To ensure your safety, start by turning off the power supply to the electrical circuit you’ll be working on. Locate the circuit breaker or fuse box and switch off the corresponding circuit. Test the circuit with an electrical tester to ensure that there is no power flowing to the circuit.
Removing the existing switch and preparing the wiring:
Once you’ve confirmed that the power is off, it’s time to remove the existing switch. Use a screwdriver to unscrew the switch from the junction box and carefully detach the wires. Ensure that the wires are not touching each other or any exposed metal surface.
Next, using a wire stripper, remove about 1/2 inch of insulation from the ends of the wires. This will allow you to connect the timer switch wires securely.
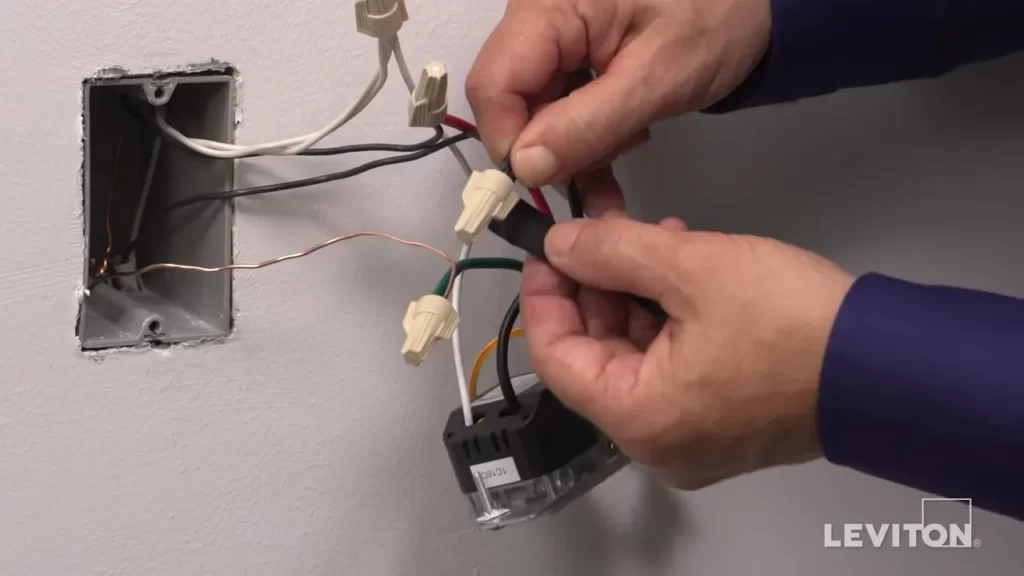
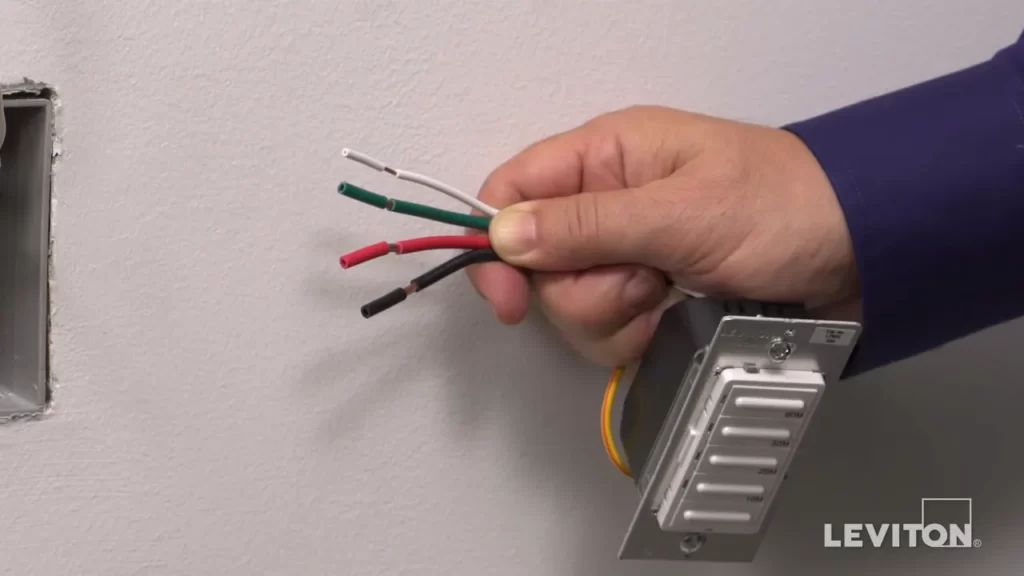
Connecting the timer switch wires:
Now it’s time to connect the wires of your new timer switch. Most timer switches come with a set of colored wires for easy identification. Match the wires on the switch to the corresponding wires in your junction box:
| Timer Switch Wire | Junction Box Wire |
|---|---|
| Black | Hot wire (usually black) |
| White | Neutral wire (usually white) |
| Green or bare copper | Ground wire (usually green or bare copper) |
Securely connect the timer switch wires to the corresponding junction box wires using wire connectors. Make sure the connections are tight and there are no exposed wires.
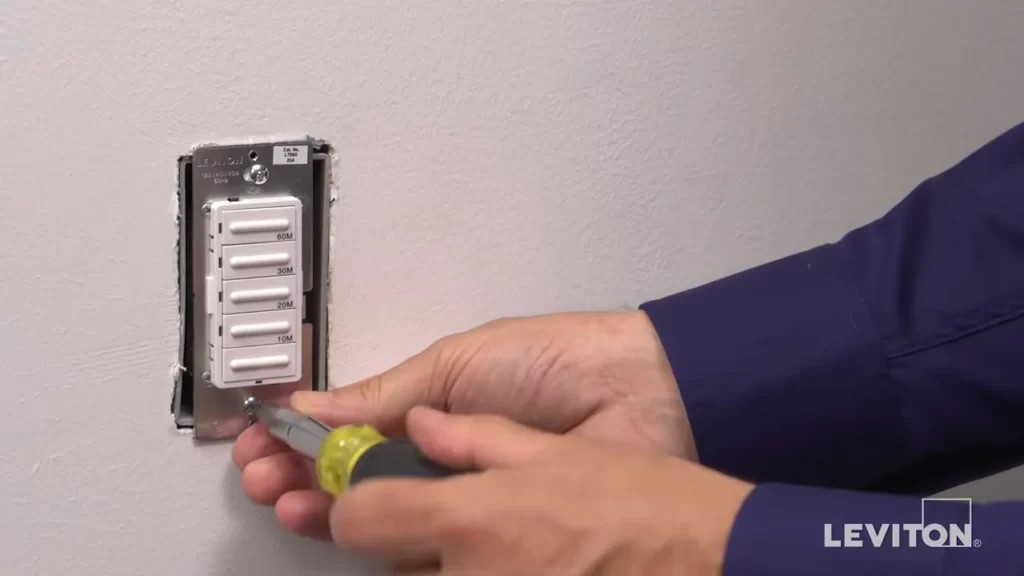
Mounting the timer switch:
With the wiring complete, it’s time to mount the timer switch back into the junction box. Align the switch with the screw holes on the box and use a screwdriver to secure it firmly in place.
Restoring the power supply and testing the switch:
Once the timer switch is securely mounted, it’s time to restore power to the circuit. Return to the circuit breaker or fuse box and switch on the corresponding circuit. Use an electrical tester to ensure power is flowing properly.
Finally, test the timer switch by setting the desired time intervals and turning the lights or appliances on and off. Ensure that the switch is functioning correctly and the timing is accurate.
By following these step-by-step instructions, you can easily install a timer switch in your home and enjoy the convenience and energy-saving benefits it offers!
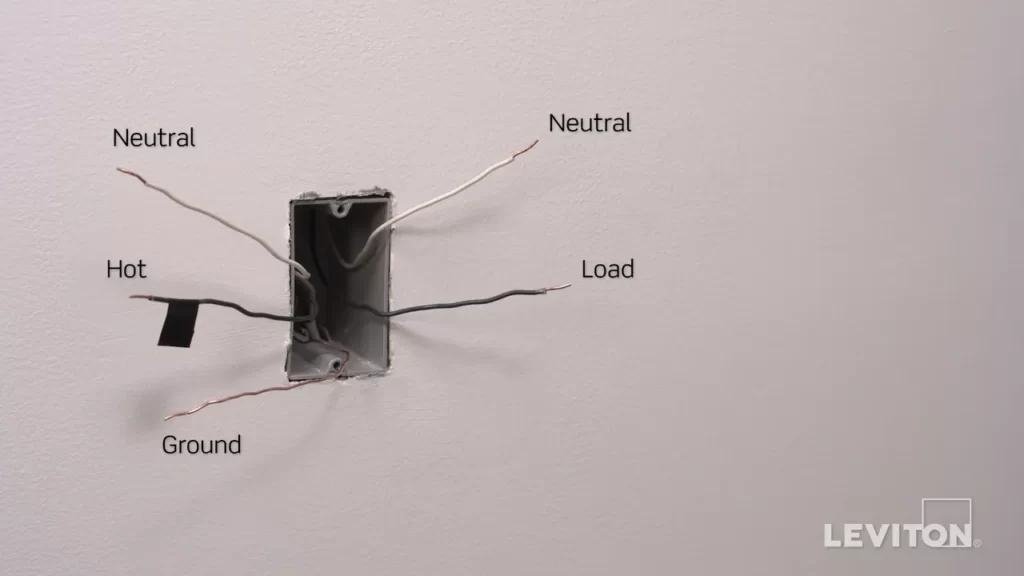
Wiring Connections
Understanding the different wire colors and their functions
Before you start installing a timer switch, it’s important to understand the different wire colors used in electrical wiring and their functions. This knowledge will help you make the right connections and ensure the switch functions properly.
In most electrical wiring installations, you will come across three main wire colors:
- Black wire: The black wire is the hot wire, which carries the electrical current to the device you want to control with the timer switch. It should be connected to the “hot” terminal on the switch.
- White wire: The white wire is the neutral wire, which completes the electrical circuit and returns current to the source. Not all timer switches require a neutral wire, but if yours does, it should be connected to the “neutral” terminal on the switch.
- Bare or green wire: This wire is the ground wire, which provides protection against electrical shocks. It should be connected to the grounding terminal on the switch for safety.
Connecting the hot wire to the timer switch
Now that you understand the different wire colors and their functions, you can proceed with the wiring connections for your timer switch.
To connect the hot wire to the switch:
- Turn off the power supply to the circuit you are working on by switching off the corresponding circuit breaker.
- Locate the black wire in the electrical box, which is the hot wire carrying the current. Carefully strip off about 1/2 inch of insulation from the end of the wire using wire strippers.
- Insert the exposed end of the black wire into the “hot” terminal on the timer switch. Ensure a tight and secure connection.
- Use a screwdriver to tighten the terminal screw, securing the wire in place.
Attaching the load wire to the switch
After successfully connecting the hot wire, the next step is to attach the load wire, which is the wire that leads to the device you want to control.
To attach the load wire to the switch:
- Identify the wire that leads to the device, usually a black or colored wire. Strip off the insulation from the end of this wire.
- Insert the exposed end of the load wire into the “load” terminal on the timer switch. Ensure a secure connection.
- Tighten the terminal screw using a screwdriver to fasten the load wire to the switch.
Connecting the neutral wire to the switch, if applicable
If your timer switch requires a neutral wire, you need to make this connection as well. Not all timer switches require a neutral wire, so check the manufacturer’s instructions before proceeding.
To connect the neutral wire to the switch:
- Locate the white neutral wire in the electrical box and strip off the insulation from its end.
- Insert the exposed end of the neutral wire into the “neutral” terminal on the timer switch. Ensure a secure connection.
- Use a screwdriver to tighten the terminal screw, securing the neutral wire in place.
Grounding the switch for safety
Grounding the switch is crucial for safety reasons. It helps protect against electrical shocks and ensures the safe operation of your timer switch.
To ground the switch:
- Locate the bare or green grounding wire in the electrical box.
- Wrap the end of the grounding wire around the grounding terminal on the timer switch.
- Use a screwdriver to tighten the grounding screw, securing the wire in place.
Once you have completed all the necessary wiring connections, carefully tuck the wires into the electrical box and mount the timer switch securely. Restore power to the circuit by switching on the corresponding circuit breaker, and you’re ready to enjoy the convenience of your newly installed timer switch!
Programming And Using The Timer Switch
Configuring the timer settings, setting the desired on/off times, adjusting the timer switch for daylight saving time, overriding the timer settings when needed, and troubleshooting common issues with timer switches are all important aspects to consider when programming and using your timer switch.
Configuring the timer settings
Before you start using your timer switch, it’s crucial to configure the timer settings according to your specific needs. To do this:
- Locate the programming buttons on the timer switch, usually labeled with symbols or numbers.
- Press and hold the “Program” button for a few seconds until the display starts flashing.
- Use the arrow buttons to navigate through the different settings, such as time, days of the week, and mode options.
- Press the “Enter” or “OK” button to save each setting as you go.
Setting the desired on/off times
Once you have configured the basic timer settings, it’s time to set the desired on/off times for your switch. Follow these steps:
- Press the “Program” button to enter the programming mode.
- Select the specific day or days of the week you want to set the timer for.
- Enter the desired on time followed by the desired off time using the provided buttons or arrows. Some switches may use a 24-hour format, while others may use AM/PM.
- Save the programmed on/off times by pressing the “Enter” or “OK” button.
Adjusting the timer switch for daylight saving time
To ensure that your timer switch automatically adjusts for daylight saving time changes, follow these instructions:
- Access the menu or settings on your timer switch.
- Look for the option to enable daylight saving time or DST.
- Toggle the DST option to “On” or “Enabled.”
- Save the changes and exit the menu.
Overriding the timer settings when needed
Sometimes, you may need to manually override the timer settings temporarily. Here’s how:
- Locate the manual override button on the timer switch.
- Press the button to activate the override mode.
- The switch will now operate independently of the programmed on/off times.
- To return to the programmed settings, press the override button again.
Troubleshooting common issues with timer switches
If you encounter any issues with your timer switch, try these troubleshooting tips:
- Check if the timer switch is receiving power by ensuring it is connected to a functioning electrical outlet.
- Reset the timer switch by following the manufacturer’s instructions.
- Make sure the batteries, if applicable, are inserted correctly and not depleted.
- Refer to the user manual for specific troubleshooting tips or contact the manufacturer for assistance.
Safety Precautions And Tips
When it comes to installing a timer switch, safety should always be the top priority. Electrical work can be hazardous if not done properly, so it’s important to follow some essential safety precautions and tips. In this section, we will discuss the importance of following electrical safety guidelines, turning off the correct circuit breaker, using appropriate personal protective equipment (PPE), and seeking professional assistance if unsure or uncomfortable with the installation process.
Importance of following electrical safety guidelines
Electrical safety guidelines are in place for a reason – to protect you from potentially dangerous situations. When installing a timer switch, it’s crucial to follow these guidelines to reduce the risk of electrical shock or fire. Some important electrical safety guidelines to keep in mind include:
- Always turn off the power supply before starting any electrical work.
- Avoid working on live wires or circuits.
- Use insulated tools to prevent electric shock.
- Ensure that all electrical connections are properly insulated and secured.
- Regularly inspect your electrical system for any signs of wear or damage.
Turning off the correct circuit breaker
Before you begin installing a timer switch, it’s crucial to turn off the correct circuit breaker to avoid any electrical accidents. Turning off the wrong breaker can result in electric shock or damage to your electrical system. To ensure you turn off the correct one, follow these steps:
- Identify the circuit breaker panel in your home.
- Locate the breaker that controls the circuit you want to work on.
- Switch off the breaker by flipping it to the “off” position.
- Double-check that the power is indeed off by testing the circuit with a voltage tester.
Using appropriate personal protective equipment (PPE)
Personal protective equipment (PPE) acts as a shield between you and potential electrical hazards. When installing a timer switch, it’s essential to wear the appropriate PPE to ensure your safety. The following PPE should be used:
| PPE | Reason for Use |
|---|---|
| Safety goggles | Protect your eyes from debris and sparks. |
| Gloves | Prevent direct contact with live wires. |
| Non-conductive footwear | Helps prevent electrical shock. |
Seeking professional assistance if unsure or uncomfortable with the installation process
If you are unsure or uncomfortable with the installation process of a timer switch, it is best to seek professional assistance. Electrical work can be complex and dangerous, and it’s not worth risking your safety or damaging your electrical system. Professionals have the knowledge and experience to install timer switches correctly and safely. Don’t hesitate to enlist their help for a smooth and secure installation process.
By adhering to these safety precautions and tips, you can ensure a safe installation of your timer switch. Remember to always prioritize your safety and seek assistance if needed. Now that we have covered the key safety guidelines, let’s move on to the actual installation process of a timer switch.
Frequently Asked Questions
Can You Put A Timer On A Regular Light Switch?
Yes, you can install a timer on a regular light switch. Simply replace the existing switch with a timer switch to automate the lights. Set the desired time duration, and the timer will turn the lights on and off accordingly.
Enjoy the convenience and energy savings!
How Do You Set An Electrical Timer Switch?
To set an electrical timer switch, follow these steps: 1. Turn off the power supply to the switch. 2. Remove the cover plate and locate the timer switch wires. 3. Connect the timer wires as per the manufacturer’s instructions. 4.
Set the desired time and program the switch accordingly. 5. Test the timer switch to ensure it is working correctly.
How Many Wires Does A Timer Switch Have?
A timer switch typically has three wires – a live wire, a neutral wire, and a load wire, allowing it to control the power supply to the connected device.
How Do You Install A Defiant Timer Switch?
To install a defiant timer switch, follow these steps: 1. Turn off the power to the switch at the breaker box. 2. Remove the old switch and disconnect the wires. 3. Connect the wires to the corresponding terminals on the timer switch.
4. Mount the switch into the electrical box. 5. Restore the power and set the timer according to the instructions provided.
Conclusion
Installing a timer switch is a simple and practical way to automate your home’s lighting and electrical devices. By following the step-by-step guide provided in this blog post, you’ll be able to enhance energy efficiency, security, and convenience within your living space.
Remember to carefully read the manufacturer’s instructions, turn off the power before installation, and test the timer switch to ensure proper functionality. Enjoy the benefits of a timer switch and take control of your home’s lighting and appliances. Happy installing!