To install a tile shower base, first, ensure the area is clean and level. Then, apply a layer of thin-set mortar using a trowel, place the shower base on top, and press it down firmly.
Introduction To Tile Shower Base Installation
In this article, we will provide you with a step-by-step guide on how to install a tile shower base. Whether you are remodeling your bathroom or building a new one, understanding the process of installing a tile shower base is crucial for a successful and long-lasting result. Installing a tile shower base is not only aesthetically pleasing, but it also provides numerous benefits, such as durability, water resistance, and easy maintenance. Before we dive into the installation process, let’s first explore the importance of a solid shower base and the benefits it brings.
Understanding the importance of a solid shower base
A solid shower base is the foundation of your shower. It is essential to have a sturdy and stable base to ensure the longevity and functionality of your tile shower. Without a solid base, the tiles can crack or shift over time, causing leaks and water damage. Additionally, a weak or unstable base can lead to a sagging or uneven floor, compromising the safety and comfort of your showering experience. Investing in a solid shower base is crucial to prevent costly repairs and to maintain a beautiful and functional shower for years to come.
Benefits of installing a tile shower base
Installing a tile shower base offers several benefits that make it a popular choice among homeowners and designers alike.
- Durability: A tile shower base is highly durable and can withstand the wear and tear of daily use. Tiles are resistant to scratches, stains, and water damage, ensuring a long lifespan for your shower.
- Water resistance: Tiles are inherently water-resistant, preventing any water from seeping through and causing mold or mildew growth. This feature not only keeps your shower clean and hygienic but also reduces the risk of water damage to the surrounding areas.
- Easy maintenance: Tile shower bases are effortless to maintain. Regular cleaning with mild soap and water is usually sufficient to keep them looking fresh and brand new. Moreover, any damaged or worn-out tiles can be easily replaced without the need for extensive repairs.
- Design versatility: With a tile shower base, you have endless design possibilities. From mosaic patterns to intricate tile designs, you can customize your shower to match your personal style and preferences. The wide range of tile materials and colors available in the market allows you to create a unique and visually appealing shower space.
Installing a tile shower base not only enhances the functionality and durability of your shower but also adds a touch of elegance and style to your bathroom. Now that we understand the importance of a solid shower base and the benefits it brings, let’s move on to the installation process in the next section.

Planning And Preparation
Installing a tile shower base can be a rewarding project that adds both beauty and functionality to your bathroom. However, before you dive into the actual installation, it’s crucial to spend time planning and preparing to ensure the process goes smoothly. In this section, we will discuss the key steps involved in planning and preparing for the tile shower base installation.
Evaluating the space and selecting the right shower base size
The first step in planning your tile shower base installation is to evaluate the available space in your bathroom. Measure the area where you want to install the shower and take note of any obstacles such as plumbing or electrical fixtures. This evaluation will help you determine the appropriate size of the shower base.
To select the right shower base size, consider both the available space and your personal preferences. A larger shower base offers more room and comfort, but it may not be suitable for smaller bathrooms. Conversely, a smaller shower base may be perfect for limited spaces or for those who prefer a more compact shower.
TIP: Remember to choose a shower base size that aligns with the size of your tiles for a visually appealing and balanced look.
Gathering the necessary tools and materials
Now that you have determined the appropriate shower base size, it’s time to gather the necessary tools and materials for the installation. Here is a handy checklist to help you with this step:
| Tools | Materials |
|---|---|
|
|
TIP: Ensure that you have all the tools and materials on hand before starting the installation to prevent any delays or interruptions in the process.
Preparing the subfloor for tile installation
The subfloor serves as the foundation for your tile shower base, so it’s essential to ensure it is properly prepared before installation. Follow these steps to prepare the subfloor:
- Clean the subfloor thoroughly to remove any dirt, dust, or debris.
- Inspect the subfloor for any signs of damage, such as rot or water damage. If any issues are found, make the necessary repairs.
- Apply a waterproofing membrane to the subfloor to protect it from moisture and prevent leaks.
- Use a level to check the subfloor for any uneven areas. If necessary, use a leveling compound to correct any imperfections.
TIP: Properly preparing the subfloor ensures a stable and long-lasting tile shower base that is resistant to water damage.
By taking the time to plan and prepare properly, you are setting yourself up for a successful and hassle-free tile shower base installation. Evaluating the space, selecting the right shower base size, gathering the necessary tools and materials, and preparing the subfloor are all crucial steps that should not be overlooked. In the next section, we will delve into the actual installation process, so stay tuned!

Choosing The Right Shower Base
When it comes to installing a tile shower base, choosing the right one is crucial. The shower base is the foundation of your shower, providing stability and support. It not only affects the overall functionality of the shower but also plays a significant role in the aesthetics of your bathroom. With various types of shower bases available in the market, it can be overwhelming to make a decision. In this section, we will explore different types of shower bases and guide you in choosing the perfect one for your bathroom.
Exploring different types of shower bases
Before diving into the details, let’s have a quick overview of the different types of shower bases you can consider for your bathroom:
- Acrylic shower bases
- Fiberglass shower bases
- Tiled shower bases
- Stone resin shower bases
Considering factors such as material, style, and budget
Each type of shower base comes with its own advantages and considerations. The material, style, and budget are significant factors to consider while making a choice. Let’s take a closer look at these factors:
1. Material:
The material of the shower base affects its durability and maintenance. Here are the different materials commonly used for shower bases:
| Material | Pros | Cons |
|---|---|---|
| Acrylic | – Lightweight and easy to install – Smooth, non-porous surface for easy cleaning |
– Prone to scratching and fading over time – Less resistant to heavy impact |
| Fiberglass | – Affordable – Lightweight and easy to clean |
– Less durable compared to other materials – Prone to cracks and chips |
| Tiled | – Versatile in terms of design options and styles – Highly durable and long-lasting |
– Requires professional installation for best results – More expensive compared to other options |
| Stone resin | – Luxurious and high-end appearance – Highly durable and resistant to scratches |
– Expensive investment – Heavy and may require additional structural support |
2. Style:
The style of the shower base should complement the overall design of your bathroom. Consider the shape, color, and texture that will best suit your bathroom aesthetics. While acrylic and fiberglass shower bases offer limited design options, tiled and stone resin shower bases allow for more customization.
3. Budget:
Your budget plays a significant role in determining the type of shower base you can choose. Acrylic and fiberglass shower bases are generally more affordable compared to tiled and stone resin options. Keep in mind that investing in a durable and long-lasting shower base can save you from costly repairs or replacements in the future.
Evaluating the pros and cons of each option
Now that we have explored the different types of shower bases and considered important factors such as material, style, and budget, let’s evaluate the pros and cons of each option:
- Acrylic shower bases: Lightweight and easy to install, but prone to scratching and fading over time.
- Fiberglass shower bases: Affordable and easy to clean, but less durable and prone to cracks.
- Tiled shower bases: Versatile in design options and highly durable, but require professional installation and have a higher cost.
- Stone resin shower bases: Luxurious appearance and highly durable, but come with a higher price tag and require additional structural support due to their weight.
By evaluating the pros and cons based on your specific needs and preferences, you can make an informed decision on the type of shower base that best suits your bathroom.
Installing The Shower Pan
When it comes to installing a tile shower base, one of the most important steps is installing the shower pan. The shower pan, also known as the shower base, is the bottom layer of the shower that provides a waterproof barrier and a solid foundation for the tile. In this section, we will guide you through the process of installing the shower pan, which includes preparing the shower drain, applying a waterproofing membrane, and pouring the mortar bed.
Preparing the Shower Drain
The first step in installing the shower pan is to prepare the shower drain. This involves removing the old drain cover and cleaning out any debris or old grout that may have accumulated. Make sure the drain is clear and free from any obstructions that could interfere with the proper drainage of water.
To protect the drain from the mortar and tile adhesive, you can cover it with a piece of plastic or a drain cover. This will prevent any debris or mortar from clogging the drain during the installation process.
Applying Waterproofing Membrane
Applying a waterproofing membrane is an essential step in ensuring that your shower pan remains leak-free. The membrane acts as a barrier between the shower pan and the surrounding walls and floor, preventing water from seeping through and causing damage.
Start by applying a layer of thinset mortar to the shower pan using a trowel. Make sure to cover the entire surface of the pan, including the sides and corners. Once the thinset mortar is applied, carefully unroll the waterproofing membrane and press it firmly onto the surface of the pan. Smooth out any wrinkles or air bubbles to ensure a tight seal.
Pouring the Mortar Bed for the Shower Pan
Once the waterproofing membrane is in place, you can proceed with pouring the mortar bed for the shower pan. The mortar bed provides a sturdy and level surface for the tile installation.
Start by mixing the mortar according to the manufacturer’s instructions. The consistency of the mortar should be thick enough to hold its shape but still spreadable. Pour the mortar onto the shower pan, starting at the center and working outward. Use a trowel to spread the mortar evenly and create a slight slope towards the drain to ensure proper water drainage.
Before proceeding with tiling, allow the mortar bed to cure for at least 24 hours. This will ensure that it is fully set and ready to support the weight of the tiles.
In summary, to install the shower pan, you should start by preparing the shower drain, applying a waterproofing membrane, and pouring the mortar bed for a sturdy and leak-free base. Following these steps will help ensure a successful tile shower installation.
Laying The Tile
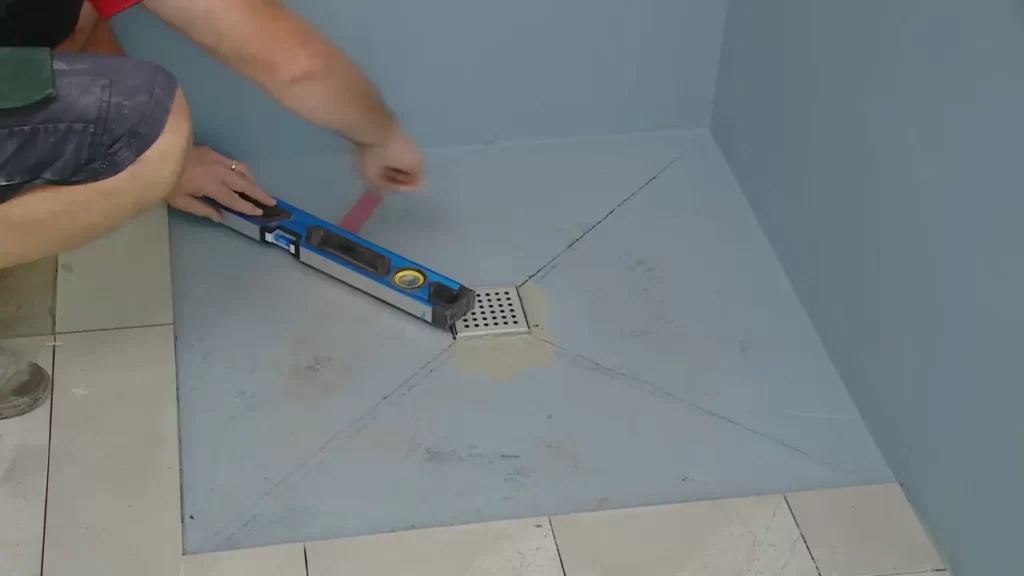
Planning the tile layout for the shower base
Before starting the tile installation process, it is essential to plan the layout of the tiles for your shower base. This step ensures you have a clear idea of how the tiles will fit and helps avoid any surprises or errors along the way.
To begin planning, measure the size of your shower base and determine the center point. From this center point, you can work outwards to establish where the tiles will start and end. It’s important to consider the size of your tiles and the grout lines. You want to avoid having tiny, uneven tiles at the edges or in visible areas of the shower.
Once you have determined the starting point and the layout for your tiles, use a straightedge or level to draw lines on the shower base. These lines will act as a guide as you lay the tiles, ensuring they are straight and aligned.
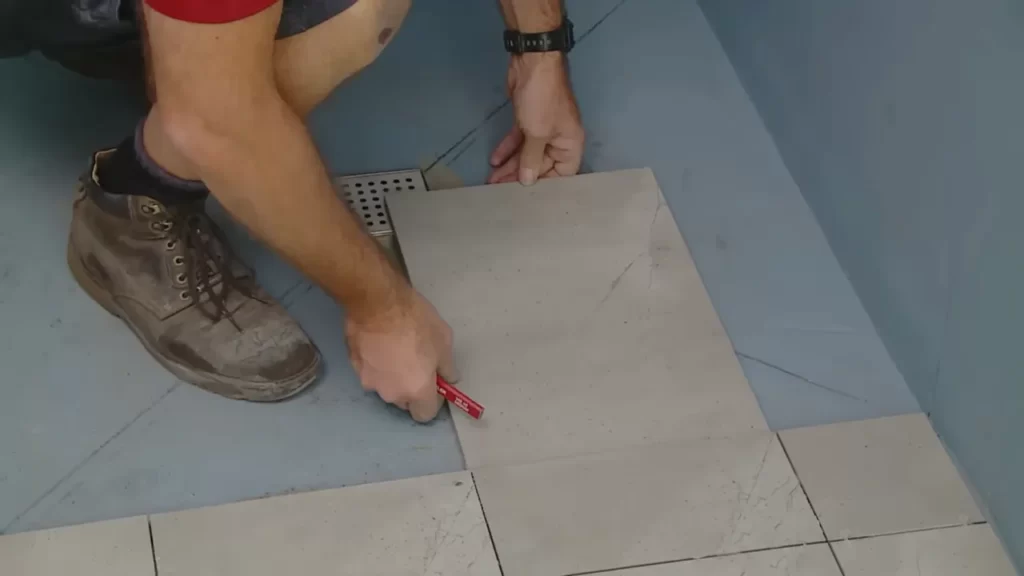
Cutting and fitting the tiles
Now that you have a clear layout plan, it’s time to start cutting and fitting the tiles for your shower base. This step is crucial to ensure the tiles fit perfectly and create a seamless, professional-looking finish.
Start by measuring the space where you need to make a cut. Using a tile cutter or wet saw, carefully cut the tile along the marked line. Remember to wear safety goggles and gloves to protect yourself during the cutting process.
Once the tile is cut, test the fit by placing it in the designated spot. Make any necessary adjustments by trimming the edges or corners until the tile fits snugly. Take your time during this process to ensure each tile is cut and fitted correctly before moving on.
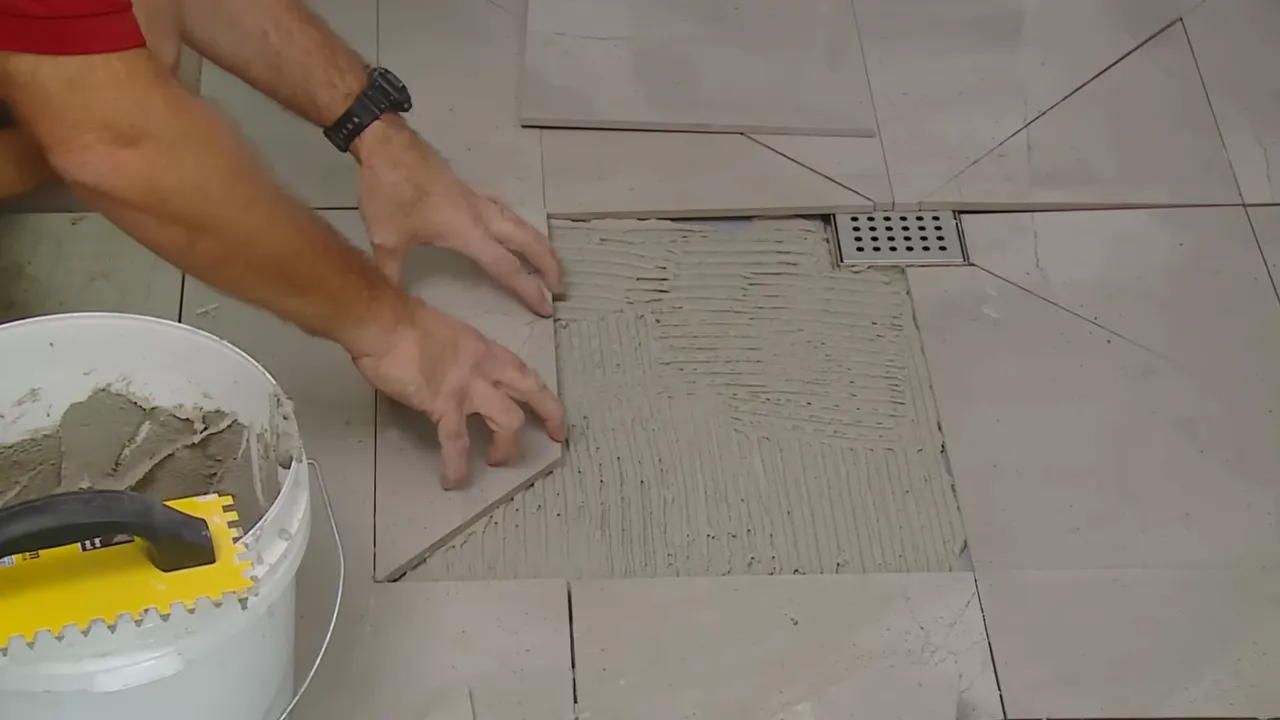
Applying thinset mortar and setting the tiles in place
With the tiles cut and fitted, it’s time to move onto the next step of laying the tile shower base. This involves applying thinset mortar and placing the tiles in their designated spots.
To begin, prepare the thinset mortar according to the manufacturer’s instructions. Spread a layer of mortar onto the shower base using a notched trowel. The notches help create an even, adhesive surface for the tiles to stick to.
After applying the mortar, carefully place each tile on the shower base, following the layout plan and using the straightedge or level to ensure they are aligned. Press firmly on each tile to ensure it adheres well to the mortar.
Continue applying mortar and setting tiles until the entire shower base is covered. Be sure to leave an appropriate gap between each tile for grouting. Once all the tiles are in place, allow the mortar to dry according to the manufacturer’s instructions before proceeding to the grouting stage.
Grouting And Sealing
One of the most important steps in installing a tile shower base is grouting and sealing. Grouting not only reinforces the tile joints, but it also adds a decorative touch to your shower. Sealing, on the other hand, protects the tile and grout from moisture and stains, ensuring its longevity and easy maintenance. In this section, we will guide you through the process of mixing and applying grout, cleaning excess grout, and applying sealant.
Mixing and applying grout to the tile joints
Grout is a cement-based mixture that fills in the gaps between the tiles, providing stability and preventing water from seeping in. To properly mix and apply grout to the tile joints, follow these steps:
- Start by preparing the grout mixture according to the manufacturer’s instructions. Typically, you will need to mix the grout powder with water in a clean bucket using a grout mixer or a trowel until you achieve a smooth, peanut butter-like consistency.
- Using a rubber grout float, apply the grout mixture diagonally across the tile joints, pressing it firmly into the gaps. Ensure that all the joints are completely filled and level with the tiles.
- Once you have applied the grout to a manageable area, hold the float at a 45-degree angle and scrape off the excess grout diagonally across the tile joints. This helps to remove excess grout and create a smooth finish.
- Repeat the process for the remaining tile joints, working in small sections at a time until the entire shower base is grouted.
Cleaning excess grout and ensuring a smooth finish
After applying the grout, it’s crucial to clean up any excess grout to achieve a seamless and professional-looking finish. Follow these steps to clean excess grout and ensure a smooth surface:
- Wait for the grout to dry for about 15-30 minutes or until it becomes firm and matte in appearance.
- Using a slightly damp sponge, gently wipe away any excess grout from the tiles, working in a circular motion. Rinse the sponge frequently to avoid smearing the grout.
- Buff the tiles with a dry cloth to remove any remaining haze or residue. This will help reveal the true color and shine of the tiles.
- Allow the grout to cure for at least 24 hours before proceeding to the next step.
Applying sealant to protect the tile and grout
Applying a sealant is the final step in ensuring the durability and longevity of your tile shower base. Follow these steps to properly apply sealant:
- Choose a suitable sealant for your particular tile and grout. There are various options available, including penetrating sealers and surface sealers. Read the manufacturer’s instructions for application guidelines.
- Using a brush or applicator, evenly apply the sealant to the tile surface, focusing on the grout lines. Ensure that all the grout lines are completely covered.
- Allow the sealant to dry according to the manufacturer’s recommended drying time.
- Once the sealant is dry, test its effectiveness by pouring a small amount of water on the tiles. If the water beads up and does not penetrate the surface, the sealant is working correctly.
By following these steps, you can effectively grout and seal your tile shower base, ensuring its beauty and functionality for years to come.
Finishing Touches
Installing the Shower Fixtures and Accessories
Once you have successfully installed the tile shower base, it’s time to add the finishing touches. Installing the shower fixtures and accessories will not only enhance the functionality of your shower, but also add a touch of style to your bathroom.
Start by carefully choosing the shower fixtures and accessories that best fit your needs and preferences. This includes items such as faucets, showerheads, handles, and any other accessories you may want, such as soap dishes or shelves.
When installing the fixtures, make sure to follow the manufacturer’s instructions carefully. This will ensure that they are securely attached and properly aligned. Use the appropriate tools, such as a wrench or screwdriver, to tighten connections and prevent any leaks. It’s important to note that different types of fixtures may require different installation methods, so be sure to consult the instructions for each specific item.
Applying Caulk to Seal Edges and Corners
One of the final steps in completing your tile shower base installation is applying caulk to seal the edges and corners. Caulking is essential for preventing water from seeping into these vulnerable areas, which can cause damage over time.
Before applying the caulk, ensure that the edges and corners are clean and dry. Remove any debris or dust using a clean cloth or brush. This will help the caulk adhere properly and create a tight seal.
Choose a high-quality silicone caulk that is specifically designed for use in wet areas, as it will be more resistant to moisture and mold. Load the caulk into a caulking gun and cut the nozzle at a 45-degree angle to create a small opening. Apply a steady and consistent bead of caulk along the edges and corners, making sure to fill any gaps or cracks.
Smooth the caulk immediately after application using a caulk smoothing tool or your finger. This will help create a neat and professional-looking finish. Wipe away any excess caulk with a damp cloth to avoid smearing or staining the tiles.
Testing the Shower Base for Leaks and Stability
Before considering your tile shower base installation complete, it’s crucial to thoroughly test it for leaks and stability. This will ensure that your shower is functioning properly and will prevent any unpleasant surprises down the line.
To test for leaks, turn on the water supply and allow the shower to run for several minutes. Carefully inspect the area around the base, as well as the edges and corners, for any signs of water leakage. If you notice any leaks, tighten connections or reapply caulk as necessary to resolve the issue.
In addition to checking for leaks, it’s important to evaluate the stability of the shower base. Apply pressure to various areas of the base to ensure it feels secure and doesn’t shift or move. If you notice any instability, you may need to reinforce the base or seek professional assistance to address the issue.
By taking the time to install the shower fixtures and accessories, applying caulk to seal the edges and corners, and thoroughly testing the shower base for leaks and stability, you can ensure that your tile shower installation is not only visually appealing but also functional and long-lasting.
Troubleshooting And Maintenance
Proper troubleshooting and maintenance are essential for ensuring the longevity and functionality of your tile shower base. By addressing common issues during installation and following the right cleaning and maintenance techniques, you can enjoy a beautiful and functional bathroom for years to come.
Addressing common issues during tile shower base installation
Even with meticulous planning and preparation, tile shower base installations can encounter certain challenges. By being aware of these common issues and knowing how to tackle them, you can ensure a seamless installation process. Here are a few common issues and how to address them:
1. Uneven subfloor
An uneven subfloor can lead to an unstable or uneven tile shower base. To address this issue, it’s important to thoroughly inspect and level the subfloor before installation. Use a leveling compound to fill in any gaps or depressions and ensure a solid foundation for the base.
2. Improper waterproofing
Waterproofing is crucial for preventing water damage and mold growth in your shower. If you notice any signs of leakage or dampness, it’s important to address it as soon as possible. Check the waterproofing membrane and ensure it is properly installed and intact. Repair any damaged areas and apply a fresh layer of waterproofing material if necessary.
3. Inadequate tile adhesive
Using the right tile adhesive is essential for ensuring the tiles adhere to the base securely. If you find that tiles are not sticking properly or are coming loose, it may be due to the use of inadequate adhesive. Remove the loose tiles, clean off the old adhesive, and reapply a high-quality tile adhesive following the manufacturer’s instructions.
Tips for cleaning and maintaining the tile shower base
Regular cleaning and maintenance are vital to keep your tile shower base looking pristine and functioning effectively. Here are some tips to help you properly clean and maintain your tile shower base:
1. Use mild cleaning solutions
Harsh chemicals can damage the tiles and the grout lines of your shower base. Instead, opt for mild cleaning solutions or mixtures of vinegar and water to effectively remove soap scum and dirt without causing any harm.
2. Scrub gently
When cleaning the tiles, use a soft brush or sponge to scrub gently. Avoid using abrasive materials that may scratch or damage the surface of the tiles.
3. Seal the grout lines
Grout lines are prone to staining and discoloration over time. Applying a grout sealer can help protect the grout and prolong its lifespan. Follow the manufacturer’s instructions to ensure proper application.
4. Regularly inspect for damage
Periodically inspect your tile shower base for any signs of damage, such as cracked or chipped tiles, loose grout, or leaking. Address any issues promptly to prevent further damage and maintain the integrity of your shower base.
Extending the lifespan of the tile shower base
To ensure the tile shower base withstands the test of time, you can take additional measures to extend its lifespan. Here are a few tips:
- Install a high-quality shower pan liner for added waterproofing protection.
- Avoid using harsh chemicals or abrasive scrubbing tools that may damage the tiles or grout lines.
- Regularly reseal the grout lines to prevent staining and maintain their appearance.
- Prevent standing water on the shower base by ensuring proper drainage and prompt fixing of any leaks.
- Place non-slip mats or rugs in heavy traffic areas to reduce wear and tear on the tiles.
By following these troubleshooting tips and implementing regular maintenance practices, you can keep your tile shower base in optimal condition and enjoy a luxurious and functional bathing experience for years to come.
Final Thoughts
Celebrating the Completed Tile Shower Base Installation
After countless hours of hard work and meticulous attention to detail, your new tile shower base installation is finally complete! It’s time to celebrate your accomplishments and bask in the satisfaction of a job well done.
Imagine stepping into your beautifully tiled shower, where every piece fits perfectly and exudes a sense of style and elegance. The pride you feel for this project is well-deserved – you’ve transformed a mundane bathroom into a personal oasis.
Each tile carefully placed, every grout line aligned, and the sturdy shower base expertly installed. Your effort has not only created a functional and aesthetically pleasing space but has also added value to your home.
Highlighting the Importance of Proper Installation Techniques
Before you indulge in the joy of your new tile shower base, it’s essential to acknowledge the importance of proper installation techniques. By adhering to industry-recommended practices, you have ensured the longevity and durability of your new shower.
Proper installation involves meticulous attention to detail at each step, from preparing the subfloor to applying the adhesive and laying the tiles. Taking shortcuts or neglecting crucial steps can lead to issues such as loose tiles, water damage, or even structural problems.
Through your commitment to doing things right the first time, your tile shower base installation will stand the test of time. It will provide you with years of enjoyment, free from unnecessary repairs and maintenance.
Encouraging Beginners to Tackle Similar DIY Projects
If you are new to home improvement projects, the successful installation of a tile shower base can act as a catalyst for future DIY endeavors. You’ve proven to yourself that with patience, dedication, and the willingness to learn, you can accomplish amazing things.
The sense of empowerment that comes with completing a project like this is unparalleled. It opens up a world of possibilities and encourages you to try your hand at other tasks, knowing that you have the ability to achieve remarkable results.
Whether you opt for a tile backsplash, a bathroom remodel, or any other home improvement project, remember that the journey is just as rewarding as the destination. The skills you acquire along the way will continue to benefit you in various aspects of your life.
Don’t be afraid to step outside your comfort zone and embrace the satisfaction of turning your dream home into a reality. With each project, you’ll add value to your property and create a space that truly reflects your personal style and taste.
Frequently Asked Questions
What Do You Put Under A Tile Shower Floor?
A tile shower floor typically needs a waterproofing material, like a shower pan liner or a waterproofing membrane, before laying the tiles. This helps prevent water damage and leakage. Remember to follow proper installation guidelines to ensure a long-lasting and functional tile shower floor.
Do You Put Shower Base In Before Tiling?
Yes, it is recommended to install shower base before tiling. This provides a solid foundation for the tiles and helps prevent water leakage.
What Do You Use For The Base Of A Tile Shower?
For the base of a tile shower, commonly used materials are cement board or waterproof membranes like Schluter-KERDI. These provide a solid and waterproof surface to support the tiles and prevent water damage.
How Do You Do A Tile Shower Base?
To create a tile shower base, follow these steps: 1. Prepare the surface by removing old flooring and ensuring it is level and waterproofed. 2. Install a shower pan liner to protect against water damage. 3. Create a mortar bed over the liner, sloping it towards the drain for proper drainage.
4. Lay the tiles on the mortar bed, leaving spaces for grouting. 5. Apply grout between the tiles, allowing it to dry before sealing for a finished tile shower base.
Conclusion
To sum up, installing a tile shower base can be a rewarding DIY project that adds both functionality and aesthetic appeal to your bathroom. By following the step-by-step instructions outlined in this blog post, you can achieve professional-looking results without the need for extensive experience or specialized tools.
Remember to properly prepare the area, choose the right materials, and take your time during the installation process for optimal outcomes. With a beautifully tiled shower base, you’ll be able to enjoy a luxurious and durable bathing experience for years to come.