To install a sump pump check valve, first, locate the check valve on the discharge pipe and ensure it is facing the right direction. Then, using pipe wrenches, tighten the check valve onto the discharge pipe.
Installing a sump pump check valve is an important step in maintaining an efficient and reliable sump pump system. The check valve prevents water from flowing back into the sump pit after it has been pumped out, reducing the risk of flooding and pump damage.
By following a few simple steps, you can easily install a sump pump check valve and ensure the proper functioning of your sump pump system. In this guide, we will walk you through the process of installing a sump pump check valve to help you safeguard your basement against potential water damage.
Understanding The Purpose And Importance Of A Sump Pump Check Valve
Why a sump pump check valve is crucial for your basement
A sump pump is an indispensable tool for keeping our basements dry and protected from flooding. However, did you know that a sump pump check valve plays a vital role in ensuring the effectiveness of your sump pump system? Understanding the purpose and importance of a sump pump check valve is essential for every homeowner with a basement.
How a sump pump check valve works to prevent backflow
A sump pump check valve acts as a one-way gate that allows water to flow out of the sump pump but prevents it from flowing back into the pit when the pump shuts off. This mechanism is crucial because without a check valve, the water that has been pumped out of the basement can flow back into the sump pit, causing what is known as backflow.
Backflow not only diminishes the effectiveness of the sump pump but can also lead to flooding, as the pump will need to work harder to expel the water that is continuously being reintroduced into the pit. This constant back and forth can shorten the lifespan of your sump pump and increase the risk of basement flooding.
A sump pump check valve works by utilizing a flapper mechanism that opens when the pump is actively discharging water. When the pump shuts off, the flapper quickly closes, preventing any water from flowing back into the pit. This design ensures a one-way flow of water, efficiently directing it away from your basement and protecting your home from potential water damage.
It is important to note that not all sump pump check valves are the same. There are different types, such as swing check valves and spring-loaded check valves, each with its own advantages and limitations. Consider consulting with a professional to determine the best type of check valve for your specific sump pump system.
In conclusion, a sump pump check valve is crucial for maintaining the effectiveness of your sump pump and preventing basement flooding. Its ability to prevent backflow ensures that water is efficiently directed away from your basement, protecting your home from potential water damage. Installing a high-quality check valve is a wise investment and an integral part of keeping your basement dry and safe.

Gathering The Necessary Equipment For Installing A Sump Pump Check Valve
When it comes to installing a sump pump check valve, having the right equipment is crucial for a successful installation. Gathering the necessary tools and materials beforehand can save you time and ensure a seamless process. In this section, we will go over the list of tools required and recommend materials for a complete installation. Let’s dive in!
List of tools required for the installation process
Before you begin the installation process, it’s important to have the following tools on hand:
- Adjustable wrench
- Pipe cutter or hacksaw
- Teflon tape or pipe thread sealant
- Drill
- Screwdriver
- Tubing cutter (if using plastic pipes)
- Measuring tape
- Pipe wrench or tongue-and-groove pliers
Having these tools readily available will make the installation process smoother and ensure you have everything you need.
Recommended materials for a seamless installation
When it comes to the materials needed for installing a sump pump check valve, it’s essential to choose the right ones to ensure a seamless installation. Here are the recommended materials:
- Check valve: Choose a high-quality check valve that is compatible with your sump pump system. Look for one that is durable, reliable, and designed to prevent backflow.
- Pipe fittings: Select the appropriate pipe fittings based on the size and type of your sump pump system. It is crucial to ensure a secure and leak-free connection.
- Pipes: Opt for sturdy and corrosion-resistant pipes such as PVC or stainless steel. The size of the pipes should match your sump pump system’s specifications.
- Pipe clamps or brackets: Use pipe clamps or brackets to secure the pipes and ensure stability.
- Sealant or Teflon tape: Apply a sealant or Teflon tape to the threads of the pipe fittings to create a watertight seal and prevent leaks.
By using these recommended materials, you can have peace of mind knowing that your sump pump check valve installation will be sturdy, efficient, and long-lasting.
In conclusion, gathering the necessary equipment for installing a sump pump check valve is the first step towards a successful installation. Make sure you have all the required tools and recommended materials on hand to save time and ensure a seamless process. Remember, investing in high-quality materials will result in a more reliable and efficient sump pump system. Now that we have gathered the necessary equipment, let’s move on to the next steps of the installation process.
A Comprehensive Walkthrough For A Successful Installation
Preparing the sump pump and the check valve for installation
Before you start installing the sump pump check valve, it’s essential to ensure that both the sump pump and the check valve are ready for installation. Follow these steps to prepare them:
- Turn off the sump pump: Begin by disconnecting the power supply to the sump pump. This step is crucial to prevent any accidents during the installation process.
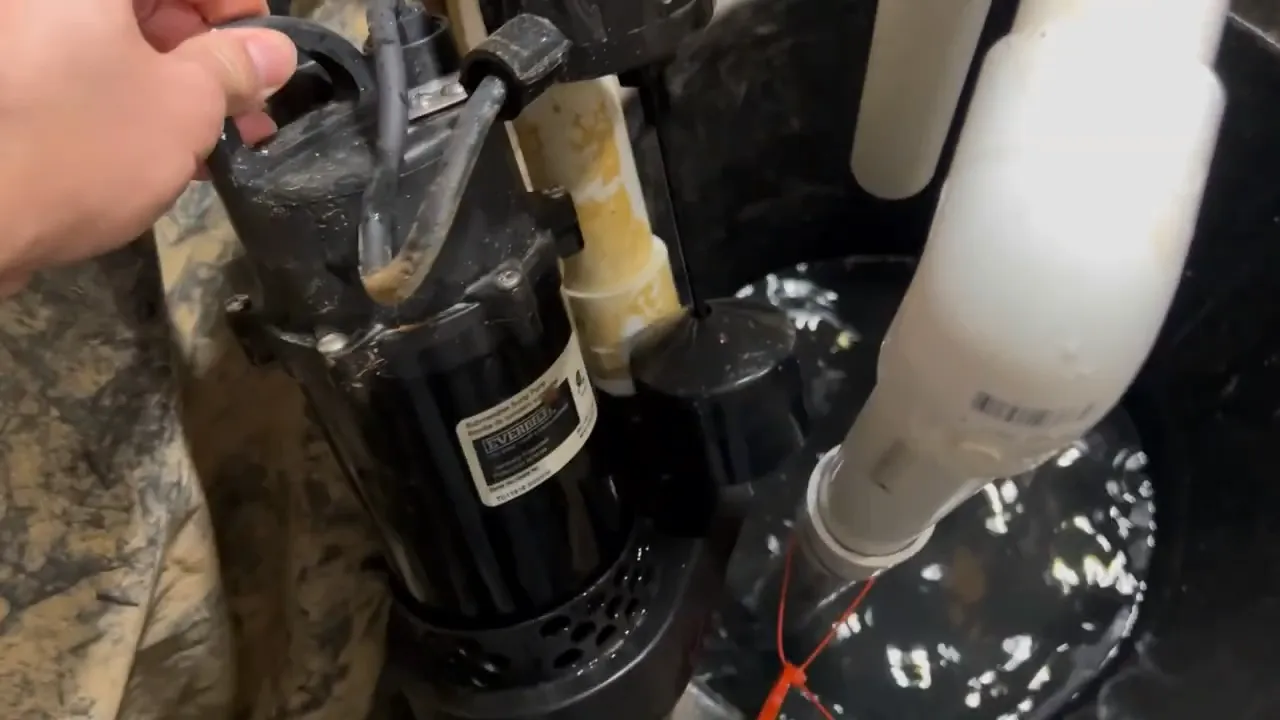
- Clean the sump pump basin: Check the sump pump basin for any debris or dirt that might hinder the proper functioning of the check valve. Remove any obstructions to ensure a smooth installation.
- Inspect the check valve: Take a close look at the check valve to ensure there are no damages or defects. Make sure all the components are intact and in good condition. If there are any concerns, consider replacing the check valve before proceeding with the installation.
Securing the check valve onto the discharge pipe
Once the sump pump and check valve are prepared, it’s time to secure the check valve onto the discharge pipe. Follow these steps carefully:
- Measure the discharge pipe: Using a measuring tape, measure the diameter of the discharge pipe. This will help you determine the correct size of the check valve required for your sump pump system.
- Select the appropriate check valve: Based on the measurement, choose a check valve that fits securely onto the discharge pipe. It’s important to ensure a tight seal between the check valve and the pipe to prevent any leakage.
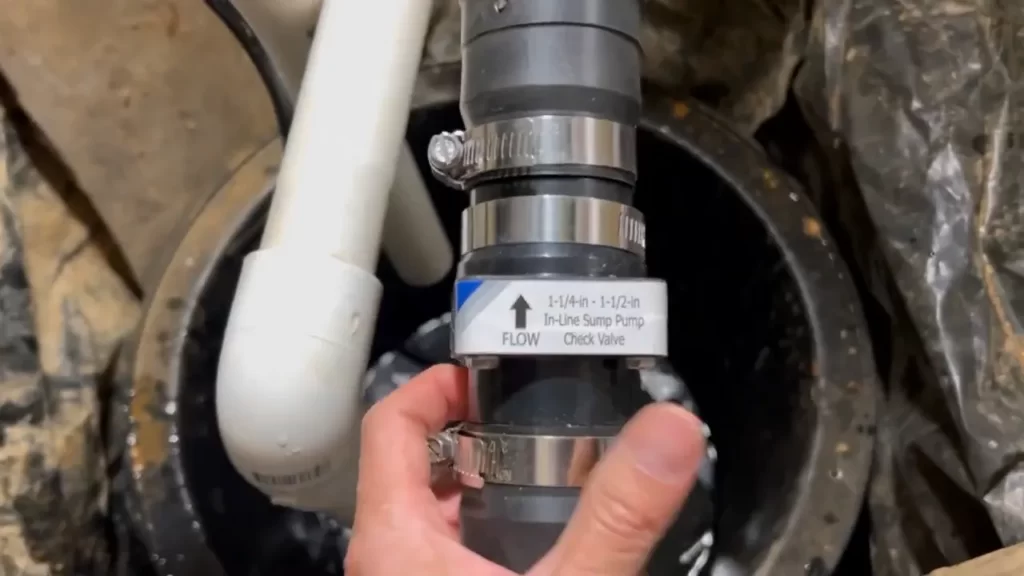
- Position the check valve: Slide the check valve onto the discharge pipe, ensuring that it is oriented in the correct direction. The arrow on the check valve should be pointing away from the sump pump.
- Tighten the clamps: Use clamps or couplings to secure the check valve onto the discharge pipe. Make sure the clamps are tightened adequately to prevent any movement or leaks.
Properly connecting the sump pump and the check valve
Now that the check valve is securely attached to the discharge pipe, it’s time to connect the sump pump to the check valve:
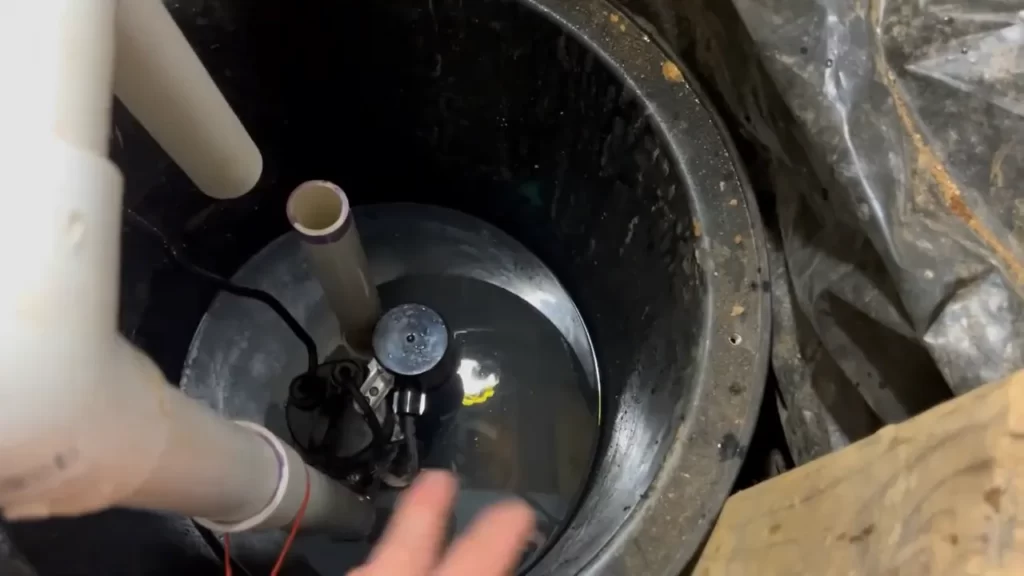
- Position the sump pump: Place the sump pump in the sump pump basin, making sure it is level and stable. Check if it aligns with the discharge pipe.
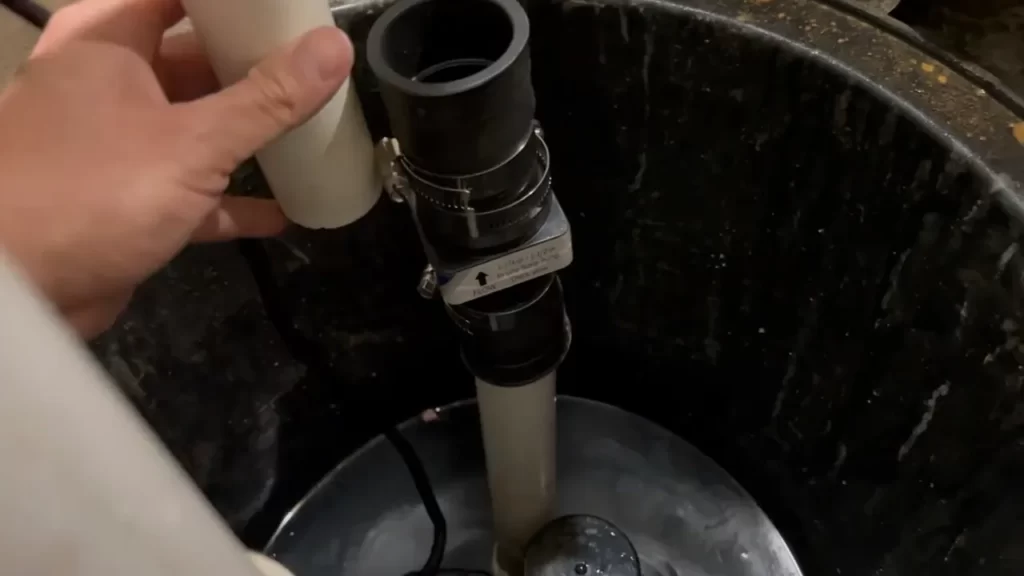
- Connect the sump pump to the check valve: Attach the pipe from the sump pump to the check valve using a rubber coupling or a similar connecting mechanism. Ensure a snug fit to avoid any potential leaks.
- Secure the connection: Use clamps to secure the connection between the sump pump and the check valve. Make sure the clamps are tightened firmly, but not overly so, to avoid damaging any components.
Testing the check valve for functionality
After completing the installation, it’s important to test the check valve to ensure its proper functionality. Follow these steps for a successful functionality test:
- Reconnect the power supply: Turn the power back on to the sump pump to enable it to function during the test. Ensure all connections are secure and properly tightened.
- Activate the sump pump: Trigger the sump pump by adding water to the sump pump basin. Observe the flow of water through the check valve. It should only allow water to flow in one direction, preventing any backflow.
- Check for leakage: Inspect the connections between the sump pump, check valve, and discharge pipe for any signs of leakage. If any leaks are detected, tighten the connections or replace any faulty components as necessary.
- Monitor the sump pump: Monitor the sump pump’s operation for a sufficient amount of time to ensure it is functioning correctly and efficiently. Take note of any unusual noises or behaviors that might indicate a problem.
By following this comprehensive walkthrough for the installation of a sump pump check valve, you can ensure a successful and reliable setup. Remember to consult the manufacturer’s instructions for specific guidance and recommendations based on your sump pump system.
Addressing Potential Challenges During The Installation Process
Common problems encountered during sump pump check valve installation
Installing a sump pump check valve is an essential step in ensuring the proper functioning of your sump pump system. While the installation process may seem straightforward, there are a few common challenges that homeowners might encounter. Being aware of these challenges can help you address them effectively and ensure a successful installation. Here are some of the common problems you might face:
- Inadequate space: One of the primary challenges during the installation process is insufficient space around the sump pump system. Limited space can make it difficult to maneuver and connect the check valve properly. It is crucial to measure the available space beforehand and choose a check valve that fits comfortably.
- Misalignment: Another common issue is the misalignment of the check valve with the sump pump discharge pipe. This can lead to leaks and improper functioning. It is important to ensure that the check valve is aligned correctly and tightly connected to avoid any potential problems.
- Leaks: Leakage is a common concern during sump pump check valve installation. Even a small leak can cause significant damage over time. It is crucial to thoroughly inspect the connections and use proper sealants or Teflon tape to create a watertight seal. Regularly checking for leaks after installation is also advisable.
- Noisy operation: Some homeowners may experience noisy operation after installing a sump pump check valve. This could be due to improper installation or air trapped within the system. To address this, ensure that the check valve is installed in the correct orientation and that there is no air trapped in the pipes. Bleeding the system of any trapped air can help reduce noise.
Troubleshooting tips for issues such as leaks or noisy operation
Encountering issues during the installation process is not uncommon. However, there are several troubleshooting tips you can follow to address specific problems:
- To fix leaks:
- Check all connections for tightness and secure them if necessary.
- Use a sealant or Teflon tape on threaded connections to create a watertight seal.
- Inspect the check valve for cracks or damage and replace it if needed.
- Regularly check for leaks after installation and promptly address any issues.
- To address noisy operation:
- Ensure the check valve is installed in the correct position with the arrow pointing away from the sump pump.
- Check for any obstructions, such as debris or dirt, in the valve or discharge pipe. Clear any blockages that may be causing noise.
- Bleed the system of any trapped air by opening the discharge pipe momentarily and allowing water to flow freely.
- If the noise persists, consider contacting a professional to assess the issue.
By addressing these potential challenges during the installation process and following the troubleshooting tips, you can ensure a smooth and successful installation of your sump pump check valve. Remember, if you encounter any persistent problems or are unsure about the installation, it’s always best to consult a professional plumber for assistance.
Ensuring The Longevity And Optimal Performance Of Your Sump Pump Check Valve
The sump pump check valve is a crucial component of your home’s sump pump system. It prevents water from flowing back into the sump pit after being pumped out, ensuring the effectiveness and efficiency of the entire system. To maximize the lifespan and maintain the optimal performance of your sump pump check valve, it is important to follow certain maintenance practices.
Regular inspection and cleaning of the check valve
Inspecting and cleaning your sump pump check valve on a regular basis is essential to ensure its proper functioning. Over time, debris, sediment, and mineral deposits can accumulate in the valve, hindering its ability to close tightly. This can lead to water backflow issues and reduce the efficiency of your sump pump.
To inspect and clean the check valve, follow these steps:
- Ensure the sump pump is unplugged and disconnected from the power source to avoid any accidents.
- Locate the check valve, typically positioned on the discharge pipe above the sump pump.
- Remove the check valve from the pipe by loosening the clamps or fittings that hold it in place.
- Inspect the check valve for any visible signs of damage, such as cracks or fractures. If any are found, it is recommended to replace the valve.
- Flush out any debris or sediment by running water through the valve in the opposite direction of normal flow.
- Use a soft brush or cloth to remove any stubborn deposits.
- Once cleaned, reattach the check valve to the discharge pipe securely, ensuring proper alignment.
By performing regular inspections and cleanings, you can maintain the functionality and extend the lifespan of your sump pump check valve.
Best practices for maintaining the sump pump and check valve system
In addition to inspecting and cleaning the check valve, there are other maintenance practices that can help ensure the longevity and optimal performance of your sump pump and check valve system:
- Test the sump pump regularly by pouring water into the sump pit to ensure it activates and pumps water out effectively.
- Keep the sump pit and the surrounding area clean and free from debris to prevent clogs and potential damage to the pump or check valve.
- Check the sump pump’s float switch periodically to verify its proper operation. The float switch is responsible for activating the pump when the water level rises.
- Consider installing a backup battery system to keep the sump pump operational during power outages.
- Monitor the discharge pipe for any signs of leaks or obstructions.
- Regularly check the sump pump motor for excessive heat or unusual noises, as these may indicate underlying issues.
- Keep an eye on the check valve’s body and fittings for any signs of damage, such as loose connections or cracks.
By following these best practices, you can ensure that your sump pump check valve and the entire sump pump system continue to function effectively, providing you with the peace of mind and protection you need against potential water damage in your home.
Understanding The Advantages Of Having A Sump Pump Check Valve Installed
Protecting your basement from flooding and water damage
A sump pump check valve is an essential component in any basement waterproofing system. It plays a crucial role in protecting your basement from flooding and water damage. Understanding the advantages of having a sump pump check valve installed will help you appreciate the importance of this small but mighty device.
Preventing potential sewer line backups
When heavy rain or melting snow turns your yard into a miniature pond, it’s not just your basement that’s at risk of flooding. Without a sump pump check valve, there’s also the potential for sewer line backups. This is because in times of heavy rainfall, the water can flow back into the main municipal sewer line, causing it to overflow and back up into your home.
This can result in contaminated water flooding your basement, causing extensive damage and posing health hazards. By installing a check valve, you can prevent this nightmare scenario and keep your basement dry and free from sewage backups.
Ensuring proper functioning of your sump pump
A sump pump check valve is designed to ensure the proper functioning of your sump pump system. It works by allowing water to flow in one direction, which is away from your basement and towards the designated drainage area.
Without a check valve, water can flow back into the sump pump pit after it has been pumped out. This can cause unnecessary wear and tear on the pump, leading to increased maintenance and potential breakdowns.
By installing a check valve, you can significantly extend the lifespan of your sump pump and ensure that it operates efficiently when you need it the most. This not only saves you money on pump repairs and replacements but also provides you with peace of mind knowing that your basement is protected.
In conclusion, if you want to protect your basement from flooding, prevent potential sewer line backups, and ensure the proper functioning of your sump pump, installing a sump pump check valve is a no-brainer. This small investment can have a significant impact on the longevity and efficiency of your basement waterproofing system.
Frequently Asked Questions
Where Should Sump Pump Check Valve Be Installed?
The sump pump check valve should be installed in the discharge pipe, just above the sump pump. This prevents water from flowing back into the sump pit after the pump shuts off, ensuring proper drainage and preventing flooding.
Can I Install A Check Valve On A Sump Pump?
Yes, you can install a check valve on a sump pump. It helps prevent water from flowing back into the sump pit after the pump shuts off, reducing the risk of flooding. But remember to consult the manufacturer’s guidelines for proper installation and ensure the check valve is compatible with your sump pump system.
How Do You Install A Check Valve?
To install a check valve, first, identify the direction of flow in the pipe. Then, cut the pipe and ensure it is clean and free of debris. Apply Teflon tape to the male threads of the valve and screw it onto the pipe.
Use a wrench to tighten it securely. Finally, test for leaks.
Should Sump Pump Check Valve Be Horizontal Or Vertical?
A sump pump check valve can be installed either vertically or horizontally. The specific orientation depends on the available space and plumbing setup in your sump pump system. Both orientations are effective in preventing water backflow and ensuring the pump functions properly.
Conclusion
To sum up, installing a sump pump check valve is a crucial step in ensuring proper functioning of your sump pump system. By preventing backflow of water and reducing pump wear, the check valve provides long-term protection for your basement against flooding.
With the easy-to-follow steps outlined in this guide, you can confidently take on this DIY project. Remember to always prioritize safety and refer to manufacturer’s instructions for specific details. Happy plumbing!