
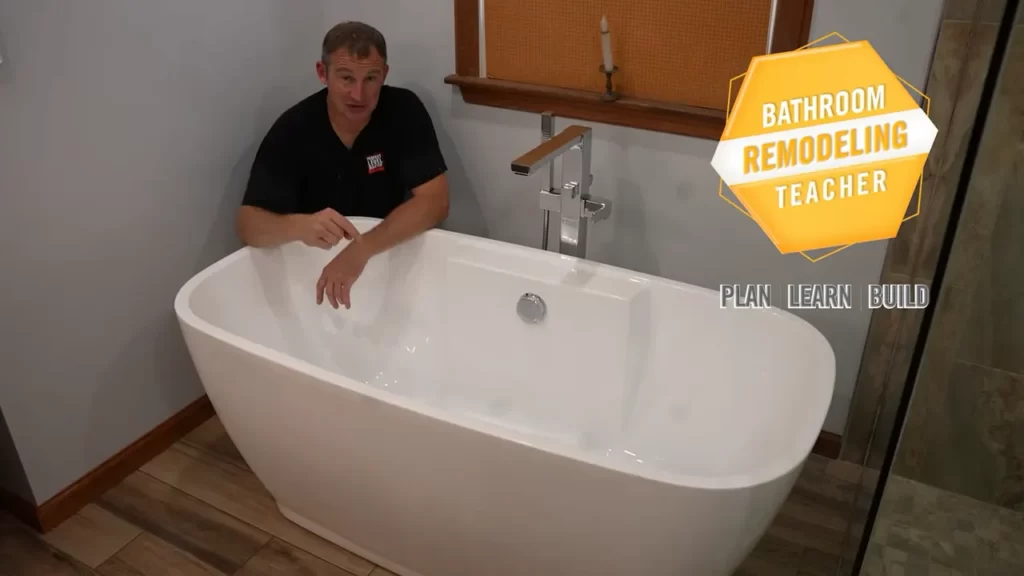
To install a soaking tub, position and level the tub, connect the drain and overflow pipes, and secure the tub to the framing. Installing a soaking tub in your bathroom can add luxury and relaxation to your daily routine.
Soaking tubs are deeper than regular bathtubs, allowing you to submerge your entire body for a soothing bathing experience. Whether you are remodeling your bathroom or building a new one, installing a soaking tub requires careful planning and precise execution.
We will guide you through the steps to correctly install a soaking tub in your bathroom, ensuring a durable and comfortable addition to your bathing space. Let’s get started with the installation process.
Choosing The Perfect Soaking Tub For Your Bathroom
Considerations for selecting a soaking tub
When it comes to creating a relaxing and luxurious bathroom experience, few elements can compare to a soaking tub. These deep, freestanding tubs have become increasingly popular in recent years, offering homeowners a chance to unwind and rejuvenate in the comfort of their own home. However, with so many options available, choosing the perfect soaking tub for your bathroom can be a daunting task. To help you make an informed decision, there are several key considerations to keep in mind.
Measuring your bathroom space
The first step in selecting the perfect soaking tub is to measure your bathroom space. Before you start browsing through options, it’s important to have a clear understanding of how much room you have available. Measure both the length and width of the area where you plan to install the tub, and also take into account any obstructions such as doors or cabinets that may limit your available space.
Style and design
Once you have determined the dimensions of your bathroom, you can begin considering the style and design of the soaking tub. There are a wide variety of options available, ranging from sleek and modern to classic and traditional. Think about the overall aesthetic of your bathroom and what style of tub would complement it best. Consider factors such as the material of the tub, such as acrylic or cast iron, as well as any additional features like built-in seating or jets.
Installation requirements
Another important consideration is the installation requirements of the soaking tub. Will your bathroom be able to support the weight of a freestanding tub, or will you need to opt for a drop-in or alcove tub? Additionally, think about the plumbing requirements and whether any modifications will need to be made to your existing plumbing system. It’s crucial to consult with a professional plumber to ensure that the installation is done properly and safely.
Budget
Of course, budget is always a consideration when undertaking any home improvement project. Soaking tubs can vary greatly in price, depending on factors such as size, material, and brand. Before you start shopping, determine a realistic budget for your tub and try to stick to it. Remember that while it’s important to invest in a quality tub, there are options available at a range of price points.
In conclusion
Choosing the perfect soaking tub for your bathroom can seem overwhelming at first, but by considering factors such as measurements, style, installation requirements, and budget, you can narrow down your options and find the ideal tub for your space. Take your time to research and compare different options, and don’t hesitate to consult with professionals for guidance. With the right soaking tub, your bathroom can become a tranquil oasis that you’ll never want to leave.
Preparing Your Bathroom For Soaking Tub Installation
Installing a soaking tub in your bathroom can provide a luxurious and relaxing experience. However, before you dive into this project, it is essential to prepare your bathroom properly. Taking the time to ensure structural integrity and proper plumbing connections will help you avoid any potential issues down the line. In this section, we will discuss two crucial steps to prepare your bathroom for soaking tub installation: assessing the structural integrity of your bathroom floor and ensuring proper plumbing connections.
Assessing the structural integrity of your bathroom floor
The first step in preparing your bathroom for a soaking tub installation is to evaluate the structural integrity of your bathroom floor. Since bathtubs are heavy and can hold a significant amount of water, it is important to ensure that your floor can support the weight. Here are a few simple steps to assess the condition of your bathroom floor:
- Inspect for any signs of sagging or soft spots in the floor. These could indicate structural issues that need to be addressed before installing the tub.
- Check the floor joists beneath the bathroom. Ensure they are in good condition and not weakened or damaged.
- Measure the distance between the floor joists to ensure they are properly spaced to support the weight of the tub.
- Consider consulting a professional contractor or structural engineer for a thorough evaluation, especially if you have any concerns about your bathroom floor’s strength.
By taking these steps to assess the structural integrity of your bathroom floor, you will have peace of mind knowing that it can support the weight of your soaking tub.
Ensuring proper plumbing connections
Proper plumbing connections are crucial to ensure that your soaking tub functions correctly and efficiently. Before installing the tub, it is essential to check and prepare your plumbing system for the new addition. Here are some steps to ensure proper plumbing connections:
- Check the existing plumbing layout to see if any adjustments need to be made to accommodate the soaking tub.
- Ensure that the water supply lines and drain pipes are properly sized to accommodate the tub’s requirements.
- Check for any leaks or signs of rust in the existing pipes and make necessary repairs or replacements.
- If you’re unsure about the plumbing requirements, consider hiring a professional plumber to ensure everything is set up correctly.
By paying attention to these plumbing connections, you can avoid potential issues such as leaks and inadequate water flow, ensuring a seamless installation of your soaking tub.
By taking the time to assess the structural integrity of your bathroom floor and ensure proper plumbing connections, you are setting the stage for a successful soaking tub installation. Following these steps will not only enhance your bathing experience but also give you peace of mind knowing that your bathroom is ready for this luxurious addition.
Step-By-Step Guide For Installing A Soaking Tub
Installing a soaking tub can transform your bathroom into a luxurious retreat, providing you with a relaxing and rejuvenating bathing experience. However, the installation process can be complex if you don’t have the proper guidance. In this step-by-step guide, we will walk you through the installation process, from removing the existing bathtub or shower to securing the new soaking tub in place.
Removing the existing bathtub or shower
The first step in installing a soaking tub is to remove the existing bathtub or shower. This can be a challenging task, as you will need to disconnect the plumbing, remove any surrounding tiles or fixtures, and safely transport the old tub out of the bathroom. It is important to take caution during this step to avoid any damage to your bathroom or injuries.
Preparing the area for the new soaking tub
Once the old bathtub or shower has been removed, you will need to prepare the area for the new soaking tub. This involves thoroughly cleaning the space, making any necessary repairs or modifications to the bathroom floor or wall, and ensuring that the area is leveled and properly prepared for the new tub. Taking the time to properly prepare the area will ensure a smooth and hassle-free installation process.
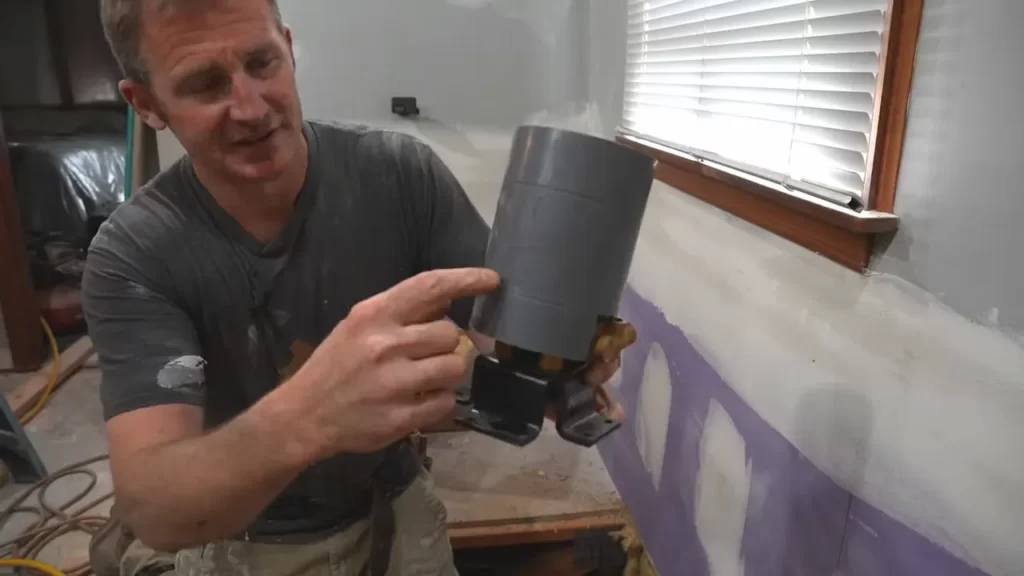
Installing the drain and overflow system
Next, it is time to install the drain and overflow system for the soaking tub. This step requires careful measurements and precision to ensure that the drain and overflow are properly aligned with the tub. Once the drain and overflow system are in place, you can proceed with connecting them to the plumbing, ensuring a tight and secure fit. Remember to follow the manufacturer’s instructions and recommendations for the specific tub model you are installing.
Placing the soaking tub in its designated spot
With the drain and overflow system installed, it’s time to position the soaking tub in its designated spot. Carefully maneuver the tub into place, ensuring that it fits snugly and securely. Take measurements as needed to ensure the tub is properly aligned and centered in the designated area.
Connecting the plumbing
Once the soaking tub is in place, it’s time to connect the plumbing. This involves connecting the water supply lines, hot and cold, to the appropriate connections on the tub. Take care to use the proper seals and fittings to prevent any leaks. Test the plumbing connections to ensure they are secure and functioning properly.
Securing the tub in place
The final step in installing a soaking tub is to secure it in place. This is an important step to ensure the tub remains stable and safe to use. Follow the manufacturer’s instructions to properly secure the tub, using the recommended brackets or supports. Take the time to double-check that the tub is securely fastened and doesn’t wobble or move.
Installing a soaking tub can be a rewarding DIY project, but it’s important to follow the step-by-step guide to ensure a successful installation. By removing the existing bathtub or shower, preparing the area, installing the drain and overflow system, placing the tub in its designated spot, connecting the plumbing, and securing the tub in place, you can enjoy the luxury and relaxation of a beautiful soaking tub in your own bathroom.
Proper Tub Placement And Alignment
Installing a soaking tub in your bathroom can transform it into a serene oasis, providing you with a luxurious and relaxing bathing experience. However, to ensure optimal functionality and aesthetics, proper tub placement and alignment are essential. In this section, we will discuss the important considerations for determining the ideal location for your soaking tub and how to ensure its proper alignment with other bathroom fixtures.
Determining the Ideal Location for the Soaking Tub
The first step in installing a soaking tub is determining the ideal location for it in your bathroom. To do this, you need to consider factors such as the size and shape of the tub, the layout of your bathroom, and your personal preferences.
To determine the ideal location for your soaking tub, follow these steps:
- Take measurements of the tub to ensure it fits comfortably in the chosen location.
- Consider the plumbing requirements and make sure the location allows easy access for plumbing installation.
- Assess the impact of tub placement on the overall flow and functionality of the bathroom. Ensure there is ample space for movement and other fixtures.
- Take into account natural light sources and views, as placing the tub near a window can create a visually appealing and relaxing bathing experience.
By carefully considering these aspects, you can determine the ideal location for your soaking tub, ensuring maximum comfort and functionality.
Ensuring Proper Alignment with Other Bathroom Fixtures
Proper alignment of the soaking tub with other bathroom fixtures is crucial to create a cohesive and visually pleasing bathroom design. Consistency in alignment helps to maintain a balanced and harmonious aesthetic, elevating the overall ambiance of the space.
Follow these tips to ensure proper alignment with other bathroom fixtures:
- Position the soaking tub in such a way that it complements and aligns with other focal points in the bathroom, such as a vanity or a shower.
- Measure and align the tub with the existing plumbing lines to ensure proper water flow.
- Use a level and measuring tape to ensure the tub is perfectly aligned and leveled both horizontally and vertically.
- Consider the visual flow of the bathroom by aligning the tub with other elements, such as tiles, mirrors, or windows.
By adhering to these principles of proper alignment, you can create a visually appealing and cohesive bathroom design, ensuring that your soaking tub becomes a stunning centerpiece.
Installing Drain And Overflow System
Installing the drain and overflow system is a crucial step in the process of installing a soaking tub. The drain and overflow system ensures proper water drainage and helps maintain the tub’s structural integrity. In this section, we will guide you through the installation process, from choosing the right drain and overflow kit to testing for leaks.
Choosing the right drain and overflow kit
It is essential to select the right drain and overflow kit for your soaking tub to ensure a proper fit and functionality. Here are a few factors to consider when choosing the kit:
- Compatibility: Make sure the kit is compatible with your soaking tub’s specifications. Check the manufacturer’s recommendations or consult a professional if you are unsure.
- Quality: Opt for a high-quality kit made of durable materials to ensure long-lasting performance.
- Style: Consider the aesthetic aspect and choose a drain and overflow kit that complements the overall design of your bathroom.
Installing the drain and overflow pipe
Once you have chosen the right kit, it’s time to install the drain and overflow pipe. Follow these steps to complete the installation process:
- Begin by assembling the pipe components as per the manufacturer’s instructions. Ensure a secure connection between all the pieces.
- Position the drain shoe in the designated hole in the tub’s bottom, making sure it sits flush against the surface.
- Tighten the nut on the underside of the drain shoe to secure it in place.
- Attach the overflow pipe to the overflow hole located near the top of the tub. Again, make sure it fits snugly.
- Connect the other end of the overflow pipe to the drain shoe.
- Secure all connections using the appropriate fittings and ensure everything is tightly sealed.
Testing for leaks
To ensure a leak-free installation, it’s essential to test the drain and overflow system before using the soaking tub. Follow these steps:
- Fill the tub with water to its maximum capacity.
- Observe the drain and overflow system closely for any signs of leaking, such as dripping or pooling water.
- If you notice any leaks, tighten the connections and fittings or make any necessary adjustments to eliminate the issue.
- Repeat the testing process until the drain and overflow system is completely leak-free.
By choosing the right drain and overflow kit, following the correct installation steps, and thoroughly testing for leaks, you can ensure that your soaking tub’s drain and overflow system functions flawlessly. Enjoy the tranquility and relaxation of your soaking tub without any worries about water drainage or structural integrity.
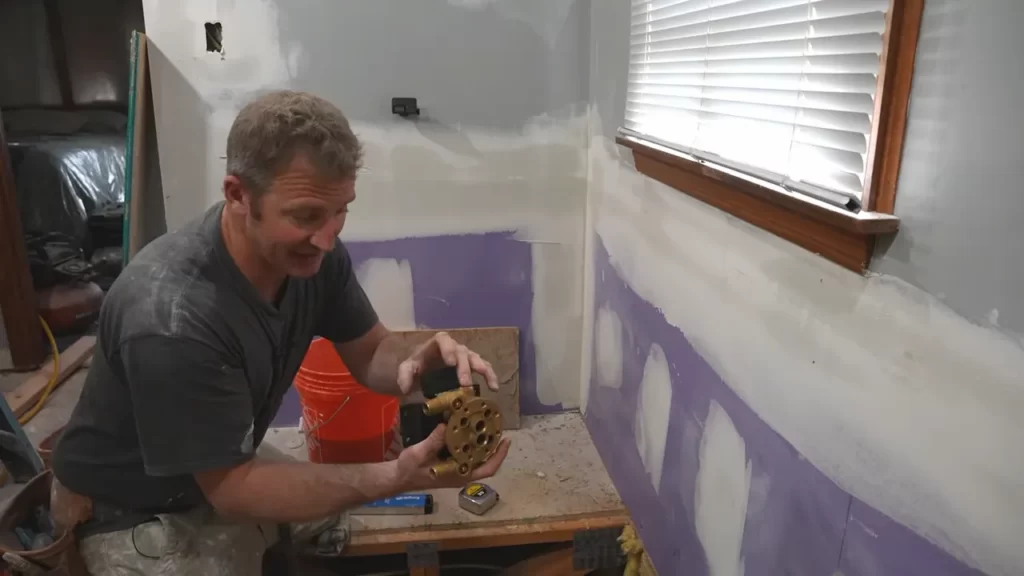
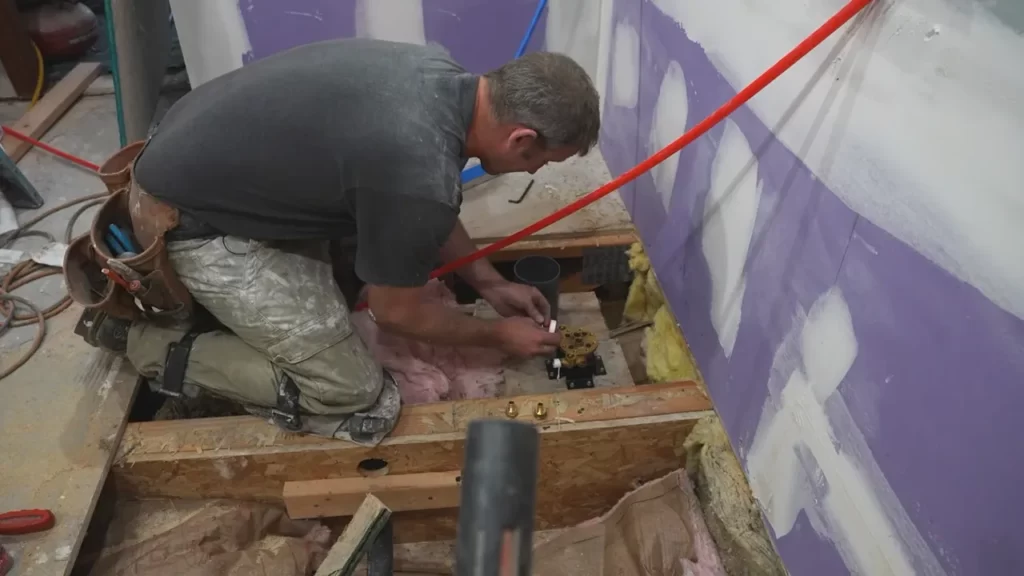
Connecting The Plumbing
Connecting the plumbing is an essential step in installing a soaking tub. Properly connecting the hot and cold water supply lines and the drain pipe ensures that your tub functions smoothly and efficiently. In this section, we’ll guide you through the process of connecting the plumbing for your new soaking tub, ensuring that each step is carried out correctly. Let’s get started!
Installing the hot and cold water supply lines
To begin with, you’ll need to install the hot and cold water supply lines for your soaking tub. Follow these steps to ensure a successful installation:
- 1. Locate the water supply valve: Locate the nearest water supply valve and shut it off to prevent any water flow during the installation process. This valve is typically located near the tub area.
- 2. Measure and cut the pipes: Measure the distance between the water supply valve and the tub, allowing for a proper length to connect the pipes. Use a pipe cutter to cut the pipes to the measured length.
- 3. Attach the fittings: Apply plumber’s tape to the threaded ends of the pipes to create a watertight seal. Screw on the appropriate fittings to connect the pipes to the water supply valve and the tub.
- 4. Tighten the connections: Use a wrench to tighten the connections securely. Make sure not to overtighten, as it may damage the pipes or fittings.
- 5. Test for leaks: Once you’ve connected the hot and cold water supply lines, turn on the water supply valve and check for any leaks. If you notice any leaks, tighten the connections or replace any faulty fittings.
Connecting the drain pipe to the main plumbing system
After installing the hot and cold water supply lines, it’s time to connect the drain pipe to the main plumbing system. Follow these steps to ensure a proper connection:
- 1. Prepare the drain pipe: Measure and cut the drain pipe to the appropriate length, considering the distance between the tub drain and the main plumbing system. Ensure that you have a properly sized drain pipe that matches your tub’s specifications.
- 2. Connect the drain pipe: Apply plumber’s putty around the tub drain flange to create a watertight seal. Insert the drain pipe into the drain flange and secure it in place using the provided hardware.
- 3. Connect the drain pipe to the main plumbing system: Locate the main plumbing system’s drainpipe and connect it to the other end of the tub’s drain pipe. Use the appropriate fittings and secure the connections tightly.
- 4. Test for proper draining: Once you’ve connected the drain pipe, fill the tub with water and check if it drains properly. If you notice any issues, such as slow draining or leaks, double-check the connections and make any necessary adjustments.
By following these steps, you’ll be able to connect the plumbing for your soaking tub successfully. Ensure that each connection is tight and secure to prevent any water leaks or drainage problems. Remember to check for any leaks after completing the installation to address any issues promptly. Now you’re one step closer to enjoying a relaxing soak in your new tub!
Securing The Tub In Place
When it comes to installing a soaking tub, it is essential to secure it properly in place to ensure stability and prevent any movement. This not only ensures the safety of the users but also prolongs the lifespan of the tub. In this section, we will explore two key steps to be followed to anchor the soaking tub in a way that it remains firmly fixed to the floor or wall.
Anchoring the soaking tub to the floor or wall
To anchor the soaking tub securely, you have two options: anchoring it to the floor or anchoring it to the wall. Both methods have their own advantages, so let’s take a closer look at each.
Anchoring to the floor:
Anchoring the soaking tub to the floor is a common and effective method of securing it in place. This method provides excellent stability and prevents any unwanted movement. Here’s how you can anchor the tub to the floor:
- Start by determining the desired location of the soaking tub in your bathroom. Ensure that the floor is strong enough to support the weight of the tub.
- Next, mark the exact position where the tub will be placed, using a tape measure and a pencil. Ensure that the markings are accurate to ensure a snug fit.
- Using a drill, create holes on the marked spots. The size of the holes will depend on the type of anchors you are using.
- Insert the anchors into the holes carefully and tighten them using a screwdriver or a wrench. This will provide a strong base for securing the tub.
- Now, carefully place the soaking tub over the anchors, ensuring that it aligns perfectly with the markings. Apply slight pressure to ensure a snug fit.
- Finally, check the stability of the tub by applying some gentle force. If it feels firm and does not move, your anchoring job is well done.
Anchoring to the wall:
An alternative method to secure a soaking tub is by anchoring it to the wall. This method is often preferred when there are space constraints or if the floor is unable to support the weight of the tub. Here’s how you can anchor the tub to the wall:
- Begin by selecting a suitable location on the wall where the tub will be installed. Ensure that the wall is sturdy and capable of supporting the weight of the tub.
- Using a pencil and a tape measure, mark the locations where the mounting brackets will be attached to the wall. These brackets will provide the necessary support for the tub.
- Using a drill, create holes on the marked spots. Be aware of any plumbing or electrical lines behind the wall when drilling.
- Insert wall anchors into the holes and secure them tightly using a screwdriver or a wrench. These anchors will create a stable base for attaching the mounting brackets.
- Attach the mounting brackets to the wall using screws and ensure that they are securely fastened.
- With the help of an assistant, carefully lift the soaking tub and rest it onto the brackets, making sure it aligns perfectly with the markings on the wall.
- Lastly, check the stability of the tub by gently pushing it from different angles. If it remains firmly in place, you can be confident that the tub is securely anchored to the wall.
By following these steps and carefully anchoring the soaking tub to either the floor or wall, you can enjoy your relaxing baths without any worries about instability or movement. Remember to verify the stability periodically to ensure the continued safety and longevity of your soaking tub.
Adding The Finishing Touches
Adding the Finishing Touches
Once you have successfully installed your soaking tub, it’s important to pay attention to the finishing touches to ensure a seamless and professional look. In this section, we will go over the crucial steps of caulking around the edges of the tub, sealing any gaps or joints, and reinstalling tile or flooring around the tub.
Caulking around the edges of the tub
Caulking around the edges of the tub is essential to prevent water from seeping into the gaps and causing damage. Follow these steps to properly caulk the tub:
- Begin by thoroughly cleaning the area around the edges of the tub using a mild detergent and water.
- Once the surface is clean and dry, insert a tube of silicone caulk into a caulk gun and cut off the tip at a 45-degree angle.
- Apply a bead of caulk along the joint between the tub and the surrounding surface, ensuring even coverage.
- Smooth the caulk line using a caulk smoothing tool or your finger, removing any excess caulk.
- Allow the caulk to cure according to the manufacturer’s instructions before using the tub.
Sealing any gaps or joints
In addition to caulking around the edges, it’s important to seal any gaps or joints in the surrounding area to prevent moisture from causing damage. Follow these steps to effectively seal gaps or joints:
- Inspect the area around the tub for any visible gaps or joints that may need sealing.
- Using an appropriate sealant, such as silicone or acrylic caulk, carefully fill in the gaps or joints, ensuring complete coverage.
- Smooth the sealant using a sealant applicator or your finger, removing any excess.
- Allow the sealant to dry and cure completely before using the tub.
Reinstalling tile or flooring around the tub
Once the caulking and sealing are complete, it’s time to reinstall any tile or flooring that was removed during the installation process. Follow these steps for a seamless reinstallation:
- Clean the area where the tile or flooring will be installed, ensuring it is free of any dust or debris.
- Apply a thin layer of adhesive or mortar to the back of each tile or flooring piece, using a trowel or similar tool.
- Carefully place each tile or piece of flooring in its designated position, ensuring proper alignment.
- Press down firmly on each tile or piece of flooring to ensure proper adhesion.
- Allow the adhesive or mortar to dry and cure according to the manufacturer’s instructions.
Congratulations! You have successfully added the finishing touches to your soaking tub installation. Properly caulking, sealing, and reinstalling tile or flooring will not only enhance the overall look of your bathroom but also ensure the longevity of your new soaking tub. Enjoy your relaxing soak in style!
Maintenance And Care For Your Soaking Tub
Proper maintenance and care are essential to ensure your soaking tub remains in top condition for years to come. By following a few simple steps, you can keep your tub clean, free from mold and mildew, and ensure its longevity. In this section, we will discuss the necessary cleaning and sanitizing processes, as well as tips for preventing mold and mildew buildup. Additionally, we will provide some regular maintenance tips to help extend the life of your soaking tub.
Cleaning and Sanitizing the Tub
Keeping your soaking tub clean is crucial not only for hygiene purposes but also for the overall aesthetics of your bathroom. Here are some steps to follow when cleaning and sanitizing your tub:
- First, gather the necessary supplies, including a non-abrasive cleaning solution, a soft sponge or cloth, and warm water.
- Start by filling the tub with warm water and adding the recommended amount of cleaning solution.
- Using the sponge or cloth, gently scrub the interior surface of the tub, paying extra attention to any stains or spots.
- Rinse the tub thoroughly with warm water to remove any leftover cleaning solution.
- Dry the tub with a clean, dry cloth to prevent water spots and streaks.
- For regular maintenance, it is recommended to clean your soaking tub at least once a week to prevent the buildup of dirt and grime. However, this frequency may vary depending on usage.
Preventing Mold and Mildew Buildup
Mold and mildew can quickly develop in damp environments like bathrooms. To prevent these issues in your soaking tub, follow these helpful tips:
- After each use, wipe down the tub with a dry cloth to remove any excess water and moisture.
- Ensure proper ventilation in your bathroom by using an exhaust fan or opening a window. This helps to reduce the humidity levels and discourage mold growth.
- Avoid leaving wet bath mats or towels in the tub or on the bathroom floor, as they can create a breeding ground for mold and mildew.
- If you notice any signs of mold or mildew, such as black spots or a musty odor, take immediate action to remove it using a mildew remover or a mixture of vinegar and water.
Regular Maintenance Tips for Longevity
To maximize the lifespan of your soaking tub, consider incorporating these regular maintenance tips into your routine:
- Avoid using abrasive cleaning products or tools that can damage the surface of your tub. Stick to mild, non-abrasive cleaners and soft sponges or cloths.
- Prevent scratches and chips by placing a rubber or non-slip mat at the bottom of the tub, especially if you have young children or pets.
- Check the tub’s plumbing fittings regularly to ensure there are no leaks or drips that could cause water damage to the surrounding area.
- If you have a whirlpool or jetted tub, follow the manufacturer’s instructions for maintaining the jets and cleaning the system to prevent any buildup of debris.
By following these maintenance and care tips, you can enjoy a clean and well-maintained soaking tub that provides you with the ultimate relaxation experience for years to come.
Frequently Asked Questions
How Hard Is It To Install A Soaking Tub?
Installing a soaking tub is not overly difficult. It involves some plumbing and construction work. Hiring a professional can ensure proper installation and minimize any potential challenges. However, with the right tools and knowledge, it can also be a DIY project for those with experience in home renovations.
How Do You Secure A Soaking Tub To The Floor?
To secure a soaking tub to the floor, follow these steps: 1. First, ensure the floor is level and sturdy. 2. Use a silicone adhesive to attach the tub to the floor. 3. Apply the adhesive to the bottom of the tub’s feet.
4. Press the tub firmly onto the floor to create a secure bond. 5. Allow the adhesive to cure fully before using the tub.
Do You Need To Tile Behind A Soaker Tub?
Yes, it is recommended to tile behind a soaker tub. Tiling protects the walls from water damage and ensures a waterproof barrier. It also enhances the aesthetics of the bathroom and provides a cohesive look. Proper tiling can prevent moisture penetration and mold growth.
What Do You Put Under A Bathtub For Support?
Place a sturdy support structure, like a wooden frame or blocks, under the bathtub to ensure stability and prevent damage. This provides proper weight distribution and prevents sagging. Ensure the support is level and secure for a safe and long-lasting installation.
Conclusion
Installing a soaking tub can be a simple yet transformative project for your bathroom. By following the step-by-step instructions and guidelines discussed in this blog post, you can confidently embark on this installation process. Remember to gather all the necessary tools and materials, accurately measure the space, and ensure proper plumbing connections.
With a little patience and attention to detail, you’ll soon be enjoying luxurious soaks in your new soaking tub.