
Installing a bathroom sink is a straightforward process. Start by assembling the necessary tools and materials, then follow these steps to complete the installation.
Introducing a new sink to your bathroom can enhance both its functionality and aesthetic appeal. Whether you’re replacing an old sink or installing a new one, the process can be easily accomplished with the right tools and a clear set of instructions.
In this guide, we will provide you with step-by-step instructions on how to install a sink in your bathroom, ensuring a successful and hassle-free installation experience. So, let’s get started on transforming your bathroom by installing a sink that suits your space and style perfectly.
Preparing For The Installation
Before diving into the installation process of your new bathroom sink, it’s crucial to adequately prepare the area. This will ensure a smooth and hassle-free installation experience. To help you with this, we have divided the preparation phase into two sections: gathering the necessary tools and materials, and clearing the area around the sink.
Gathering the necessary tools and materials
To begin with, you will need to gather all the essential tools and materials required for installing your new sink. By having them ready beforehand, you can save time and avoid unnecessary interruptions during the installation. Here’s a list of the basic tools and materials you will need:
| Tools | Materials |
|
|
Clearing the area around the sink
Before starting the installation, it is essential to clear the area around the sink to create a clutter-free workspace. This will provide you with ample room to maneuver and work comfortably. Here are a few steps to follow when clearing the area:
- Remove any items from the bathroom vanity or countertop that may obstruct the installation process.
- Place a towel or old cloth on the countertop to protect it from any potential damage that could occur during the installation.
- Use the putty knife to gently remove any old caulk or sealant around the existing sink. Ensure that the area is clean and free from any debris.
- If necessary, turn off the water supply to the sink by shutting off the water valves located under the sink or at the main water supply.
- Finally, ensure there is sufficient lighting in the area by either opening curtains or using additional lighting fixtures.
By following these steps and properly preparing for the installation, you can ensure that the process goes smoothly and without any unforeseen complications. Now that you have everything in place, let’s move on to the next step: removing the old sink.
Removing The Old Sink
Before installing a new sink in your bathroom, you’ll need to remove the old one. This process entails shutting off the water supply, disconnecting the plumbing connections, and detaching the sink from the vanity or countertop. Let’s break down each step to guide you through the process.
Shutting off the water supply
The first step in removing the old sink is shutting off the water supply. You need to locate the shut-off valves under the sink or in the bathroom. Turn the valve knobs clockwise to shut off the water. This will prevent any water from flowing into the sink while you work on removing it.
Disconnecting the plumbing connections
Next, you’ll need to disconnect the plumbing connections attached to the sink. Start by placing a bucket or towel under the sink to catch any water that may drip out during the process. Grab a pair of pliers or an adjustable wrench to loosen the nuts securing the water supply hoses and the drain pipe. Turn the nuts counterclockwise to loosen them, and once they are loose, use your hands to unscrew them completely. Make sure to remember which hose or pipe connects to which part for easier reinstallation later.
Detaching the sink from the vanity or countertop
After disconnecting the plumbing connections, you’ll need to detach the sink from the vanity or countertop. Take a look underneath the sink and locate the clips or brackets holding it in place. Use a screwdriver or a wrench to loosen these clips or brackets. Once they are loose, you can gently lift the sink up and away from the vanity or countertop. Be careful not to force it or damage the surrounding area.
And there you have it! By following these simple steps, you can easily remove the old sink from your bathroom. In the next section, we will guide you through the process of installing the new sink.

Installing The New Sink
When it comes to bathroom renovations, installing a new sink can completely transform the look and functionality of the space. Whether you’re upgrading your sink for aesthetic purposes or due to wear and tear, it’s important to know the correct process for installation. In this guide, we will walk you through the step-by-step process of installing a sink in your bathroom, ensuring that you have all the necessary tools and materials handy. Let’s get started!
Positioning the sink in the desired location
The first step in installing a new sink is to determine the desired location. Consider factors such as existing plumbing connections, wall space, and accessibility. Once you have chosen the ideal spot, place the sink upside down on a clean, flat surface. Check the sink’s measurements and compare them with the available space to ensure a proper fit. If necessary, make any adjustments to the countertop or vanity to accommodate the sink.
Attaching the sink to the vanity or countertop
- Clean the underside of the sink and the top surface of the vanity or countertop to remove any dirt or debris.
- Apply a thin bead of silicone caulk around the edge of the sink’s rim or mounting brackets, depending on the sink type.
- Lower the sink into place on the vanity or countertop, aligning it with the pre-determined position.
- Press the sink firmly against the surface to ensure a strong bond with the caulk.
- Wipe away any excess caulk using a damp cloth.
- Allow the caulk to cure as per the manufacturer’s instructions before proceeding to the next step.
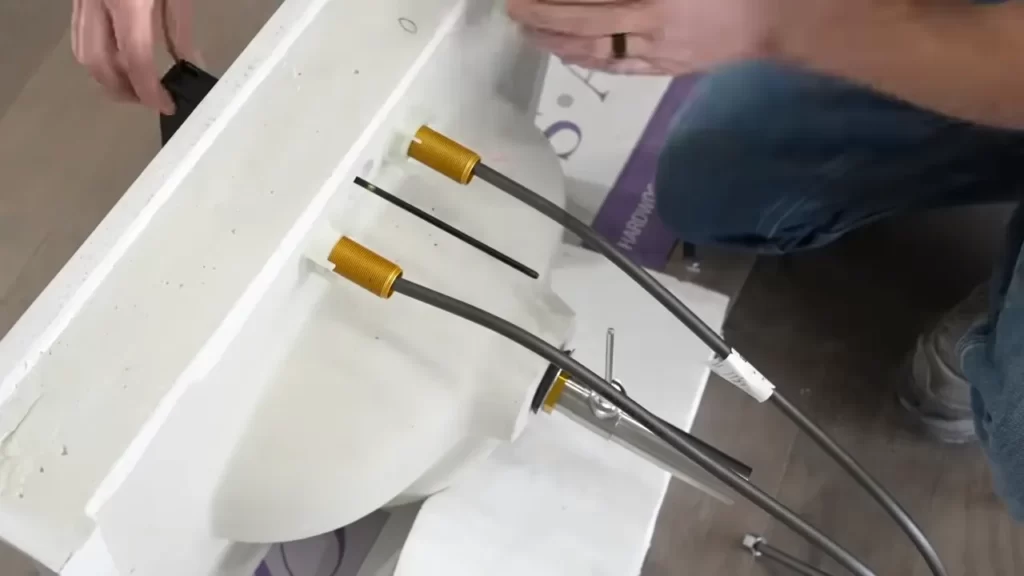
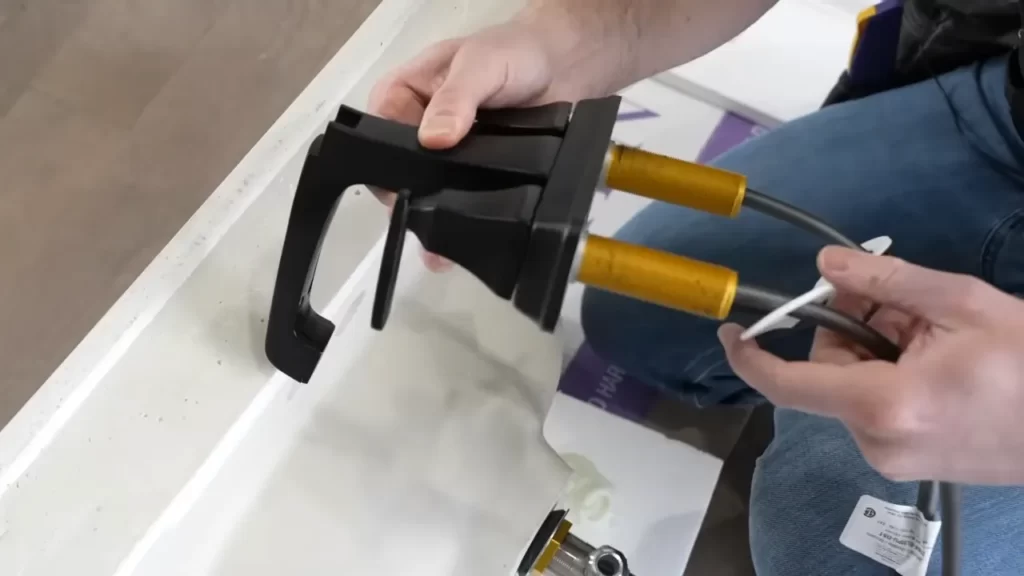
Connecting the plumbing connections
Once the sink is securely attached to the vanity or countertop, it’s time to connect the plumbing. Follow these steps:
- Connect the drain assembly to the sink’s drain hole, ensuring a tight fit.
- If required, attach a tailpiece to the drain assembly, allowing for a smooth connection to the P-trap.
- Connect the water supply lines to the faucet’s inlet fittings, ensuring a secure connection.
- Check all the connections for tightness, using a wrench if necessary.
Turning on the water supply and checking for leaks
With the sink in place and the plumbing connections made, it’s time to turn on the water supply and check for any potential leaks. Follow these steps:
- Slowly turn on the water supply valves, allowing water to flow through the faucet.
- Inspect all the connections for any signs of leaking or dripping.
- If a leak is detected, tighten the corresponding connection until it is secure.
- Once you have ensured that there are no leaks, let the water run for a few minutes to flush out any impurities before using the sink.
By following these steps, you can successfully install a new sink in your bathroom. Remember to take your time and double-check all the connections to ensure a proper and leak-free setup. Enjoy your newly installed sink and the refreshed look it brings to your bathroom!
Additional Considerations
Installing a new sink is an exciting project that can enhance the functionality and style of your bathroom. However, before diving into the installation process, there are a few additional considerations to keep in mind. From choosing the right sink for your bathroom to properly maintaining and troubleshooting common installation issues, these factors will ensure a successful and long-lasting sink installation.
Choosing the Right Sink for Your Bathroom
When it comes to selecting a sink for your bathroom, there are several factors to consider. First and foremost, you’ll want to choose a style that complements your bathroom’s overall design scheme. Whether you prefer a sleek and modern vessel sink or a classic pedestal sink, make sure it aligns with your personal taste and the existing elements in your bathroom.
Additionally, consider the size and shape of the sink. Measure the available space in your bathroom to ensure a proper fit. Larger bathrooms can accommodate double sinks, while smaller bathrooms may require a compact or corner sink to maximize space. Take into account the depth and width of the sink as well, as this will affect how much counter space you have available.
Proper Maintenance and Care for Your New Sink
Once your new sink is installed, it’s important to properly maintain and care for it to prolong its lifespan. Regular cleaning is essential to prevent the buildup of grime, soap scum, and hard water stains. However, avoid using abrasive cleaners or scrub brushes that may scratch or damage the surface of the sink.
In addition to cleaning, be mindful of what you place on the sink’s surface. Avoid exposing it to extreme heat or placing heavy objects that may cause cracks or chips. Consider using a protective mat or tray underneath frequently used items, such as a curling iron or toothbrush holder, to prevent accidental damage.
Troubleshooting Common Installation Issues
During the sink installation process, you may encounter some common issues that can be easily resolved. One common problem is a leaky faucet. To troubleshoot this, ensure all connections are properly tightened and consider using plumber’s tape to create a secure seal. Leaks can also occur at the base of the sink, which may require adjusting the sink’s mounting brackets or applying silicone caulk to seal any gaps.
Another issue you may face is improper drainage. If the sink is draining slowly or not at all, check for clogs in the P-trap or the main drainpipe. Using a plunger or a plumber’s snake can help clear any obstructions. Additionally, ensure that the sink’s stopper is properly aligned and functioning correctly.
By keeping these additional considerations in mind when installing a sink in your bathroom, you can ensure a successful installation that enhances the functionality and aesthetics of your space. Remember to choose the right sink for your bathroom, properly maintain and care for it, and troubleshoot any common installation issues that arise. With these tips, you’ll be on your way to a beautiful and functional bathroom sink!

Conclusion (Optional)
Conclusion (optional)
Installing a sink in your bathroom may seem like a daunting task, but with the right tools and a step-by-step process, it can be a straightforward and rewarding DIY project. By following the recap of the installation process and understanding the importance of proper sink installation, you can ensure a long-lasting and functional addition to your bathroom.
Recap of the installation process
- Begin by gathering all the necessary tools, including a wrench, plumber’s tape, and a screwdriver.
- Turn off the water supply to the bathroom and drain any remaining water from the sink.
- Disconnect the old sink, making sure to turn off the valves and remove any traps or drain pipes.
- Prepare the area for the new sink by cleaning the countertop and making any necessary adjustments to the plumbing.
- Install the faucet and drain assembly according to the manufacturer’s instructions, applying plumber’s tape to ensure a proper seal.
- Place the sink onto the countertop, ensuring it is level and centered.
- Secure the sink to the countertop using mounting brackets or adhesive, depending on the type of sink.
- Reconnect the water supply lines and test for any leaks.
- Finish the installation by caulking around the edges of the sink to ensure a watertight seal.
Importance of proper sink installation
Proper sink installation is essential for both functionality and aesthetics. A poorly installed sink can lead to leaks, which can cause water damage to your bathroom and potentially lead to mold and mildew growth. Additionally, an improperly installed sink can be a nuisance to use, with wobbly fixtures and inefficient drainage. By taking the time to properly install your sink, you can ensure a seamless and enjoyable experience every time you use your bathroom.
Remember, if you’re unsure about any step of the installation process, it’s always best to consult a professional plumber to avoid any potential problems down the line.
Frequently Asked Questions
Can I Install A Bathroom Sink Myself?
Yes, you can install a bathroom sink yourself. Just make sure to follow the instructions carefully and have the necessary tools and materials on hand. It’s a relatively simple project that can save you money on hiring a professional.
How Does A Sink Attach To A Vanity?
A sink attaches to a vanity by securing it with clips, screws, or adhesive under the countertop. It is important to follow the manufacturer’s instructions and ensure proper alignment and sealing to prevent leaks or damage.
What Is Needed To Plumb A Bathroom Sink?
To plumb a bathroom sink, you will need a few essential items. Firstly, a supply of water via pipes and a faucet. Secondly, a drain system to remove wastewater, including a trap and pipes. Lastly, you’ll need plumbing tools like wrenches and pipe tape for installation.
Does A Bathroom Vanity Need To Be Attached To The Wall?
No, a bathroom vanity does not need to be attached to the wall. Some vanities are freestanding and can be placed anywhere in the bathroom.
Conclusion
Installing a bathroom sink doesn’t have to be a daunting task. By following the step-by-step guide in this blog post, you can successfully install a sink in your bathroom with ease. From selecting the right sink to connecting the plumbing, we’ve covered everything you need to know.
Remember to take your time, double-check your work, and call a professional if needed. Now you can enjoy the satisfaction and functionality of a newly installed bathroom sink. Happy DIY-ing!