
To install a shower valve, first turn off the water supply, remove the old valve, apply plumber’s tape to the new valve threads, and tightly screw it into place. Then, connect the necessary pipes and fittings, ensuring they are secure, before turning the water supply back on.
Welcome to our comprehensive guide on how to install a shower valve. As crucial components in your bathroom, shower valves control the water flow and temperature, ensuring an enjoyable and comfortable shower experience. Whether you’re replacing an old valve or installing a new one, this step-by-step tutorial will walk you through the process.
Remember to gather all the necessary tools and materials beforehand to complete the installation smoothly and efficiently. So let’s dive right in and get your shower valve installed in no time!
Understanding The Importance Of Proper Shower Valve Installation
Proper shower valve installation is crucial for ensuring a satisfying and efficient showering experience. When you invest your time and money into creating a beautiful bathroom space, it’s essential to pay attention to the details, and the shower valve is an important part of that. Understanding the importance of a well-functioning shower valve can help you avoid potential problems down the line.
Importance of a Well-Functioning Shower Valve
A well-functioning shower valve guarantees reliable water flow and temperature control, providing you with a pleasant and comfortable shower experience every time. Here are a few reasons why having a properly installed shower valve is so crucial:
- Water Efficiency: A properly installed shower valve ensures that water flows through the showerhead efficiently, minimizing any wastage. This not only helps you conserve water but also saves money on your water bills.
- Temperature Consistency: A shower valve that is correctly installed helps maintain a consistent water temperature throughout your shower. It prevents sudden bursts of hot or cold water, which can be uncomfortable and inconvenient.
- Preventing Leaks: Improper installation can lead to leaks in the shower valve, causing water damage to your bathroom walls and floors. A well-installed valve prevents any potential leaks, keeping your bathroom dry and free from moisture-related issues.
- Longevity: When a shower valve is installed correctly, it improves its overall durability and lifespan. It ensures that the valve functions as intended and reduces the likelihood of premature wear and tear, allowing you to enjoy your shower for years to come.
Effects of Improper Installation
Improper installation of a shower valve can lead to various negative consequences, affecting both your shower experience and the overall functionality of your bathroom. Here are some potential effects of improper installation:
- Inconsistent Water Temperature: Improperly installed shower valves can result in inconsistent water temperature, making it difficult to find the perfect balance between hot and cold. This can lead to discomfort, especially during winter months.
- Low Water Pressure: A poorly installed valve can restrict water flow, causing low water pressure in your shower. This can diminish the overall showering experience, leaving you unsatisfied.
- Frequent Leaks: Improper connections or sealing can result in frequent leaks in the shower valve, leading to water damage and costly repairs. It’s important to ensure that the valve is installed correctly to avoid these issues.
Overview of Different Types of Shower Valves
There are several types of shower valves available in the market, each with its own set of features and advantages. Understanding the different types can help you make an informed decision when choosing the right valve for your bathroom. Here’s a quick overview:
| Valve Type | Description |
|---|---|
| Single-handle Pressure-Balancing Valve | Controls both water flow and temperature using a single handle, ensuring a consistent shower experience. |
| Thermostatic Mixing Valve | Allows precise control of water temperature, maintaining a steady flow regardless of pressure changes in the plumbing system. |
| Dual-Handle Valve | Requires separate handles for controlling water flow and temperature. Offers traditional appeal and simplicity. |
Choosing the right shower valve depends on your personal preferences and needs. It’s essential to consult with a professional plumber or research extensively to determine which type suits your bathroom setup.
Proper installation of a shower valve ensures an enjoyable showering experience and prevents potential issues in the long run. By understanding the importance of a well-functioning shower valve, the effects of improper installation, and the different types available, you can make an informed decision to enhance your bathroom and daily routines.
Assessing The Existing Plumbing System
Before installing a new shower valve, it is essential to assess the existing plumbing system to ensure a proper and hassle-free installation. By checking the water supply lines, evaluating the current valve setup, and identifying any necessary repairs or modifications, you can save time and avoid potential issues in the future.
Checking the water supply lines
Begin by thoroughly examining the water supply lines connected to the current shower valve. Look for any signs of leaks, rust, or damage in the pipes. This is important as it allows you to determine if any repairs or replacements are needed before proceeding with the installation. Additionally, check the size of the water supply lines to ensure compatibility with the new shower valve.
Evaluating the current valve setup
Examine the current valve setup to understand its configuration. Take note of the number of handles or levers present in the shower and how they control both the hot and cold water. This information will help you select the appropriate replacement valve and ensure a smooth transition during installation.
Identifying any necessary repairs or modifications
If any issues or inconsistencies are found during the assessment of the existing plumbing system, it is crucial to address them before proceeding with the installation. This may include repairing leaks, replacing damaged pipes, or modifying the plumbing connections to fit the new shower valve. Taking care of these repairs beforehand can prevent further complications and ensure a successful installation.
In conclusion, when installing a shower valve, assessing the existing plumbing system is vital for a seamless and problem-free process. By checking the water supply lines, evaluating the current valve setup, and identifying any necessary repairs or modifications, you can ensure that the installation is carried out correctly, saving time and effort in the long run.
Gathering The Required Tools And Materials
Before you begin installing a shower valve, it is important to gather all the necessary tools and materials. This will ensure a smooth and efficient installation process, saving you time and preventing any potential setbacks. In this section, we will discuss the essential tools, list of materials needed, and the recommended safety equipment.
Essential tools for the installation process:
Having the right tools at hand is crucial to the success of your shower valve installation. Here are the essential tools you’ll need:
- Adjustable wrench
- Phillips screwdriver
- Flathead screwdriver
- Plumbers tape
- Pipe wrench
- Teflon tape
- Tube cutter
- Plumbers putty
- Utility knife
- Pliers
These tools will help you handle various tasks involved in the installation, such as tightening connections, cutting pipes, and applying sealing tape.
List of materials needed:
In addition to the tools mentioned above, you will also need several materials to complete the shower valve installation. Here is a list of the materials you will require:
- Shower valve
- Showerpipe or showerhead
- Pipes and fittings
- Waterproofing membrane
- Shower wallboard
- Plumbing solder
- Solder flux
- Grout or caulk
These materials are essential components of a functional and secure shower valve installation. Ensure you have them readily available before you begin.
Recommended safety equipment:
Prioritizing safety is important when working on any plumbing project. To protect yourself and minimize the risk of accidents, be sure to have the following safety equipment:
- Safety goggles
- Gloves
- Dust mask
- Protective clothing
- Knee pads
Wearing appropriate safety equipment will safeguard you from potential hazards, such as sharp tools, chemicals, and debris.
By gathering all the required tools and materials, as well as using recommended safety equipment, you’ll be well-prepared to tackle the installation process. This preparation will help ensure a successful and hassle-free shower valve installation.
Shutting Off The Water Supply
Before installing a new shower valve, it’s crucial to shut off the water supply to the shower. This step is essential to ensure your safety and prevent any potential water damage during the installation process. In this section, we will guide you through the necessary steps to shut off the water supply, drain remaining water from the pipes, and prepare for the installation of your new shower valve.
Locating the main water shut-off valve
The main water shut-off valve is typically located near where the water enters your home. It could be situated in your basement, utility room, crawl space, or garage. To find the main water shut-off valve, follow these steps:
- Start by looking for a brass or metal valve handle.
- Check near your water meter, along the exterior foundation wall, or where the water line enters your home.
- If you have a crawlspace or basement, search for the valve near your water heater or by the front foundation wall.
- Once you locate the main water shut-off valve, ensure that it’s easily accessible and not obstructed by any objects.
Turning off the water supply to the shower
After locating the main water shut-off valve, it’s time to turn off the water supply specifically to the shower. Follow these steps carefully:
- Find the individual water supply valves for your shower. These valves may be located inside the wall, under the sink, or in an access panel.
- If you cannot find the individual water supply valves, turn off the main water shut-off valve to cut off water supply to the entire house. This step is necessary if you don’t have separate valves for your shower.
- Turn the valve clockwise until it is fully closed. This action will shut off the water supply to the shower completely.
- Ensure that you test the water by turning on the shower faucet to confirm that the water supply has been successfully shut off.
Draining any remaining water from the pipes
Before starting the shower valve installation, it’s important to drain any remaining water from the pipes. To do this, follow these steps:
- Open the faucets on the highest and lowest levels of your home. This will help drain water from the pipes.
- Flush the toilets in your home to further drain the water from the pipes.
- Allow water to drain completely from the shower faucet and other open faucets.
- Once there is no more water flowing, close all the faucets and proceed to the installation process.
By following these steps to shut off the water supply, locate the main water shut-off valve, turn off the water to the shower, and drain any remaining water from the pipes, you will be well-prepared to install your new shower valve without any complications.
Removing The Old Valve
Steps for removing the existing valve
Before you can install a new shower valve, you’ll need to remove the existing one. Follow these steps to successfully remove the old valve:
- Turn off the water supply: To avoid any unexpected water leakage, first, you must shut off the water supply to your shower. Locate the main water shut-off valve for your house and close it. This will prevent water flow to the shower valve.
- Remove the shower handle and trim: The shower handle and trim cover the valve, so you’ll need to remove them to access the valve. To do this, check for any screws or fasteners holding the handle and trim in place. Unscrew or remove these fasteners and gently pull off the handle and trim.
- Disconnect the water supply lines: Once the handle and trim are removed, you’ll see the water supply lines connected to the valve. Use an adjustable wrench to carefully disconnect these lines. Turn the wrench counterclockwise to loosen and remove the connections.
- Detach the valve from the wall: The valve is typically secured to the wall with a mounting bracket. Locate the screws holding the valve in place and use a screwdriver to remove them. Once the screws are removed, gently pull the valve away from the wall.
Tips for minimizing damage to surrounding fixtures
It is important to take precautions to avoid damaging any surrounding fixtures during the valve removal process. Here are some helpful tips:
- Use masking tape: Before you begin the removal process, apply masking tape to the surrounding fixtures such as tiles, faucets, or other delicate surfaces. This will provide protection against accidental scratches or dents.
- Work carefully and patiently: Take your time and proceed with caution when removing the old valve. Apply gentle force and avoid using excessive pressure that could potentially damage nearby fixtures.
- Protect exposed areas: Once the valve is removed, cover any exposed pipes or openings to prevent debris from falling into them. You can use clean rags or tape to secure temporary covers.
Dealing with stubborn or corroded connections
In some cases, the connections to the old valve may be stubborn or corroded, making it difficult to remove. Here are a few strategies you can try:
- Apply penetrating oil: If the connections are rusted or stuck, applying a penetrating oil solution such as WD-40 can help loosen them. Allow the oil to penetrate the connections for a few minutes before attempting to unscrew them.
- Use heat: Heat can also help loosen stubborn connections. Apply heat to the connection area using a heat gun or a hairdryer set to a high heat setting. The expansion caused by the heat can help break the connection.
- Use a pipe wrench or pliers: If all else fails, a pipe wrench or pliers can provide additional leverage to help break loose stubborn connections. Be cautious not to use too much force that could cause damage.
By following these steps and taking the necessary precautions, you’ll be able to efficiently remove the old shower valve and prepare for the installation of a new one.
Preparing The Shower Valve For Installation
Before installing a shower valve, it’s essential to properly prepare the valve area for a seamless and leak-free installation. By following a few simple steps, you can ensure that your shower valve works efficiently and lasts for years to come.
Cleaning and Prepping the Valve Area
The first step in preparing the shower valve for installation is to clean and prep the valve area. Use a mild detergent and warm water to thoroughly clean the area where the valve will be installed. This will remove any dirt, grime, or residue that could affect the performance of the valve. Rinse the area thoroughly and dry it completely before proceeding.
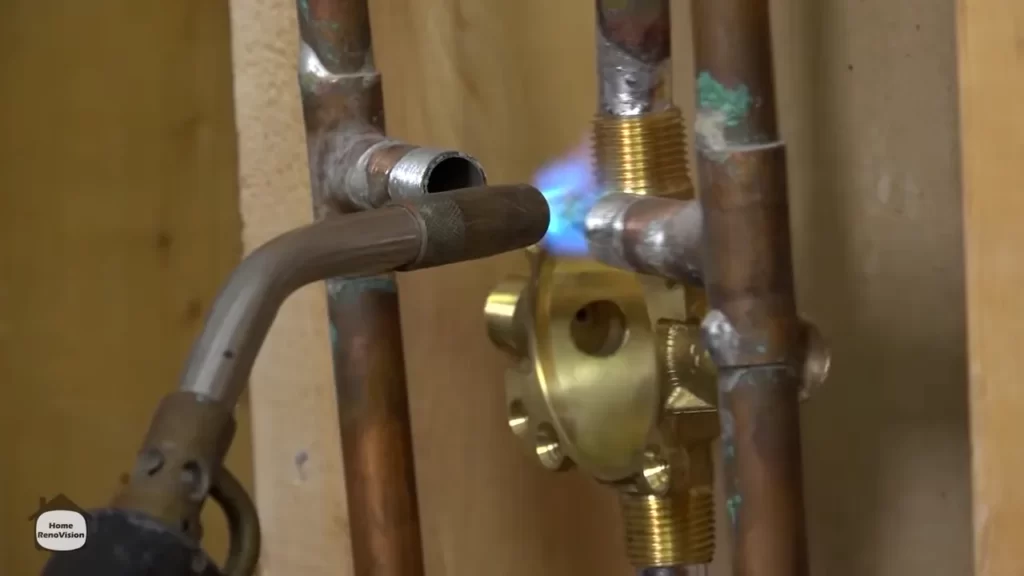
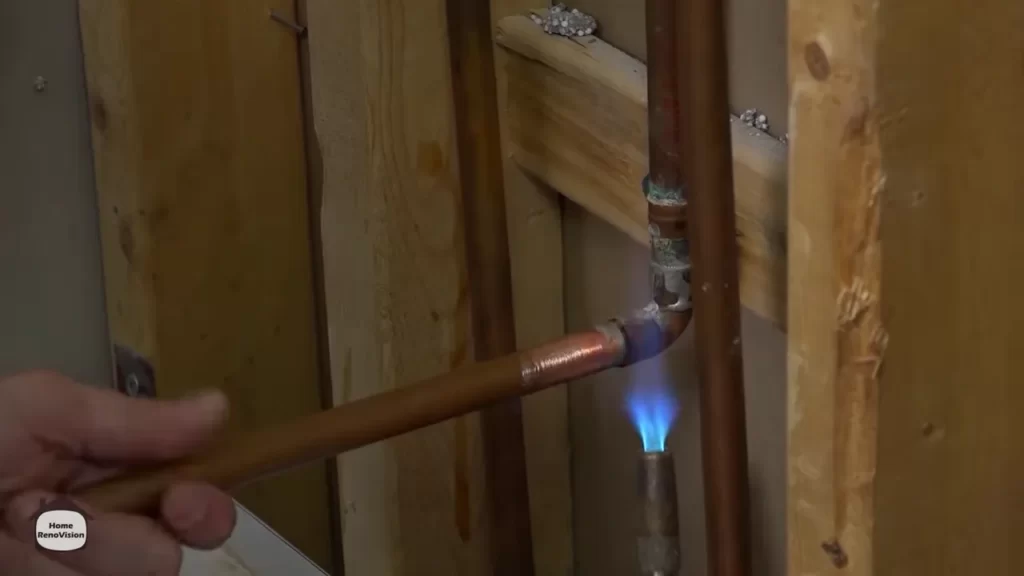
Applying Plumber’s Tape or Sealant
Once the valve area is clean and dry, the next step is to apply plumber’s tape or sealant. Plumber’s tape, also known as Teflon tape, is a thin, white tape that is applied to the threads of the valve connections. It helps create a watertight seal and prevents leaks. Wrap a few layers of plumber’s tape clockwise around the threaded ends of the valve connections. Alternatively, you can use a plumber’s sealant, which is applied directly to the threads.
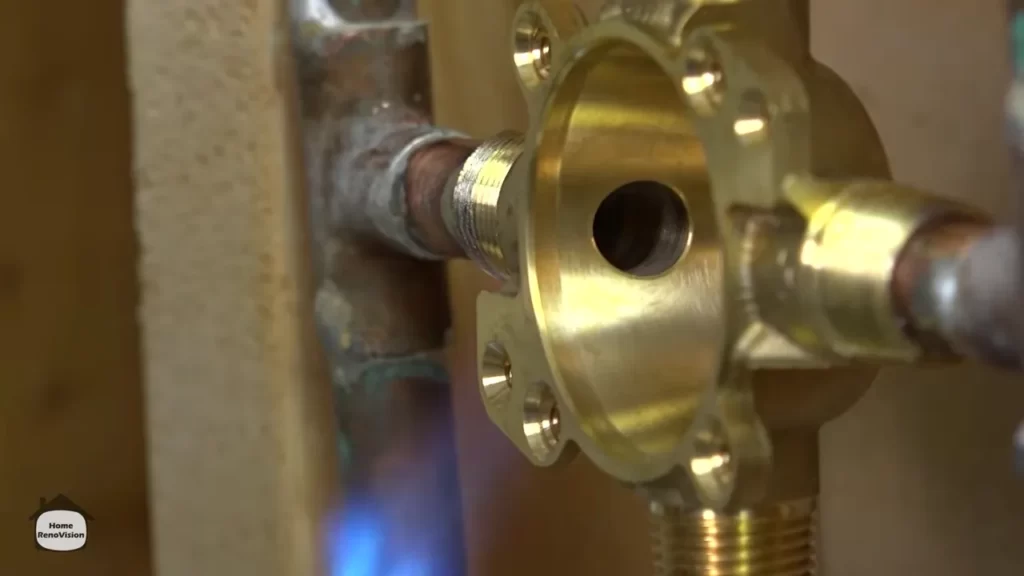
Ensuring Proper Alignment and Orientation
Proper alignment and orientation of the shower valve is crucial for its functionality. Before securing the valve in place, ensure that it is positioned correctly. Refer to the manufacturer’s instructions for the specific orientation of the valve. The hot and cold water inlets should be properly aligned with the corresponding plumbing connections. Additionally, make sure the valve is level and straight to ensure optimal performance.
By following these steps and properly preparing the shower valve for installation, you’ll ensure a smooth and successful installation process. Taking the time to clean and prep the valve area, applying plumber’s tape or sealant, and ensuring proper alignment and orientation will help prevent leaks and ensure the longevity of your shower valve.
Installing The New Shower Valve
Once you have removed the old shower valve and prepared the area, it’s time to install the new shower valve. This step is crucial in ensuring a properly functioning and reliable shower system. Read on to learn how to install the new shower valve.
Connecting the water supply lines
Before securing the valve to the wall, you need to connect the water supply lines. Start by identifying the hot and cold water supply lines. These are usually color-coded – red for hot and blue for cold. If they are not color-coded, check the water pipe labels or consult a professional if unsure.
To connect the water supply lines, follow these steps:
- Wrap the threaded ends of the supply lines with plumber’s tape to create a watertight seal.
- Attach the hot water supply line to the designated hot water inlet on the shower valve. Tighten the connection using an adjustable wrench.
- Repeat the above step for the cold water supply line, connecting it to the appropriate cold water inlet.
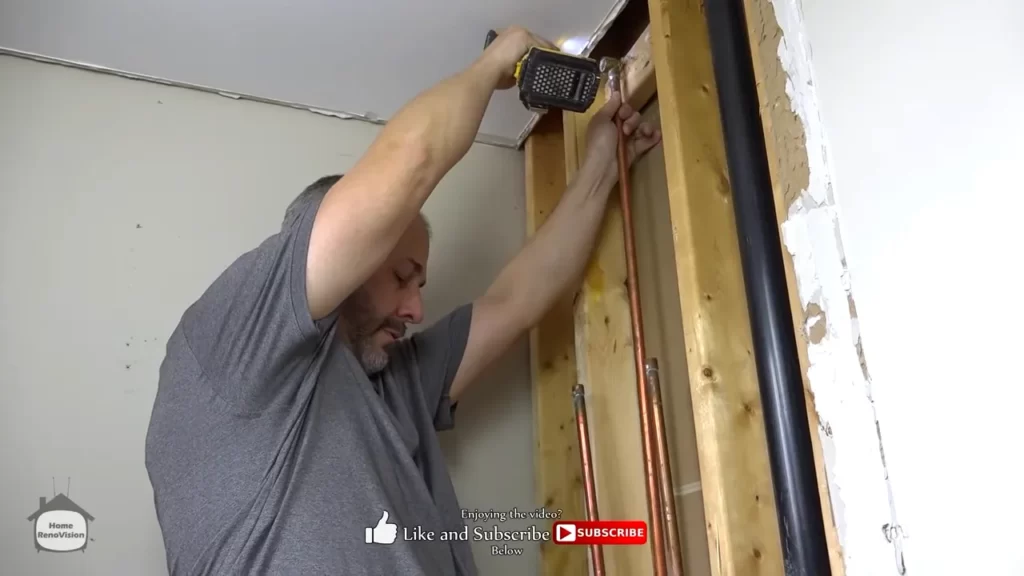
Securing the valve to the wall
Once the water supply lines are connected, it’s time to secure the valve to the wall. This step ensures stability and prevents any unnecessary movement or leaks. Follow these steps to secure the valve:
- Position the valve in the designated area and ensure it is level and aligned correctly.
- Using a drill, drive screws through the mounting holes on the valve flange into the wall. Ensure the screws are properly tightened, but be cautious not to overtighten and damage the valve.
Testing for leaks and proper functionality
Now that the valve is securely attached, it’s crucial to test for leaks and ensure proper functionality before finishing the installation. Follow these steps to test the new shower valve:
- Turn on the water supply to the shower valve.
- Check all connections, including the valve itself, for any signs of leaks. If you notice any leaks, take note of the areas and tighten the corresponding connections as needed.
- Verify that the water flows smoothly from both the hot and cold water outlets. Test the temperature adjustment by turning the valve knob from hot to cold and vice versa.
- Test the diverter valve, if applicable. Ensure that the water is diverted to the appropriate showerhead or handheld shower.
By following these steps and ensuring there are no leaks or malfunctions, you can confidently complete the installation of your new shower valve. Enjoy a rejuvenating and hassle-free shower experience!
Troubleshooting Common Installation Issues
Installing a shower valve can be a fairly straightforward process, but sometimes there are common issues that can arise. In this section, we will discuss how to identify and resolve leaks, adjust water temperature and pressure, and address other potential problems that may occur during the installation process.
Identifying and resolving leaks
One of the most common issues that can occur during the installation of a shower valve is leaks. Leaks can occur in various places, such as around the valve stem or through the showerhead. Here are a few steps you can take to identify and resolve leaks:
- Check all connections: Inspect the connections between the shower valve and the water supply pipes. Make sure that the connections are tight and secure.
- Inspect the valve body: Examine the valve body for any cracks or damage that could be causing leaks. If you find any issues, you may need to replace the valve.
- Replace worn-out components: Over time, gaskets and seals can become worn out and cause leaks. If you notice any signs of wear, such as cracks or tears, replace the affected components.
- Apply plumber’s tape: If you have identified a leaky connection, applying plumber’s tape can help create a tighter seal. Wrap the tape around the threads of the connection before reassembling.
Adjusting water temperature and pressure
Another common issue that may arise during shower valve installation is improper water temperature and pressure. Here are some steps you can take to adjust these settings:
- Check the valve settings: Take a look at the valve’s temperature and pressure settings. Follow the manufacturer’s instructions to make any necessary adjustments.
- Inspect the water supply: Ensure that the water supply to the shower is sufficient. Low water pressure can affect both temperature and pressure.
- Consider installing a pressure regulator: If you consistently experience high water pressure, installing a pressure regulator can help prevent damage to your shower valve and maintain a more comfortable water pressure.
Addressing other potential problems
In addition to leaks and water temperature/pressure issues, there are other potential problems that may occur during shower valve installation. Here are a few additional troubleshooting tips:
- Ensure proper valve orientation: The valve may need to be installed in a specific orientation to function correctly. Refer to the installation instructions to confirm the correct positioning.
- Double-check connections: Before finalizing the installation, double-check all connections and make sure they are tight and secure.
- Assess water flow: If you are experiencing weak water flow, it could be due to a clogged pipe or showerhead. Remove the showerhead and clean any debris that may be blocking the flow.
By following these troubleshooting steps, you can mitigate common installation issues and ensure that your shower valve functions properly, allowing you to enjoy a comfortable and satisfying showering experience.
Finishing Touches And Reassembly
Once you have successfully replaced your shower valve, it’s time to move on to the final steps of the installation. This section will guide you through reattaching the shower fixtures and trim, testing the shower valve to ensure it’s working properly, and completing a final inspection and cleanup.
Reattaching Shower Fixtures and Trim
To reattach the shower fixtures and trim, follow these steps:
- Apply a thin layer of plumber’s tape around the threads of each fixture to create a watertight seal.
- Hand tighten each fixture onto the valve, ensuring they are aligned properly.
- Use an adjustable wrench to tighten the fixtures just enough to prevent any leaks, being careful not to overtighten and damage the fixtures or valve.
Testing the Shower Valve after Reassembly
After reassembling the shower fixtures and trim, it’s crucial to test the shower valve to make sure everything is functioning as it should. Follow these steps:
- Turn on both the hot and cold water supply to the shower.
- Check for any leaks around the fixtures and trim. If you notice any leaks, tighten the fixtures further or replace any faulty parts.
- Adjust the temperature and flow of the water using the shower handle or knobs.
- Ensure that the water reaches the desired temperature and that the flow is consistent.
Final Inspection and Cleanup
Once you have confirmed that the shower valve is working properly, you can proceed with the final inspection and cleanup:
- Check all the connections one last time to ensure there are no leaks.
- Wipe down the fixtures and trim with a damp cloth to remove any fingerprints or residue.
- Inspect the surrounding areas for any signs of water damage or leaks.
- If everything looks good, turn off the water supply and give yourself a pat on the back for a job well done!
With the finishing touches and reassembly complete, you can now fully enjoy your newly installed shower valve. Remember to always follow safety precautions and consult a professional if you encounter any issues during the installation process. Happy showering!
Regular Maintenance And Care For Shower Valves
Just like any other plumbing fixture, shower valves require regular maintenance and care to ensure they continue to work efficiently and provide a satisfactory showering experience. By following a few simple tips and performing recommended maintenance tasks on a regular basis, you can prolong the lifespan of your shower valve and avoid common issues that may arise.
Tips for keeping the valve in good working order
To keep your shower valve in good working order, here are some tips to follow:
- Keep the valve clean: To prevent the build-up of mineral deposits and other debris, regularly clean your shower valve with a mild cleaning solution. Be sure to follow the manufacturer’s instructions for cleaning and avoid using abrasive cleaners that could damage the valve.
- Check for leaks: Periodically check for any signs of leaks around the valve. Leaks can lead to water damage and wasted water, so it’s important to address them promptly. If you notice any leaks, tighten or replace the necessary components.
- Test the temperature control: Test the temperature control regularly to ensure it is functioning properly. This can be done by adjusting the temperature settings and observing the water temperature as it comes out of the showerhead. If you notice any inconsistencies or issues with the temperature control, consider contacting a professional plumber for a thorough inspection.
- Inspect the valve handle: Inspect the valve handle for any signs of wear or damage. If you notice any cracks or loose parts, replace the handle to ensure proper operation of the valve.
- Address water pressure issues: If you experience low water pressure or inconsistent water flow from your shower valve, it may be caused by sediment or debris clogging the valve. In this case, it’s important to clean or replace the valve cartridge to restore proper water pressure.
Recommended maintenance schedule
Following a regular maintenance schedule is crucial for the proper functioning of your shower valve. Here is a recommended maintenance schedule to keep in mind:
| Task | Frequency |
|---|---|
| Clean the valve | Every 3-6 months |
| Check for leaks | Every month |
| Test the temperature control | Every 6 months |
| Inspect the valve handle | Every 6-12 months |
| Address water pressure issues | As needed |
By adhering to this maintenance schedule, you can stay on top of any potential issues and ensure your shower valve continues to operate smoothly.
Troubleshooting common issues
Despite regular maintenance, you may still encounter some common issues with your shower valve. Here are a few troubleshooting tips:
- Low water pressure: If you experience low water pressure, check for any blockages in the water supply lines or the showerhead. Clean or replace any clogged components as necessary.
- Inconsistent water temperature: Inconsistent water temperature can be caused by a faulty thermostatic valve or sediment buildup in the valve cartridge. Consider replacing the valve cartridge or seek professional assistance if the issue persists.
- Leaking valve: If you notice a leak around the valve, check for loose connections or damaged components. Tighten or replace any necessary parts to fix the leak.
- Stuck valve handle: If the valve handle becomes difficult to turn, it may be due to sediment or debris accumulation. Clean the valve handle and lubricate it with a suitable lubricant for smoother operation.
By troubleshooting these common issues and taking appropriate action, you can resolve many problems with your shower valve and maintain its optimal performance.
Frequently Asked Questions
Can You Install A Shower Valve Yourself?
Yes, you can install a shower valve yourself. It’s a simple process that can be done with basic tools. Just follow the instructions carefully and ensure that you have the necessary plumbing skills. Make sure to turn off the water supply before beginning the installation.
How Do You Replace A Shower Faucet Valve?
To replace a shower faucet valve, follow these steps: 1. Turn off the water supply to the shower. 2. Remove the handle and trim plate. 3. Unscrew and remove the old valve. 4. Install the new valve and secure it tightly.
5. Reattach the trim plate and handle. Turn the water supply back on. Done!
What Is The Easiest Shower Valve To Install?
The easiest shower valve to install is a pressure balance valve. It requires fewer plumbing connections and can be adjusted to maintain a constant water temperature.
How Far Into Wall Should Shower Valve Be?
The shower valve should be installed about 18-24 inches above the floor, centered between the hot and cold water supply lines. This ensures convenient access and proper functionality.
Conclusion
Installing a shower valve may seem daunting at first, but with the right tools and step-by-step instructions, it can be a simple and rewarding DIY project. By following the guidelines outlined in this blog post, you’ll be able to install a shower valve efficiently and effectively.
Remember to always prioritize safety and consult professional help if needed. With these tips in mind, you’ll have a fully functioning shower valve in no time. Happy installing!