
To install a shower liner, measure the area, cut the liner to size, and secure it using adhesive or clips. Additionally, fold and crease the corners for a snug fit.
Are you ready to give your bathroom a fresh new look? Installing a shower liner is a great way to protect your walls and give your shower a clean and polished appearance. But how do you go about installing a shower liner?
We will provide you with a step-by-step guide on how to install a shower liner quickly and effectively. Whether you’re a seasoned DIY enthusiast or a beginner, these simple instructions will help you achieve professional-looking results. So, let’s get started and transform your shower into a luxurious oasis!
Why Is A Shower Liner Important?
A shower liner serves as an essential component in any bathroom, providing numerous benefits that promote the long-term functionality and durability of your shower area. In this section, we will explore the significance of a shower liner by highlighting three key aspects: protecting the underlying structure, preventing water damage, and enhancing the lifespan of the shower area.
Protecting the underlying structure
One of the primary reasons why a shower liner is important is its ability to protect the underlying structure of your shower. When water seeps through the shower floor and walls, it can gradually penetrate the underlying materials, such as wood or drywall, leading to excessive moisture accumulation and potential structural damage. By installing a shower liner, you create a watertight barrier that prevents water from reaching the underlying structure, preserving the integrity and strength of your shower area.
Preventing water damage
Water damage is a common issue in bathrooms, and it can lead to costly repairs and renovations. A shower liner acts as a reliable shield against water leakage, minimizing the risk of water seeping into the walls, floors, or neighboring areas. By effectively containing the water within the shower enclosure, a shower liner prevents water damage, including mold and mildew growth, rotting, warping, and discoloration of the surrounding surfaces. This not only maintains the aesthetic appeal of your bathroom but also saves you from potential financial burdens in the future.
Enhancing the lifespan of the shower area
Installing a shower liner significantly enhances the lifespan of your shower area. The presence of the liner creates a barrier against daily wear and tear caused by water, soap, and cleaning agents, thus prolonging the beauty and functionality of your shower. Additionally, the liner helps to minimize the accumulation of moisture within the shower enclosure, reducing the likelihood of rust, corrosion, and other forms of deterioration that can affect the longevity of fixtures, hardware, and surfaces in the shower area. By investing in a shower liner, you are effectively increasing the lifespan of your bathroom and ensuring its long-term durability.
Tools And Materials Needed
When it comes to installing a shower liner, having the right tools and materials is essential for a smooth and successful installation. Here is a list of the necessary tools and materials:
Shower liner
A shower liner is a waterproof barrier that goes underneath the shower floor and walls to prevent water penetration and protect against potential leaks. It is an essential component of any shower installation.
Measuring tape
In order to ensure a proper fit for your shower liner, you’ll need a measuring tape to accurately measure the dimensions of your shower space. This will help you determine the size of the liner you’ll need to purchase.
Utility knife
A utility knife is a versatile tool that will come in handy during the installation process. You’ll need it to cut the shower liner to the correct size and make any adjustments as needed.
Adhesive
To secure the shower liner to the shower floor and walls, you’ll need adhesive specifically designed for this purpose. Make sure to choose a high-quality adhesive that is waterproof and capable of bonding various materials.
Roller
A roller is a useful tool for ensuring proper adhesion of the shower liner. It helps to smooth out any air bubbles or wrinkles, ensuring a tight and seamless fit. A roller can also be used to apply even pressure while the adhesive sets.
Caulking gun
Once the shower liner is installed, you’ll need a caulking gun to apply silicone caulk along the edges and seams. This will provide an extra layer of protection against water leakage and help create a clean and finished look.
By gathering these tools and materials before you begin the installation process, you’ll be well-prepared and ready to tackle the project with confidence.
Step 1: Measure The Shower Area
Before you start installing a shower liner, it’s crucial to measure the shower area accurately. The measurements will determine the size and type of liner you need to purchase. In this step, we will discuss how to measure the length and width of the shower, as well as how to take into account any irregularities or obstacles that may affect the installation process.
Measuring the length and width of the shower
Start by measuring the length of the shower from one side to the other. Use a measuring tape to get accurate measurements. Make sure to measure from wall to wall, excluding any protruding fixtures such as shower handles or grab bars. Write down the measurement.
Next, measure the width of the shower from the back wall to the entrance. Similar to measuring the length, exclude any fixtures that may affect the measurement. Write down the measurement.
Taking into account any irregularities or obstacles
When measuring the shower area, it’s important to consider any irregularities or obstacles that may impact the installation of the shower liner. This includes recessed areas, alcoves, or seats within the shower.
If you encounter such irregularities, measure their dimensions separately and note them down. Additionally, if there are any obstacles such as pipes or faucets that require special attention during the installation process, make sure to take their measurements and note them down as well.
By accounting for these irregularities and obstacles during the measuring process, you can ensure that you purchase a shower liner that fits perfectly and that the installation process goes smoothly without any hindrances.

Step 2: Choose The Right Shower Liner
Choosing the perfect shower liner is a crucial step towards achieving a functional and aesthetically pleasing bathroom. There are several factors to consider when selecting the right shower liner, including budget, personal preferences, durability, maintenance, and aesthetics. By carefully evaluating these aspects, you can find a shower liner that meets your needs and enhances your bathing experience.
Selecting the Appropriate Material Based on Budget and Preferences
One of the first considerations when choosing a shower liner is your budget. Shower liners are available in a range of materials, each with different price points. Understanding your budgetary constraints will help you narrow down your options and prevent overspending.
Once you have identified your budget, it’s essential to consider your personal preferences. Shower liners come in various materials such as vinyl, polyester fabric, and PEVA. Each material has its own unique qualities, so it’s important to select one that aligns with your preferences. For example, if you prefer a more luxurious and soft feel, a polyester fabric liner may be the best choice for you.
Considering Factors Like Durability, Maintenance, and Aesthetics
After considering your budget and personal preferences, it’s time to evaluate the shower liner’s durability, maintenance requirements, and aesthetics.
Durability is an important factor as you want your shower liner to withstand daily use. Vinyl liners are known for their durability and resistance to mold, mildew, and tears. On the other hand, polyester fabric liners offer excellent durability and are less prone to tearing.
Maintenance is another crucial consideration. Some shower liners require regular cleaning and may be more susceptible to staining. If you prefer a low-maintenance option, vinyl liners are easy to clean and maintain.
Aesthetics should also be taken into account when choosing a shower liner. After all, you want the liner to enhance the overall look of your bathroom. Vinyl liners come in various colors and patterns, allowing you to find one that complements your decor. Polyester fabric liners offer a more sophisticated and luxurious appearance.
By carefully considering factors like budget, personal preferences, durability, maintenance, and aesthetics, you can choose the perfect shower liner for your bathroom. Whether you opt for a vinyl liner for its durability and affordability or a polyester fabric liner for its luxurious feel, finding the right shower liner will ensure a beautiful and functional bathing space.
Step 3: Preparing The Shower Area
Now that you have gathered all the necessary tools and materials, it’s time to prepare the shower area. This step involves removing existing fixtures and accessories, as well as cleaning the surface thoroughly. Follow these substeps to ensure a proper and smooth installation of the shower liner.
Removing existing fixtures and accessories
The first substep in preparing the shower area is to remove any existing fixtures and accessories. This includes the showerhead, faucet handles, soap dish, and any other items that are attached to the wall. Use a wrench or pliers to loosen and disconnect these fixtures, ensuring that they are fully detached before proceeding.
Cleaning the surface thoroughly
Once all the fixtures and accessories have been removed, it’s time to clean the surface of the shower area. This is a crucial step as any dirt, grime, or residue can interfere with the adhesion of the shower liner. Here’s how to do it:
- Gather your cleaning supplies: Before starting, gather a non-abrasive cleaner, a sponge or cloth, and warm water. Make sure the cleaner is suitable for the material of your shower walls.
- Wet the sponge or cloth: Wet the sponge or cloth with warm water and wring out the excess. This will ensure that the cleaner is properly diluted.
- Apply the cleaner: Apply a small amount of the non-abrasive cleaner to the sponge or cloth. Avoid using excessive amounts, as this can leave a residue on the surface.
- Scrub the walls: Gently scrub the walls of the shower area using the sponge or cloth. Pay close attention to areas that are prone to buildup, such as corners and seams.
- Rinse the walls: Once you have thoroughly cleaned the walls, use clean water to rinse off the cleaner. Make sure to remove any traces of the cleaning solution.
- Dry the walls: Finally, use a clean towel or cloth to dry the walls completely. This will ensure that the surface is ready for the installation of the shower liner.
By removing existing fixtures and accessories and cleaning the surface thoroughly, you are setting the stage for a successful shower liner installation. Now you are ready to move on to the next step, which involves measuring and cutting the liner to fit your shower area.
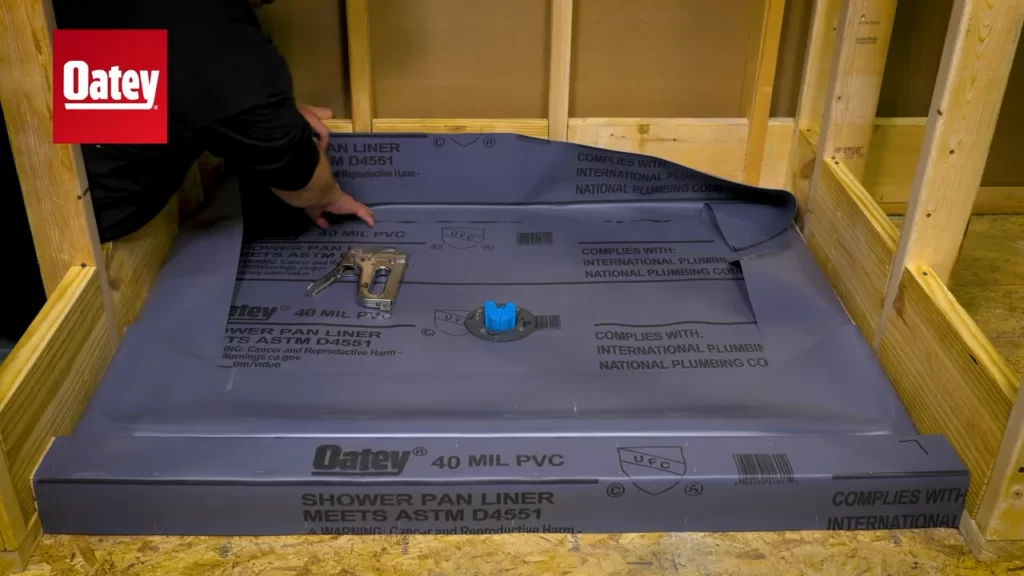
Step 4: Cut The Shower Liner
Removing the excess material
Before cutting the shower liner, it’s essential to remove any excess material that might hinder the installation process. This excess material can make it challenging to achieve a perfect fit and may result in wrinkles or bunching once the liner is installed.
To remove the excess material, start by folding back the shower liner and identifying the areas where it extends beyond the shower floor or walls. Use a pair of scissors or a utility knife to carefully trim off the extra material. Take your time during this step to ensure you’re only removing what is necessary, as cutting too much can result in an ill-fitting liner.
Remember that the goal here is to create a seamless and smooth surface for your shower liner to adhere to. By removing the excess material, you’ll be on your way to achieving a professional-looking installation.
Creating a perfect fit for the shower area
Once you’ve trimmed the excess material, it’s time to focus on creating a perfect fit for the shower area. This step is crucial to ensure that your shower liner functions correctly and provides maximum waterproofing.
It’s recommended to take accurate measurements of your shower area before cutting the liner. Measure the length and width of the shower floor and walls, ensuring you consider any nooks or curves that might require additional cuts.
Once you have the measurements, lay the shower liner on a flat surface and mark the required dimensions using a marker or a pencil. Double-check your measurements before proceeding to cut the liner.
When cutting the liner, it’s important to use a sharp utility knife or a pair of scissors to ensure clean and precise cuts. Take your time and follow the marked lines, ensuring that the cuts are straight and accurate.
Remember to apply even pressure while cutting to avoid jagged edges that can compromise the integrity of the liner.
By creating a perfect fit for the shower area, you’ll not only enhance the overall aesthetic of your bathroom but also ensure a leak-free and durable installation.
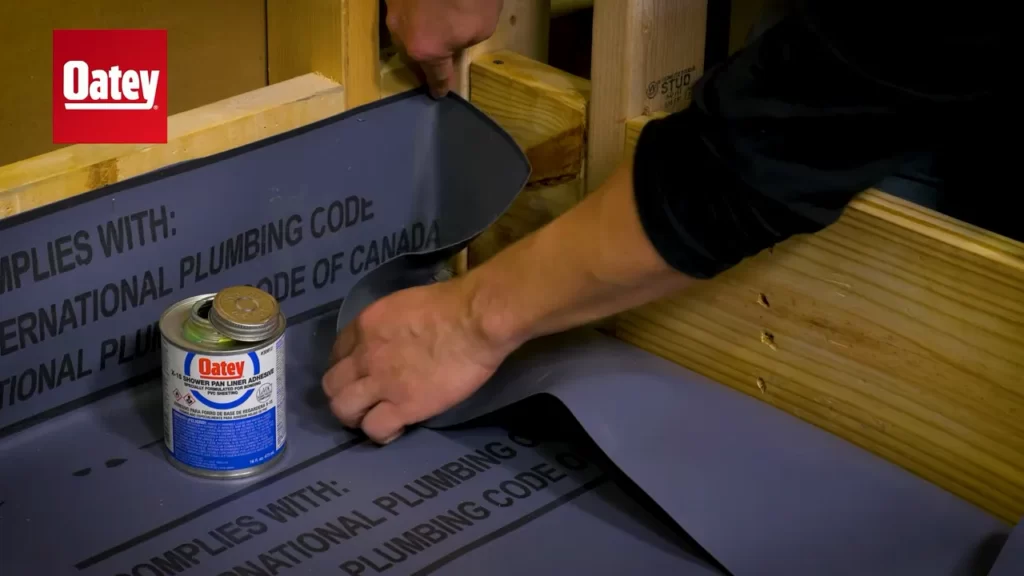
Step 5: Apply Adhesive
Applying adhesive to the shower area is a critical step in the shower liner installation process. This adhesive helps to create a watertight seal and ensures that your shower liner stays in place, protecting your walls and floors from moisture damage.
Applying adhesive to the shower area
Before you start applying the adhesive, make sure that you have prepared the shower area properly. Clean the surfaces using a suitable cleaner and remove any debris or dirt. Smooth out any rough patches to ensure a smooth application.
Once the shower area is clean and dry, it’s time to apply the adhesive. Here’s a step-by-step guide:
- Start by opening the adhesive container and stirring it gently. This will ensure that the adhesive is properly mixed and ready to use.
- Using a notched trowel, apply the adhesive to the shower walls and floor. Work in small sections to ensure that the adhesive doesn’t dry out before you can place the shower liner.
- Hold the trowel at a 45-degree angle and spread the adhesive evenly on the surfaces. This will help to create a strong bond between the liner and the shower area.
- Make sure to cover the entire surface area with adhesive, paying extra attention to the corners and edges. These areas are prone to leaks, so you want to ensure even coverage.
- Once the adhesive is applied, wait for the recommended drying time as mentioned on the adhesive packaging. This will allow the adhesive to set properly and create a strong bond.
Ensuring even coverage
When applying adhesive, it’s essential to ensure even coverage on both the shower walls and floor. This will ensure that the shower liner adheres properly and prevents any potential leaks.
To ensure even coverage, you can use a paint roller to spread the adhesive evenly on the larger surfaces. For the corners and edges, you may need to use a brush or putty knife to ensure that the adhesive reaches every nook and cranny.
It’s important to take your time during this step and be thorough in applying the adhesive. Any areas left uncovered may lead to water seepage, defeating the purpose of installing a shower liner.
By following these steps and ensuring even coverage with the adhesive, you can be confident in the durability and effectiveness of your shower liner installation.
Step 6: Install The Shower Liner
Congratulations, you’ve reached the final and crucial step of installing your shower liner. Now it’s time to bring it all together by securely placing the liner on the adhesive. This step ensures a watertight and durable shower base that will last for years to come.
Placing the liner on the adhesive
To begin, carefully position the shower liner over the adhesive area, ensuring that it is centered and aligned properly. Take your time with this step to ensure a perfect fit. Once positioned, press the liner down firmly to adhere it to the walls and floor.
To provide additional support and prevent sagging or shifting of the liner, you can attach it to the wall studs using stainless steel staples. Place the staples along the top edge of the liner, spacing them approximately every 6-8 inches. This will help create a secure and sturdy installation.
Smooth out any wrinkles or air bubbles
Next, it’s crucial to smooth out any wrinkles or air bubbles that may have formed during the installation process. These imperfections can affect the overall appearance and water-tightness of the shower liner. Use a plastic smoothing tool or your hands to gently push out any wrinkles from the center towards the edges.
Make sure to remove any air trapped beneath the liner as well. You can achieve this by lightly pressing down on the liner while simultaneously flattening it against the wall or floor. Take your time with this step to ensure a smooth and professional-looking finish.
Once you’ve smoothed out any wrinkles or air bubbles, take a step back and visually inspect the liner for any remaining imperfections. If you spot any, go back and repeat the smoothing process until you’re satisfied with the result.
By following these simple steps, you can successfully install your shower liner, creating a sturdy and watertight base for your shower. Remember to always refer to the manufacturer’s instructions for specific installation details and best practices. With proper installation, you can enjoy a beautiful and functional shower for many years to come.
Summary:
To install the shower liner, first, place it on the adhesive and press it firmly to adhere it to the walls and floor. For added support, attach the liner to the wall studs using stainless steel staples. Smooth out any wrinkles or air bubbles by gently pushing them out from the center towards the edges. Take the time to visually inspect the liner and repeat the smoothing process if necessary. Following these steps will ensure a professional-looking and watertight shower liner installation. Always refer to the manufacturer’s instructions for specific details and guidelines.
Step 7: Trim Excess Liner
Now that you have successfully installed the shower liner and ensured a watertight seal, it’s time to trim off any excess liner beyond the shower area. This final step will give your shower a neat and tidy finish, ensuring that everything looks professional and well-designed.
Cutting off any excess liner beyond the shower area
Before you begin trimming, it’s important to gather the necessary tools. You will need a sharp utility knife or scissors and a measuring tape. Take the measuring tape and measure the distance from the top of the shower liner to the top edge of the shower walls. This will ensure that you have an even cut and prevent any unsightly gaps or overlaps.
Once you have measured the distance, mark it with a pencil or marker on the shower liner. Use the utility knife or scissors to carefully cut along the marked line. Take your time and make sure to apply even pressure to get a clean and precise cut. Remember, it’s always better to cut off less initially and trim more if needed, rather than cutting off too much and having to start over.
Ensuring a neat and tidy finish
After trimming off the excess liner, step back and assess the overall appearance. Check for any uneven edges or visible gaps. If you notice any imperfections, use the utility knife or scissors to make any necessary adjustments. Be careful not to cut into the shower walls or any plumbing fixtures.
To achieve a seamless look, you can also use a caulk gun to apply a thin bead of caulk along the edges of the shower liner. This will create a waterproof seal and further enhance the finished appearance. Smooth the caulk with a caulk smoothing tool or your finger to create a clean and professional finish.
Finally, clean up any debris and dispose of the excess liner properly. Wipe down the shower walls and floor to remove any dust or residue. Admire your handiwork and take pride in knowing that you have successfully installed a shower liner and achieved a neat and tidy finish.
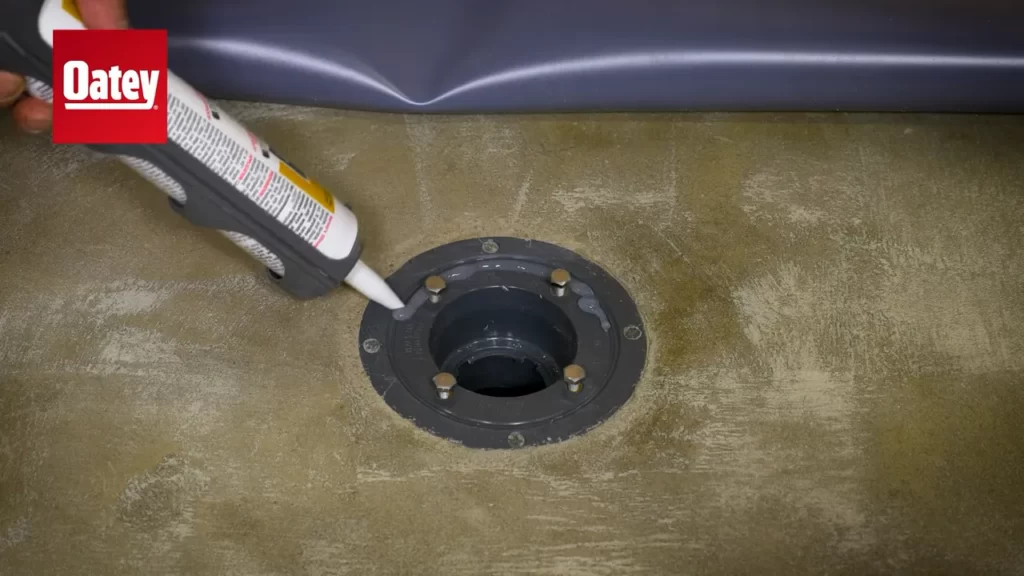
Step 8: Caulk The Seams
Once you have properly installed your shower liner and attached it securely to the walls, it’s time to take an extra step to ensure maximum water resistance. This is where caulking the seams comes into play. Caulking is the process of filling in any gaps or joints to prevent water from seeping through and causing damage. By performing this step, you can effectively enhance the durability and longevity of your shower liner.
Applying Caulk to the Seams for Added Water Resistance
To begin caulking the seams, you will need a caulking gun. This tool provides precise application and allows you to control the flow of caulk. Ensure that the caulking gun is loaded with the appropriate caulk that is specifically designed for bathroom or shower use.
When applying the caulk, start by cutting the tip of the tube at a 45-degree angle using a utility knife. Make sure to cut a small opening to control the amount of caulk being dispensed. Holding the caulking gun at a 45-degree angle, position the tip of the caulk tube at the beginning of the seam.
Gently squeeze the trigger of the caulking gun to begin dispensing the caulk. As you move the gun along the seam, apply a steady and even amount of pressure. Be sure to maintain a consistent speed to ensure a smooth and even application.
Continue caulking each seam of your shower liner, making sure to cover any areas where the liner meets the floor or walls. Pay extra attention to corners and edges, as these areas are prone to water leakage if not properly sealed.
Once you have finished applying caulk to the seams, use a caulking tool or your finger to smooth the caulk and create a neat finish. This step helps to ensure that the caulk adheres well to the seams and creates a watertight seal.
Allow the caulk to dry completely according to the manufacturer’s instructions before using your shower. This typically takes around 24 hours, but it’s crucial to follow the specific recommendations for the caulk you have used.
By caulking the seams of your shower liner, you are taking proactive steps to protect your bathroom from water damage and prolong the lifespan of your liner. It’s a simple yet highly effective measure that ensures a waterproof barrier and provides peace of mind during every shower experience.
Step 9: Reinstall Fixtures And Accessories
Step 9: Reinstall Fixtures and Accessories
After completing the necessary steps to install your shower liner, it’s time to reattach the fixtures and accessories to ensure your shower is fully functional and ready for use. This step involves reattaching the showerhead, faucets, and other fixtures, as well as checking for proper functionality. Let’s go through each of these tasks in detail.
Reattaching the Showerhead, Faucets, and Other Fixtures
Start by reattaching the showerhead to the shower arm. Carefully screw it back on, ensuring it is snug and secure. If necessary, use an adjustable wrench or pliers to tighten it further, but be careful not to overtighten and damage the fittings.
Next, move on to the faucets. If you had removed them during the installation process, now is the time to reinstall them. Align the faucet valves with the corresponding holes in the wall, and secure them using the provided hardware. Use an adjustable wrench or pliers to tighten them, but again, avoid overtightening.
Additionally, reattach any other fixtures that were removed, such as soap holders, shelves, or towel bars. Follow the manufacturer’s instructions for each fixture to ensure proper installation.
Checking for Proper Functionality
With all the fixtures and accessories reattached, it’s important to check for proper functionality before considering the installation complete. Here are a few key steps to follow:
- Turn on the water supply and check for any leaks. Pay close attention to the connections between the fixtures and the shower wall.
- Test the showerhead by turning on the water. Ensure that the water pressure is adequate and that the water flows evenly from the showerhead.
- Check the faucets by turning them on and off. Make sure they operate smoothly and without any leaks.
- If you had removed any other fixtures, such as soap holders or towel bars, make sure they are securely attached to the wall and can support the weight they are intended to hold.
By thoroughly checking for proper functionality, you can address any issues or concerns before fully utilizing your shower. This step ensures that all fixtures and accessories are securely attached, and that your shower is ready to provide a comfortable and enjoyable bathing experience.
In conclusion, the process of reinstalling fixtures and accessories after installing a shower liner is crucial to the overall functionality and aesthetics of your shower. By carefully reattaching the showerhead, faucets, and other fixtures, and thoroughly checking for proper functionality, you can ensure a successful installation that will stand the test of time.
Step 10: Clean And Inspect
Once you’ve successfully installed your shower liner, there are a few important steps left to ensure that everything is in top shape. Step 10 involves cleaning the newly installed shower liner and inspecting it for any imperfections or issues. This final step will help to ensure that your shower liner performs well and lasts for years to come.
Cleaning the newly installed shower liner
After installation, it’s essential to clean your new shower liner to remove any debris or residue that may have accumulated during the installation process. Cleaning your liner not only keeps it looking fresh but also helps to maintain its functionality and prolong its lifespan.
To clean your newly installed shower liner, follow these simple steps:
- Start by removing any loose dirt or debris from the liner’s surface. You can use a soft brush or a microfiber cloth for this.
- Next, prepare a solution of warm water and mild liquid soap. Avoid using harsh or abrasive cleaners as they can damage the liner.
- Dip a sponge or cloth into the soapy solution and gently scrub the liner’s surface, paying extra attention to any areas that appear dirty or stained.
- Rinse the liner thoroughly with clean water to remove any soap residue.
- Finally, dry the liner with a clean towel or allow it to air dry completely before using your shower.
Inspecting for any imperfections or issues
After cleaning your shower liner, it’s important to inspect it carefully for any imperfections or issues that may have occurred during the installation process. This inspection will help to identify potential problems early on, allowing you to address them before they worsen.
Here are some key areas to inspect:
| Area | What to Look For |
|---|---|
| Seams and edges | Check for any loose seams or edges that may require resealing or reinforcement. |
| Drain area | Ensure that the liner is properly fitted around the drain, with no gaps or leaks. |
| Wall attachment | Inspect the liner’s attachment to the walls to ensure it is secure and tightly sealed. |
| Waterproofing | Verify that the liner provides a waterproof barrier and that there are no signs of water leakage or seepage. |
If you notice any imperfections or issues during the inspection, take the necessary steps to address them promptly. This may involve resealing seams, reattaching the liner to the walls, or seeking professional assistance if needed.
By following these cleaning and inspection steps, you can ensure that your newly installed shower liner remains in optimal condition, providing you with a clean and leak-free showering experience for years to come.
Frequently Asked Questions
How Do You Secure A Shower Liner To The Wall?
To secure a shower liner to the wall, follow these steps: 1. Clean and dry the wall surface thoroughly. 2. Apply adhesive or caulk to the back of the liner. 3. Press the liner firmly against the wall, starting from the top and working your way down.
4. Smooth out any wrinkles or bubbles. 5. Allow the adhesive to cure before using the shower.
How Do You Fasten A Shower Liner?
To fasten a shower liner, follow these steps: 1. Measure the shower area and cut the liner to fit. 2. Attach the liner to the shower walls using adhesive or caulk. 3. Use clips or hooks to secure the liner to the top of the shower rod or curtain rod.
4. Ensure the liner hangs straight and is taut. 5. Double-check for any leaks or gaps, and make adjustments if needed.
What Do You Use To Glue A Shower Liner?
To glue a shower liner, use a waterproof adhesive or adhesive tape specifically designed for bathroom installations. Apply the glue or tape according to the manufacturer’s instructions, ensuring that the liner is securely attached to the surface.
Can You Tile Directly On Shower Pan Liner?
Yes, you can tile directly on a shower pan liner. It provides a waterproof barrier and helps to prevent water damage. Be sure to use appropriate thinset mortar and follow manufacturer instructions for installation. Ensure the surface is clean and dry before tiling.
Conclusion
To sum it up, installing a shower liner doesn’t have to be daunting. By following these step-by-step instructions, you can easily have a leak-free shower in no time. Remember to measure accurately, prep your surface properly, and secure the liner firmly.
With a little patience and attention to detail, you’ll have your bathroom looking fresh and functional. Happy showering!