To install a shower hose, first, remove the old hose by loosening the connection at the showerhead. Then, attach the new shower hose by screwing it onto the showerhead tightly.
Factors To Consider Before Buying A Shower Hose
Before you start the process of installing a new shower hose, it’s important to consider a few key factors. These factors will help ensure that you choose the right hose for your needs and preferences. In this section, we’ll discuss three important factors to consider before buying a shower hose: length and flexibility, material quality, and compatibility with your shower system.
Length and Flexibility
One of the first things to consider when buying a shower hose is the length. It’s crucial to choose a hose that is long enough to reach all corners of your shower without stretching or straining.
The average length of a shower hose is around 60 inches, but it’s always a good idea to measure the distance from your showerhead to the bottom of your shower or bathtub to ensure a proper fit. Keep in mind that some shower hoses come with a built-in extension, allowing you to adjust the length as needed.
In addition to length, you should also consider the flexibility of the hose. A flexible shower hose will make it easier to maneuver the showerhead, allowing you to direct the water exactly where you need it.
Material Quality
The material quality of the shower hose is another crucial consideration. A high-quality hose will not only last longer but also withstand the daily wear and tear of regular use. The most common materials used for shower hoses are stainless steel, brass, and plastic.
| Material | Pros | Cons |
|---|---|---|
| Stainless Steel | Durable and long-lasting | Slightly more expensive |
| Brass | Corrosion-resistant | Heavier than stainless steel |
| Plastic | Lightweight and affordable | Less durable than metal |
Consider your budget and personal preferences when choosing the material for your shower hose.
Compatibility with Your Shower System
Lastly, it’s important to ensure that the shower hose you choose is compatible with your shower system. Check the manufacturer’s specifications to ensure that the hose is designed to work with your specific showerhead and valve assembly.
Some shower systems use proprietary connectors, so it’s essential to double-check for compatibility before making a purchase. Additionally, consider the type of shower system you have – whether it’s a fixed overhead shower or a handheld shower – as this can impact the type of hose you need for installation.
By considering these factors – length and flexibility, material quality, and compatibility with your shower system – you can make an informed decision and select the perfect shower hose that will enhance your shower experience. Keep these factors in mind when shopping for a new shower hose, and you’ll be well on your way to enjoying a refreshing and functional shower.
Essential Tools For Installing A Shower Hose
When it comes to installing a shower hose, having the right tools is essential. With the right tools on hand, you can ensure a smooth and hassle-free installation process. In this section, we will discuss some of the essential tools you will need for installing a shower hose. Let’s get started!
Adjustable Wrench
An adjustable wrench is one of the most important tools you will need for installing a shower hose. This versatile tool allows you to tighten and loosen different sizes of nuts and bolts, making it perfect for securing the connectors of your shower hose.
Pliers
Pliers are another essential tool that can make your shower hose installation a breeze. With their strong grip and ability to hold and twist objects, pliers are perfect for tightening fittings and connectors. Whether you are working with plastic or metal parts, a good pair of pliers will help you achieve a secure and leak-free connection.
Teflon Tape
Teflon tape is a must-have when it comes to installing a shower hose. This thin, white tape is specifically designed to create a watertight seal between threaded connections. By wrapping the threaded ends of your shower hose with Teflon tape, you can prevent leaks and ensure a tight and secure fit.
Now that you know the essential tools for installing a shower hose – the adjustable wrench, pliers, and Teflon tape – you can confidently take on this DIY project. Remember to use these tools responsibly and follow the manufacturer’s instructions for a successful installation. Happy showering!
Turning Off The Water Supply
Before starting the installation process of your shower hose, it’s important to turn off the water supply to prevent any water leakage or potential damage. In this section, we will guide you through the steps to locate and shut off the water supply to your shower.
Locating the Water Shut-Off Valve
To begin, you need to find the water shut-off valve for your shower. The shut-off valve is usually located near the shower area, often hidden behind an access panel or in the basement. In some cases, it can be found in the water meter pit outside your house.
To locate the shut-off valve, look for a lever or a round handle attached to a pipe. This valve controls the flow of water to your shower and needs to be completely closed before proceeding with the installation.
Closing the Shut-Off Valve
Once you’ve located the shut-off valve, it’s time to close it to stop the water flow. Follow these simple steps:
- Turn the handle or lever clockwise to close the valve. You may need to use a wrench or pliers if the valve is tight.
- Ensure that the valve is fully closed by checking that the handle or lever is perpendicular to the pipe.
- Once the valve is closed, turn on the shower to release any remaining water pressure.
By closing the shut-off valve, you can rest assured that the water flow to your shower is completely stopped, allowing you to install the shower hose without any leaks or water damage.
Remember, it’s always a good idea to double-check that the shut-off valve is closed before proceeding with the installation. This simple step will save you from potential mishaps or accidents during the installation process.
Now that you’ve successfully turned off the water supply, you’re ready to move on to the next step of installing your shower hose. In the following section, we will guide you through the process of removing the old showerhead.
Removing The Old Shower Hose
Before you can install a new shower hose, you’ll need to remove the old one. This process requires a few simple steps, but it’s important to follow them carefully to avoid any damage or leaks. In this section, we’ll guide you through the process of unscrewing the hose from the showerhead and detaching it from the wall outlet.
Unscrewing the Hose from the Showerhead
Start by turning off the water supply to the shower. This can usually be done by closing the shut-off valve located near the shower area. If you don’t have a shut-off valve, you may need to turn off the main water supply to your home.
Once the water is turned off, take a pair of pliers and grip the shower hose firmly near the showerhead. Hold the showerhead steady with your other hand to prevent any twisting or damage.
Apply steady but gentle pressure to the pliers, turning them counterclockwise to unscrew the hose from the showerhead. Keep turning until the hose is completely detached from the showerhead.
Detaching the Hose from the Wall Outlet
With the showerhead end of the hose detached, you can now move on to removing the other end from the wall outlet. This is usually a bracket or holder that keeps the hose in place.
Take a look at the wall outlet and determine how it is attached. It may be secured with a screw or a clip. If there is a screw, use a screwdriver to remove it. If there is a clip, gently pry it open using a small flathead screwdriver.
Once the bracket or holder is loosened, pull the hose out of the wall outlet. Be careful not to tug too hard, as this could cause damage. If the hose feels stuck, try gently twisting it as you pull to help loosen it.
Now that you have successfully removed the old shower hose, you can proceed with installing the new one. In the next section, we will guide you through the steps of attaching the new shower hose.
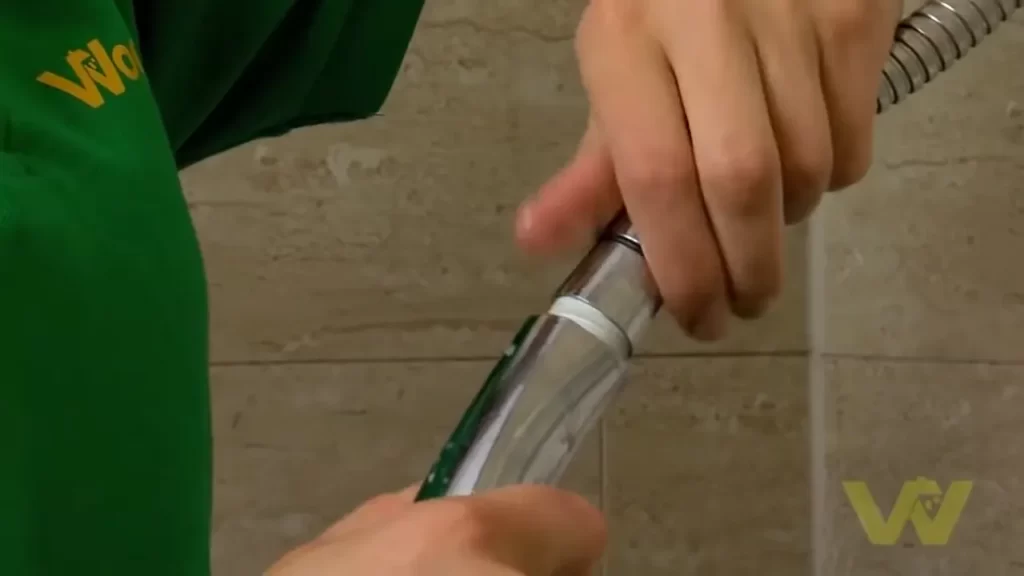
Applying Teflon Tape
One crucial step in installing a shower hose is applying Teflon tape to the threads. Teflon tape, also known as plumber’s tape, is a thin, white tape made of polytetrafluoroethylene (PTFE). It is commonly used in plumbing projects to create a watertight seal. Wrapping the threads with Teflon tape ensures that your shower hose connections are leak-free and secure.
Wrapping the Threads with Teflon Tape
To start, make sure the threads on both the shower arm and the shower hose are clean and dry. This will help the Teflon tape adhere properly and create a tighter seal. Then, follow these steps:
- Hold the end of the Teflon tape against the threads on the shower arm.
- Wrap the tape around the threads in a clockwise direction, overlapping the tape slightly as you go. Be sure to apply gentle pressure to ensure the tape is firmly adhered.
- Continue wrapping until you reach the end of the threads. To prevent any loose tape from unraveling, tear the tape cleanly by pressing it against the threads.
Ensuring a Secure Seal
Applying Teflon tape is not just about wrapping it around the threads; it’s also crucial to ensure a secure seal. Here are a few key tips:
- Avoid over-tightening the shower hose. Applying excessive force can lead to damaged threads and potential leaks.
- Check for any exposed threads. If you see any, start again by removing the existing tape and reapplying it.
- Inspect the wrapped threads to ensure they are completely covered by the tape. Any gaps or inconsistencies may compromise the seal.
By following these steps and tips, you can confidently apply Teflon tape to create a secure seal for your shower hose installation. This simple yet important step will help prevent leaks and ensure a smooth and uninterrupted shower experience.
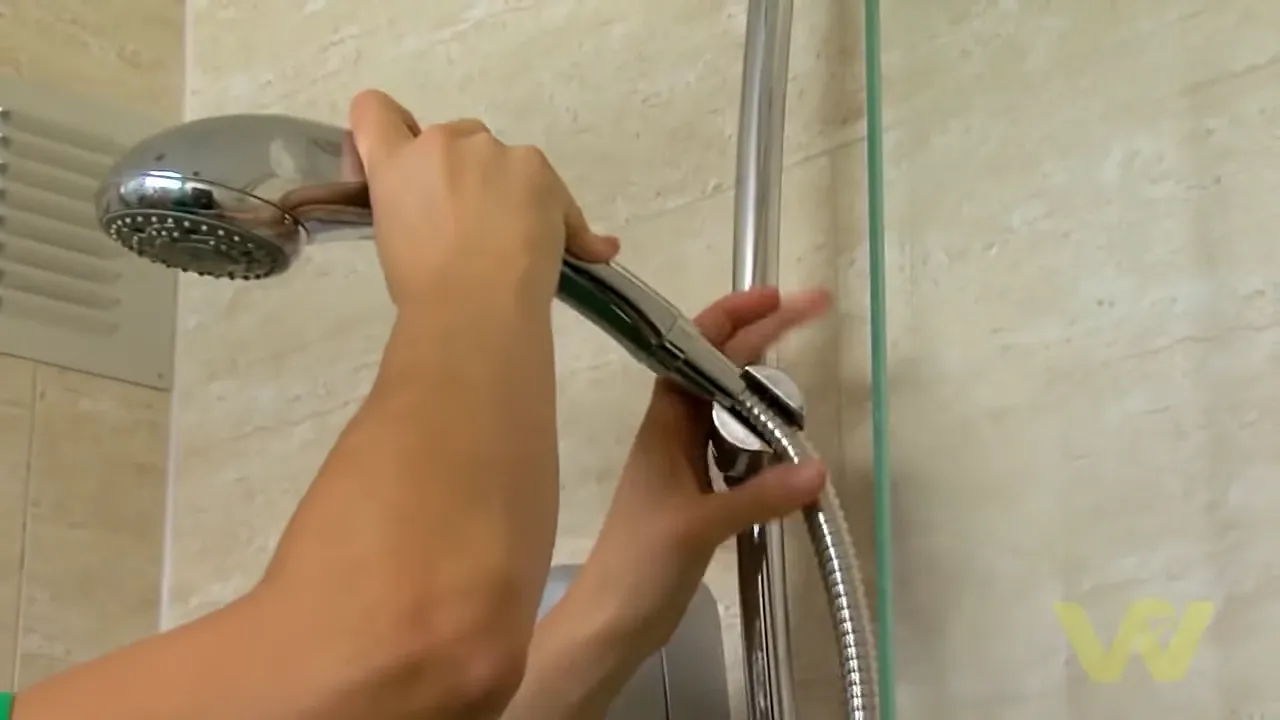
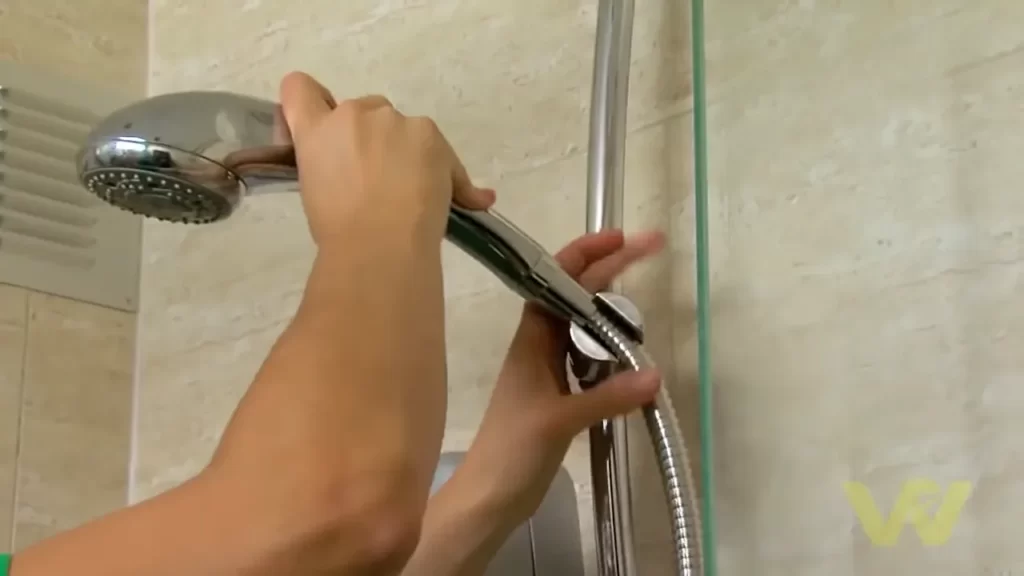
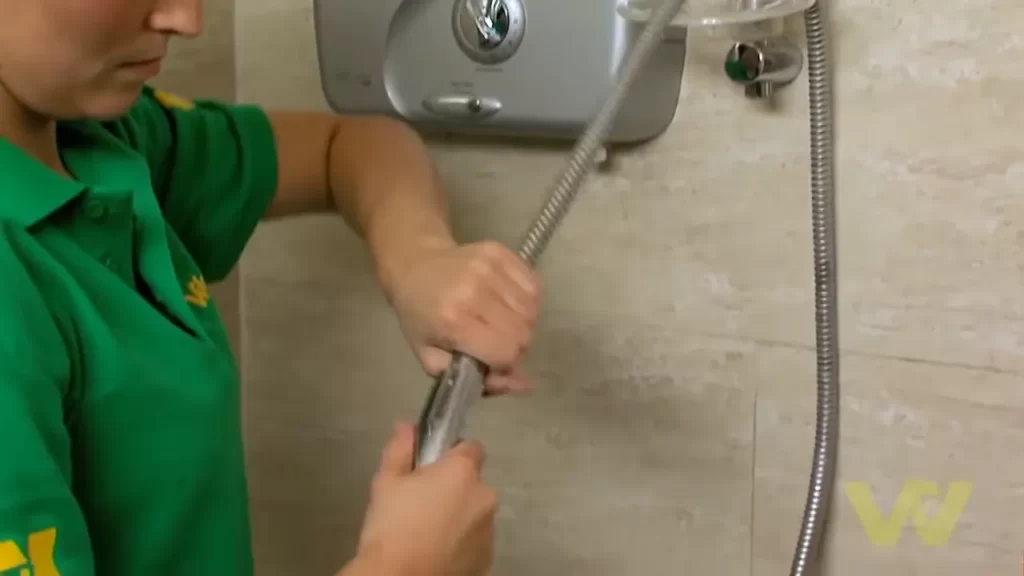
Screw The Shower Hose To The Showerhead
Installing a shower hose is a relatively simple task that can be done by anyone with basic DIY skills. One crucial step in the installation process is screwing the shower hose to the showerhead. This ensures a secure connection that will prevent leaks and allow for a smooth water flow. In this guide, we will walk you through the steps to effectively screw the shower hose to the showerhead, so you can enjoy your refreshing showers with ease.
Aligning the Threads
Before you can start screwing the shower hose to the showerhead, it is important to align the threads properly. The threads are the ridges on both the shower hose and the showerhead that allow them to interlock securely. To align the threads:
- Ensure that both the shower hose and the showerhead threads are clean and free from any debris or residue.
- Hold the showerhead firmly in one hand and the shower hose in the other.
- Align the threads of the shower hose with those of the showerhead.
- Gently twist the shower hose clockwise onto the showerhead, making sure that the threads are catching and aligning.
Aligning the threads properly is essential to create a tight seal between the shower hose and the showerhead, preventing any water leakage.
Tightening the Shower Hose
Once the threads are aligned, it’s time to tighten the shower hose securely onto the showerhead. Follow these steps to ensure a tight connection:
- Using one hand, hold the showerhead firmly in place to prevent it from moving.
- With your other hand, grip the shower hose near the connection point with the showerhead.
- Slowly and evenly twist the shower hose clockwise, applying gentle pressure.
- Continue tightening until the shower hose feels secure and snug against the showerhead.
It’s important not to overtighten the shower hose, as this can lead to damage or make it difficult to remove the hose in the future. Use firm pressure, but avoid excessive force.
By following these simple steps to align and tighten the shower hose to the showerhead, you can ensure a secure and leak-free connection. Now that your shower hose is properly installed, you can enjoy the convenience and flexibility it provides.
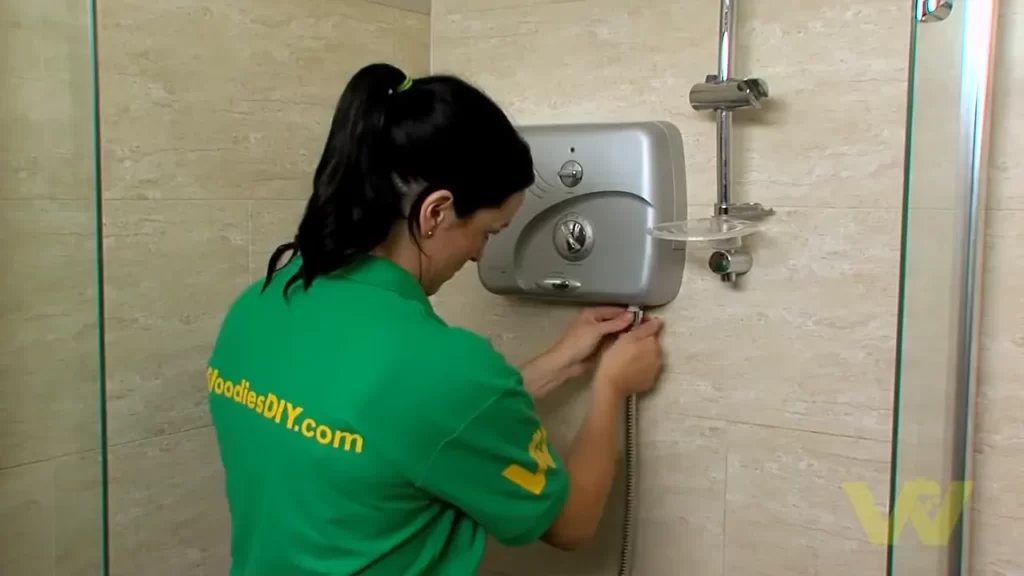
Connecting The Hose To The Wall Outlet
Once you have successfully installed the shower hose, the next step is to connect it to the wall outlet. This crucial step ensures that water flows smoothly from the outlet through the hose and into your showerhead. By following these simple instructions, you can easily connect the hose to the wall outlet without any hassle. Read on to find out how to do it.
Inserting the Washer into the Wall Outlet
To begin with, it is important to insert a washer into the wall outlet. The washer acts as a sealant, preventing water from leaking out of the connection point. Without a washer, you may experience water leakage, which can be inconvenient and wasteful. Here’s how you can insert the washer:
- Check the size and type of washer required for your wall outlet. It is usually included in the shower hose kit.
- Take the washer and place it inside the threaded part of the wall outlet.
- Ensure that the washer is properly positioned and fits snugly into the threaded area.
By following these simple steps, you can ensure a tight seal and prevent water leakage from the wall outlet.
Attaching the Hose to the Wall Outlet
With the washer securely in place, you can now attach the hose to the wall outlet. This step completes the connection and allows water to flow from the outlet to your showerhead. Follow these steps to attach the hose:
- Take the free end of the shower hose and screw it onto the wall outlet.
- Tighten the connection by turning the hose clockwise until it is securely fastened to the wall outlet.
- Make sure not to overtighten, as it can damage the threads.
Once you have attached the hose to the wall outlet, test it by turning on the water supply. Check for any signs of leakage and ensure that water flows smoothly through the hose and out of the showerhead.
By carefully following these instructions, you can successfully connect the shower hose to the wall outlet. It is essential to ensure a secure connection to avoid any potential water leakage. With the hose properly connected, you can enjoy a refreshing and hassle-free shower experience.
Turning On The Water Supply
Opening the Shut-Off Valve
To ensure a smooth flow of water through your shower hose, it’s important to properly open the shut-off valve. This valve is typically located near your shower handles or in the bathroom plumbing system. Here’s how to open the shut-off valve:
- Locate the shut-off valve:
- Look for a small lever or wheel near the plumbing system or beneath the sink.
- If you’re unsure, consult the instruction manual or contact a professional plumber.
- Turn on the shut-off valve:
- If it’s a lever-type valve, simply push it upwards or in the direction indicated by the arrow.
- If it’s a wheel-type valve, rotate it clockwise until it stops.
- Ensure the valve is fully open:
- Check for any resistance or restrictions in the valve’s movement.
- If necessary, adjust the valve to its fully open position for optimal water flow.
Checking for Leaks
Now that you’ve opened the shut-off valve, it’s crucial to check for any possible leaks before proceeding further. Identifying leaks early can prevent water damage and ensure the longevity of your shower hose. Here’s how to check for leaks:
- Inspect the connections:
- Examine the areas where the shower hose connects to the showerhead and the water supply pipe.
- Ensure that the connections are tight and secure.
- Turn on the water:
- Gently turn on the water supply to create pressure in the shower system.
- Observe for any signs of water leakage, such as dripping or spraying.
- Check the shower hose:
- Inspect the entire length of the shower hose, looking for any cracks or holes.
- If any damage is found, consider replacing the hose to prevent future leaks.
- Fixing leaks:
- If you notice any leaks, tighten the connections or replace faulty components.
- Consult a professional plumber if the leaks persist or if there are major issues with the plumbing system.
By following these steps and ensuring the proper opening of the shut-off valve, as well as checking for leaks, you can confidently move forward with the installation of your shower hose. This will help you enjoy a refreshing and leak-free shower experience.
Running Water Through The Shower Hose
Once you have successfully installed the shower hose, it’s time to test it out and start enjoying a refreshing shower experience. Running water through the shower hose is a simple process that ensures everything is working effectively, from the water flow to the pressure. In this section, we’ll go through the essential steps to let the water flow freely and check for proper water pressure.
Letting the Water Flow Freely
Before turning on the water, make sure the showerhead is properly installed and tightly secured. If the showerhead is loose or improperly aligned, it can result in leaks and reduce the water flow. To ensure a proper seal, give the showerhead a gentle twist to make sure it is tightly in place.
Once the showerhead is securely attached, turn on the water slowly by fully opening the hot and cold water valves. This gradual flow of water helps to prevent sudden pressure surges that can cause damage to the shower hose or other plumbing components. As the water starts flowing through the shower hose, check for any leaks or drips. If you notice any leaks, carefully tighten the connections until they are snug, being careful not to over-tighten.
Once you have confirmed that there are no leaks, you can increase the water flow gradually to reach your desired water volume. Pay attention to any changes in water pressure as you adjust the valves. If you experience a sudden drop in pressure, there may be an issue with the plumbing system that requires further investigation.
Checking for Proper Water Pressure
Proper water pressure is crucial for a satisfying shower experience. To ensure you have the right water pressure, start by turning on the shower to its highest setting and observing the strength and consistency of the water stream. It should be steady and strong without any sputtering or irregularities. If you notice any issues, such as low water pressure or a weak stream, it may be necessary to check the water pressure in your household.
To determine the water pressure, you can use a pressure gauge specifically designed for this purpose. Attach the gauge to a water outlet and turn on the water to get an accurate reading. The ideal water pressure for most households is typically between 40 to 60 psi (pounds per square inch). If the pressure is too low, it can be a sign of clogged pipes or other plumbing issues. On the other hand, excessively high water pressure can damage your plumbing system over time. If you suspect any problems with your water pressure, it’s recommended to consult a professional plumber for further evaluation and adjustments.
Once you have tested the water flow and confirmed the proper water pressure, you’re ready to enjoy a rejuvenating shower experience with your newly installed shower hose. The combination of a steady flow and suitable water pressure will provide you with a comfortable and invigorating shower, helping you start your day on a refreshing note.
Dealing With Leaks
Reapplying Teflon Tape
One common cause of shower hose leaks is a faulty seal between the showerhead and the hose. To address this issue, it is essential to reapply Teflon tape properly. Teflon tape acts as a sealant, creating a tight connection that prevents leaks. Here’s how you can reapply Teflon tape to fix any potential leaks.
- Start by removing the showerhead from the hose. You can do this by turning it counterclockwise until it comes loose. Set the showerhead aside for now.
- Carefully unwind any existing Teflon tape from the threads of the showerhead and the hose. Make sure to remove all the old tape so that you can apply a fresh layer.
- Take a new roll of Teflon tape and hold the end of the tape against the threads of the showerhead. Begin wrapping the tape around the threads in a clockwise direction. Be sure to wrap it tightly to create a secure seal.
- Continue wrapping the Teflon tape around the entire length of the threads. It is recommended to wrap the tape at least three to five times for an effective seal.
- Once you have finished wrapping the tape, press it down to secure it in place. Make sure there are no loose ends or gaps in the tape.
After reapplying the Teflon tape, you can now move on to tightening the connections to further prevent leaks.
Tightening Connections
Another common cause of leaks in shower hoses is loose connections. To ensure a snug fit and prevent leaks, it’s important to tighten the connections properly. Follow these steps to tighten the connections effectively.
- Start by reattaching the showerhead to the hose. Hold the showerhead against the hose and turn it clockwise until it feels secure. Use a pair of pliers if necessary, but be careful not to overtighten as it may damage the threads.
- Next, check the connection between the hose and the water supply outlet. Turn the hose clockwise onto the water supply outlet until it is hand-tight. Again, use pliers if needed, but avoid overtightening.
- Once both connections are secure, turn on the shower to check for any remaining leaks. If you notice any leaks, turn off the water and double-check the connections. Adjust them as needed to ensure a tight fit.
- After ensuring there are no leaks, enjoy your shower without any worries about water escaping from the hose!
By reapplying Teflon tape for a proper seal and tightening the connections, you can effectively deal with leaks in your shower hose, allowing you to shower comfortably without any inconvenient drips or sprays.
Addressing Reduced Water Pressure
If you’ve noticed a decrease in water pressure when using your shower hose, there are a few simple steps you can take to address and resolve this issue. In this section, we’ll walk you through the process of checking for blockages and adjusting water flow to help restore optimal water pressure.
Checking for Blockages
The first step in addressing reduced water pressure is to check for any blockages in your shower hose. Over time, mineral deposits, dirt, or debris can accumulate and impede the flow of water. Follow these steps to inspect and clean your shower hose:
- Remove the shower hose from its connection to the showerhead.
- Inspect both ends of the hose for any visible blockages, such as limescale or buildup.
- If you notice any blockages, gently scrub the affected areas with a soft brush or toothbrush to remove the deposits.
- Rinse the hose thoroughly to ensure all debris is removed.
- Reattach the shower hose to the showerhead and test the water pressure.
Adjusting Water Flow
If you’ve ruled out blockages as the cause of reduced water pressure, the next step is to adjust the water flow. Follow these steps to ensure optimal water flow:
- Locate the water flow control knob or valve on your shower hose.
- Turn the knob or valve counterclockwise to increase the water flow.
- If the knob or valve is already fully open, check the water flow at the showerhead.
- If the water flow is still low, you may need to replace the showerhead to resolve the issue.
By checking for blockages and adjusting the water flow, you can effectively address and resolve reduced water pressure in your shower hose. These simple steps will help ensure a satisfactory showering experience with optimal water pressure.
Frequently Asked Questions
Can I Replace A Shower Hose Myself?
Yes, you can replace a shower hose by following these steps: Firstly, turn off the water supply. Then, unscrew the old hose from the showerhead and the faucet. Finally, attach the new hose by tightening the connections. It’s a simple DIY task that you can do yourself.
How Do You Install A Hand Held Shower Hose?
To install a hand held shower hose, first, turn off the water supply. Then, unscrew the existing showerhead and attach the holder bracket to the shower arm. Next, connect the hose to the shower arm and tighten with a wrench.
Finally, attach the showerhead to the hose and turn on the water to test the installation. It’s that simple!
Is It Easy To Fit A Shower Hose?
Yes, fitting a shower hose is easy. You can do it yourself with a few simple steps. Just unscrew the old hose and attach the new one by screwing it onto the showerhead. Ensure tight connections and test for leaks.
How Do You Attach A Shower Hose To A Tap?
To attach a shower hose to a tap, begin by unscrewing the aerator from the tap. Then, attach the shower hose adapter to the tap. Finally, connect the shower hose to the adapter. Make sure all the connections are tight to prevent leakage.
Conclusion
To sum it up, installing a shower hose is a simple task that can enhance your bathing experience. By following these step-by-step instructions, you can easily replace or upgrade your shower hose without any professional help. Remember to choose a durable and high-quality hose that suits your preferences.
Whether you’re a DIY enthusiast or a novice, this guide has provided you with the necessary knowledge to successfully install a shower hose. Now, you can enjoy a refreshing and convenient shower every day.