To install a shower head in a bathtub, remove the existing spout and attach the new shower head by screwing it into place. This straightforward process can be done without professional assistance.
Updating your bathtub with a shower head can transform your bathing experience and add convenience to your daily routine. By following a few simple steps, you can easily install a shower head in your bathtub without the need for a plumber.
We will guide you through the process, explaining each step clearly and concisely. Whether you desire a handheld shower head or a fixed overhead one, this installation method will work for most types. Get ready to enjoy the benefits of a shower in your bathtub by learning how to install a shower head in just a few minutes.
Before You Begin
Installing a shower head in your bathtub can enhance your bathroom experience and provide a refreshing showering experience. Before you dive into the installation process, it’s important to gather all the necessary tools and materials and familiarize yourself with the steps involved. This will help ensure a smooth and hassle-free installation process, allowing you to enjoy your new shower head in no time.
Gathering the Necessary Tools and Materials
To install a shower head in your bathtub, you will need the following tools and materials:
| Tools | Materials |
|---|---|
|
|
Make sure you have all these tools and materials readily available before beginning the installation process. This will save you time and prevent any unnecessary trips to the hardware store during the installation.

Step-By-Step Guide: Installing A Shower Head In A Bathtub
If you’ve been longing for a refreshing shower experience in your bathtub, installing a shower head can be a game-changer. Not only does it add convenience, but it also upgrades the overall bathing experience. If you’re ready to take on this DIY project, we’ve got you covered with this step-by-step guide on how to install a shower head in a bathtub.
Removing the Existing Shower Head
The first step in installing a shower head in a bathtub is to remove the existing shower head. This can usually be done by twisting it counterclockwise. If it’s tightly secured, you may need to use pliers or a wrench for extra leverage.
Preparing the Bathtub for Installation
Once the old shower head is removed, it’s crucial to prepare the bathtub for installation. Start by cleaning the area where the shower head will be mounted. Make sure to remove any dirt, grime, or debris that may hinder the installation process. For a seamless installation, ensure the surface is dry and free from any obstructions.
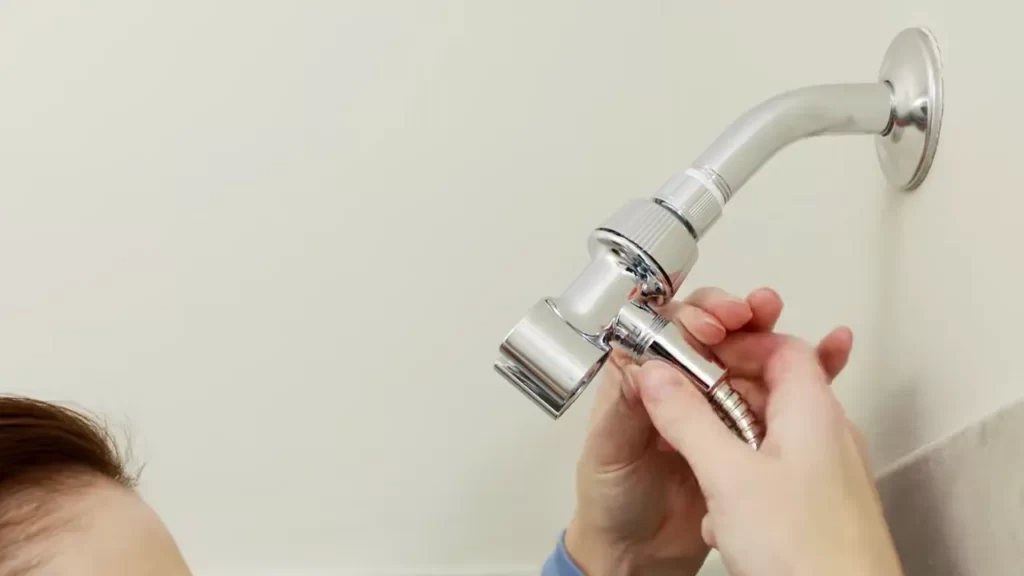
Attaching the Shower Arm Extension
Next, it’s time to attach the shower arm extension. This is a crucial component that connects the shower head to the water supply. Apply a thin layer of plumber’s tape on the threaded end of the shower arm extension. This tape will help create a tight seal and prevent leaks.
Placing the Teflon Tape
To ensure a watertight connection, it’s important to place Teflon tape on the threads of the shower arm extension. Simply wrap the tape in a clockwise direction, making sure to cover the entire threaded area. This will prevent any water from seeping out and provide a secure fit.
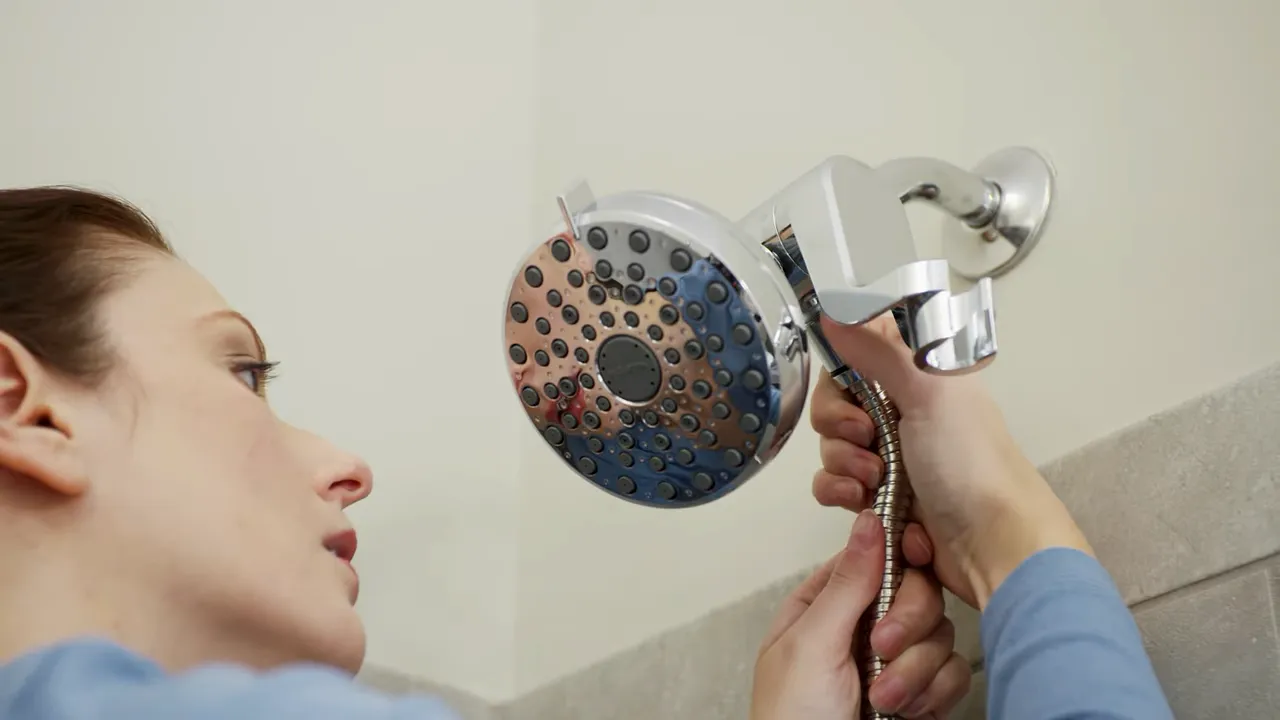
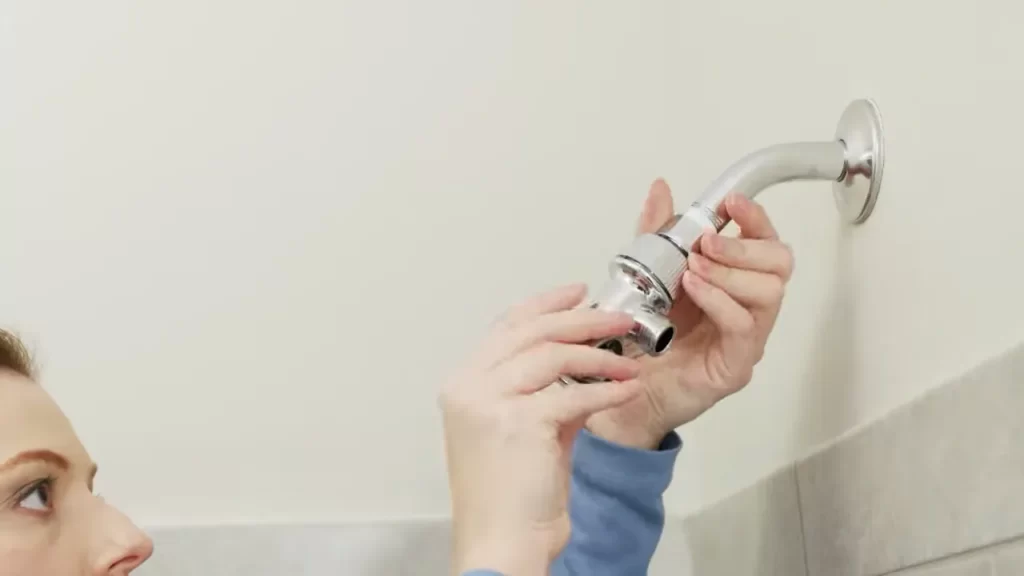
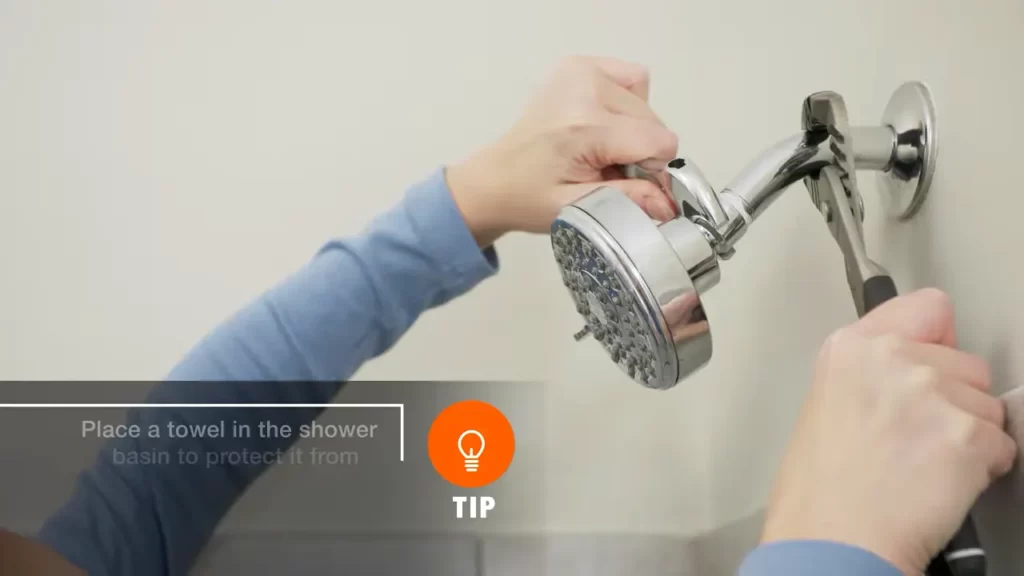
Fastening the New Shower Head
With the shower arm extension and Teflon tape in place, it’s time to fasten the new shower head. Begin by screwing the shower head onto the threaded end of the shower arm extension. Use your hand to tighten it initially, and then use an adjustable wrench to give it a final snug fit. Be careful not to overtighten, as this could damage the shower head or the arm.
Testing the Installation
Now that the shower head is securely installed, it’s important to test the installation before fully enjoying your shower. Turn on the water and check for any leaks or drips. Adjust the shower head to ensure the water flow and pressure meet your preferences. If any issues arise, make the necessary adjustments and retest until you achieve the desired result.
Congratulations! You have successfully installed a shower head in your bathtub. Enjoy the enhanced bathing experience and the convenience of a refreshing shower right in your own home.
Tips For A Successful Shower Head Installation
Installing a shower head in your bathtub can be a simple and rewarding DIY project. Whether you want to upgrade your existing shower head or replace a worn-out one, following the right tips and techniques can ensure a successful installation. In this guide, we will walk you through three important steps to help you achieve the perfect installation – choosing the right shower head for your bathtub, properly positioning the shower arm extension, and ensuring a proper seal with Teflon tape.
Choosing the Right Shower Head for your Bathtub
Choosing the right shower head for your bathtub is crucial, as it determines the overall showering experience. With a wide variety of options available in the market, it’s essential to consider factors such as water pressure, spray pattern, and style to make the right choice. Here are a few key points to keep in mind while selecting a shower head:
- Water Pressure: Ensure that the shower head you choose is compatible with your home’s water pressure. Low-pressure shower heads can provide a relaxing and gentle spray, while high-pressure ones offer a more invigorating experience.
- Spray Pattern: Consider the desired spray pattern for your shower head. Whether you prefer a rainfall effect, massaging jets, or a combination, make sure to choose a shower head that offers the desired spray options.
- Style: Choose a shower head that complements the aesthetics of your bathroom. Whether you prefer a modern or traditional style, there are plenty of options available to suit your preferences.
Properly Positioning the Shower Arm Extension
The shower arm extension is the component that connects the shower head to the water supply pipe. Properly positioning the shower arm extension is essential for achieving optimal height and angle for your shower head. Here are a few steps to ensure proper positioning:
- Measurements: Take precise measurements to determine the ideal height and angle for your shower head.
- Use Adjustable Arm: Opt for a shower arm extension that offers adjustability. This will allow you to easily customize the height and angle of your shower head.
- Tighten Securely: Use an adjustable wrench to tighten the connections between the shower arm extension and the water supply pipe. Ensure that the connections are secure to avoid any leaks.
Ensuring Proper Seal with Teflon Tape
Creating a proper seal between the shower arm and the shower head is crucial to prevent any leaks. Teflon tape, also known as plumber’s tape, can be used to achieve a watertight seal. Here’s how to ensure a proper seal:
| Steps | |
|---|---|
| 1. Clean Threads: | Clean the threads of both the shower arm and the shower head thoroughly. |
| 2. Wrap Teflon Tape: | Wrap Teflon tape clockwise around the shower arm threads. Make sure to overlap the tape by half with each rotation. |
| 3. Tighten Shower Head: | Attach the shower head to the shower arm and tighten it securely. The Teflon tape will help create a watertight seal. |
Following these steps will ensure a successful shower head installation in your bathtub. By choosing the right shower head, properly positioning the shower arm extension, and ensuring a proper seal with Teflon tape, you can enjoy a refreshing and satisfying showering experience.
Troubleshooting Common Installation Issues
While installing a shower head in your bathtub can be a simple task, sometimes you may encounter some common installation issues. Don’t worry – we’ve got you covered! In this section, we will discuss the three most common issues that you may face during the installation process and provide you with practical solutions: low water pressure, leaking shower head, and difficulty in removing the existing shower head.
Low Water Pressure
Experiencing low water pressure can be frustrating when trying to install a new shower head. Here are a few possible causes and solutions to resolve this issue:
- Clogged shower head: Over time, mineral deposits can build up in the shower head, causing reduced water flow. To fix this, unscrew the shower head and soak it in a solution of vinegar and water overnight. Then, use a brush to scrub away any remaining debris and reinstall the shower head.
- Water flow restrictor: Some shower heads come with a water flow restrictor installed to conserve water. If you have low water pressure and suspect a restrictor, remove the shower head, locate the restrictor, and gently pry it out using a flathead screwdriver. Remember to reinstall the shower head afterward.
- Plumbing issues: If none of the above solutions improve the water pressure, you may have underlying plumbing problems. It is recommended to consult a professional plumber to diagnose and fix the issue.
Leaking Shower Head
A leaking shower head can waste water and also be annoying. If you encounter a leaking shower head during installation, follow these steps to address the problem:
- Tighten connections: Ensure that all the connections between the shower head and the water pipe are tight. Use an adjustable wrench or pliers to secure the joints properly. Be cautious not to overtighten, as it may damage the fittings.
- Check washer: Leaks can also occur if the washer inside the shower head is worn out or damaged. Disassemble the shower head and inspect the washer. If necessary, replace it with a new one before reinstalling.
- Apply plumber’s tape: Wrap plumber’s tape around the threaded parts of the shower head to create a tight seal. This can help prevent any potential leaks.
Difficulty in Removing the Existing Shower Head
Removing the existing shower head can sometimes be a tricky task. If you encounter difficulty, try the following steps to make the process easier:
- Use a wrench: If the shower head is tightly fixed, you may need to use an adjustable wrench to loosen it. Grip the shower head with the wrench and turn it counterclockwise until it loosens.
- Apply rust penetrant: In case the shower head is stuck due to rust or mineral buildup, spray a rust penetrant onto the connections and let it sit for a few minutes. Then try loosening the shower head using the wrench again.
- Seek professional help: If you have tried the above steps without success, it is best to consult a professional plumber who will have the necessary tools and expertise to remove the shower head safely.
By troubleshooting these common installation issues and following the provided solutions, you can successfully install a shower head in your bathtub without any hassles. Now, let’s move on to the next section and complete the installation process.
Maintenance And Care Tips For Shower Heads
Proper maintenance and care of your shower head are essential to ensure optimal performance and longevity. By following a few simple steps, you can keep your shower head clean, prevent clogs and mineral buildup, and address any rust or corrosion issues that may arise.
Cleaning the Shower Head Regularly
Regular cleaning is crucial to prevent bacteria, mold, and other contaminants from accumulating on your shower head. Here are a few easy steps to keep your shower head clean:
- Start by removing the shower head from the bathtub faucet. This can usually be done by twisting it counterclockwise.
- Fill a bowl or bucket with equal parts white vinegar and warm water.
- Submerge the shower head in the vinegar-water mixture and let it soak for at least 30 minutes. This will help dissolve any mineral deposits or clogs.
- After soaking, scrub the shower head with a soft brush or toothbrush to remove any remaining buildup.
- Rinse the shower head thoroughly with clean water to remove any vinegar residue.
- Finally, reattach the shower head to the faucet and test the water flow to ensure it is running smoothly.
Preventing Clogs and Mineral Buildup
To prevent clogs and mineral buildup in your shower head, it is important to take proactive measures. Here are a few tips:
- Use a shower head with rubber nozzles or silicone jets. These materials are less prone to mineral buildup and are easier to clean.
- Install a water softener or use a water conditioner to reduce the mineral content in your water.
- Periodically remove the shower head and rinse it with clean water to remove any mineral deposits that may have accumulated.
- Avoid using harsh chemical cleaners on your shower head, as these can damage the finish and the internal components.
Addressing Rust and Corrosion Issues
Rust and corrosion can occur on shower heads, especially if they are exposed to moisture for prolonged periods. Here are a few steps to address these issues:
- Inspect the shower head regularly for any signs of rust or corrosion. Look for discolored areas, flaking paint, or visible damage.
- If you notice any rust or corrosion, remove the shower head and soak it in a mixture of equal parts water and vinegar for a couple of hours.
- After soaking, scrub the affected areas with a soft brush or toothbrush to remove the rust or corrosion.
- Rinse the shower head thoroughly with clean water and dry it completely before reattaching it to the faucet.
- If the rust or corrosion is severe, you may need to consider replacing the shower head to ensure proper functionality.
By implementing these maintenance and care tips, you can enjoy a clean and efficient shower head for years to come. Remember, regular cleaning, preventing clogs and mineral buildup, and addressing rust and corrosion issues are key to prolonging the lifespan of your shower head.
Advantages Of Installing A Shower Head In A Bathtub
Enhancing your shower experience, providing versatility for different needs, and saving water and energy are just a few of the key advantages of installing a shower head in a bathtub. Not only does it transform your daily routine into a spa-like experience, but it also offers various functionalities that cater to different preferences. Additionally, it promotes sustainability by reducing water consumption and energy usage, making it a wise choice for both your comfort and the environment.
Enhanced Shower Experience
Installing a shower head in your bathtub can immensely enhance your shower experience. The adjustable settings on the shower head allow you to customize the water flow, pressure, and temperature to suit your preferences. Whether you prefer a gentle rainfall-like flow or a powerful massage setting, you can easily switch between different modes for a luxurious and relaxing bathing experience. The soothing sensation provided by the shower head’s various settings can help alleviate stress and tension, turning your daily shower routine into a rejuvenating escape.
Versatility for Different Needs
A shower head in a bathtub offers versatility that caters to different needs and preferences. With an adjustable shower head, you can easily switch between various spray patterns, allowing you to choose from a rainfall effect, a pulsating massage, a gentle mist, or even a combo of different modes. This versatility is especially beneficial for households with varying preferences, as each family member can adjust the shower head to their liking. Whether you want a relaxing shower or a stimulating massage, a shower head in a bathtub provides the flexibility to accommodate everyone’s needs.
Saving Water and Energy
Another significant advantage of installing a shower head in your bathtub is the ability to save water and energy. Many modern shower heads feature water-saving technologies such as aerators or flow restrictors, which limit the amount of water flowing through the shower head without compromising the showering experience. By reducing water consumption, you not only contribute to the preservation of this precious resource but also save on your monthly water bill. Additionally, using less water in your shower helps conserve energy by reducing the amount of hot water required, resulting in lower energy consumption and utility costs.
In conclusion, by installing a shower head in your bathtub, you can elevate your shower experience, cater to different preferences, and promote water and energy conservation. With its adjustable settings, vast functionality, and eco-friendly features, a shower head in a bathtub brings convenience, comfort, and sustainability to your everyday routine.
Frequently Asked Questions
Can You Add A Shower Head To A Bathtub?
Yes, it is possible to add a shower head to a bathtub. By installing a diverter valve, you can switch between the showerhead and the bathtub faucet. This allows you to have the convenience of a shower while still having the option to use your bathtub as well.
Where Do You Put A Shower Head In A Bathtub?
The shower head in a bathtub is typically placed on the wall above the faucet.
How Do You Install A Hand Held Shower Head In A Bathtub?
To install a hand held shower head in a bathtub, follow these steps: 1. Remove the old shower head. 2. Use plumber’s tape on the shower arm. 3. Screw the new hand held shower head onto the shower arm. 4.
Adjust the height and angle as desired. 5. Test for any leaks and make adjustments if needed.
How To Turn A Bathtub Into A Shower?
To turn a bathtub into a shower, you can replace the tub with a shower stall, add a showerhead and faucet, and install a waterproof surround. Don’t forget to ensure proper drainage and consider hiring a professional for the job.
Conclusion
To wrap it up, installing a shower head in the bathtub may seem daunting at first, but with the right tools and a step-by-step guide, it is a doable task for anyone. Remember to turn off the water supply, remove the old shower head, apply Teflon tape, and hand tighten the new one.
Finally, test for any leaks, and you’re ready to enjoy a refreshing showering experience. So don’t hesitate to give it a try and transform your bathtub into a multifunctional space.