
To install shower glass panels, measure and mark the desired location on the wall, attach the metal track, and then slide the glass panels into place. Installing shower glass panels can help to create a modern and sleek look in your bathroom while also providing a functional and easy-to-clean shower enclosure.
Whether you are renovating your existing shower or building a new one, installing glass panels can be a straightforward process. In this guide, we will outline the step-by-step instructions to help you successfully install shower glass panels in your bathroom.
By following these simple steps, you’ll be able to transform your shower into a stylish and contemporary space in no time.
Preparing For Installation
Measure and assess your shower space
Before you begin the installation process, it is essential to carefully measure and assess your shower space. This step ensures that you select the right size glass panels and avoids any potential problems during installation. To measure your shower space, follow these simple steps:
- Use a measuring tape to measure the width and height of your shower area. Start from the bottom of the shower base to the top where the glass panels will end. Take accurate measurements to ensure a precise fit.
- Consider the layout and shape of your shower. Does it have any unusual angles or curves? Take note of these details to ensure you choose the appropriate glass panels that can accommodate your shower’s unique design.
- Check for any obstructions such as fixtures, handles, or knobs that may interfere with the glass panel installation. Take note of their positions and make necessary adjustments in your measurements.
- Double-check your measurements to ensure accuracy. It’s better to be safe than sorry!
Gather the necessary tools and materials
Now that you have measured and assessed your shower space, it’s time to gather the necessary tools and materials for a successful installation. Here’s a list of what you’ll need:
| Tools | Materials |
|---|---|
| Measuring tape | Glass panels |
| Level | Shower panel hardware (clips, brackets, etc.) |
| Drill | Silicone sealant |
| Screwdriver | Shims |
| Glass cutter (if necessary) | Masking tape |
Having these tools and materials ready before you start the installation process will save you time and ensure a smoother experience.
Select the right type of glass panels for your shower
Choosing the right type of glass panels for your shower is crucial to achieve both functionality and aesthetics. Here’s what you need to consider:
- Thickness: The thickness of glass panels can vary. Thicker glass panels offer more durability and rigidity, while thinner ones may provide a sleeker look.
- Finishes: Glass panels come in various finishes, such as clear, frosted, or patterned. Consider your desired level of privacy and the overall style of your bathroom when making your selection.
- Frameless or framed: Decide whether you prefer frameless glass panels for a seamless and modern look or framed ones for added support and stability.
- Tempered glass: Ensure that the glass panels you choose are made of tempered glass, as it is stronger and safer than regular glass.
Take your time to explore different options and consult with professionals if needed to ensure you select the most suitable glass panels for your shower.
Removing Existing Shower Components
Before you can install new shower glass panels, you will need to remove any existing shower doors or curtains, as well as any hardware or framework that may be in the way. This step-by-step guide will walk you through the process of removing these components to ensure a smooth installation.
Remove old shower doors or curtains
To begin, take down any old shower doors or curtains that are currently in place. Start by removing any mounting brackets or tracks that may be holding the doors in place. Then, carefully lift the doors off of their hinges or tracks, taking care not to scratch or damage the surrounding walls or floor. If you have a shower curtain, remove it from the rod and set it aside for disposal or replacement.
Take out any hardware or framework that may be in the way
After removing the shower doors or curtains, it’s important to check for any hardware or framework that may still be attached to the walls or floor. This can include brackets, screws, or other fasteners that were used to secure the previous components.
If you encounter any hardware or framework, use a screwdriver or appropriate tool to carefully remove them. Take note of their location and store them in a safe place in case they are needed for the installation of your new shower glass panels.
By removing these components, you’ll create a clean and empty space for the installation of your new shower glass panels. This important step will ensure that your new panels fit properly and enhance the overall aesthetic of your bathroom.
Now that you have successfully removed the old shower doors or curtains and any hardware or framework that may have been in the way, you are ready to move on to the next step of installing your new shower glass panels.
Preparing The Shower Area
Before installing shower glass panels, it is crucial to properly prepare the shower area. This involves cleaning the space thoroughly and ensuring that the walls and floor are in good condition for installation. By taking these preparatory steps, you can ensure that your shower glass panels are installed smoothly and securely.
Clean the shower space thoroughly
To begin, it is essential to clean the shower space thoroughly. This means removing any debris, dirt, or grime that may have accumulated over time. A clean shower area not only creates a more visually appealing aesthetic but also ensures that the glass panels adhere properly.
Here are some steps to thoroughly clean the shower space:
- Remove all personal items, such as shampoo bottles and soap dishes, from the shower area.
- Use a mild, non-abrasive cleaner and warm water to scrub the walls and floor of the shower. Ensure that all surfaces are thoroughly cleaned, including corners and crevices.
- Rinse the walls and floor with clean water to remove any residue from the cleaning solution.
- Dry the shower space with a clean towel or allow it to air dry completely.
Note: It is important to avoid using harsh chemicals or abrasive scrubbers, as these can damage the shower walls or floor. Stick to gentle cleaning solutions and soft cleaning tools to ensure the longevity of your shower area.
Ensure the walls and floor are in good condition for installation
In addition to cleaning the shower space, it is vital to assess the condition of the walls and floor before installing shower glass panels. This step ensures that the installation process goes smoothly and that the glass panels are securely fixed.
Here are some key points to consider when assessing the walls and floor:
- Wall condition:
- Inspect the walls for any signs of damage, such as cracks, loose tiles, or mold/mildew growth. If any issues are detected, repair or address them before proceeding with the installation.
- Floor condition:
- Check the floor for stability and any signs of water damage. Ensure that the floor is level and free from any moisture issues. If necessary, repair or reinforce the floor to provide a solid foundation for the glass panels.
Note: If you are unsure about the condition of the walls or floor, it is recommended to consult a professional for a thorough assessment and necessary repairs. This will help prevent any future issues and ensure the longevity of your shower glass panels.
Installing The Shower Glass Panels
When it comes to transforming your bathroom into a sleek and modern oasis, installing shower glass panels is the way to go. Not only do they create an open and spacious look, but they also provide a barrier to keep water from splashing out of the shower area. While the idea of installing glass panels may seem intimidating, with the right tools and a step-by-step guide, you can easily complete the installation process. In this post, we will walk you through the installation steps, starting with the bottom track installation.
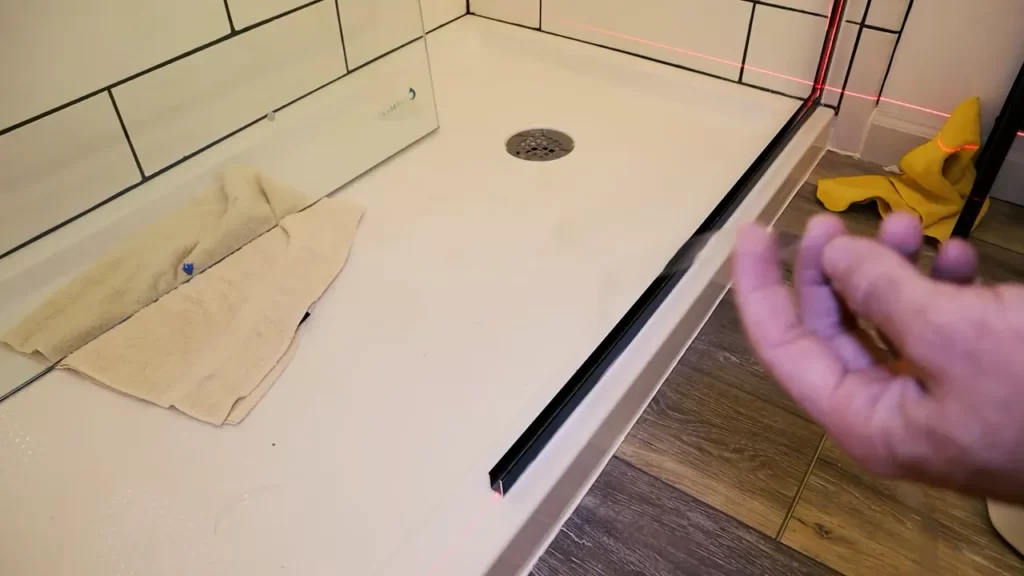
Start with the bottom track installation
To begin the installation process, you need to start by installing the bottom track. This track will serve as the foundation for the shower glass panels. You will want to ensure that the track is level and properly aligned with the shower tray or floor. Here’s a step-by-step breakdown of how to install the bottom track:
- Measure and mark the placement of the bottom track on the shower floor or tray.
- Apply a thin bead of silicone adhesive along the marked line.
- Place the bottom track onto the adhesive, making sure it aligns properly with the marks.
- Use a level to double-check that the track is perfectly level.
- Allow the adhesive to dry according to the manufacturer’s instructions before moving on to the next step.
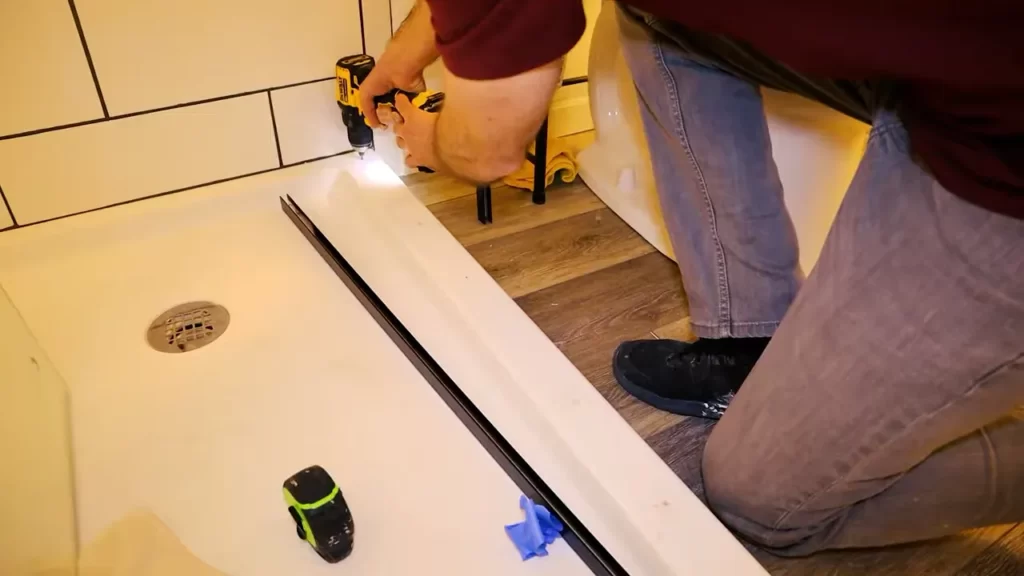
Attach the side panels to the track
With the bottom track securely in place, it’s time to attach the side panels. The side panels will be inserted into the track and secured using screws or clips, depending on the style of your shower glass panels. Here’s how to attach the side panels:
- Insert the side panels into the bottom track, ensuring they fit snugly.
- Secure the panels to the track using screws or clips, following the manufacturer’s instructions.
- Check that the panels are level and align perfectly with the bottom track.
Secure the top track and align the panels
Once the side panels are in place, it’s time to secure the top track and align the panels. The top track will provide additional support and stability for the shower glass panels. Here’s what you need to do:
- Measure and mark the placement of the top track on the walls.
- Apply a thin bead of silicone adhesive along the marked lines.
- Place the top track onto the adhesive, making sure it aligns perfectly with the marks.
- Double-check that the panels are level and align properly with the top track.
- Allow the adhesive to dry completely before proceeding.
Install door hinges or handles, if applicable
If your shower glass panels include a door, it’s important to install door hinges or handles to complete the installation. Door hinges or handles will allow for easy opening and closing of the shower door. Here’s how to install door hinges or handles:
- Mark the placement of the door hinges or handles on the glass panels.
- Drill holes in the glass panels according to the marked placements.
- Attach the door hinges or handles to the glass panels using the appropriate hardware.
- Ensure that the door hinges or handles are securely attached and allow for smooth movement of the door.
With the shower glass panels installed and door hinges or handles in place, you have successfully completed the installation process. It’s important to follow these steps carefully and consult the manufacturer’s instructions for any specific requirements or recommendations. By installing shower glass panels yourself, you can achieve a stylish and functional shower that adds value to your bathroom.
Sealing And Finishing Touches
After successfully installing your shower glass panels, it’s time to focus on the crucial step of sealing and adding the finishing touches. This stage ensures that your glass panels are secure and leak-free, while also enhancing their aesthetic appeal. Let’s dive into the steps involved in sealing and finishing your shower glass panels.
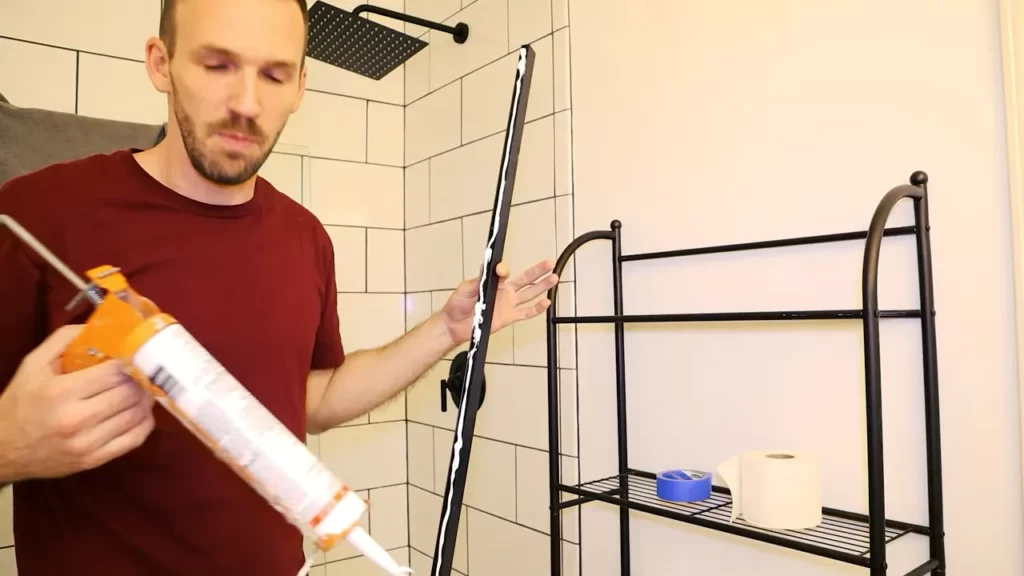
Apply sealant and caulking around the glass panels
The first step in achieving a tight seal for your shower glass panels is to apply sealant and caulking. This helps to prevent water from seeping through any gaps between the glass and the surrounding surfaces. Take the following steps to ensure a proper seal:
- Thoroughly clean the area around the glass panels to remove any dirt, dust, or residue. This will ensure a better bond between the sealant and the surfaces.
- Apply a bead of high-quality silicone sealant along the edges of the glass panels. Be sure to cover any gaps or openings completely.
- Smooth out the sealant using a caulking tool or your finger to create a neat and even finish.
By applying sealant and caulking, you not only enhance the water resistance of your shower enclosure but also provide a barrier against mold and mildew.
Check for any gaps or leaks
Once the sealant has been applied and dried, carefully inspect the glass panels for any remaining gaps or potential leaks. Pay close attention to corners, joints, and edges, as these areas are more prone to problems. Here are a few steps to assist you in this process:
- Run a finger along the sealed edges to feel for any unevenness or gaps. If you detect any, reapply sealant as necessary.
- Perform a water test by spraying water directly at the glass panels. Observe closely for any signs of leakage.
- If you notice any leaks, it’s important to address them promptly. Reapply sealant or consult a professional if needed.
Regularly checking for gaps or leaks ensures that your shower glass panels remain functional and maintain their structural integrity over time.
Clean and polish the glass surfaces for a professional finish
Now that the sealing is complete, it’s time to give your shower glass panels a final touch of perfection. Cleaning and polishing the glass surfaces not only enhances their appearance but also helps to maintain their clarity and shine. Follow these steps for a professional finish:
- Use a non-abrasive glass cleaner to remove any residue, soap scum, or water spots from the glass surfaces.
- Wipe the glass panels dry with a lint-free cloth or squeegee to prevent streaks or water spots.
- Apply a glass polish or protective coating to create a barrier against future water stains and mineral deposits.
Regularly cleaning and polishing your shower glass panels will keep them looking pristine and ensure they remain a focal point of your bathroom.
By following these steps, you can successfully seal and add the finishing touches to your shower glass panels. Remember, proper sealing and regular maintenance will help prolong the lifespan of your glass panels, providing you with a functional and visually appealing shower enclosure for years to come.
Maintaining And Cleaning The Glass Panels
Keeping your shower glass panels clean and well-maintained is essential to not only preserve their aesthetic appeal but also to prolong their lifespan. Regular cleaning and proper maintenance practices ensure that your shower remains a sparkling oasis, free from dirt, grime, and unsightly stains. In this section, we will discuss effective cleaning techniques for shower glass and provide you with valuable tips on maintaining your panels for long-lasting beauty and functionality.
Learn effective cleaning techniques for shower glass
To keep your shower glass panels looking their best, follow these tried-and-true cleaning techniques:
- Start by rinsing the glass with warm water to remove any loose dirt or residue.
- Use a non-abrasive, mild glass cleaner specifically designed for shower glass. Avoid using harsh chemicals or abrasive cleaners as they can damage the glass surface.
- Apply the glass cleaner onto a soft, lint-free cloth or sponge.
- Gently wipe the glass surface in a circular motion, ensuring you cover all areas.
- For stubborn stains or mineral deposits, you can create a homemade solution by mixing equal parts white vinegar and water. Apply the solution on the affected areas, let it sit for a few minutes, and then wipe it off with a clean cloth.
- For hard-to-reach spots such as corners or crevices, use a soft-bristle brush or an old toothbrush to gently scrub away any residue.
Remember to thoroughly rinse the glass with warm water after cleaning to remove any cleaning solution residue, and then wipe it dry with a clean, lint-free cloth to prevent water spots.
Use proper maintenance practices to prolong the lifespan of your panels
While regular cleaning is essential, proper maintenance practices can greatly extend the lifespan of your shower glass panels. Here are some tips to keep in mind:
- After each use, wipe down the glass panels with a squeegee or a microfiber cloth to remove excess water and prevent the buildup of water spots.
- Regularly check the shower door seals and hinges for any signs of damage or wear. Replace any worn-out seals or hinges promptly to prevent water leakage and ensure the longevity of your panels.
- Avoid using abrasive scrubbers or harsh cleaning tools that can scratch or damage the glass surface. Stick to soft, non-abrasive materials for cleaning.
- If you have hard water, consider installing a water softener or using a water conditioner to minimize mineral deposits and stains on your glass panels.
- Inspect the tracks and rollers of sliding shower doors regularly and clean them to remove any dirt or debris that may hinder smooth operation.
Incorporating these cleaning and maintenance practices into your routine will not only keep your shower glass panels looking their best but also ensure they remain in excellent condition for years to come.
Troubleshooting Common Installation Issues
Installing shower glass panels can add a touch of elegance to any bathroom. However, even with careful installation, things may not always go as planned. In this section, we will address some common installation issues that may arise and provide solutions to help you overcome them.
Addressing alignment problems
One of the most common issues with shower glass panel installation is improper alignment. This can lead to uneven gaps or a misfit between the glass panels and surrounding fixtures. To address this problem, follow these steps:
- Check if the surrounding walls and floor are perfectly perpendicular and level. Use a level and measuring tape to ensure accuracy.
- If you notice any discrepancies, use shims or adjustable spacers to fix the misalignment. Place them strategically between the glass panels and the surrounding walls or floor to achieve proper alignment.
- Make sure to tighten the screws or brackets securely after adjusting the alignment. This will help maintain the desired position of the glass panels.
Dealing with leaks and water damage
A shower glass panel that leaks can be frustrating and can lead to water damage if not addressed promptly. Here’s what you can do to prevent leaks:
- Inspect the edges of the glass panels for any gaps or cracks that may be allowing water to escape. If you spot any, apply a bead of clear silicone caulk to seal the gaps.
- Ensure that the shower door sweep or seal at the bottom is intact and provides a tight seal when the door is closed. Replace it if necessary.
- Check the hinges and brackets for any loose screws or fittings. Tighten them as needed to prevent water from seeping through.
- If the leakage persists, consider consulting a professional to assess the installation and provide a more thorough solution.
Fixing loose or unstable glass panels
Having loose or unstable shower glass panels can be a safety hazard. Take these steps to ensure stability:
- Inspect the brackets or hinges securing the glass panels. If you find any loose screws or fittings, tighten them with an appropriate tool.
- If the glass panels still feel unstable, consider adding support in the form of metal braces or anchors attached to the surrounding walls or floor.
- Reevaluate the weight-bearing capacity of the existing support structures. Additional reinforcement might be necessary, especially for larger or heavier glass panels.
By addressing these common installation issues, you can ensure a secure and visually appealing shower glass panel setup in your bathroom. If you encounter any difficulties or have concerns, it’s always advisable to consult a professional for assistance. Now that you’re equipped with these troubleshooting solutions, you can confidently tackle any problems that may arise during the installation process.
Frequently Asked Questions
What Holds Shower Glass In Place?
The shower glass is held in place by a combination of brackets, hinges, and silicone sealant. These components ensure stability and prevent the glass from sliding or falling. Silicone sealant secures the edges of the glass and creates a watertight seal.
Can You Install Shower Glass Yourself?
Yes, you can install shower glass yourself. It’s important to carefully follow installation instructions and ensure proper measurements. Invest in quality materials and tools for a successful installation. However, it’s recommended to hire a professional for complex installations or if you’re unsure of your DIY skills.
Does Shower Glass Need A Stud?
No, shower glass does not need a stud. It can be installed directly to the wall using specialized brackets or hardware designed for shower glass.
How Do You Seal Frameless Glass Shower Panels?
To seal frameless glass shower panels, apply a high-quality silicone sealant around the edges. Ensure the surface is clean and dry before application. Smooth the sealant with a caulking tool for a neat finish. Let it dry for 24 hours before using the shower.
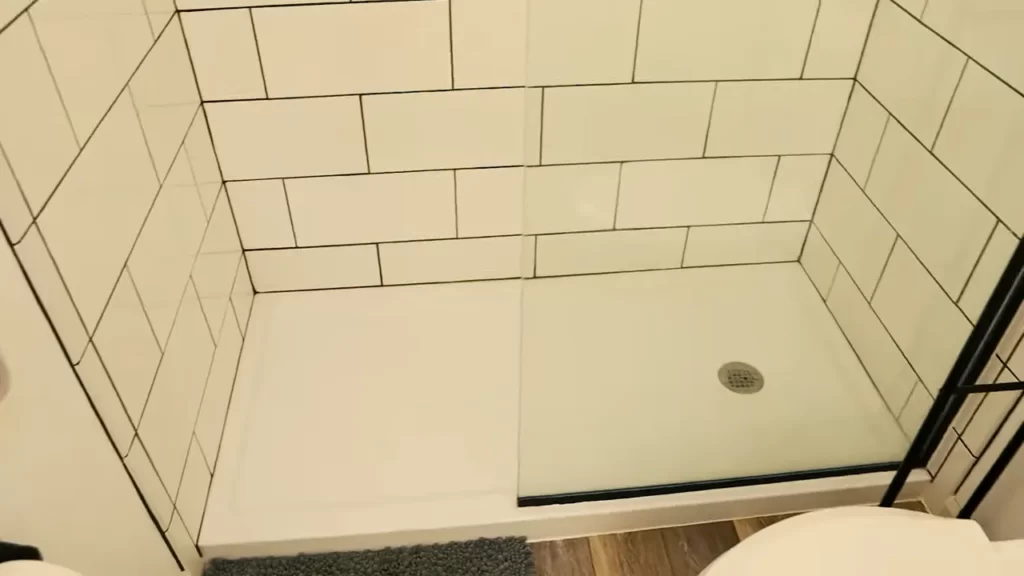
Conclusion
Installing shower glass panels is a great way to elevate the look and functionality of your bathroom. By following the step-by-step guide provided in this blog post, you can easily install these panels on your own. With its sleek design and transparency, shower glass panels create a modern and spacious atmosphere in your bathroom.
Plus, they are easy to clean and maintain. Upgrade your bathroom today and enjoy the benefits of shower glass panels.