
To install a shower drain in the basement, follow this procedure: clear the area where the drain will be placed, cut a hole in the floor for the drain, connect the drain pipes to the main sewage line, and secure the drain body in place. This will ensure proper drainage for your basement shower.
A shower drain is an essential component of a basement bathroom. Whether you’re planning to convert your basement into a full bathroom or simply adding a shower to an existing space, installing a shower drain is an important step. We will guide you through the process of installing a shower drain in the basement.
By following these steps, you will have a fully functional and efficient drainage system in your basement shower. Let’s get started!
Understanding The Importance Of A Properly Installed Basement Shower Drain
Understanding the Importance of a Properly Installed Basement Shower Drain
When it comes to installing a shower drain in your basement, getting it right is crucial. A properly installed basement shower drain plays a vital role in maintaining the functionality and longevity of your plumbing system. In this section, we will delve into the importance of a functional basement shower drain, the potential issues that may arise from a poorly installed drain, and the benefits of having a properly installed drain for your basement showers.
H3: Importance of a Functional Basement Shower Drain
Having a functional basement shower drain is essential for several reasons. Let’s explore some of the key reasons why it is crucial to invest in a proper installation:
1. Prevents water damage: A properly installed basement shower drain efficiently channels water away from your home’s foundation, preventing any potential water damage. This is particularly important in basements, where excess moisture can lead to mold growth and structural issues over time.
2. Maintains proper drainage: A functional shower drain ensures that water flows smoothly down the drain, preventing any standing water in your shower area. This not only keeps your basement dry but also helps to maintain the overall hygiene and cleanliness of the space.
3. Preserves the structural integrity: By effectively directing water away from your basement, a properly installed shower drain helps in preserving the structural integrity of your home. Moisture-related issues, such as foundation cracks and wood rot, can be avoided, saving you from expensive repairs down the line.
H3: Potential Issues with a Poorly Installed Drain
On the other end of the spectrum, a poorly installed basement shower drain can lead to a host of problems. Here are some potential issues that may arise:
1. Clogging and backups: Improper installation may result in a drain that is prone to clogging and backups. This can cause water to overflow into your basement, leading to damage and inconvenience.
2. Mold and mildew growth: If water isn’t efficiently drained away, it can create a damp environment that promotes the growth of mold and mildew. This not only poses health risks but can also cause a foul odor in your basement.
3. Structural damage: A poorly installed drain may fail to protect your basement from water intrusion. Over time, this can cause significant structural damage, including foundation cracks, compromised walls, and weakened flooring.
H3: Benefits of a Properly Installed Drain for Basement Showers
Investing in a properly installed basement shower drain brings numerous benefits. Here’s what you can expect:
1. Long-term durability: A well-executed installation ensures that your basement shower drain functions optimally for years to come. You can have peace of mind knowing that your plumbing system is built to last.
2. Improved comfort and safety: With a properly installed drain, you can enjoy a comfortable and safe showering experience in your basement. No more worrying about slippery surfaces or the inconvenience of stagnant water.
3. Increased property value: When potential buyers see a properly installed basement shower drain, it signals that the property has been well-maintained and cared for. This can greatly enhance the overall value of your home.
In conclusion, understanding the importance of a properly installed basement shower drain is crucial for maintaining a functional and safe basement space. By avoiding potential issues that arise from a poorly installed drain and enjoying the benefits of a properly installed one, you can ensure the long-term durability and value of your property. So, make sure to invest in a professional installation to safeguard your basement from unnecessary damages and enjoy worry-free showers.
Preparing For The Installation Process
In order to successfully install a shower drain in your basement, it is important to properly prepare for the installation process. This involves assessing the location and layout of the basement shower, gathering the necessary tools and materials, and clearing the area while ensuring proper ventilation. By following these steps, you can ensure a smooth and efficient installation.
Assessing the Location and Layout of the Basement Shower
Prior to starting the installation process, it is important to assess the location and layout of the basement shower. Take note of the size and shape of the shower area, as well as any existing plumbing or drainage systems. This information will help you determine the best location for the shower drain and ensure that it aligns with the overall design of the space.
Gathering the Necessary Tools and Materials
Next, gather all the necessary tools and materials for the installation. Some of the common tools you may need include a wrench, pliers, a utility knife, and a tape measure. Additionally, you will need materials such as a shower drain kit, PVC piping, cement, and silicone caulk. Ensuring you have all the required tools and materials beforehand will help streamline the installation process and prevent unnecessary delays.
Clearing the Area and Ensuring Proper Ventilation
Before beginning the installation, it is crucial to clear the area surrounding the basement shower. Remove any obstacles or debris that may hinder the installation process. Additionally, ensure that the area is well-ventilated to prevent the accumulation of moisture, which can lead to mold and mildew problems. Opening windows, using fans, or even installing a dehumidifier can help promote proper ventilation during the installation process.
Step-By-Step Guide To Installing A Basement Shower Drain
Installing a shower drain in your basement is a crucial step in creating a functional bathroom space. Whether you’re converting your basement into a guest suite or adding a bathroom for convenience, the installation process can be overwhelming if you’re not familiar with plumbing. In this step-by-step guide, we will walk you through the process of installing a basement shower drain to ensure a secure fit and prevent any potential leaks. Let’s get started!
Removing the existing drain (if applicable)
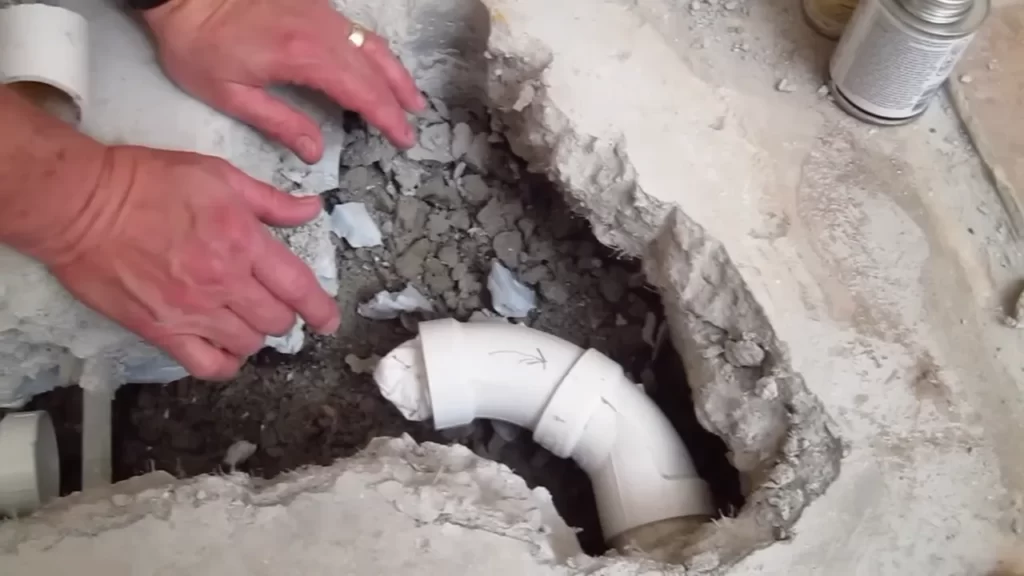
If you already have an existing drain in your basement, you’ll need to remove it before proceeding with the installation. Start by locating the drain and using a drain wrench to unscrew the drain cover. Once the cover is removed, use a pair of pliers or a drain key to unscrew the drain from the drainpipe. Make sure to clean the drainpipe thoroughly to remove any debris that may have accumulated over time. This will ensure a smooth installation process.
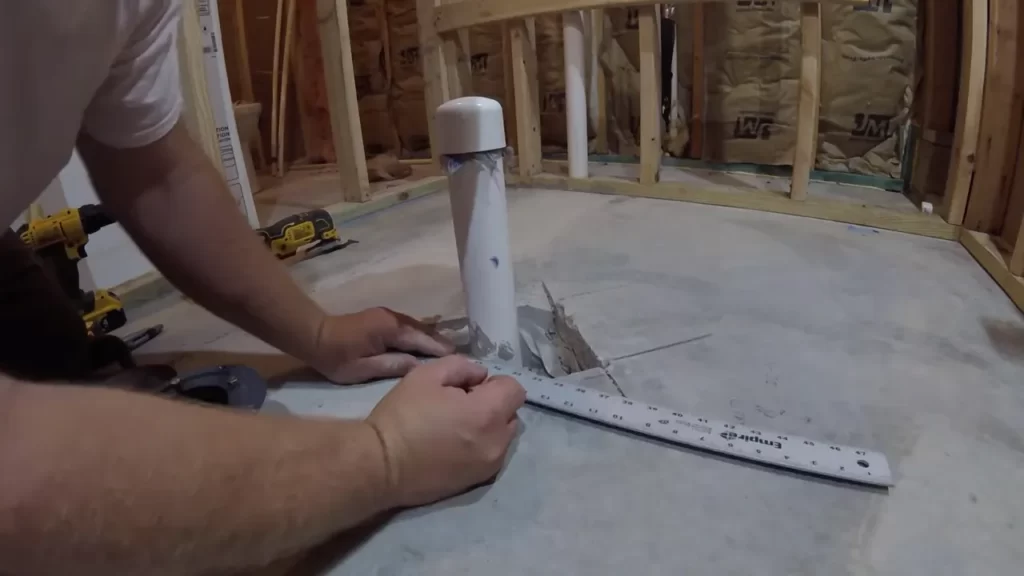
Preparing the basement floor for installation
Before installing the new drain, it’s essential to prepare the basement floor to ensure a proper fit and prevent any future issues. Start by cleaning the area where the drain will be installed, removing any dirt, dust, or debris. Next, use a level to check if the floor is level. If there are any uneven areas, you may need to use a leveling compound to create a smooth surface. This will help prevent water from pooling around the drain and causing potential leaks or damage.
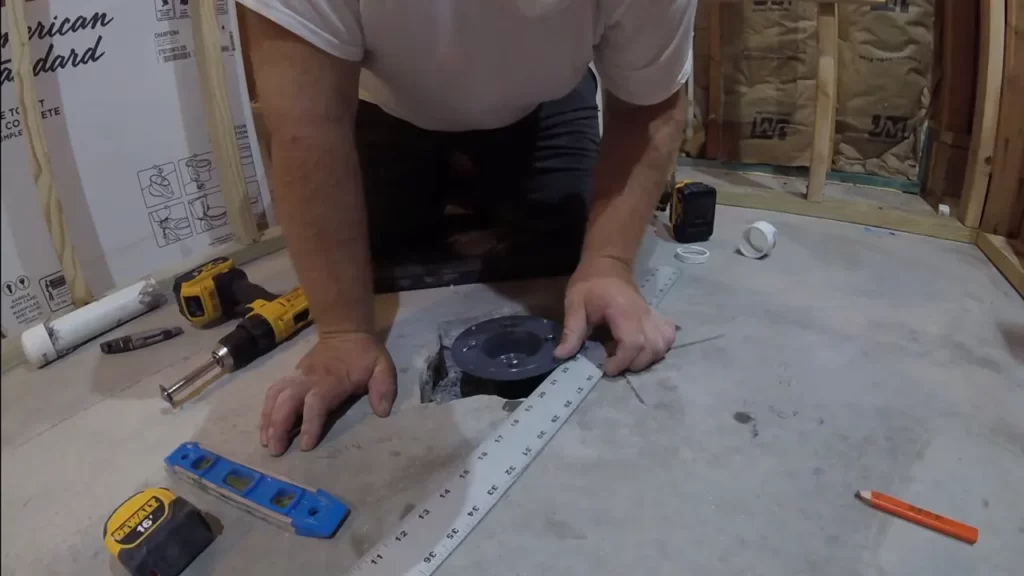
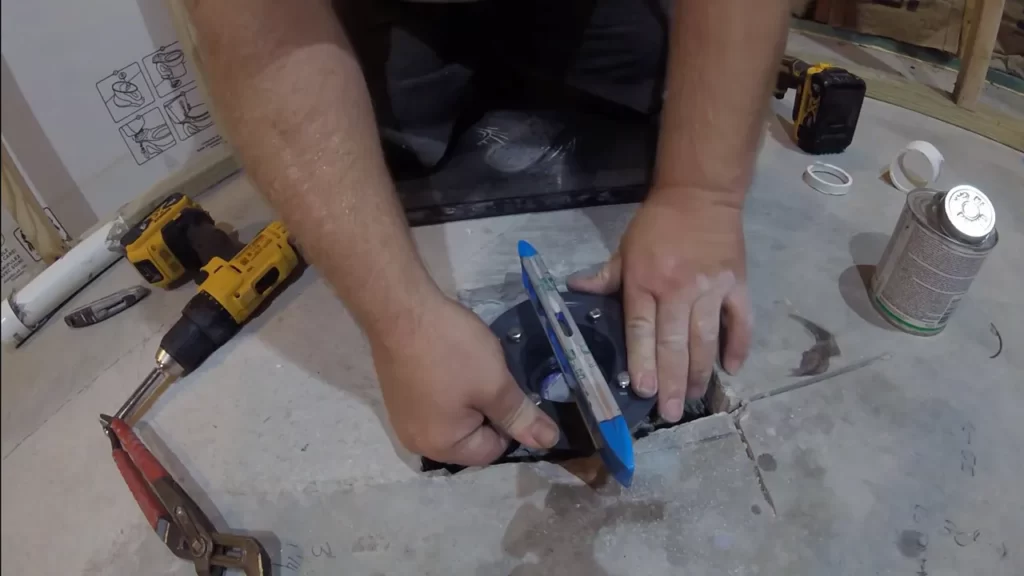
Installing the drain base and connecting it to the plumbing
Now that the floor is prepared, it’s time to install the drain base and connect it to the plumbing. Start by placing the drain base onto the cleaned floor and aligning it with the drainpipe. Use a wrench to tighten the connection, ensuring a secure fit. Once the drain base is in place, connect the drainpipe to the plumbing system. You may need to adjust or extend the drainpipe to ensure a proper connection. Use a pipe wrench or pliers to tighten the connections securely.
Attaching the shower pan and ensuring a secure fit
With the drain base and plumbing connections in place, it’s time to attach the shower pan. Start by placing the shower pan onto the drain base, making sure it fits securely and evenly. Use a level to double-check that the shower pan is level in all directions. If it’s not, you may need to adjust the shower pan or the drain base to create a level surface. Once the shower pan is properly aligned and level, use screws or clips to secure it to the drain base, ensuring a tight and secure fit.
Testing for leaks and addressing any issues
Once the installation is complete, it’s important to test the drain for any potential leaks or issues. Fill a bucket or container with water and pour it directly into the shower pan. Observe if the water drains properly and check for any signs of leaks around the drain or plumbing connections. If you notice any leaks, tighten the connections or apply plumber’s tape as needed. Repeat the test until you are confident that there are no leaks or issues with the drain.
Congratulations! You have successfully installed a shower drain in your basement. By following this step-by-step guide, you can ensure a secure and leak-free installation, creating a functional and convenient bathroom space in your basement.
Troubleshooting Common Challenges During Installation
While installing a shower drain in the basement can be a rewarding DIY project, it’s not without its challenges. To help you navigate through the process smoothly, we have identified some common issues that you might encounter during installation and how to troubleshoot them.
Dealing with uneven basement floors
Uneven basement floors can make the installation of a shower drain more challenging. To tackle this issue, you have a few options:
- Use a self-leveling compound: A self-leveling compound can help create a flat and even surface for the shower drain installation. Follow the manufacturer’s instructions to apply the compound and ensure a leveled base for your drain.
- Adjust the drain flange: If the floor is slightly uneven, you can try adjusting the drain flange. Loosen the screws securing the flange and use shims to level it. Once the flange is level, tighten the screws to secure it in place.
Addressing plumbing connection problems
When installing a shower drain in the basement, you may encounter plumbing connection problems. Here’s how to troubleshoot them:
- Check for leaks: After connecting the drain to the main plumbing line, test for any leaks. Use a flashlight to inspect the connections and look for any signs of water leakage. If you spot any leaks, tighten the connections or replace any faulty parts.
- Ensure proper alignment: Improper alignment of the plumbing connections can cause leaks and other issues. Make sure the pipes are aligned correctly and tightly fastened using the appropriate fittings. If necessary, use thread seal tape or plumbing putty to create a watertight seal.
Resolving issues with the shower pan and drain alignment
Aligning the shower pan and drain correctly is crucial for proper drainage. If you encounter alignment issues during installation, follow these troubleshooting steps:
- Verify the measurements: Double-check your measurements to ensure that the shower pan and drain align perfectly. Measure and remeasure the distance between the walls and the drain to ensure accuracy.
- Make necessary adjustments: If the drain and the shower pan do not align, you may need to make some adjustments. Loosen the fasteners holding the shower pan in place and carefully reposition it until it aligns with the drain. Once aligned, secure the shower pan using the appropriate fasteners.
By addressing these common challenges during the installation process, you can ensure a successful and hassle-free installation of a shower drain in your basement.
Proper Maintenance For A Basement Shower Drain
Proper maintenance is key to ensure that your basement shower drain functions effectively and avoids any costly repairs down the line. By implementing regular cleaning and maintenance routines, preventing clogs and blockages, and being aware of potential problems, you can keep your basement shower drain in top-notch condition.
Regular cleaning and maintenance routines
Keeping your basement shower drain clean is essential for optimal functionality. By incorporating simple cleaning routines into your weekly or monthly schedule, you can prevent the build-up of soap scum, hair, and other debris that can lead to clogs and blockages. Here are a few tips to help you maintain a clean shower drain:
- Use a drain strainer to catch hair and other large particles before they enter the drain.
- Pour boiling water down the drain regularly to dissolve any accumulated soap scum.
- Once a month, flush the drain with a mixture of baking soda and vinegar to eliminate odors and remove any stubborn clogs.
By following these simple steps, you can keep your basement shower drain free-flowing and prevent the need for costly repairs.
Preventing clogs and blockages
Prevention is always better than cure, and this applies to your basement shower drain as well. By taking proactive measures to prevent clogs and blockages, you can save yourself from the inconvenience and expense of dealing with a backed-up drain. Here are a few preventive measures to consider:
- Avoid pouring grease, oils, and food scraps down the drain, as these can solidify and cause blockages.
- Regularly clean the drain strainer to remove any accumulated debris.
- Teach family members to minimize the amount of hair and other residues that go down the drain.
The key is to be mindful of what goes down your basement shower drain and taking steps to prevent potential clogs. By doing so, you can maintain a smooth and functional drain system.
Signs of potential problems and when to seek professional help
Being aware of the signs of potential problems with your basement shower drain is crucial for timely intervention and preventing further damage. Here are a few common signs that indicate potential issues:
| Signs of Potential Problems | When to Seek Professional Help |
| Slow draining | If simple cleaning methods don’t alleviate the issue. |
| Unpleasant odors | If the smell persists even after thorough cleaning. |
| Gurgling noises | If strange noises occur when the shower is in use. |
| Overflow or backups | If water starts to back up or overflows from the drain. |
If you notice any of these signs, it’s essential to seek professional help from a plumber experienced in dealing with basement shower drain issues. They can identify the underlying problem and provide appropriate solutions to keep your drain running smoothly.
Remember, proper maintenance and timely intervention are key to ensuring a functional basement shower drain. By incorporating regular cleaning and maintenance routines, taking preventive measures, and being aware of potential problems, you can keep your basement shower drain in top condition for years to come.
Enhancing The Functionality And Aesthetics Of A Basement Shower
Enhancing the functionality and aesthetics of a basement shower is crucial for creating a comfortable and inviting space. When it comes to installing a shower drain in the basement, there are a few additional considerations to ensure the shower functions properly and enhances the overall appeal of the space.
Adding additional features like a waterproofing membrane:
When installing a shower drain in the basement, it is important to incorporate a waterproofing membrane. This membrane acts as a protective barrier, preventing water from seeping into the surrounding areas and causing damage. By adding this extra layer of protection, you can ensure that your basement shower remains dry and free from any potential issues.
Incorporating stylish and functional shower fixtures:
Another way to enhance the functionality and aesthetics of a basement shower is by choosing stylish and functional shower fixtures. Whether it’s a sleek rain showerhead or a handheld sprayer with various settings, the right fixtures can greatly improve your showering experience. Additionally, consider the finish of the fixtures to match the overall design of your basement, creating a cohesive and visually appealing space.
Considering safety measures for basement showers:
Safety should always be a top priority when installing a shower drain in the basement. To ensure the safety of everyone using the shower, consider installing grab bars and non-slip flooring. These measures provide stability and reduce the risk of slips and falls. Additionally, make sure there is proper ventilation in the basement shower area to prevent the buildup of moisture and the growth of mold and mildew.
Frequently Asked Questions
Installing a shower drain in the basement can be a complex task, but with the right guidance and knowledge, it can be a successful DIY project. In this section, we will address some frequently asked questions about installing a basement shower drain to help you navigate the process smoothly.
Q1: Can I install a basement shower drain myself?
Yes, you can certainly install a basement shower drain yourself. However, it is important to note that this task requires a fair amount of plumbing knowledge and skills. If you are confident in your abilities and have experience with plumbing projects, then this can be a rewarding DIY endeavor. However, if you are uncertain or lack the necessary expertise, it is always best to consult a professional plumber to ensure the installation is done correctly.
Q2: What types of drains are suitable for basement showers?
When it comes to choosing a drain for your basement shower, there are a few options to consider. The most common types of drains suitable for basement showers include:
- Traditional floor drains: These are the most common type of drain used in basement showers. They are installed flush with the floor and allow water to drain directly into the plumbing system.
- Linear drains: Linear drains are becoming increasingly popular due to their sleek and modern design. They are long, narrow drains placed against one wall or along with the shower entrance. Linear drains are an excellent choice if you want to create a seamless and minimalist look in your basement shower.
- Point drains: Point drains, also known as spot drains, are small drains placed in specific areas of the shower floor. They are practical for showers with a slope or multiple showerheads, as they help to efficiently collect water in targeted areas.
Q3: How long does it typically take to install a basement shower drain?
The time required to install a basement shower drain can vary depending on several factors, such as the complexity of the installation, the chosen drain type, and your plumbing skills. On average, it may take several hours to a day to complete the installation process. It is recommended to set aside ample time for the project to ensure a thorough and accurate installation. Remember, it is better to take your time and do the job right rather than rushing through it and potentially encountering issues later on.
Frequently Asked Questions
How Much Does It Cost To Install A Shower Drain In A Basement?
The cost of installing a shower drain in a basement can vary depending on factors such as the location, complexity of the installation, and materials used. It’s best to consult with a professional plumber for an accurate estimate.
Can I Put A Shower Drain In Concrete Floor?
Yes, you can install a shower drain in a concrete floor.
How Do You Install A Shower Drain Without Breaking Concrete?
To install a shower drain without breaking concrete, follow these steps: 1. Use a specialized shower drain installation kit. 2. Locate and mark the desired drain location on the concrete floor. 3. Cut a hole in the concrete using a concrete saw or drill.
4. Attach the drain assembly to the pipe beneath the concrete. 5. Securely fasten the drain assembly and apply waterproofing materials before tiling.
Can A Basement Drain Be Used For A Shower Drain?
No, a basement drain is not intended to be used as a shower drain. Basements drains are typically designed for sewage and water runoff from utilities and plumbing fixtures, while shower drains are specifically made to handle the flow of water and prevent clogs.
Conclusion
Installing a shower drain in your basement can be a straightforward process with the right tools and guidance. By following the step-by-step instructions in this blog post, you can ensure a proper and functional installation. Remember to carefully plan the layout, choose the appropriate drain system, and properly seal the connections.
Taking the time to install a shower drain correctly will provide you with a reliable and efficient drainage system for years to come.