
To install a shower door, measure the opening and purchase a door that fits those dimensions. Then, follow the manufacturer’s instructions to secure the frame and attach the door panels.
Gather The Necessary Tools And Materials
Before you embark on the task of installing a shower door, it’s important to ensure that you have all the necessary tools and materials on hand. This will not only make your installation process smoother but also save you time and frustration. Here’s a list of essential tools and required materials you’ll need to gather:
List of essential tools
Having the right tools will make all the difference when it comes to installing your shower door. Here are the essential tools you’ll need:
- Measuring tape
- Screwdriver (Phillips and flathead)
- Level
- Drill
- Hacksaw
- Utility knife
- Caulking gun
- Hammer
- Adjustable wrench
Make sure you have these tools ready to go before you begin the installation process. It’s always better to be well-prepared.
List of required materials
In addition to the essential tools, you’ll also need a few materials to complete the installation of your shower door. Here’s a list of the required materials:
- Shower door kit (including the door and frame)
- Mounting hardware
- Sealant
- Shims
- Screws
- Plastic anchors
- Masking tape
Having these materials ready will ensure that you can proceed with the installation without any interruptions. Double-check your list to make sure you have everything you need.

Measure And Prepare The Shower Area
Before installing a shower door, it is crucial to measure and prepare the shower area properly. Taking accurate measurements will ensure that the shower door fits perfectly and functions as intended. Additionally, removing any existing shower hardware, if necessary, will create a clean and blank canvas for the new shower door installation.
Accurate measurement of the shower area
The first step in preparing the shower area is to measure it accurately. This will help determine the appropriate size for your new shower door. To obtain precise measurements, follow these steps:
- Measure the width: Start by measuring the width of the shower area. Use a tape measure to measure the distance between both sides of the shower opening. Take the measurement at the top, middle, and bottom of the opening and note down the narrowest width.
- Measure the height: Next, measure the height of the shower area. Use the tape measure to measure the distance from the top of the shower curb or base to the ceiling. Again, take measurements at various points along the height and record the shortest measurement.
- Check for any irregularities: It is important to look out for any irregularities in the shower area. Check if the walls or floor are slanted or uneven, as this can affect the measurements and the installation process. Make a note of any discrepancies or issues you come across.
Removal of existing shower hardware, if necessary
If you have any existing shower hardware, such as a shower curtain rod or old shower door, it needs to be removed before installing a new shower door. Follow these steps to ensure a clean and smooth removal process:
- Gather the necessary tools: Before starting the removal process, gather the tools you will need. This may include a screwdriver, pliers, or an adjustable wrench, depending on the type of hardware.
- Inspect the hardware: Thoroughly examine the existing shower hardware to determine the method of removal. Look for screws, brackets, or other fastening mechanisms.
- Uninstall the hardware: Using the appropriate tools, begin removing the hardware by unscrewing or unclipping it. Take care to support any heavy or large pieces while removing them to prevent damage or injury.
- Store or dispose of the hardware: Once the hardware is removed, determine whether it can be reused or needs to be disposed of. If it is still in good condition, store it safely for future use. If it is damaged or no longer needed, dispose of it responsibly.
By accurately measuring the shower area and removing any existing shower hardware, you are well on your way to a successful shower door installation. These preliminary steps lay the foundation for a seamless and aesthetically pleasing final result.

Pre-Installation Preparation
Before you start the process of installing your shower door, it’s vital to prepare the shower area to ensure a smooth and successful installation. This involves some essential steps, such as cleaning the shower area and adjusting the shower opening if necessary. By following these pre-installation preparation steps, you’ll set the foundation for a flawless installation and enjoy your new shower door for years to come.
Cleaning the Shower Area
Before installing your shower door, it’s important to thoroughly clean the shower area. This will ensure proper adhesion and make the installation process easier. Start by removing any existing shower doors or curtains, as well as any bathroom accessories that might obstruct the installation.
Next, clean the entire shower area using a mild cleaner or a mixture of warm water and vinegar. Wipe down the walls, floor, and corners to remove any soap scum, mold, or dirt. This will provide a clean surface for the shower door to adhere to and prevent any potential issues down the line.
Adjusting the Shower Opening, if Needed
One crucial step in the pre-installation preparation is adjusting the shower opening to ensure it fits the dimensions of the shower door. Proper measurements are essential to avoid any gaps or misalignments.
Start by measuring the height and width of the shower opening using a tape measure. Compare these measurements to the dimensions of the shower door you plan to install. If necessary, adjust the shower opening by trimming or adding material to ensure a perfect fit.
It’s important to note that the adjustment process may require special tools or professional assistance, especially if you’re dealing with a complex installation. In such cases, it’s wise to consult a professional to ensure accurate adjustments and avoid any potential damage to the shower area or the shower door itself.
By thoroughly cleaning the shower area and adjusting the shower opening as needed, your pre-installation preparation will be complete. These steps will help you create a clean and suitable surface for your new shower door and ensure a smooth installation process. Once your pre-installation preparation is complete, you can move on to the next steps of installing the shower door.

Assembling The Shower Door Components
Once you have successfully prepared your shower space for installation, it’s time to start putting together the shower door components. This step is crucial to ensure proper functionality and long-lasting performance of your new shower door. Follow this step-by-step guide to efficiently assemble the components and create a stunning shower enclosure.
Organize and Identify all the Shower Door Components
The first step in assembling your shower door is to organize and identify all the components. This will save you time and avoid confusion during the installation process. Lay out all the parts on a clean, flat surface and cross-reference them with the provided instruction manual or guide. Take a moment to inspect each component for any visible damage or defects, and if necessary, notify the manufacturer for replacement parts.
Some common shower door components you might encounter include:
| Component | Quantity |
|---|---|
| Glass panels | 2 |
| Door frame | 1 |
| Hinges | 2 |
| Handles | 2 |
| Screws | Various |
Having a clear understanding of the components will help you assemble the shower door correctly and avoid any unnecessary delays or mistakes.
Step-by-Step Guide to Assembling the Shower Door
- Start by positioning the door frame in the desired location within the shower opening. Ensure that it is level and plumb using a measuring tape and a spirit level.
- Attach the hinges to the designated locations on the door frame. Use the provided screws to secure the hinges firmly in place.
- Next, carefully align the glass panels with the door frame and gently slide them into position. Be cautious not to exert excessive force or cause any damage to the glass.
- Once the glass panels are properly aligned, attach the handles to the designated locations on the door frame. Again, use the provided screws to secure the handles firmly.
- Double-check that all the components are securely fastened before proceeding further. Tighten any loose screws or connections, if needed.
- Finally, open and close the shower door several times to ensure smooth operation and proper alignment. Make any necessary adjustments to the hinges or handles to optimize functionality.
Congratulations! You have successfully assembled your shower door components. Now, it’s time to move on to the next step of the installation process, where you will secure your shower door to the wall or enclosure. Stay tuned for the upcoming section on securing the shower door for a complete and functional installation.
Installing The Door Frame And Track
Attaching the frame to the shower walls
When it comes to installing a shower door, one of the most important steps is attaching the frame to the shower walls. This ensures that the door is securely held in place and provides a stable structure for the entire shower enclosure. Here’s a step-by-step guide on how to attach the frame:
- Start by measuring the size of the shower opening and cut the frame accordingly. Make sure to leave some room for adjustment.
- Position the frame against the shower walls, ensuring that it is level and plumb. Use a level and a plumb line to double-check the alignment.
- Once you are satisfied with the positioning, mark the areas where you will be attaching the frame to the walls. This will help you keep track of where to drill the holes.
- Using a drill and suitable wall anchors, create the necessary holes for attaching the frame. Make sure to follow the manufacturer’s instructions for the specific anchor types required.
- Insert the wall anchors into the holes and carefully screw the frame to the walls. Ensure that the screws are tight enough to hold the frame securely in place, but be careful not to overtighten and damage the walls.
- Repeat this process on all sides of the frame, making sure that each section is securely attached to the walls.
By following these steps, you can successfully attach the frame to the shower walls and create a sturdy foundation for your shower door.
Installing the track for the shower door
Once the frame is securely attached to the shower walls, the next step is to install the track for the shower door. The track provides a smooth sliding mechanism for the door and ensures easy opening and closing. Follow these steps to install the track:
- Measure the length of the shower opening and cut the track accordingly. Make sure to leave some extra length for adjustments.
- Position the track on the frame, making sure it aligns properly with the top and bottom sections. Use a level to ensure that the track is perfectly straight.
- Once the track is properly positioned, mark the areas where you will be attaching it to the frame. This will serve as your guide for drilling the holes.
- Using a drill and appropriate screws, attach the track to the frame. Make sure to tighten the screws securely, but avoid overtightening to prevent damage to the track or frame.
- Check the smoothness of the door’s movement along the track. If needed, make any necessary adjustments or fine-tuning to ensure smooth sliding.
With the track installed, you are now one step closer to completing the installation of your shower door. Ensure that the track is securely attached and the door moves smoothly along it for a hassle-free shower experience.
Mounting The Shower Door
Once you have properly measured and prepared your shower area, it’s time to mount the shower door. This step is crucial to ensure a secure and functional installation. In this section, we will discuss how to secure the hinges or brackets to the shower wall, as well as how to properly align and level the shower door.
Securing the hinges or brackets to the shower wall
Securing the hinges or brackets to the shower wall is an essential part of installing a shower door. This step ensures that the door stays in place and operates smoothly. Follow these steps to securely attach the hinges or brackets:
- Start by positioning the hinges or brackets in the designated locations on the shower wall. Make sure they are aligned correctly and level.
- Once aligned, mark the screw holes on the wall through the holes provided in the hinges or brackets. This will serve as a guide for drilling.
- Using a drill with the appropriate bit, carefully drill pilot holes into the marked screw holes.
- Next, attach the hinges or brackets to the shower wall using screws provided in the installation kit.
- Tighten the screws securely, but ensure not to overtighten, as this may damage the wall or the hinges/brackets.
- Repeat the process for all hinges or brackets, making sure they are evenly spaced and aligned.
Properly aligning and leveling the shower door
Proper alignment and leveling of the shower door are crucial for ensuring a seamless and functional installation. Follow these steps to achieve the desired alignment:
- Begin by placing a level vertically against the hinge side of the shower door. Adjust the door until the bubble in the level is centered, indicating that it is plumb.
- Next, place the level horizontally at the top edge of the door. Again, adjust the door until the bubble is centered, ensuring that it is level.
- Check the alignment of the door by opening and closing it. It should swing freely without any obstructions or misalignment.
- If the door requires further adjustments, loosen the screws on the hinges or brackets and make the necessary changes.
- Once the door is properly aligned, tighten the screws securely.
By following these steps to secure the hinges or brackets to the shower wall and properly align and level the shower door, you will ensure a sturdy and functional installation. Take your time during this process and make any necessary adjustments to achieve the perfect fit for your shower enclosure.
Installing The Door Handles And Seals
Once you have successfully installed the shower door frame and glass panels, it’s time to focus on the final touches – the door handles or pulls, as well as the seals and sweeps. These elements are crucial for ensuring a watertight fit and enhancing the functionality and appearance of your shower enclosure. In this section, we will guide you through the process of attaching the door handles or pulls and installing the seals and sweeps with simple and easy-to-follow steps.
Attaching the door handles or pulls
To begin with, you will need to gather the necessary tools, including a drill, measuring tape, screwdriver, and the door handles or pulls. Start by positioning the handles or pulls on the door panel at your desired height – typically around 36 to 48 inches from the bottom of the door.
Once you have determined the correct position, use a measuring tape to ensure the handles or pulls are level and evenly spaced. Make small markings on the door panel to indicate the position of the drill holes.
Next, carefully drill pilot holes at the marked spots. Remember to use an appropriate drill bit size for the screws provided with your door handles or pulls. Once the pilot holes are ready, take the handles or pulls and align them with the holes. Insert the screws through the handles or pulls and into the pilot holes. Using a screwdriver, tighten the screws until the handles or pulls are securely attached to the door.
Installing the seals and sweeps for a watertight fit
The next step is to install the seals and sweeps to ensure a watertight fit for your shower door. Start by examining the bottom of the shower door for any existing seals or sweeps. Remove them if necessary. Clean the area thoroughly to ensure a clean and smooth surface for the new seals and sweeps.
Now, measure the length of the bottom edge of the shower door. Cut the seals and sweeps accordingly, ensuring they fit perfectly from one end of the door to the other. Most seals and sweeps come with adhesive backing, making installation quick and easy.
Peel off the adhesive backing and carefully press the seal or sweep onto the bottom edge of the shower door. Apply firm pressure to ensure proper adhesion. Repeat this process for any other sides of the shower door that require seals or sweeps.
Once the seals and sweeps are installed, it’s important to test the watertightness of your shower door. Turn on the shower and observe if any water leaks occur. If you notice any leaks, adjust the seals and sweeps accordingly to create a tight seal.
By following these simple steps, you can confidently install the door handles or pulls and seals and sweeps for your shower door. Not only will this enhance the functionality and appearance of your shower enclosure, but it will also provide a watertight seal, ensuring a pleasant and leak-free shower experience.
Checking For Proper Alignment And Functionality
Before the final installation of your shower door, it is essential to check for proper alignment and functionality. Ensuring that your shower door opens and closes smoothly is crucial for a seamless and enjoyable shower experience. Additionally, verifying the door’s compatibility with existing hardware or systems is necessary to avoid any unnecessary issues and ensure that everything functions properly.
Ensuring the shower door opens and closes smoothly
One of the first things you should do when installing a shower door is to check if it opens and closes smoothly. Open and close the door several times to determine if it glides effortlessly along the tracks or hinges. A smooth opening and closing motion not only indicates proper alignment but also adds to the overall functionality and aesthetics of your shower. If you notice any resistance or obstruction, it may be necessary to adjust the door or address any potential issues before proceeding with the installation.
Verifying the door’s compatibility with existing hardware or systems
Compatibility with existing hardware or systems is another crucial aspect to consider when installing a shower door. This step ensures that all components work together harmoniously, minimizing the risk of malfunction or damage. Take a careful look at your existing shower hardware and systems, such as the shower track or hinges, and compare them to the new door you are installing. Ensure that they are compatible in terms of size, design, and functionality. If any incompatibilities are detected, it may be necessary to make adjustments or acquire compatible replacement parts to ensure a seamless installation process.
By checking for proper alignment and functionality, you can ensure that your shower door operates smoothly and integrates seamlessly with your existing shower hardware or systems. This attention to detail will not only enhance your showering experience but also contribute to the overall reliability and longevity of your shower door installation.
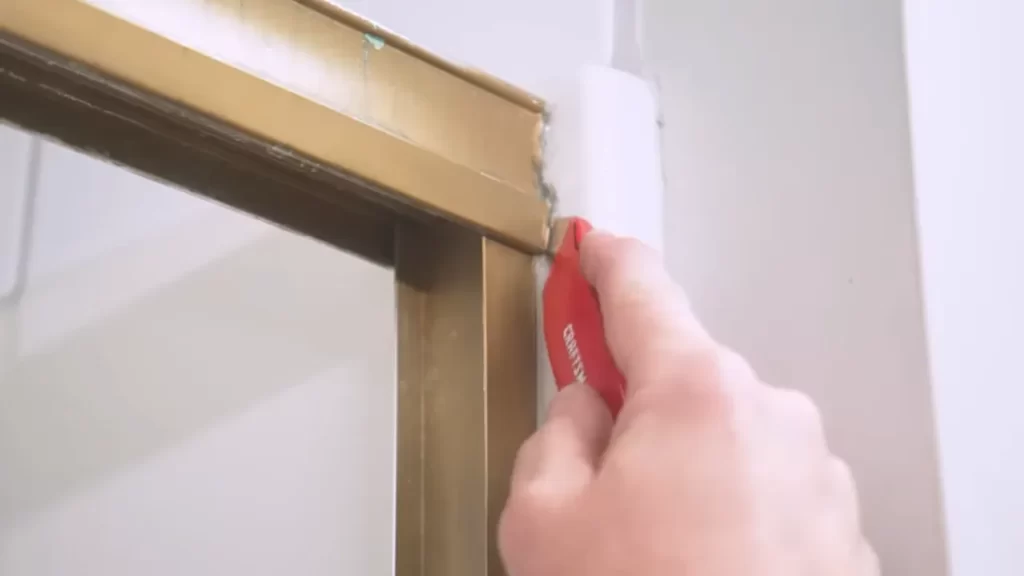
Applying Caulk And Sealant
Properly sealing the gaps and joints to prevent leaks
One crucial step in the installation of a shower door is properly sealing the gaps and joints to prevent any potential leaks. This ensures that water remains within the shower area, keeping your bathroom dry and free from water damage.
To effectively seal these gaps, you will need to utilize a high-quality caulk and sealant that is specifically designed for use in bathrooms and shower areas. This will help create a waterproof barrier that prevents any water from seeping out and causing damage to the surrounding walls or floors. By following these steps, you can ensure that your shower door not only looks great but provides reliable functionality as well.
Choosing the right caulk and sealant for the shower door materials
When it comes to choosing the right caulk and sealant for your shower door, it is essential to consider the materials used in its construction. Different materials may require different types of caulk to ensure optimal adhesion and water resistance.
If you have a glass shower door, silicone caulk is typically the best option as it offers excellent flexibility and water resistance. It adheres well to glass surfaces and provides a durable seal. For metal or plastic shower doors, an acrylic caulk or a caulk specifically made for use on these materials may be more suitable.
To determine the best caulk and sealant for your shower door, consult the manufacturer’s instructions or seek guidance from a professional. They can advise you on the most suitable products for your specific shower door materials, ensuring a secure and leak-free installation.
Troubleshooting Common Installation Issues
Dealing with misalignment or uneven gaps
If you find that your shower door is not properly aligned or there are uneven gaps between the door and the frame, there are a few troubleshooting steps you can take to fix the issue.
The first thing to check is whether the hinges are properly adjusted. Sometimes, misalignment can occur if the hinges are not aligned correctly. To adjust the hinges, follow these steps:
- First, loosen the screws that hold the hinges to the door and frame using a screwdriver.
- Next, move the door slightly to align it properly with the frame.
- Tighten the screws back in place to secure the hinges in the adjusted position.
If the hinges are properly aligned, but there is still misalignment or uneven gaps, you may need to consider adjusting the strike plate or the door sweep. The strike plate is the metal plate on the door frame where the door latch engages, while the door sweep is the strip at the bottom of the door that helps to keep water inside the shower.
To adjust the strike plate or the door sweep, follow these steps:
- Loosen the screws holding the strike plate or door sweep in place.
- Move the strike plate or door sweep slightly to align it properly with the door.
- Tighten the screws back in place to secure the strike plate or door sweep in the adjusted position.
Fixing loose or squeaky hinges
If you notice that your shower door hinges are loose or squeaky, it’s important to address the issue promptly to ensure the door functions properly and safely. Here’s how you can fix loose or squeaky hinges:
- Start by examining the screws that hold the hinges in place. If they are loose, use a screwdriver to tighten them. Be careful not to overtighten, as this can cause damage to the door or frame.
- If the screws are tight but the hinges are still loose, you may need to replace the screws with longer ones to provide a better grip.
- If the hinges are squeaky, you can apply a lubricant like WD-40 to the hinge pins to reduce friction and eliminate the noise. Simply spray a small amount onto the hinge pins and work them back and forth to distribute the lubricant evenly.
By following these troubleshooting steps, you can effectively address common installation issues with your shower door. Remember, proper alignment and secure hinges are essential for a functional and visually appealing shower door.
Final Inspection And Testing
After completing the installation of your new shower door, it is crucial to perform a final inspection and testing to ensure everything is in proper working order. This step is essential as it allows you to identify any remaining adjustments or fixes that may be required, as well as test the functionality and water-tightness of the door. By following these final steps, you can guarantee a successful installation and enjoy a fully functional and leak-proof shower door.
Checking for any remaining adjustments or fixes
Once the shower door is securely in place, take a moment to inspect it carefully for any remaining adjustments or fixes that need to be made. Check the alignment of the door panels and ensure they are properly aligned with the frame. Look out for any gaps or uneven spaces that may compromise the functionality and appearance of the door.
To ensure a tight fit, test the opening and closing of the door panels. Pay close attention to any squeaking noises or resistance that may indicate misalignment. If needed, use an appropriate tool to make minor adjustments to the hinges or tracks to ensure a smooth operation.
Inspect the handles, knobs, or other hardware accessories to ensure they are securely attached and functioning correctly. Tighten any loose fasteners or screws and make sure they are properly aligned. A loose or faulty handle can be a potential safety hazard and may lead to door misalignment.
Testing the door’s functionality and water-tightness
One of the most critical aspects of a shower door installation is testing its functionality and water-tightness. It is essential to ensure that the door opens and closes smoothly, without any obstructions or sticking points. Test the door at various angles to ascertain its flexibility and confirm that it operates effortlessly.
The water-tightness of the shower door is equally important to prevent leaks and water damage. With the door closed, run water over the edges and seals to check for any signs of leakage. Pay close attention to the corners, bottom sweep, and top frame. Any water seepage indicates the need for readjustment or better sealing.
Additionally, inspect the door’s sealant or caulk for any gaps or cracks. These can compromise the water-tightness and invite mold or mildew growth. If necessary, apply a fresh bead of sealant to ensure a watertight seal all around the door.
By performing a thorough final inspection and testing, you can address any remaining adjustments or fixes, as well as ensure the functionality and water-tightness of your shower door. This final step helps to guarantee a successful installation, providing you with a secure and watertight showering experience.
Maintaining And Cleaning The Shower Door
After successfully installing your new shower door, it’s important to understand how to maintain and clean it to keep it looking its best. By following a few simple tips and incorporating regular maintenance practices, you can ensure your shower door stays in good condition for years to come.
Tips for keeping the shower door clean and in good condition
Maintaining a clean shower door is crucial to prevent the build-up of soap scum, mildew, and hard water stains. By following these tips, you can keep your shower door looking sparkling clean:
- Wipe down the shower door after each use: Take a few extra seconds to wipe down your shower door with a squeegee or microfiber cloth. This helps remove excess water and prevents mineral deposits from forming.
- Use a daily shower cleaner: To prevent soap scum and mineral build-up, use a daily shower cleaner. Simply spray it on the door and wipe it down with a cloth or sponge. This will keep your shower door looking clean and shiny.
- Remove soap scum with vinegar: If you notice soap scum build-up on your shower door, mix equal parts white vinegar and water in a spray bottle. Spray the solution onto the affected areas and let it sit for a few minutes. Wipe it away with a cloth or sponge, and rinse with water. The acidic properties of vinegar help dissolve the soap scum, leaving your shower door spotless.
- Avoid using abrasive cleaners: Harsh chemical cleaners and abrasive sponges can damage the surface of your shower door. Stick to mild, non-abrasive cleaners to avoid scratching or dulling the glass.
- Keep shower products off the door: Try to keep shampoo, conditioner, and other shower products away from direct contact with the shower door. This prevents residue from accumulating and reduces the need for frequent cleaning.
- Regularly clean the shower door tracks: The tracks that guide your shower door can accumulate dirt and grime over time. Clean them regularly using a brush or cloth to prevent build-up and ensure smooth operation.
Regular maintenance practices to prevent issues
In addition to regular cleaning, practicing maintenance habits can help extend the lifespan of your shower door and prevent common issues. Here are a few maintenance practices to keep in mind:
- Check the door seals: Inspect the door seals periodically to ensure they are intact and free from cracks or damage. Damaged seals can lead to water leaks, so it’s important to replace them if necessary.
- Tighten loose hardware: Over time, the hardware on your shower door may become loose. Regularly check and tighten any loose screws or brackets to prevent further damage or malfunction.
- Address caulking gaps: If you notice gaps or cracks in the caulking around your shower door, it’s essential to address them promptly. Water can seep through these gaps and cause damage to the surrounding areas. Remove the old caulking and reapply a fresh layer to ensure a watertight seal.
- Inspect the rollers or hinges: If your shower door has rollers or hinges, make sure to inspect them regularly. Clean any debris and lubricate them if necessary to ensure smooth and effortless door movement.
By incorporating these cleaning and maintenance practices into your routine, you can keep your shower door looking pristine and functioning properly. Regular care and attention will pay off in the long run, allowing you to enjoy a beautiful and functional shower space for years to come.
Frequently Asked Questions
Can I Install A Shower Door By Myself?
Yes, you can install a shower door by yourself following proper instructions and using the necessary tools. Make sure to carefully follow the installation guide provided with the shower door to ensure a successful DIY installation.
Is It Easy To Install Shower Glass Door?
Yes, installing a shower glass door is relatively easy. It requires basic tools and DIY skills. Just follow the manufacturer’s instructions, measure accurately, and secure the door in place.
How Is A Shower Door Attached?
A shower door is attached by using hinges or tracks that secure it onto the shower walls. The hinges allow the door to swing open and closed, while the tracks keep it in place. It’s important to ensure proper alignment and installation for a secure attachment.
Do You Install Shower Door Over Tile?
Yes, it is possible to install a shower door over tile.
Conclusion
Installing a shower door doesn’t have to be a complicated task. By following the step-by-step guide provided in this blog post, you can successfully install a shower door with ease. Remember to measure accurately, gather all necessary materials, and carefully follow the instructions.
With patience and attention to detail, you’ll have a functional and stylish shower door in no time. Happy installing!