To install a shower arm, first, remove the existing showerhead by unscrewing it from the shower pipe. Then, apply plumber’s tape to the threads of the new shower arm and screw it onto the shower pipe until it is tight.
Introducing a shower arm into your bathroom can greatly enhance your showering experience. Whether you want to replace an old one or install a new shower arm altogether, the process is relatively straightforward. In this guide, we will explain how to install a shower arm in a few easy steps.
By following this method, you can enjoy a new shower arm that extends the reach of your showerhead, providing you with a comfortable and customized shower. So let’s get started and learn how to install a shower arm efficiently.
Tools And Materials Needed
Tools and Materials Needed:
Before embarking on the installation of a shower arm, it is important to gather all the necessary tools and materials. With the right equipment at hand, you can ensure a smooth and successful installation process. Here are the essential tools and materials you will need:
Item 1: Adjustable wrench
An adjustable wrench is an indispensable tool for any plumbing project. It allows you to tighten and loosen different-sized nuts and bolts, providing the flexibility required for installing a shower arm securely. Make sure to have an adjustable wrench handy before beginning the installation process.
Item 2: Plumbers tape
Plumbers tape, also known as Teflon tape, is a crucial material for preventing leaks in plumbing connections. It is a thin, white tape that is wrapped around the threads of the shower arm and other plumbing components to create a watertight seal. Applying plumbers tape properly can greatly enhance the longevity and effectiveness of your shower arm installation.
Item 3: Shower arm
The shower arm is the main component that connects the plumbing system to the showerhead. It is typically a metal pipe with threads on one end for screwing into the wall-mounted water pipe. When choosing a shower arm, consider the length, angle, and finish that best suit your specific shower setup and personal preferences. Ensure you have a suitable shower arm ready for installation.
Item 4: Showerhead
A showerhead is designed to provide a steady and enjoyable flow of water during your showering experience. When installing a shower arm, it is important to have a corresponding showerhead that can be attached to the arm. Choose a showerhead that complements your shower arm and enhances the overall aesthetics and functionality of your bathroom.
Item 5: Towel
Having a towel nearby during the installation process is essential for wiping away any excess water or debris. It helps to keep the installation area clean and dry, ensuring a hassle-free installation experience. Remember to have a towel on hand to maintain a tidy workspace throughout the process.
Understanding The Existing Setup
No bathroom is complete without a functioning shower, and if you’re looking to upgrade or replace your existing shower arm, it’s important to understand the current setup before diving into the installation process. Taking the time to familiarize yourself with the existing configuration will allow you to identify any necessary replacements or modifications that need to be made. In this article, we’ll guide you through the process of understanding the existing setup of your shower arm, ensuring a smooth installation experience.
Checking the current shower arm
The first step in understanding your existing shower arm setup is to visually inspect it. Start by removing any covers or decorative elements that may be concealing the arm. Once exposed, take note of the arm’s length, shape, and material. This will help you in selecting a suitable replacement, if needed. Additionally, consider the type of shower head connection the arm has, as this will determine the compatibility of any new shower head you may choose.
Identifying any necessary replacements or modifications
After checking the current shower arm, assess its overall condition. Look for signs of corrosion, leaks, or damage that may affect its performance. If the arm is showing any of these issues, it is advisable to replace it. In some cases, you may also need to consider modifications to the existing setup. For instance, if you want to change the height or angle of the shower head, you may need to install a longer or adjustable arm.
Once you have determined the need for replacement or modification, measure the length of the current arm and note down the specific measurements. This will help you in finding a suitable replacement that matches the dimensions of the existing arm.
When it comes to selecting a new shower arm, consider both functionality and aesthetics. Opt for materials that are durable and resistant to corrosion, such as stainless steel or brass. Additionally, choose a design that complements the overall look of your bathroom.
In conclusion, understanding the existing setup is a crucial step in installing a new shower arm. By visually inspecting the current arm and assessing its condition, you can identify any necessary replacements or modifications. Taking the time to measure and select the right replacement arm will ensure a successful installation and an enjoyable shower experience for years to come.
Gathering The Necessary Tools And Materials
Introduction
In order to successfully install a shower arm, it is important to gather all the necessary tools and materials beforehand. This ensures a smooth and efficient installation process, reducing the chances of any delays or complications. By assembling the required items and ensuring that all tools are readily available, you can save time and effort when it comes to installing your shower arm.
Assembling the required items for the installation process
Before you start installing your shower arm, make sure you have all the necessary tools and materials at your disposal. By gathering these items in advance, you can avoid interruptions and complete the installation process without any hassle. The table below presents a list of the essential items needed for the installation:
| Tools | Materials |
|---|---|
| Adjustable wrench | Shower arm |
| Teflon tape | Gasket |
| Pipe cutter | Plumber’s tape |
| Level | Thread sealant |
| Drill | Plumber’s putty |
Ensuring all tools are readily available
Once you have gathered the necessary tools and materials, it is important to ensure that all tools are readily available and easily accessible during the installation process. This helps to minimize any potential disruptions or delays, allowing you to complete the installation smoothly. Ensure that each tool is in good working condition and that you have a backup in case of any malfunctions or breakages.
Conclusion
Gathering the necessary tools and materials is a crucial step when installing a shower arm. By assembling the required items in advance and ensuring all tools are readily available, you can streamline the installation process and save time and effort. Having everything prepared and organized allows you to focus on the task at hand and complete the installation successfully. So, before you begin installing your shower arm, take the time to gather all the tools and materials you’ll need.
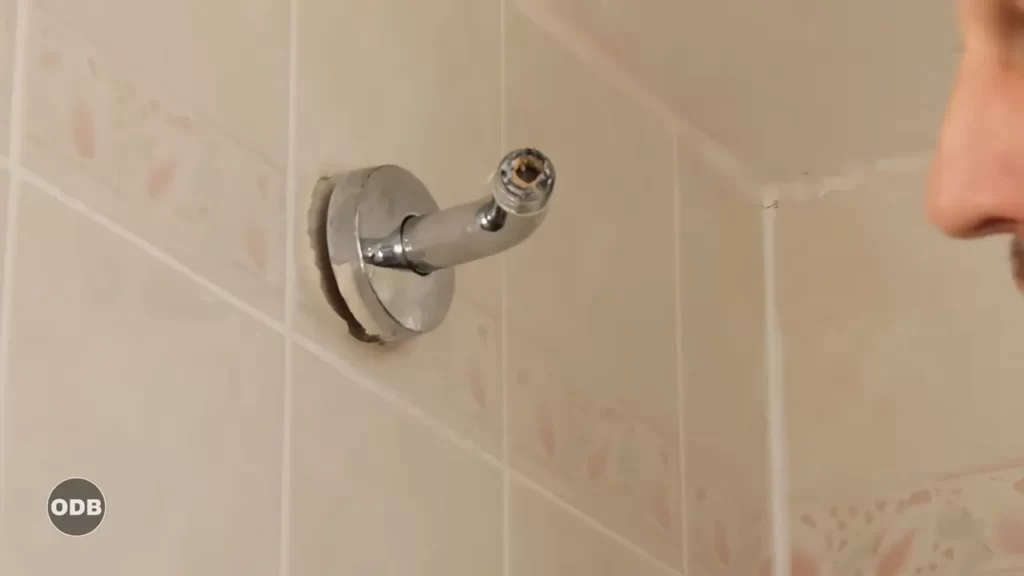
Step 1: Removing The Old Shower Arm
Before installing a new shower arm, it’s important to remove the old one properly. This will ensure a smooth installation process and prevent any damage to your plumbing system. In this step, we will guide you through the process of removing the old shower arm.
Turning off the water supply
The first thing you need to do is turn off the water supply to the shower. Locate the water shut-off valve, which is usually found near the shower or in the basement. Turn the valve clockwise until it is fully closed.
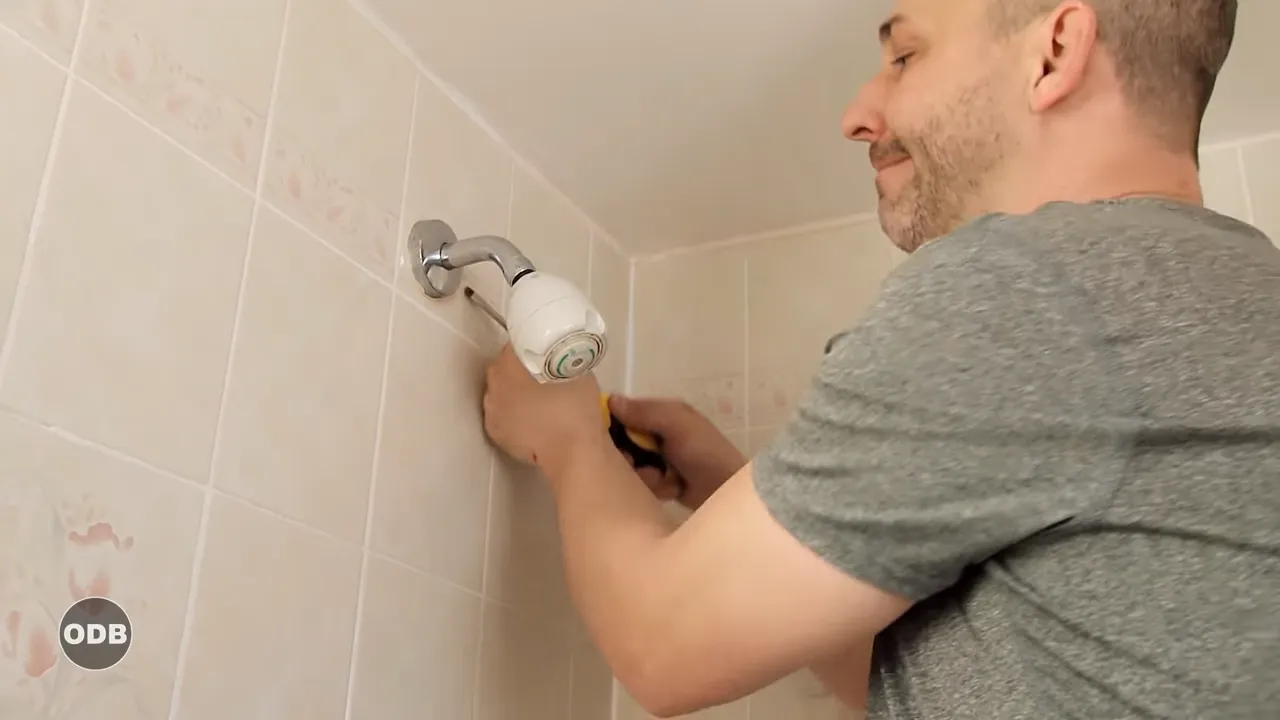
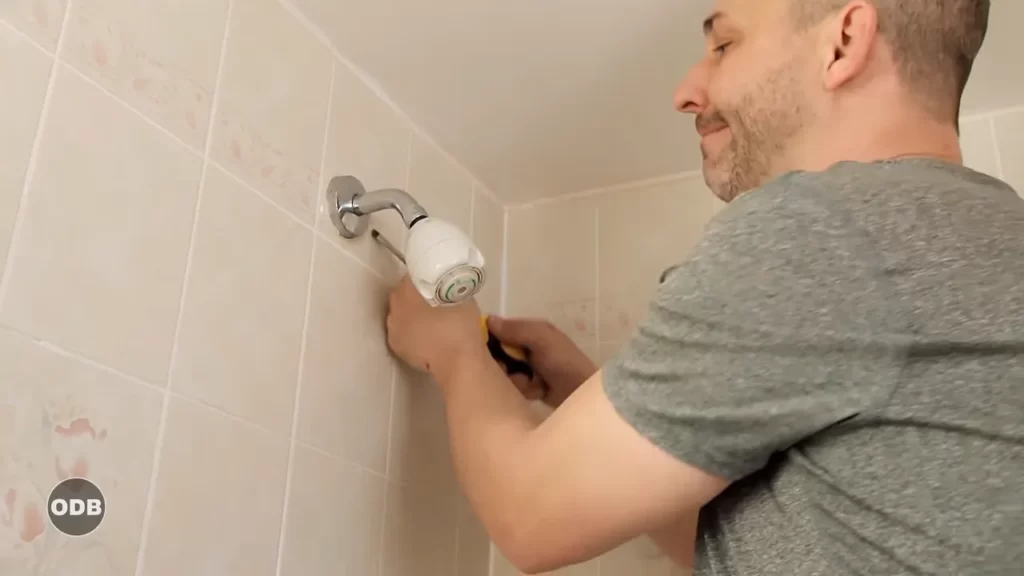
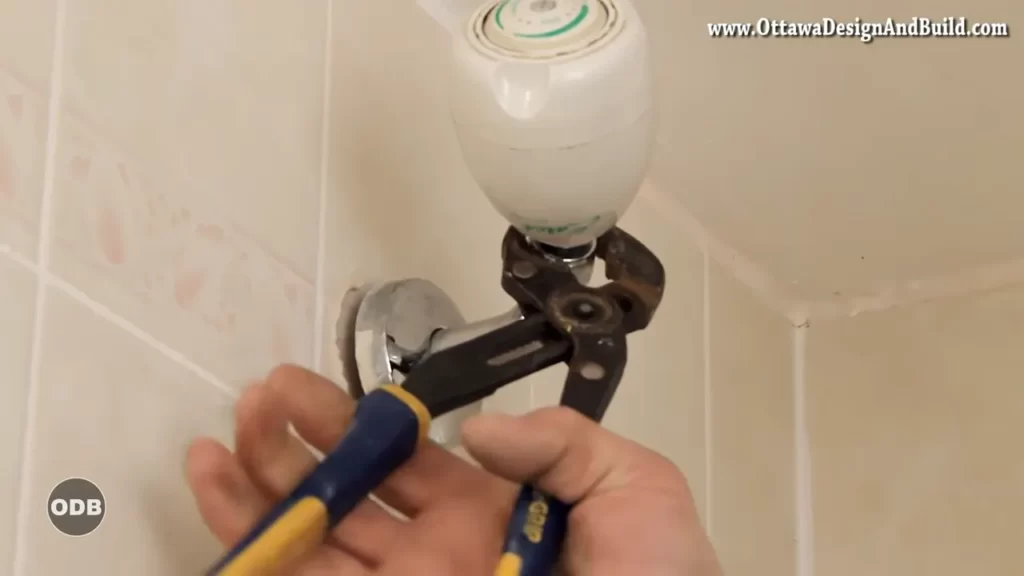
Using an adjustable wrench to loosen and remove the existing shower arm
Once the water supply is turned off, you can start removing the old shower arm. To do this, you will need an adjustable wrench that fits the nut on the shower arm. Position the wrench on the nut and turn it counterclockwise to loosen it. Apply steady pressure until the nut is completely loose.
Next, twist the shower arm in a counterclockwise direction to remove it from the wall. If you encounter any resistance, you can use the wrench to loosen it further. Remember to apply gentle force to avoid damaging the plumbing connections.
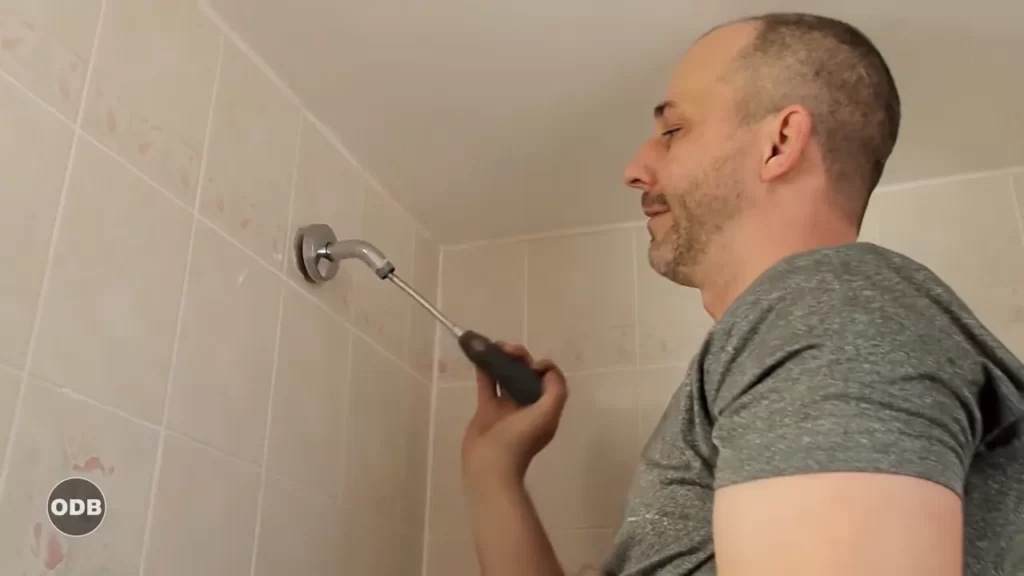
Checking for any pipe tape residue
After you have successfully removed the old shower arm, it’s essential to check for any pipe tape residue left on the threads. This residue can interfere with the proper installation of the new shower arm.
Inspect the threads of the shower pipe for any leftover pipe tape. If you find any, use a clean cloth or a wire brush to remove it. Ensure that the threads are clean and smooth before proceeding with the installation of the new shower arm.
Now that you have completed the first step of removing the old shower arm, you are ready to move on to the next step in the installation process.
Step 2: Preparing The New Shower Arm
When it comes to installing a shower arm, proper preparation is key. In this step, we will focus on preparing the new shower arm before installation. This ensures a secure and leak-free connection, resulting in a reliable and functional shower experience.
Applying plumbers tape to the threads of the new shower arm
Before attaching the new shower arm to the plumbing fixture, it is important to apply plumbers tape to the threads. This tape is a thin, flexible polymer that helps create a watertight seal between the shower arm and the plumbing system.
To apply the plumbers tape, follow these simple steps:
- Start by holding the shower arm in one hand.
- With your other hand, tear a small piece of plumbers tape, approximately 3-4 inches long.
- Hold one end of the tape against the threads of the shower arm.
- Slightly stretch the tape as you wrap it around the threads. This helps ensure a tight and secure fit.
Making sure the tape is wrapped tightly and evenly
As you apply the plumbers tape to the shower arm threads, make sure to wrap it tightly and evenly. This ensures a consistent seal and prevents any gaps that could potentially lead to leaks. Here are some tips to ensure a proper application:
- Avoid overlapping the tape too much, as this can make it difficult to properly thread the shower arm into place.
- Make sure the tape covers the entire threaded area of the shower arm, leaving no gaps exposed.
- Apply gentle pressure as you wrap the tape, ensuring it adheres firmly to the threads.
- Double-check for any loose ends or wrinkles in the tape. Smooth them out to ensure a uniform application.
By following these steps and taking the time to properly prepare the new shower arm, you can ensure a secure and leak-free installation. With the plumbers tape applied correctly, you are now ready to move on to the next step of the installation process.
Step 3: Installing The New Shower Arm
Now that you have successfully removed the old shower arm, it’s time to install the new one. This step is crucial to ensuring a properly functioning shower, so let’s get started.
Positioning the new shower arm in the desired location
Carefully examine the shower wall and determine the location where you want to install the new shower arm. Take into consideration the height and angle that will provide the best showering experience. Once you have identified the desired position, make sure the area is clean and free of any debris.
Hand-tightening the shower arm into place
Take your new shower arm and apply a small amount of Teflon tape around the male threads. This tape will help create a secure and watertight seal. Insert the threaded end of the shower arm into the shower wall, turning it clockwise. Use your hand to tighten the shower arm as much as possible. This initial hand-tightening will ensure that the arm is securely positioned in place.
Using an adjustable wrench to securely tighten the arm
To further secure the shower arm, grab an adjustable wrench. Place the wrench on the flat portion of the arm and turn it clockwise. This will provide the extra leverage needed to tighten the arm securely. Be careful not to over-tighten, as this could damage the shower arm or the plumbing behind the wall.
Remember to test the arm for stability by gently pulling on it. If it moves or feels loose, use the wrench to tighten it a little more. Ideally, the shower arm should be firmly in place without any wobbling.
And there you have it! You have successfully installed the new shower arm. Now, all that’s left to do is attach the showerhead and enjoy a refreshing shower experience.
Step 4: Attaching The Showerhead
Once you have successfully installed the new shower arm, the next step is to attach the showerhead. This is a crucial step as it directly affects the functionality and water flow of your shower. Follow these simple instructions to ensure a tight and secure fit.
Applying plumbers tape to the threads of the showerhead
Before attaching the showerhead, it is important to apply plumbers tape to the threads of the shower arm. This tape helps create a watertight seal and prevents any leaks. Here’s how to do it:
- Take the roll of plumbers tape and hold it at one end of the shower arm.
- Gently wrap the tape around the threads of the shower arm in a clockwise direction.
- Ensure that the tape covers the entire threaded area, making at least three complete rotations.
Applying plumbers tape is a simple yet effective step that can save you from potential water leaks.
Connecting the showerhead to the new shower arm
Now that you have applied plumbers tape, it’s time to connect the showerhead to the new shower arm. Follow these steps:
- Hold the showerhead in one hand and the shower arm in the other.
- Align the threads of the showerhead with the threads of the shower arm.
- Gently twist the showerhead clockwise onto the shower arm until it is hand-tight. Avoid overtightening to prevent any damage.
The showerhead should feel secure and snug on the shower arm, allowing for a seamless water flow.
Ensuring a tight and secure fit
To ensure a tight and secure fit between the showerhead and the shower arm, follow these final steps:
- Gently turn on the shower to check for any leaks. If you notice any leaks, tighten the connection a little more using an adjustable wrench or pliers.
- If the connection is leak-free, turn off the shower and give the showerhead a final twist to ensure a tight fit. Again, be careful not to overtighten.
- Run the shower for a few minutes to flush out any debris or air bubbles that may have accumulated during installation.
By following these steps, you can successfully attach the showerhead to the new shower arm, providing you with a reliable and enjoyable shower experience.
Step 5: Testing The Installation
Turning on the water supply and checking for any leaks
Once you have successfully installed the shower arm, it’s time to test your installation and ensure that everything is working as it should. The first step in this process is turning on the water supply and checking for any leaks. It’s important to do this carefully to ensure that you don’t cause any damage to your bathroom or the surrounding area.
To turn on the water supply, locate the main water shut-off valve for your shower. It is usually found near the water heater or in the basement. Once you’ve located the valve, turn it counterclockwise to open the water supply. Take note that some showers may have a separate shut-off valve specifically for the shower, so make sure to check for that as well.
With the water supply turned on, carefully observe the shower arm and the connections for any signs of leakage. Look for dripping water or any wet spots around the joints. If you notice any leaks, it’s essential to act quickly to prevent further damage. Tighten the connections using an adjustable wrench or pipe tape to seal any potential gaps. It’s crucial to fix any leaks before proceeding to the next step.
Adjusting the showerhead angle and testing water flow
Once you have confirmed that there are no leaks in your installation, it’s time to adjust the showerhead angle and test the water flow. This step ensures that you can tailor the shower experience to your liking and that the water is flowing correctly, providing an optimal showering experience.
To adjust the showerhead angle, hold onto the showerhead firmly and twist it gently in the desired direction. You can experiment with different angles to find the most comfortable position for you. Once you’ve adjusted the angle, let go of the showerhead to keep it in place.
Now it’s time to test the water flow. Turn on the shower and check if the water is coming out of the showerhead evenly and at an adequate pressure. If you notice any irregularities, such as low water pressure or water spraying in the wrong direction, you may need to make some adjustments or repairs.
Making any necessary adjustments or repairs
If you encounter any issues with the water flow during the previous step, it’s essential to make any necessary adjustments or repairs. To ensure a smooth and enjoyable shower experience, it’s important to address any problems promptly.
If the water flow seems weak, check the showerhead for any blockages. Mineral deposits and buildup can obstruct the water flow. Remove the showerhead from the shower arm and soak it in a mixture of vinegar and water to dissolve any deposits. Rinse it thoroughly and reattach it to the shower arm, then retest the water flow to see if the issue has been resolved.
If you notice water spraying in the wrong direction, it may be an issue with the showerhead angle. Repeat the process of adjusting the angle until you find the optimal position. You can examine the showerhead’s pivoting mechanism and make sure it is functioning correctly, enabling you to adjust the angle smoothly.
By following these steps and ensuring that your shower arm installation is properly tested, you can enjoy a comfortable and refreshing shower experience. Remember to address any issues promptly to prevent further damage and maintain the longevity of your shower system.
Tips For A Successful Installation
Installing a shower arm may seem like a simple task, but it’s important to pay attention to key details to ensure a successful installation and prevent potential issues down the line. Here are some expert tips to help you navigate the process smoothly:
Using Caution When Tightening to Prevent Damage
When it comes to tightening the shower arm, caution is essential to prevent damaging either the arm itself or the existing plumbing connections. Avoid over-tightening, as this can lead to cracked pipes and leaks. Instead, follow these steps:
- Start by hand-tightening the shower arm onto the plumbing fitting.
- Use an adjustable wrench to gently tighten the arm until it is firmly in place.
- Avoid applying excessive force; instead, use small increments to ensure a secure fit.
- Check for any leaks or movement once the shower arm is tightened to ensure a proper seal.
Applying an Adequate Amount of Plumbers Tape for a Watertight Seal
One key step in installing a shower arm is applying plumbers tape to provide a watertight seal. Here’s how to get it right:
- Wrap the threads of the shower arm with a few layers of plumbers tape in a clockwise direction.
- Ensure that the tape covers the entire threaded portion of the arm.
- Smooth out the tape to eliminate any creases or wrinkles that may hinder a proper seal.
- Tighten the shower arm onto the plumbing fitting, applying the necessary caution mentioned earlier.
Seeking Professional Assistance if Unsure or Encountering Difficulties
If you are unsure about any step in the installation process or encounter difficulties along the way, it is always wise to seek professional assistance. Plumbing systems can be complex, and errors during installation can lead to costly repairs or water damage. Don’t hesitate to reach out to a professional plumber who can provide guidance or complete the installation for you.
Remember, these tips are meant to guide you towards a successful shower arm installation. By following the precautions discussed and seeking help when needed, you can enjoy a watertight and reliable shower arm that enhances your bathing experience.
Frequently Asked Questions
How Tight Should A Shower Arm Be?
Tighten the shower arm securely, but not too tight. Avoid using excessive force that could damage the pipe or fittings. A snug fit is sufficient to prevent leaks without causing any harm. Keep it firm, but not overly tight.
Do You Put Plumbers Tape On Shower Arm?
Yes, it is recommended to use plumbers tape on the shower arm to create a tight seal and prevent leaking.
Do I Need To Turn Off Water To Replace Shower Arm?
Yes, it is necessary to turn off the water supply to replace the shower arm. This ensures that water doesn’t unexpectedly flow while you’re replacing the arm.
Do Shower Arms Fit All Shower Heads?
Shower arms are not universally compatible with all shower heads. Compatibility may vary depending on the specific design and connections of each shower arm and shower head. It is important to consider the specifications of both the shower arm and the shower head to ensure a proper fit.
Conclusion
Installing a shower arm can be a simple process that enhances your bathing experience. By following the step-by-step instructions provided in this blog post, you can easily complete the installation without any hassle. Remember to gather all the required tools beforehand and ensure proper sealing to prevent leaks.
With just a few easy steps, you can enjoy the benefits of a new shower arm and experience revitalizing showers.