To install Sharkbite fittings on copper, first, ensure that the copper pipe is clean, deburred, and cut square. Then, simply push the Sharkbite fitting onto the pipe until it reaches the depth mark, indicating a secure connection.
Now, let’s dive deeper into the process of installing Sharkbite fittings on copper. Sharkbite fittings are a popular choice for connecting copper pipes due to their simplicity and efficiency. These fittings are designed to create leak-proof and reliable connections without the need for soldering or specialized tools.
In just a few simple steps, you can have a tight and secure joint. First and foremost, it is crucial to prepare the copper pipe. Give it a thorough cleaning, removing any dirt, debris, or oxidation. Trim the pipe if necessary, ensuring it is cut square. Smooth the edges by deburring the pipe and ensure it is dry. Next, grab the Sharkbite fitting and check that the pipe size matches the fitting size.
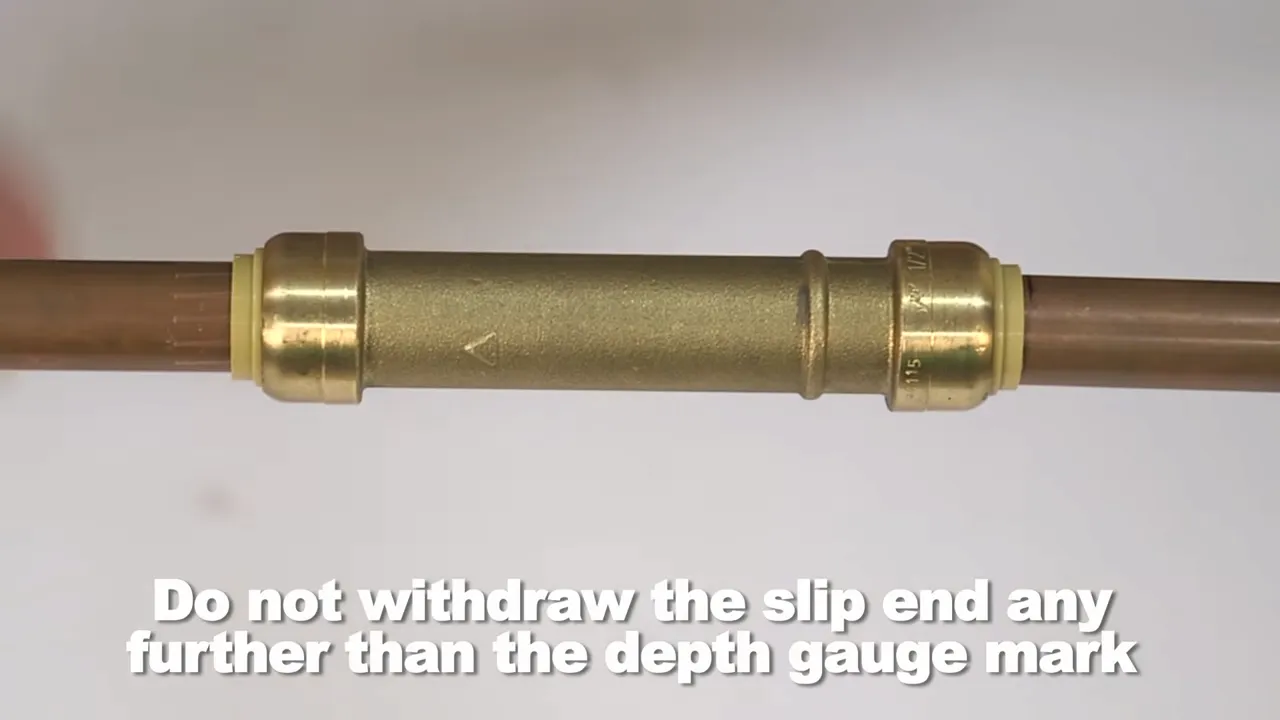
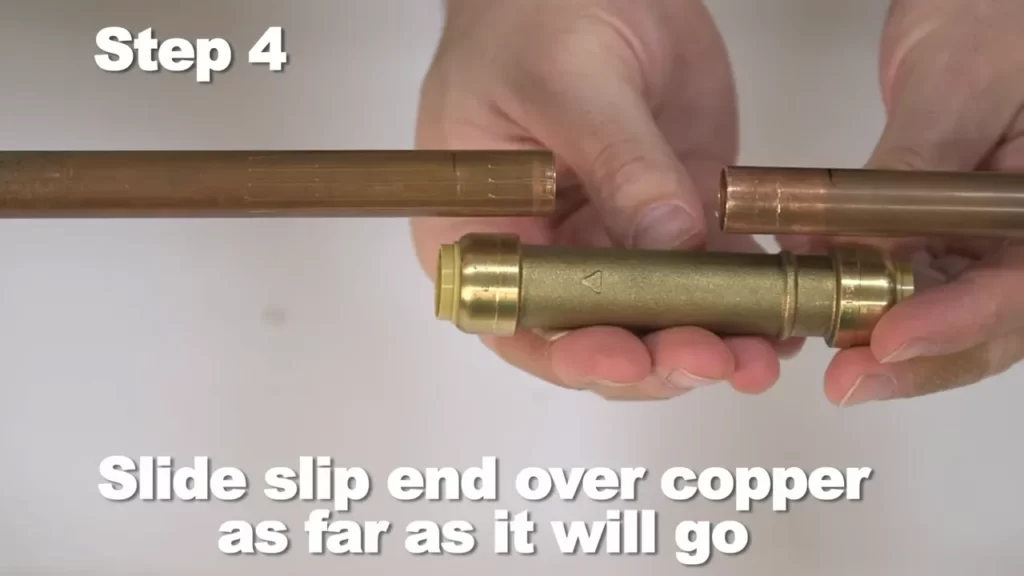
These fittings are available in various sizes to accommodate different pipe diameters. Now comes the easy part. Take the Sharkbite fitting and push it onto the copper pipe. Apply moderate pressure and push the fitting until it reaches the depth mark, ensuring a proper connection. You may use a depth gauge tool to achieve accurate insertion depth.
And that’s it! Your Sharkbite fitting is securely installed on the copper pipe, ready for use. These fittings are removable, reusable, and compatible with various types of plumbing applications, making them a convenient choice for DIY projects or professional installations. So take advantage of the simplicity of Sharkbite fittings and enjoy reliable connections without the hassle of soldering.
Why Choose Sharkbite Fittings For Copper Pipes
**Why Choose Sharkbite Fittings for Copper Pipes**
**Benefits of Sharkbite Fittings for Copper Pipes**
When it comes to installing fittings on copper pipes, Sharkbite fittings are an excellent choice for both professional plumbers and DIY enthusiasts. These innovative fittings offer a range of benefits that make them the preferred choice for many.
**Longevity and Durability of Sharkbite Fittings**
One of the key advantages of Sharkbite fittings for copper pipes is their longevity and durability. These fittings are made from high-quality materials that are resistant to corrosion and wear, ensuring that they will stand the test of time. With Sharkbite fittings, you can have peace of mind knowing that your copper pipe system will stay secure and leak-free for years to come.
**Ease of Installation with Sharkbite Fittings**
Installation can be a time-consuming and complicated process, but not with Sharkbite fittings. These fittings are designed with ease of installation in mind, making them suitable for both professionals and DIYers. Thanks to their innovative push-to-connect design, Sharkbite fittings can be installed quickly and easily, without the need for specialized tools or soldering. Simply insert the copper pipe into the fitting and push until it clicks into place. The fittings are also fully removable, allowing for easy adjustments and modifications to your plumbing system.
In addition to the ease of installation, Sharkbite fittings also provide a secure and reliable connection. The fittings feature strong, stainless steel teeth that grip onto the copper pipe, creating a watertight seal. This ensures that your plumbing system remains leak-free, even under high pressure.
Moreover, Sharkbite fittings are compatible with various types of copper pipes, including K, L, and M. This versatility makes them a flexible choice for different plumbing projects.
In conclusion, opting for Sharkbite fittings for your copper pipe installation offers numerous benefits. Their longevity, durability, and ease of installation make them a reliable and convenient choice for both professionals and DIYers. Say goodbye to complex and time-consuming installations and enjoy the confidence of a leak-free plumbing system with Sharkbite fittings.

Understanding Sharkbite Fittings
Sharkbite fittings have gained immense popularity in recent years for their convenience and ease of use. They have revolutionized the way plumbing connections are made, especially when it comes to working with copper pipes. If you are planning to install Sharkbite fittings on copper pipes, it is essential to have a good understanding of these innovative fittings.
What are Sharkbite Fittings?
Sharkbite fittings are innovative push-to-connect plumbing fittings that allow for quick and reliable connections without the need for any special tools or soldering. They are designed to work with various types of pipes, including copper, CPVC, PEX, and even certain types of polybutylene. These fittings feature a unique and patented design that incorporates an O-ring and a grab ring to create a secure and leak-proof connection.
Different Types and Sizes of Sharkbite Fittings
Sharkbite fittings are available in a wide range of options to accommodate different plumbing needs. They come in various types, including straight connectors, elbows, tees, couplings, and more. Each type of fitting serves a different purpose, allowing you to create the desired configuration depending on your specific plumbing project.
These fittings are also available in different sizes to accommodate the specific pipe size you are working with. Common sizes include 1/2 inch, 3/4 inch, and 1 inch. It is crucial to ensure that you select the correct size of Sharkbite fitting that matches your copper pipe size to achieve a proper and secure connection.
How Sharkbite Fittings Work with Copper Pipes
When it comes to working with copper pipes, Sharkbite fittings offer a convenient solution. These fittings are compatible with both hard-drawn and annealed copper pipe, making them versatile for various plumbing applications.
The installation process of Sharkbite fittings on copper pipes is straightforward. First, ensure that the end of the copper pipe is clean and free from any burrs or scratches. Then, simply insert the copper pipe into the Sharkbite fitting until it reaches the depth mark indicated on the fitting. The O-ring and grab ring inside the fitting will automatically create a secure and watertight connection.
It is important to note that Sharkbite fittings are not reusable and should not be used on exposed external installations or buried underground. They are designed for use in accessible locations such as under sinks, behind walls, or in crawl spaces.
Overall, Sharkbite fittings are an excellent choice when it comes to installing plumbing connections on copper pipes. Their ease of use, reliability, and compatibility with various pipe types make them a popular option among DIY enthusiasts and professional plumbers alike.
Step-By-Step Guide To Installing Sharkbite Fittings On Copper Pipes
Are you looking to install Sharkbite fittings on your copper pipes? Look no further! In this step-by-step guide, we will walk you through the process of installing Sharkbite fittings on copper pipes, ensuring a secure and leak-free connection. Whether you’re a seasoned DIYer or a beginner, this guide will provide you with all the information you need to successfully complete the installation. So, let’s get started!
Preparing the Copper Pipe for Installation
Before you begin installing the Sharkbite fitting, it’s important to properly prepare the copper pipe to ensure a secure connection. Follow these steps to prepare the copper pipe:
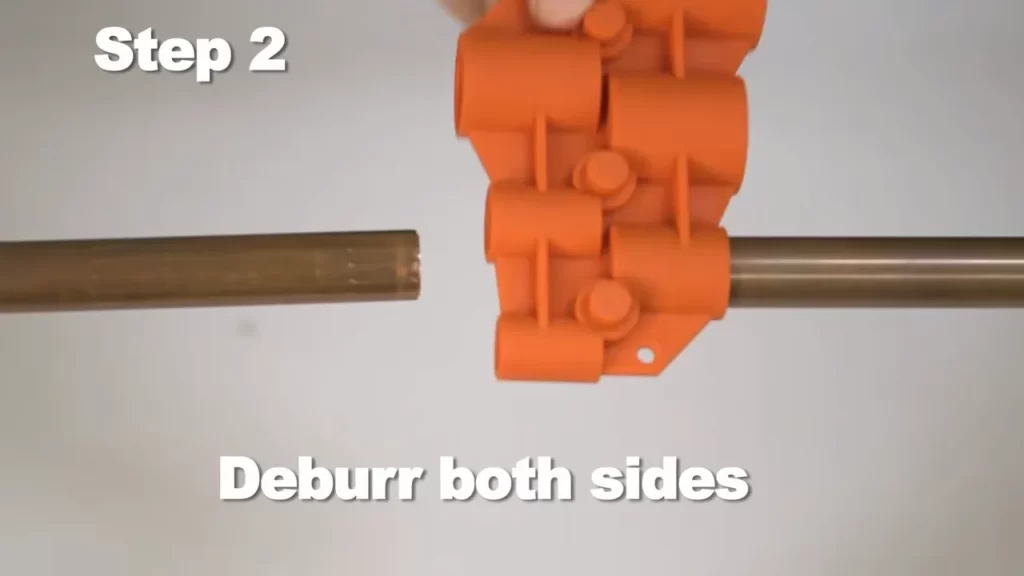
- Using a pipe cutter, cut the copper pipe to the desired length. Ensure that the cut is clean and free of any burrs or debris.
- Smooth the cut end of the pipe using a deburring tool or sandpaper. This will help create a smooth surface for the Sharkbite fitting to slide onto.
Inserting the Sharkbite Fitting onto the Copper Pipe
Now that the copper pipe is prepared, it’s time to insert the Sharkbite fitting onto the pipe. Follow these steps for a successful insertion:
- Ensure the Sharkbite fitting is clean and free from any dirt or debris. Wipe it down if necessary.
- With one hand, hold the Sharkbite fitting and with the other hand, slide the fitting onto the prepared end of the copper pipe.
- Push the Sharkbite fitting onto the pipe until you hear a audible click or feel it lock into place. This indicates that the fitting is properly inserted.
Securing the Sharkbite Fitting onto the Copper Pipe
Now that the Sharkbite fitting is inserted onto the copper pipe, it’s time to secure it to ensure a tight and leak-free connection. Follow these steps to secure the Sharkbite fitting:
- Using a pipe wrench or adjustable wrench, grip the Sharkbite fitting securely.
- Tighten the fitting onto the copper pipe by turning it clockwise. Ensure a tight connection, but be careful not to overtighten.
- Once the fitting is securely tightened, give it a slight tug to ensure it is properly seated and won’t come loose.
Congratulations! You have successfully installed a Sharkbite fitting onto your copper pipe. Remember to check for any leaks or drips and make any necessary adjustments if needed. With Sharkbite fittings, plumbing projects are made easier and more efficient. Enjoy the benefits of a secure and reliable connection without the need for soldering or special tools.
Tips And Best Practices For Installing Sharkbite Fittings On Copper Pipes
Are you looking to install Sharkbite fittings on your copper pipes? If so, you’re in the right place. In this article, we will share some valuable tips and best practices to ensure a successful installation of Sharkbite fittings on copper pipes. From ensuring proper pipe alignment to avoiding common mistakes during installation, we’ve got you covered. Let’s dive in!
Ensuring Proper Pipe Alignment for a Leak-Free Connection
One of the most crucial aspects of installing Sharkbite fittings on copper pipes is ensuring proper pipe alignment. This step is essential to achieve a leak-free connection. Here are some tips to help you with the alignment process:
- Measure and mark the pipe to determine the insertion depth for the fitting.
- Deburr the end of the pipe to remove any rough edges that may hinder proper alignment.
- Ensure the pipe is cut square and straight to maintain optimal alignment.
- Use a pipe deburring tool to clean the inside of the fitting and remove any debris.
By adhering to these best practices, you can ensure that your pipe is properly aligned, resulting in a leak-free connection with your Sharkbite fitting.
Avoiding Common Mistakes during Installation
When it comes to installing Sharkbite fittings on copper pipes, it’s important to be aware of common mistakes that can compromise the integrity of the connection. Here are some common mistakes to avoid:
- Over-insertion: Avoid inserting the pipe too far into the fitting, as this can cause leaks.
- Under-insertion: On the other hand, make sure not to under-insert the pipe, as it may lead to a weak connection.
- Using excessive force: While it’s important to push the pipe firmly into the fitting, using excessive force can damage the fitting or pipe.
- Not checking alignment: Double-check the alignment of the pipe and fitting before finalizing the connection to ensure a proper fit.
- Not following manufacturer guidelines: Always refer to the manufacturer’s instructions for specific installation requirements and guidelines.
By avoiding these common mistakes, you can ensure a successful and long-lasting installation of Sharkbite fittings on your copper pipes.
Testing the Connection for Leaks
After the installation process, it’s crucial to test the connection for any potential leaks before considering the job complete. Here’s how you can test the connection:
- Turn off the water supply.
- Use a pressure testing gauge or tester to verify that the connection holds pressure.
- If you notice any leaks or issues, make the necessary adjustments or replacements before turning the water supply back on.
By following these testing procedures, you can ensure that your Sharkbite fitting is securely installed on your copper pipe, without any potential leaks that could lead to future problems.
In conclusion, with these tips and best practices, installing Sharkbite fittings on copper pipes can be a straightforward and successful process. Remember to always handle your pipes and fittings with care, ensuring proper alignment and avoiding common mistakes. Testing the connection is the final step to ensure a leak-free installation. Now, you’re ready to enjoy the benefits of a secure and reliable connection with your Sharkbite fittings and copper pipes.
Frequently Asked Questions About Installing Sharkbite Fittings On Copper Pipes
Are you looking to install Sharkbite fittings on your copper pipes but have a few questions before getting started? We’ve got you covered! In this section, we’ll address some commonly asked questions about installing Sharkbite fittings on copper, so you can ensure a successful installation. Read on to find out if Sharkbite fittings can be reused, if they’re compatible with other pipe materials, and how long they can last.
Can Sharkbite Fittings be Reused?
One question that often comes up is whether Sharkbite fittings can be reused. The answer is yes! Sharkbite fittings are designed to be removable and reusable, making them a convenient option for both DIY enthusiasts and professionals. Whether you need to make adjustments to your plumbing system or simply want to repurpose the fittings for a different project, Sharkbite fittings can be easily disconnected and reused without the need for special tools.
Are Sharkbite Fittings Compatible with Other Pipe Materials?
If you’re working with different types of pipe materials, you may be wondering if Sharkbite fittings are compatible with them. The good news is that Sharkbite fittings are compatible with a wide range of pipe materials, including copper, PEX, CPVC, and even certain types of polyethylene. This versatility makes Sharkbite fittings a popular choice for various plumbing applications, as they can easily connect different types of pipes without the need for soldering or other traditional joining methods.
How Long Do Sharkbite Fittings Last?
The durability of Sharkbite fittings is another common concern among homeowners and professionals alike. You’ll be pleased to know that Sharkbite fittings are built to last. With solid brass construction and high-quality rubber O-rings, these fittings are designed to withstand the test of time and provide a reliable connection. In fact, Sharkbite fittings are backed by a 25-year warranty, giving you peace of mind that your plumbing system will remain leak-free for years to come.
In conclusion, Sharkbite fittings offer a reusable, versatile, and durable solution for connecting copper pipes. Whether you need to make adjustments to your plumbing system or work with different pipe materials, Sharkbite fittings provide a reliable and convenient option. With their easy installation process and long-lasting performance, Sharkbite fittings are a great choice for both DIYers and professionals alike.
Frequently Asked Questions
How Do You Attach A Sharkbite Fitting To Copper?
To attach a SharkBite fitting to copper, follow these steps: 1. Cut the copper pipe cleanly and remove any burrs or debris. 2. Mark the insertion depth on the pipe. 3. Push the fitting onto the pipe until it reaches the insertion mark.
4. Check for leaks by turning on the water supply. 5. Ensure the fitting is secure and properly aligned.
Do You Need To Prep Copper Pipe For Sharkbite?
Yes, prep copper pipe before using SharkBite.
Should I Sand Copper Pipe Before Sharkbite?
No, you do not need to sand copper pipe before using SharkBite. SharkBite fittings are designed to work with the smooth surface of copper pipes, so sanding is not necessary. Simply clean the pipe and push the SharkBite fitting onto it for a secure connection.
Can You Connect Sharkbite To Copper?
Yes, SharkBite can be connected to copper pipes easily without the need for soldering or special tools.
Conclusion
To sum it up, installing Sharkbite fittings on copper pipes is a simple and efficient process that can save you time and money. With their innovative design and user-friendly installation, Sharkbite fittings offer a reliable solution for any plumbing project.
By following the steps outlined in this blog post, you can confidently tackle your copper pipe connections with ease. Say goodbye to soldering and hello to a quicker, hassle-free installation method. Upgrade your plumbing game with Sharkbite fittings today!