To install a sewer drain pipe, first, dig a trench to the required depth and slope, then lay the pipe, making sure to connect the sections securely.
Assessing The Location And Requirements
Before starting any sewer drain pipe installation project, it is crucial to thoroughly assess the location and determine the specific requirements. This initial step will help you identify the scope and goals of your project, examine the existing plumbing system, and ensure compliance with necessary permits and regulations. By taking the time to assess the location and requirements, you can ensure a smooth and successful installation process.
Identifying the Project Scope and Goals
Identifying the project scope and goals is the first step in assessing the location and requirements for installing a sewer drain pipe. This involves determining the specific area where the pipe will be installed and outlining the objectives you aim to achieve. Are you expanding an existing plumbing system or installing a completely new one? Are you looking to improve drainage efficiency or accommodate additional fixtures? By clearly defining the project scope and goals, you can effectively plan the installation process and ensure that all necessary requirements are met.
Examining the Existing Plumbing System
Examining the existing plumbing system is an essential aspect of assessing the location and requirements for sewer drain pipe installation. By evaluating the current setup, you can identify any potential issues or limitations that may impact the installation process. This includes assessing the type and condition of existing pipes, identifying any obstructions or blockages, and evaluating the overall capacity of the system. Through a thorough examination, you can determine the necessary modifications or repairs needed to ensure a seamless integration with the existing plumbing system.
Determining the Necessary Permits and Regulations
Determining the necessary permits and regulations is a vital step in the assessment process for sewer drain pipe installation. Different jurisdictions have specific requirements and regulations governing plumbing installations, including sewer systems. This may involve obtaining permits for excavation or construction, adhering to specific building codes, or working with licensed professionals for certain aspects of the project. It is essential to research and familiarize yourself with the local regulations to ensure compliance and avoid any potential legal issues. By obtaining the necessary permits and following the required regulations, you can proceed with the installation confidently, knowing that the project is in full compliance with local authorities.
In conclusion, assessing the location and requirements for installing a sewer drain pipe is an integral part of the planning process. By identifying the project scope and goals, examining the existing plumbing system, and determining the necessary permits and regulations, you can ensure a successful installation that meets your objectives while adhering to legal requirements. Taking the time to assess these crucial factors will help pave the way for a smooth and efficient sewer drain pipe installation project.
Choosing The Right Materials And Tools
When it comes to installing a sewer drain pipe, it’s crucial to choose the right materials and tools to ensure a successful and long-lasting installation. Understanding the different types of sewer drain pipes available, selecting the appropriate pipe material for your specific project, and gathering the necessary tools are key steps in this process. In this article, we will guide you through each of these steps, providing you with the essential knowledge you need to complete your sewer drain pipe installation efficiently and effectively.
Understanding different types of sewer drain pipes
- PVC (Polyvinyl Chloride): Known for its durability and affordability, PVC pipes are widely used in sewer drain installations. They can handle high water pressure and are corrosion-resistant.
- Cast Iron: This type of pipe is highly durable and provides excellent soundproofing characteristics. Cast iron pipes are often used in commercial buildings or areas where noise reduction is essential.
- HDPE (High-Density Polyethylene): HDPE pipes are lightweight yet sturdy, making them suitable for underground applications. They are resistant to chemicals and won’t rust or corrode over time.
Selecting the appropriate pipe material for the specific project
When selecting the right pipe material for your sewer drain installation, several factors come into play. Consider the following:
- Location: Depending on whether your installation is above ground or underground, different materials may be suitable. PVC pipes are commonly used for above-ground installations, while HDPE pipes are often preferred for underground applications.
- Environment: If your installation is in a corrosive environment, such as near a chemical plant or in coastal areas, you’ll want a pipe material that is resistant to corrosion. Consider options like PVC or HDPE pipes in such cases.
- Building codes and regulations: Ensure that the pipe material you select complies with local building codes and regulations. This is important to avoid any issues or delays during the installation process.
Gathering the necessary tools for installation
Before you begin the installation process, it’s essential to gather all the necessary tools to ensure a smooth workflow. Here are the tools you’ll need:
| Tools | Description |
|---|---|
| Trenching shovel | Used to excavate the trench for the sewer drain pipe. |
| Tape measure | Used to accurately measure the length of the pipe and determine the slope. |
| Hacksaw | Used to cut the pipe to the desired length. |
| PVC primer and cement | Used to join PVC pipes together securely. |
| Ratchet wrench | Used to tighten and secure fittings. |
| Level | Used to ensure the pipe is installed with the proper slope for efficient drainage. |
Gathering these tools in advance will save you time and ensure you have everything you need to complete the sewer drain pipe installation successfully. Remember to use proper safety equipment, such as gloves and safety glasses, during the installation process.
By understanding the different types of sewer drain pipes, selecting the appropriate pipe material for your specific project, and gathering the necessary tools, you’ll be well-prepared to install a sewer drain pipe with confidence and efficiency. Stay tuned for the next section of this guide, where we will walk you through the step-by-step process of installing a sewer drain pipe.

Clearing The Work Area
Before starting the installation of a sewer drain pipe, it is crucial to clear the work area to ensure a smooth and efficient process. By removing any obstacles or debris, ensuring proper accessibility, and taking safety precautions, you can create a safe and conducive environment for the installation. Let’s dive into the details of each step:
Removing any obstacles or debris
The first step in clearing the work area is to remove any obstacles or debris that may hinder the installation process. This could include rocks, sticks, leaves, or any other objects that might be in the way. By clearing the area, you will have a clean and clear space to work, minimizing the risk of accidents or interruptions during the installation.
Ensuring proper accessibility for the installation process
Proper accessibility is vital to ensure a smooth and efficient installation process. It is important to determine the best route for the sewer drain pipe and clear any obstructions that may impede its path. This could involve trimming overhanging branches, removing barriers, or even excavating the ground if necessary. Having a clear and accessible pathway will make it easier to install the drain pipe and ensure proper functionality.
Taking safety precautions
Safety should always be a top priority when working on any installation project. Before starting the installation of the sewer drain pipe, it is important to take adequate safety precautions. This may include wearing protective gear such as gloves, safety glasses, and a helmet if required. It is also essential to follow any safety guidelines or regulations specific to your location or project. By prioritizing safety, you can prevent accidents and ensure a secure work environment for everyone involved.
In conclusion, when it comes to installing a sewer drain pipe, clearing the work area is a crucial step to ensure a successful and efficient installation process. By removing any obstacles or debris, ensuring proper accessibility, and taking safety precautions, you can create a safe and conducive environment for the installation. This will not only streamline the process but also contribute to the longevity and effectiveness of the sewer drain pipe installation.
Digging The Trench
When it comes to installing a sewer drain pipe, one of the most crucial steps is digging the trench. This is where you prepare the ground for the pipe to be installed and ensure proper drainage for your system. In this section, we will guide you through the process of measuring and marking the trench dimensions, using excavation tools to dig the trench, and managing soil and debris during the excavation process.
Measuring and marking the trench dimensions
Before you start digging, it is essential to measure and mark out the trench dimensions to ensure accuracy. This will help you determine the length, width, and depth of the trench you need to dig. To do this, follow these steps:
- Using a measuring tape, measure the distance between the starting point and the endpoint of the sewer drain pipe. This will give you the length of the trench.
- Next, determine the width of the trench. It is recommended to make it at least twice the diameter of the pipe to allow enough space for backfilling and proper compaction.
- Using marking paint or stakes, mark the starting and ending points of the trench.
Using excavation tools to dig the trench
Once you have marked out the dimensions of the trench, it’s time to start digging! Excavation tools are essential in this process to ensure efficient and accurate digging. Here’s how you can use these tools:
- Start by clearing any obstacles or vegetation from the area where you will be digging.
- Wear appropriate safety gear, such as a hard hat and gloves, to protect yourself during the excavation process.
- Choose the right excavation tool for the job, such as a shovel, spade, or trenching machine depending on the size and depth of the trench.
- Begin digging from the marked starting point and continue along the trench, following the marked dimensions.
- Work systematically, removing soil and debris from the trench as you progress.
Managing soil and debris during the excavation process
As you excavate the trench, it is important to manage the soil and debris to ensure a safe and efficient installation of the sewer drain pipe. Here are some tips to help you with this process:
- Create a designated area to stockpile the excavated soil and debris, away from the working area.
- Regularly inspect the trench for any loose soil or rocks that may pose a safety hazard during the installation process.
- Use tarps or plastic sheets to cover the excavated trench when not in use to prevent rainwater or debris from entering.
- Consider renting a dumpster or arranging for proper disposal of the excavated soil and debris.
By following these guidelines for measuring and marking the trench dimensions, using the right excavation tools, and managing the soil and debris during the excavation process, you will be able to prepare the groundwork for a successful sewer drain pipe installation.
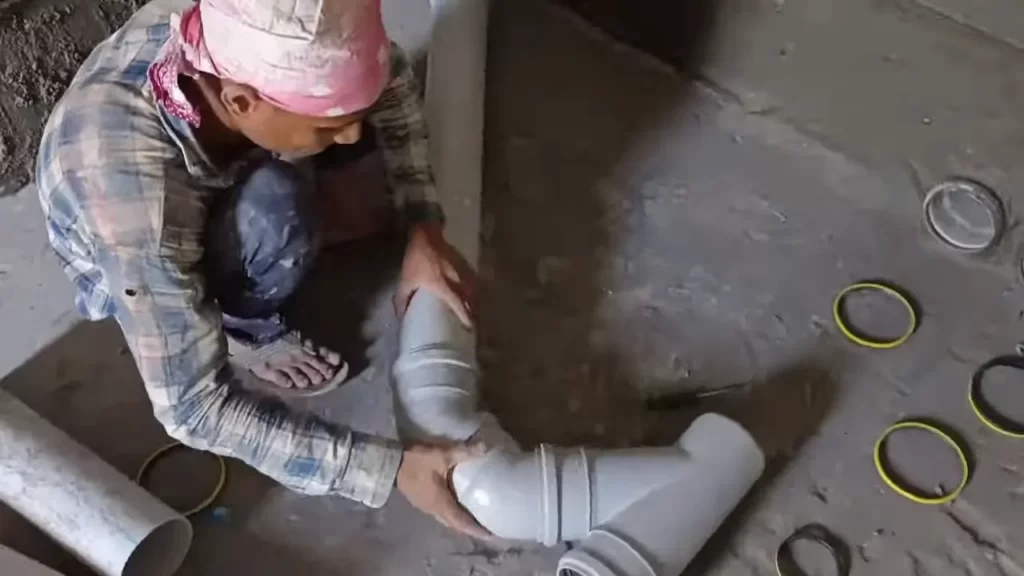
Preparing The Pipe
Before you can begin installing your sewer drain pipe, it is crucial to properly prepare the pipe. This involves a few key steps, including cutting the pipe to the required length, cleaning and deburring the pipe ends, and applying primer and solvent to ensure proper connections.
Cutting the pipe to the required length
To ensure a proper fit and connection, it is important to cut the sewer drain pipe to the required length. You can easily cut the pipe using a hand saw or a reciprocating saw. Begin by measuring the length you need, and then use a marker to clearly mark the cut line on the pipe. Make sure to keep a steady hand and follow the marked line to ensure a straight and clean cut.
Cleaning and deburring the pipe ends
Once you have cut the pipe to size, it is essential to clean and deburr the ends. This will remove any dirt, debris, or rough edges that could hinder the proper connection of the pipe. To clean the pipe ends, you can use a brush or a rag to wipe away any dirt or grime. Next, take a deburring tool and run it along the cut edges to smooth them out. This will prevent any sharp edges that could potentially damage the pipe or interfere with the connection.
Applying primer and solvent to ensure proper connections
Now that the pipe ends are clean and deburred, it is time to ensure proper connections by applying primer and solvent. Primer and solvent play a crucial role in creating a strong and leak-free connection between pipe joints. Start by applying primer to the outside of the pipe end and the inside of the fitting. Allow the primer to dry for a few seconds before applying the solvent. Apply a generous amount of solvent to both the pipe end and the fitting, ensuring even coverage. Then, quickly and firmly push the pipe into the fitting, applying slight twisting motion to ensure a tight and secure connection.
Remember, properly preparing the pipe is essential for the successful installation of your sewer drain pipe. By following these steps to cut, clean, and apply primer and solvent, you can ensure strong and leak-free connections, resulting in a durable and efficient sewer drain system.
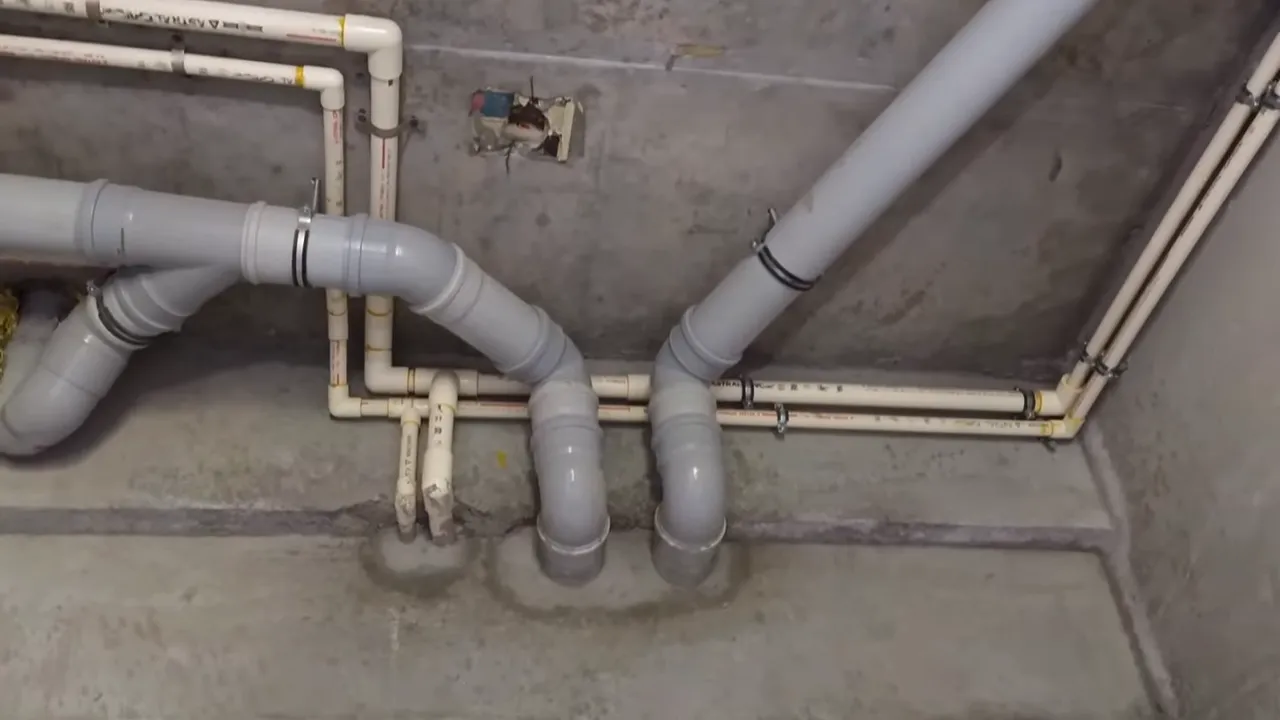
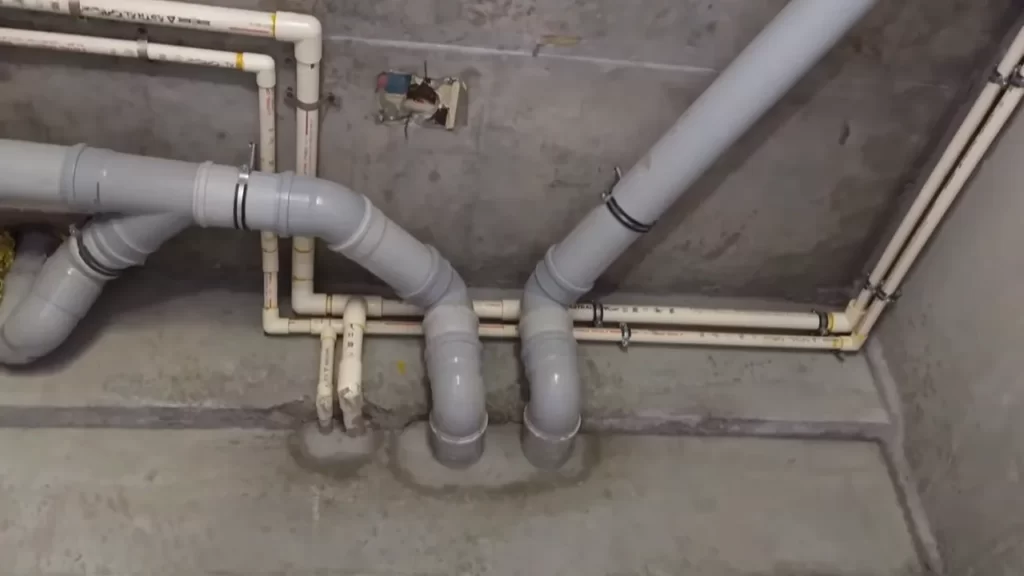
Laying The Pipe In The Trench
Laying the sewer drain pipe in the trench is a crucial step in the installation process. It involves placing the pipe in the correct position within the trench, aligning it with the required slope for efficient drainage, and securing it to prevent any movement or displacement. This ensures the proper functioning of the sewer system and prevents any potential issues in the future.
Placing the Pipe in the Correct Position within the Trench
When it comes to laying the pipe in the trench, it’s essential to position it correctly. The pipe should be placed at the bottom of the trench, allowing enough space on all sides for proper backfilling. As you position the pipe, make sure it runs straight from the starting point to the outlet, without any significant bends or deviations.
Aligning the Pipe with the Required Slope for Efficient Drainage
Aligning the pipe with the required slope is crucial for efficient drainage. The slope helps gravity do its job by allowing the wastewater to flow smoothly through the pipe and towards the outlet. To determine the required slope, refer to local building codes and regulations or consult with a professional plumber or engineer. Once you have the slope calculated, use a level or a string line to ensure that the pipe is positioned at the proper angle.
Securing the Pipe to Prevent Movement or Displacement
To prevent any movement or displacement of the sewer drain pipe, it’s important to secure it properly. This will ensure that the pipe stays in place even during heavy rain, ground settling, or any other external factors that could potentially cause damage. Use quality pipe supports or brackets at regular intervals along the length of the pipe. These supports will hold the pipe firmly in place and prevent any unwanted shifting. Additionally, backfill the trench gradually, providing gentle pressure to keep the pipe stable without causing any strain.
By following these steps and adhering to proper installation guidelines, you can lay the sewer drain pipe in the trench effectively. Placing the pipe in the correct position, aligning it with the required slope, and securing it properly will ensure a reliable and efficient sewer system for your property.
Connecting The Pipe Sections
Once you have aligned and positioned the sewer drain pipe sections, it is important to connect them properly to ensure a secure and leak-proof system. This step-by-step guide will walk you through the process of connecting the pipe sections, using appropriate connectors and fittings, ensuring leak-proof connections, and applying glue or other adhesive products as needed.
Using appropriate connectors and fittings
Before connecting the sewer drain pipe sections, it is essential to determine the appropriate connectors and fittings that will ensure a tight and secure joint. These connectors and fittings not only help in achieving a proper alignment but also help prevent leaks and ensure the smooth flow of wastewater. Different types of connectors and fittings can be used, such as:
| Types of Connectors and Fittings | Description |
|---|---|
| Couplings | Used to join two pipe sections of the same diameter. |
| Reducers | Used to connect pipes of different diameters. |
| Elbows | Used to change the direction of the pipe. |
| Wyes | Used to create branch connections. |
Ensuring leak-proof connections
Avoiding leaks is crucial when connecting drain pipes, as even a small leak can lead to major issues over time. To ensure leak-proof connections, follow these steps:
- Thoroughly clean the pipe ends and connectors to remove any dirt, debris, or moisture that could compromise the connection.
- Apply primer to the outside of the pipe and the inside of the connector. This will help the adhesive bond effectively to the surfaces.
- Apply PVC cement or adhesive to the primed areas.
- Insert the pipe into the connector with a twisting motion, ensuring it goes all the way in.
- Hold the joint together firmly for a few seconds to allow the adhesive to set.
Applying glue or other adhesive products as needed
Depending on the type of sewer drain pipe and connectors you are using, you may need to apply additional glue or adhesive products to ensure a strong and secure connection. It is important to follow the manufacturer’s instructions regarding the specific adhesive products recommended for your chosen pipe and fittings.
Remember to always wear protective gloves and goggles when handling adhesive products, and ensure proper ventilation in the work area.
By following these guidelines for connecting the pipe sections, you can create a sturdy and leak-free sewer drain pipe system. Take the time to choose the appropriate connectors and fittings, ensure leak-proof connections, and use the right adhesive products for a successful installation.
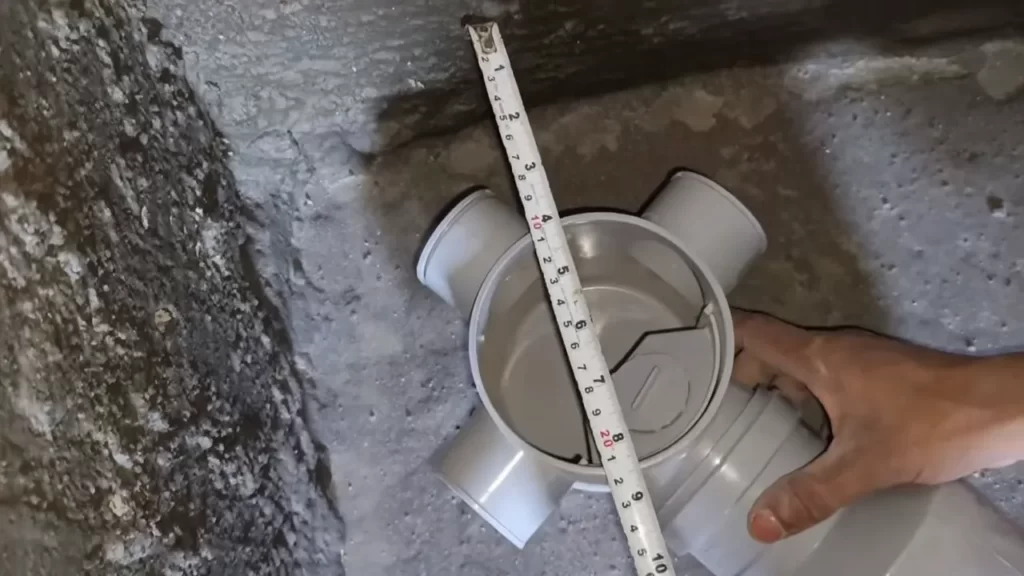
Installing Inspection And Cleanout Ports
As a homeowner, it is crucial to ensure that your sewer drain pipe is properly installed to avoid any potential problems down the line. One essential step in the installation process is adding inspection and cleanout ports. These ports not only make maintenance and troubleshooting easier but also provide accessibility for debris removal and clog removal. In this article, we will guide you on how to install inspection and cleanout ports in your sewer drain pipe.
Adding inspection ports for easy maintenance and troubleshooting
Inspection ports are an invaluable addition to your sewer drain pipe system. They allow for easy maintenance and troubleshooting, as well as early detection of any potential issues. To add inspection ports to your sewer drain pipe, follow these simple steps:
- Choose the location for the inspection ports, making sure they are easily accessible.
- Use a drill with a suitable drill bit to create openings in the pipe at the chosen locations.
- Insert PVC inspection port adapters into the openings.
- Tightly secure the adapters using PVC glue or solvent cement, ensuring a watertight seal.
- Attach removable caps or plugs to the adapters to cover the openings when not in use.
By adding inspection ports to your sewer drain pipe, you can easily inspect the condition of the pipe, identify any blockages or leaks, and perform necessary maintenance or repairs.
Installing cleanout ports for debris removal and clog accessibility
Cleanout ports are essential for easy debris removal and clog accessibility in your sewer drain pipe system. To install cleanout ports, follow these steps:
- Determine the appropriate locations for the cleanout ports, typically at bends or junctions in the pipe.
- Drill holes in the pipe at the chosen locations.
- Insert PVC cleanout adapters into the holes.
- Secure the adapters using PVC glue or solvent cement.
- Attach cleanout caps to the adapters to cover the openings.
Having cleanout ports in your sewer drain pipe allows for easy access to remove any debris or clogs that may accumulate over time. This proactive step will help prevent potential issues with your plumbing system.
Securing the ports and ensuring proper functionality
After installing the inspection and cleanout ports, it is crucial to ensure they are securely attached and functioning properly. Follow these steps to secure the ports:
- Check all the connections to ensure they are tight and leak-proof.
- Inspect the caps or plugs, ensuring they fit snuggly and provide a watertight seal.
- Test the functionality of the ports by removing the caps or plugs and checking for any obstructions.
- Make sure the ports are easily accessible and clearly marked for future maintenance.
By securing the inspection and cleanout ports, you guarantee their proper functionality and make troubleshooting or maintenance tasks more efficient and stress-free.
Installing inspection and cleanout ports is an essential part of properly setting up your sewer drain pipe system. By following these steps and ensuring their proper functionality, you can protect your home from potential plumbing issues and address any problems promptly.
Conducting A System Test
Checking for any leaks or inconsistencies
Before conducting a system test on your newly installed sewer drain pipe, it’s crucial to thoroughly check for any leaks or inconsistencies. Any faults in the pipe system can lead to potential problems down the line, so it’s best to identify and fix them at the earliest stage possible.
To check for leaks, inspect the entire length of the sewer drain pipe, including joints and connections. Look out for any signs of water leakage or dampness. Also, closely examine the surrounding areas for any signs of water damage or discoloration, as these could indicate a hidden leak. Make sure to address any leaks by properly sealing the affected areas or fixing the faulty connections.
Additionally, it’s important to check for any inconsistencies in the pipe system. These can include improper alignment, incorrect slopes, or any obstructions that may hinder the flow of wastewater. To check for alignment, visually inspect the pipe to ensure it runs straight and doesn’t have any unnecessary bends or curves. As for slope, use a level or a laser level to verify that the pipe is correctly angled in the direction of proper drainage.
Conducting a water flow test to ensure proper drainage
Once you’ve confirmed that there are no leaks or inconsistencies in the sewer drain pipe system, it’s time to conduct a water flow test to ensure proper drainage. This test will help you determine if the pipe is functioning effectively and efficiently.
To conduct the water flow test, follow these steps:
- Block off the sewer drain pipe’s outlet to prevent water from escaping.
- Pour a significant amount of water into the pipe’s inlet. This can be done using a hose or a bucket, depending on the size of the pipe.
- Observe the flow of water as it travels through the pipe. Pay close attention to any signs of blockages, such as slow or interrupted flow.
- Check the pipe’s outlet to ensure that water is being properly discharged. Look for any signs of backup or overflow.
If the water flow appears to be smooth and consistent, and there are no signs of blockages or backups, this indicates that the sewer drain pipe is functioning as intended. However, if you notice any issues during the water flow test, you may need to make necessary adjustments or repairs.
Making necessary adjustments or repairs
If the water flow test reveals any issues with the sewer drain pipe’s performance, it’s essential to make the necessary adjustments or repairs promptly. Delaying these corrective actions can lead to further complications and potential damage to the surrounding environment.
When making adjustments, focus on addressing any obstacles that may be interrupting the flow of water. This can involve removing debris or rearranging any improperly installed sections of the pipe. If necessary, consult with a professional plumber to ensure that the adjustments are done correctly and in line with local regulations and guidelines.
On the other hand, if repairs are needed, determine the specific areas that require attention. This could involve replacing damaged sections of the pipe, reinforcing weak connections, or sealing any leaks. Again, it’s advisable to seek professional assistance for complex repairs to ensure the long-term effectiveness and durability of the system.
In conclusion, conducting a system test for your sewer drain pipe is a vital step in ensuring its proper functionality. By thoroughly checking for leaks or inconsistencies, conducting a water flow test, and making necessary adjustments or repairs, you can have confidence in your newly installed sewer drain pipe’s ability to efficiently and effectively drain wastewater.
Backfilling The Trench
Backfilling the trench is an essential step when installing a sewer drain pipe. The process involves refilling the trench with excavated soil, compacting it for stability and support, and restoring the area to its original condition. Adhering to these steps ensures that the sewer drain pipe is properly installed and will function effectively. In this section, we will discuss each of these steps in detail.
Refilling the trench with excavated soil
Once the sewer drain pipe is properly laid and connected, it’s time to refill the trench. This is done by carefully placing back the excavated soil into the trench. It’s important to note that the backfill material should be free from rocks, debris, and other harmful substances that can cause damage to the sewer pipe. Additionally, it’s crucial to compact the soil layers as you refill, ensuring there are no voids or gaps that can lead to settling or shifting of the pipe.
Compacting the backfilled soil for stability and support
After refilling the trench with excavated soil, it’s imperative to compact the soil to ensure stability and support for the sewer drain pipe. Compacting the backfilled soil helps to prevent settling and maintain the proper alignment of the pipe. There are various methods to compact the soil, depending on the type of soil and the size of the trench. It’s recommended to use a compaction tool or machinery, such as a tamper or plate compactor, to achieve the desired level of compaction.
Restoring the area to its original condition
Once the backfilled soil is compacted, the next step is to restore the area to its original condition. This involves smoothing out the surface of the soil, removing any excess debris or rocks, and ensuring the area is free from any potential hazards. Additionally, it’s important to restore any landscaping elements or structures that may have been removed during the excavation process. By restoring the area to its original condition, you can ensure that the sewer drain pipe installation blends seamlessly into the surroundings.
By following these steps, you can successfully backfill the trench after installing a sewer drain pipe. This ensures that the pipe is properly supported, minimizing the risk of any future issues. Remember to always adhere to local regulations and guidelines when performing sewer drain pipe installations.
Finalizing The Installation
After successfully installing the sewer drain pipe, there are a few crucial steps to take in order to finalize the installation. These steps include conducting a final inspection to ensure compliance with regulations, documenting the installation for future reference, and cleaning up the work area along with disposing of waste materials.
Conducting a final inspection to ensure compliance with regulations
Before considering the installation complete, it is essential to conduct a thorough final inspection to ensure that the sewer drain pipe meets all the necessary regulations and requirements. This inspection will help to identify any potential issues or discrepancies that may need to be addressed before signing off on the installation.
Documenting the installation for future reference
To ensure that you have a record of the sewer drain pipe installation, it is important to document the entire process. By documenting the installation, you will have a reference for future maintenance or repairs. This documentation can include photographs, detailed notes, and any relevant permits or certificates.
Cleaning up the work area and disposing of waste materials
Once the installation is successfully completed, it is crucial to clean up the work area and dispose of any waste materials properly. This not only helps to maintain a safe and organized work environment but also contributes to environmental sustainability. It is important to dispose of waste materials in accordance with local regulations and guidelines.
In conclusion, finalizing the installation of a sewer drain pipe involves conducting a final inspection to ensure compliance with regulations, documenting the installation for future reference, and cleaning up the work area while disposing of waste materials responsibly. By following these final steps, you can ensure a successful and compliant sewer drain pipe installation.
Frequently Asked Questions
What Is The Difference Between A Sewer Pipe And A Drain Pipe?
Sewer pipes carry waste from toilets and connect to a municipal sewer system, while drain pipes handle water or liquid waste from sinks, bathtubs, and appliances, flowing into a drainage system. Sewer pipes manage solid waste, while drain pipes handle liquid waste.
How Deep Does A Drain Line Need To Be Buried?
A drain line needs to be buried at a depth that allows it to maintain a consistent slope. Typically, it should be buried at a depth of 12-18 inches. The exact depth may vary based on local building codes and the specific needs of your drainage system.
What Should Be The Proper Installation Of Drain Pipe?
To properly install a drain pipe, follow these guidelines: 1. Plan the layout and slope of the pipe to ensure proper drainage. 2. Dig a trench of appropriate depth and width. 3. Use quality materials, such as PVC pipes and watertight connectors.
4. Securely connect the pipe sections and fittings. 5. Test the system for leaks and ensure proper drainage.
How Do I Connect My Existing Sewer Pipe?
To connect your existing sewer pipe, follow these steps: 1. Ensure the pipe is clean and free from debris. 2. Use an appropriate coupling or connector to join the pipes securely. 3. Apply PVC cement or a suitable sealant to create a watertight connection.
4. Allow the adhesive to cure according to the manufacturer’s instructions. 5. Test the connection for leaks by running water through the pipe.
Conclusion
Installing a sewer drain pipe may seem like a daunting task, but with the right knowledge and preparation, it can be accomplished smoothly. By following these step-by-step instructions and tips, you can ensure a successful installation that will protect your property and prevent any future drainage issues.
Remember to gather all the necessary materials, plan the layout, and make sure you have the proper permits. With a little patience and attention to detail, you’ll have a reliable sewer drain pipe in place in no time. Happy pipe installing!