
To install a river rock shower floor, first, prepare the shower base by ensuring it is level and properly prepped. After that, apply a layer of mortar or thinset, then carefully place the river rocks on top, securing them with the thinset.
Finally, allow the thinset to cure before applying a sealant. Welcome to our guide on how to install a river rock shower floor. If you’re looking to add a touch of natural beauty to your bathroom, a river rock shower floor can be an excellent choice.
Not only does it provide a unique and luxurious look, but it also offers a comfortable and non-slip surface. However, installing a river rock shower floor requires careful preparation and precise installation techniques. In this guide, we will walk you through the step-by-step process of installing a river rock shower floor, ensuring a beautiful and long-lasting result. So let’s dive in and get started with the installation process.
Factors To Consider When Selecting River Rocks
When it comes to installing a river rock shower floor, one of the most important aspects to consider is the selection of the river rocks themselves. Choosing the right river rocks not only affects the overall look and feel of your shower floor but also plays a crucial role in its durability and quality. Here are three key factors that you should consider when selecting river rocks for your shower floor:
Size and Shape
The size and shape of the river rocks play a significant role in both the aesthetics and functionality of your shower floor. While smaller rocks provide a smoother surface for your feet, larger rocks can create a more textured and dramatic appearance. **Therefore, it is essential to consider the size and shape of the river rocks that will best suit your desired shower experience and bathroom style**. Additionally, keep in mind that irregularly shaped rocks may require more time and effort to install compared to uniformly shaped ones.
Color and Texture
Another important factor to consider is the color and texture of the river rocks. The natural colors of river rocks range from soft, earthy tones to vibrant hues, giving you a wide variety to choose from. **Consider the existing color palette of your bathroom and choose river rocks that complement or contrast beautifully**. Additionally, pay attention to the texture of the rocks as it can affect both the comfort and safety of your shower floor. Smooth rocks provide a soothing feel under your feet, while rougher rocks offer better traction to prevent slips and falls.
Durability and Quality
To ensure the longevity of your river rock shower floor, it is crucial to select rocks that are both durable and of high quality. **Opt for river rocks that are hard and resistant to cracking and chipping**. Additionally, consider the source and origin of the rocks. River rocks that are sourced from reputable suppliers and undergo rigorous quality control measures are more likely to withstand the test of time. Furthermore, rocks that have been tumbled or polished are often smoother and more durable, making them a preferable choice.

Preparing The Shower Base For Installation
Before installing a river rock shower floor, you need to prepare the shower base to ensure a solid foundation for the installation. This involves several important steps, including cleaning and removing old flooring materials, evaluating the subfloor, making necessary repairs, and applying a waterproofing membrane. By following these steps, you can create a sturdy and waterproof base for your river rock shower floor.
Cleaning and Removing Old Flooring Materials
The first step in preparing the shower base is to clean and remove any old flooring materials. This includes removing any existing tiles, linoleum, or other types of flooring that may be in the shower area. To do this, you will need a utility knife, a pry bar, and a bucket for collecting the debris. Start by using the utility knife to cut through the old flooring material, making it easier to remove. Then, use the pry bar to gently lift and remove the old flooring, being careful not to damage the subfloor underneath. Once the old flooring is removed, thoroughly clean the subfloor to ensure a clean surface for the next steps.
Evaluating the Subfloor and Making Repairs if Necessary
The next step is to evaluate the subfloor to check for any damage or decay. This is an important step to ensure a sturdy and stable base for your river rock shower floor. Inspect the subfloor for any signs of water damage, rot, or weak areas. If you notice any issues, it is crucial to make the necessary repairs before proceeding. This may involve replacing damaged subfloor sections, reinforcing weak areas, or treating any signs of rot or decay. By addressing these issues now, you can prevent future problems and ensure a long-lasting installation.
Applying a Waterproofing Membrane
Once the subfloor is in good condition, the next step is to apply a waterproofing membrane. This is an essential step to prevent water from seeping through the shower base and causing damage to the underlying structure. There are various types of waterproofing membranes available, including liquid membranes and sheet membranes. Follow the manufacturer’s instructions to apply the membrane evenly and thoroughly, paying extra attention to the corners and edges where water can often penetrate. Allow the membrane to fully cure before proceeding with the installation of the river rock shower floor.
Gathering The Necessary Tools And Materials
Before you embark on installing a river rock shower floor, it’s crucial to gather all the necessary tools and materials. By having everything ready, you’ll save time and ensure a smoother installation process. In this section, we will discuss the essential items you need to have on hand.
River Rocks
The first and most important element you’ll need for your river rock shower floor is, of course, the river rocks themselves. These rocks create a natural and visually appealing surface for your shower floor. You can find river rocks at local home improvement stores, landscaping suppliers, or even online. Make sure to choose rocks that are smooth and flat to ensure a comfortable shower experience.
Thin-Set Mortar or Adhesive
To secure the river rocks in place, you’ll need thin-set mortar or adhesive. This substance acts as the bonding agent between the rocks and the shower floor. Thin-set mortar is commonly used for this purpose, and it provides a strong and durable hold. Alternatively, you can use adhesive specifically designed for tiling projects. Ensure that the thin-set mortar or adhesive you choose is suitable for wet areas.
Notched Trowel
A notched trowel is an essential tool for spreading the thin-set mortar or adhesive onto the shower floor. The notches on the trowel create ridges in the mortar, allowing for better adhesion and ensuring an even distribution. Look for a notched trowel with a size that matches the requirements specified by the thin-set mortar or adhesive manufacturer.
Grout
After the river rocks are securely in place, you’ll need to fill in the gaps between them with grout. Grout not only adds a finishing touch to the shower floor, but it also provides stability and prevents water from seeping through. There are various types of grout available, including cement-based and epoxy-based grouts. Choose a grout color that complements the overall aesthetic of your shower and make sure to follow the manufacturer’s instructions for mixing and applying it.
Grout Float
A grout float is a handheld tool with a rubber or foam pad that is used to apply grout into the gaps between the river rocks. It allows for smooth and even distribution of the grout, ensuring that every crevice is filled. When using a grout float, gently press the grout into the gaps and scrape away any excess to create a clean finish.
Sealer
To protect your river rock shower floor from moisture and stains, applying a sealer is essential. A sealer creates a protective barrier on the surface of the rocks and grout, helping to maintain their appearance and longevity. There are sealers specifically designed for natural stone surfaces, so make sure to choose one that is suitable for river rocks. Apply the sealer according to the manufacturer’s instructions, and ensure that the shower floor is dry and clean before doing so.
By gathering all the necessary tools and materials before starting the installation process, you can complete your river rock shower floor with ease. These items, from the river rocks themselves to the grout float, are essential for a successful and visually appealing end result. In the next section, we will guide you through the process of preparing the shower floor for the installation.

Laying The River Rocks
Before you start laying the river rocks on your shower floor, it’s important to plan out the layout and design. This step will ensure that your installation looks aesthetically pleasing and functions well in your shower space. Here’s how to plan the layout:
- Measure the dimensions of your shower floor and calculate the area you need to cover with river rocks. Keep in mind that you want to create a slope towards the drain to ensure proper water drainage.
- Choose the shape and size of river rocks you want to use. Consider the overall theme and style of your bathroom to select rocks that complement the look.
- Using a marker or painter’s tape, outline the area where the river rocks will be placed. This will give you a visual guide and help you keep the rocks within the designated space.
- Arrange the river rocks outside the shower area according to their shape and size. This will help you easily select and place them in the right spot during the installation.
By taking the time to plan the layout and design, you’ll have a clear vision of how your river rock shower floor will look, and you’ll be prepared for the next steps in the installation process.
Once you have planned the layout, it’s time to apply thin-set mortar to the subfloor, which will serve as the base for your river rocks. Follow these steps to apply the mortar:
- Clean the subfloor thoroughly to ensure a good bond between the mortar and the surface. Remove any dirt, dust, or debris that might hinder adhesion.
- Using a notched trowel, spread a layer of thin-set mortar evenly over the entire subfloor. Make sure the mortar layer is about 1/4 inch thick.
- Work in small sections to ensure the mortar remains wet and workable. Avoid spreading too much mortar at once, as it can dry out before you have a chance to lay the river rocks.
- Use the flat side of the trowel to smooth out the mortar, creating a level surface for the river rocks. Make sure there are no significant gaps or bumps that could affect the stability of the rocks.
Applying the thin-set mortar properly is crucial for a strong and durable river rock shower floor. Take your time and pay attention to detail to ensure a solid foundation for the rocks to adhere to.
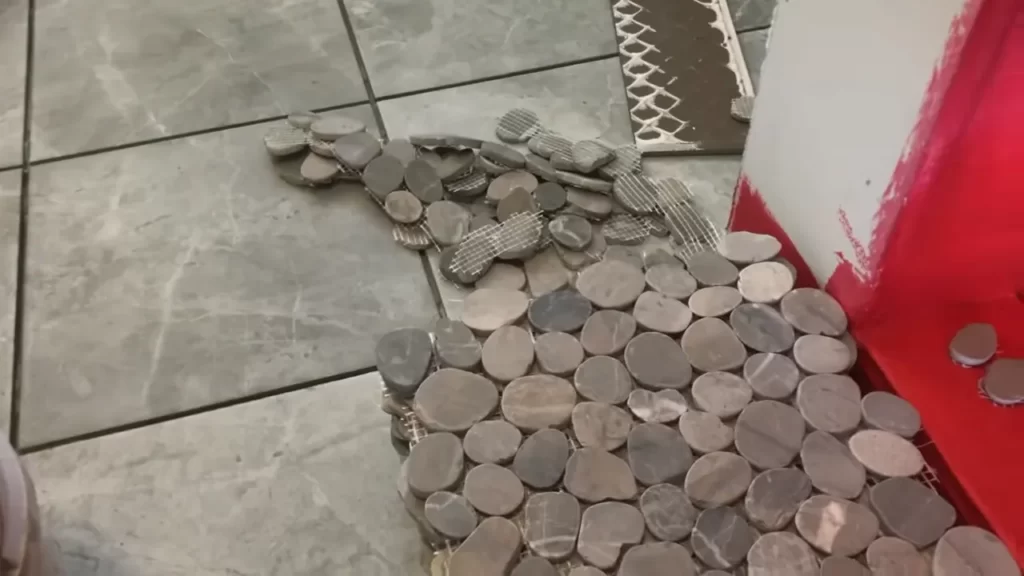
Now that the thin-set mortar is applied, it’s time to start placing the river rocks onto the mortar. Follow these steps for a successful installation:
- Start placing the river rocks along the designated outline or marker. Begin with larger rocks, as they will create a stable base for the smaller ones.
- Press each rock firmly into the mortar, making sure it is level and flush with the surrounding rocks. Apply sufficient pressure to ensure proper adhesion.
- Continue placing the river rocks in a pattern that suits your design. Mix different sizes and shapes for added visual interest.
- Take your time with the installation, ensuring each rock fits tightly against its neighbors. This will prevent gaps and improve the overall appearance of the shower floor.
Placing the river rocks onto the mortar requires patience and attention to detail. Remember to work in small sections and periodically step back to assess the overall balance and spacing.
As you continue laying the river rocks, it’s essential to ensure proper spacing and alignment for a cohesive and visually appealing shower floor. Here’s what you need to do:
- Regularly check the spacing between the river rocks as you place them. Use spacers or your fingers to maintain consistent gaps.
- Adjust the position of any misaligned rocks immediately to ensure a seamless look. The mortar’s wetness allows for easy adjustment before it fully sets.
- Pay attention to the overall alignment of the river rocks, making sure they follow the design you envisioned. This step is crucial for achieving a polished and professional finish.
- Wipe off any excess mortar that may have oozed out from between the rocks. A damp cloth or sponge can help you clean the surface without disturbing the rocks.
By consistently checking the spacing, alignment, and cleanliness of your river rock shower floor, you’ll create a visually stunning and functional addition to your bathroom.

Grouting And Sealing The River Rock Shower Floor
After completing the installation of your river rock shower floor, the next crucial step is to grout and seal the rocks. Grouting not only enhances the overall appearance of the river rock shower floor but also ensures a watertight seal. Sealing the grout and river rocks further protects them from water damage, increasing their longevity and preventing any potential issues such as mold or mildew growth.
Mixing and Applying Grout
Before you can begin grouting, make sure you have the necessary tools and materials, such as a grout float, grout sponge, and a high-quality grout suitable for use in wet environments.
Follow these steps to mix and apply grout to your river rock shower floor:
- Carefully read and follow the manufacturer’s instructions on the grout packaging for the correct water-to-grout ratio.
- Using a clean bucket, mix the grout powder with water, and stir it until you achieve a smooth, lump-free consistency.
- Start applying the grout with a grout float, pressing it firmly into the gaps between the river rocks.
- Note: Work in small sections to ensure the grout does not dry out before you have a chance to clean it up.
- Hold the grout float at a 45-degree angle and use it to spread the grout across the surface in a diagonal motion, ensuring the gaps are completely filled.
Removing Excess Grout and Cleaning the Rocks
Once you have finished applying the grout, you need to remove the excess grout on the surface of the river rocks and clean them to reveal their natural beauty.
Follow these steps to remove excess grout and clean the river rocks:
- Allow the grout to set for the recommended time provided by the grout manufacturer.
- Using a slightly damp grout sponge or a soft cloth, carefully wipe away any excess grout from the surface of the river rocks.
- Make sure to rinse the sponge or cloth frequently to avoid smearing the grout.
- Once you have removed most of the excess grout, use a clean, lint-free cloth to further buff the rocks and remove any remaining grout haze.
- Inspect the river rock shower floor for any missed spots or uneven grout lines, and touch up as necessary.
Sealing the Grout and River Rocks to Prevent Water Damage
To provide extra protection for your river rock shower floor, it is essential to seal both the grout lines and the river rocks themselves. Sealing forms a barrier that prevents water from penetrating the surface, safeguarding against potential water damage and staining.
Follow these steps to properly seal the grout and river rocks:
- Select a high-quality sealer specifically designed for use on natural stone and in wet areas like showers.
- Ensure the river rock shower floor is clean and completely dry before applying the sealer.
- Using a brush or roller, carefully apply the sealer to both the grout lines and the river rocks, ensuring full coverage.
- Allow the sealer to dry for the recommended time specified on the product packaging.
- Apply a second coat of sealer if necessary, following the same procedure as before.
Congratulations! You have successfully grouted and sealed your river rock shower floor, providing both an aesthetically pleasing appearance and extended durability. Remember to regularly maintain and reseal your river rock shower floor to keep it looking its best and to ensure long-term enjoyment.
Cleaning The River Rocks
Keeping your river rock shower floor clean is essential for both hygiene and aesthetics. Over time, soap scum and mineral deposits can build up, making the surface slippery and dulling its natural beauty. Fortunately, with regular maintenance and the right cleaning techniques, you can keep your river rock shower floor looking fresh and inviting. In this article, we will discuss different methods to effectively clean your river rocks, ensuring that they remain beautiful and safe.
Regular Sweeping and Mopping
To prevent the accumulation of dirt and debris on your river rock shower floor, regular sweeping and mopping are important. By sweeping the surface with a broom or a soft-bristle brush, you can remove loose particles that might scratch the rocks or cause stains. Remember to sweep gently to avoid damaging the rocks. Once you’ve swept the area, proceed to mop the floor using a mild, non-abrasive cleaner and warm water. This will help remove any remaining dirt and give your river rocks a clean and polished appearance.
Removing Soap Scum and Mineral Deposits
Soap scum and mineral deposits are common culprits on river rock shower floors. They can make the rocks appear dull and decrease their slip resistance. To tackle these issues, it’s important to use an effective cleaning method. Start by wetting the river rocks thoroughly with warm water. Next, apply a mixture of white vinegar and water to the affected areas. Allow the solution to sit for a few minutes to break down the build-up. Then, scrub the rocks gently using a soft-bristle brush or a sponge. Finally, rinse the entire surface with warm water to remove any residue.
Using Non-Abrasive Cleaners
When it comes to cleaning river rocks, it’s crucial to use non-abrasive cleaners to avoid damaging the natural stone. Harsh chemicals or abrasive cleaning agents can erode the rocks’ surface and dull their appearance. Instead, opt for gentle, pH-neutral cleansers that are specifically designed for stone surfaces. These cleaners effectively remove dirt and grime without causing harm. Always follow the manufacturer’s instructions and test the cleaner on a small, inconspicuous area of the floor before applying it to the entire surface.
By following these cleaning techniques, you can maintain the beauty and cleanliness of your river rock shower floor. Remember to perform regular sweeping and mopping, remove soap scum and mineral deposits, and use non-abrasive cleaners. With a little care and effort, your river rock shower floor will provide a luxurious and refreshing bathing experience for years to come.
Preventing Mold And Mildew Growth
Mold and mildew growth in your shower can not only be unsightly but also harmful to your health. Fortunately, there are several measures you can take to prevent their growth and ensure a clean and healthy shower environment. In this section, we will discuss three key steps to prevent mold and mildew in your river rock shower floor:
Proper Ventilation in the Bathroom
Proper ventilation in the bathroom is crucial to prevent mold and mildew from thriving. When moisture gets trapped in your shower area, it creates an ideal breeding ground for these unwanted guests. To ensure proper ventilation:
- Install a high-quality exhaust fan that can effectively remove excess moisture from the air.
- Keep the bathroom door open or crack a window open after showering to allow fresh air to circulate.
- Wipe down the shower walls and floor after each use to remove any lingering moisture.
Regularly Inspecting and Repairing Grout
Mold and mildew often find their way into the crevices between the river rocks through damaged or cracked grout. To prevent this:
- Inspect the grout regularly for any signs of damage or deterioration. Look for cracks, discoloration, or loose areas.
- Repair any damaged areas promptly. Remove the old grout and replace it with a high-quality grout that is specifically designed for use in wet areas.
- Seal the grout to provide an additional layer of protection and prevent moisture penetration.
Using a Mold-Inhibiting Sealer
Applying a mold-inhibiting sealer to your river rock shower floor can significantly reduce the risk of mold and mildew growth. Here’s how you can do it:
- Clean the shower floor thoroughly to remove any existing mold or mildew.
- Choose a high-quality mold-inhibiting sealer specifically formulated for natural stone surfaces.
- Apply the sealer to the entire shower floor, following the manufacturer’s instructions.
- Allow the sealer to dry completely before using the shower.
By following these preventative measures, you can enjoy a sparkling clean river rock shower floor and bid farewell to mold and mildew growth. Remember to maintain proper ventilation, regularly inspect and repair grout, and use a mold-inhibiting sealer for long-lasting results.
Dealing With Stains And Damage
Dealing with Stains and Damage
When it comes to maintaining the beauty and functionality of your river rock shower floor, it’s important to address any stains or damage that may occur over time. Whether it’s an unsightly stain, a cracked or loose river rock, or the need for resealing, taking care of these issues promptly will ensure that your shower floor remains pristine for years to come.
Removing Stains on River Rocks
Stains on river rocks can be unsightly and can detract from the overall appearance of your shower floor. Fortunately, removing these stains is relatively simple. Follow these steps to effectively eliminate stains from your river rock shower floor:
- Mix a solution of equal parts white vinegar and water in a spray bottle.
- Spray the solution directly onto the stained area.
- Using a soft-bristle brush, gently scrub the stained area in circular motions.
- Rinse the area thoroughly with water.
- Dry the shower floor with a clean towel or allow it to air dry.
By following these steps, you can easily restore the natural beauty of your river rock shower floor and eliminate any unsightly stains.
Repairing Cracked or Loose River Rocks
If you notice any cracked or loose river rocks on your shower floor, it’s important to address these issues promptly to prevent further damage. Follow these steps to effectively repair cracked or loose river rocks:
- Remove any loose river rocks from the damaged area.
- Clean the area with a mild detergent and water.
- Apply a thin layer of tile adhesive to the back of each replacement river rock.
- Press the replacement river rocks firmly into place, ensuring they are level with the surrounding rocks.
- Allow the adhesive to dry according to the manufacturer’s instructions.
- Once dry, grout the repaired area using a grout that matches the color of your river rocks.
By following these steps, you can easily repair any cracked or loose river rocks on your shower floor, ensuring its integrity for years to come.
Resealing the Shower Floor
Resealing your river rock shower floor is an essential step in maintaining its beauty and protecting it from stains and damage. Follow these steps to effectively reseal your shower floor:
- Clean the shower floor thoroughly using a mild detergent and water.
- Dry the shower floor completely.
- Apply a layer of stone sealer to the entire surface of the shower floor, using a paintbrush or roller.
- Allow the sealer to penetrate the surface for the recommended time specified by the manufacturer.
- Wipe away any excess sealer using a clean, dry cloth.
- Allow the sealer to cure for the recommended time before using the shower.
By resealing your river rock shower floor, you can protect it from stains, prolong its lifespan, and maintain its natural beauty.
Frequently Asked Questions
Does A River Rock Shower Floor Need To Be Sealed?
Yes, a river rock shower floor should be sealed. Sealing prevents water damage, stains, and the growth of mold and mildew. It also helps maintain the natural beauty and durability of the river rocks.
What Kind Of Grout Do You Use For A River Rock Shower Floor?
Use a sanded grout for a river rock shower floor. Sanded grout offers better adhesion and durability for the uneven surface. Apply the grout with a rubber float, pressing it into the gaps between the rocks. Wipe off excess grout with a damp sponge, then seal for added protection.
What Is The Best Grout For A Pebble Stone Shower Floor?
The best grout for a pebble stone shower floor is generally a sanded grout. Sanded grout provides better adhesion and prevents pebbles from shifting or popping out. It also helps to fill in the gaps between the stones, ensuring a more secure and watertight surface.
How Do You Seal A Rock Shower Floor?
To seal a rock shower floor, follow these steps: Clean the surface thoroughly, making sure it’s dry. Apply a penetrating sealer designed for natural stone. Use a brush or roller to evenly coat the entire floor. Let it dry for the recommended time.
Apply a second coat if necessary.
Conclusion
To sum up, installing a river rock shower floor can add a touch of natural beauty and style to your bathroom. By following the step-by-step process outlined in this blog post, you can achieve a stunning and functional shower floor that will impress your family and guests.
Remember to gather all the necessary materials, prepare the surface properly, and take your time during the installation process for the best results. Enjoy your new river rock shower floor and the tranquil ambiance it brings to your bathroom space.