
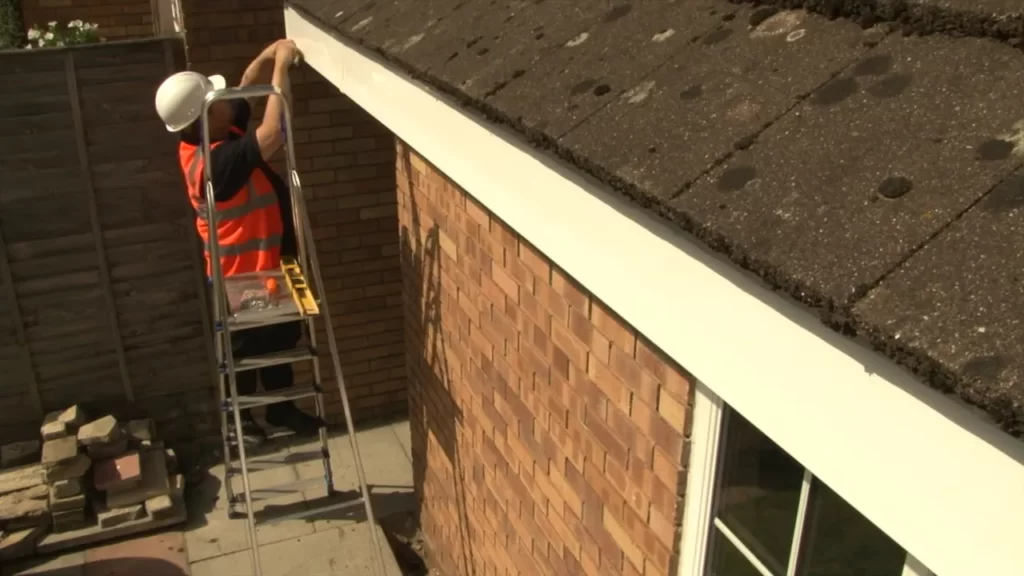
To install plastic gutters, first, measure and mark the desired location for the gutter system. Then, attach the gutter brackets along the marked line, ensuring they are spaced evenly.
Gutters are an essential component of any building’s drainage system. They help to collect rainwater and direct it away from the foundation, preventing water damage. If you are looking to install plastic gutters, you need to follow a few simple steps.
First, measure and mark the desired location for the gutter system. This will help you determine the length of the gutters and the number of parts needed. Once you have the measurements, attach the gutter brackets along the marked line, ensuring they are evenly spaced. These brackets will support the gutter sections.
Choosing The Right Plastic Gutters For Your Home
When it comes to choosing the right plastic gutters for your home, there are several important factors to consider. Understanding the different types of plastic gutters available is crucial to making an informed decision. Additionally, it’s essential to weigh the pros and cons of plastic gutters to ensure they are the best fit for your home’s needs. In this section, we will delve into these factors and provide you with valuable insights, empowering you to make the right choice for your home.
Factors to consider when selecting plastic gutters
Before diving into the different types of plastic gutters available, it’s important to consider various factors that influence your selection. The following are key aspects to keep in mind when choosing plastic gutters for your home:
- Climate: Take into account the weather conditions your gutters will be exposed to. For areas prone to heavy rainfall, choose gutters with a high water-carrying capacity and excellent drainage features.
- Home style: The architectural style of your home should align with the gutter design. Ensure that the plastic gutters you select complement the overall aesthetics of your house.
- Budget: Set a budget that suits your financial capabilities. Plastic gutters are generally more affordable than other materials, but prices may vary based on the quality and brand.
- Maintenance: Consider the level of maintenance you are willing to undertake. Some plastic gutters require less maintenance than others, so it’s crucial to find the right balance between convenience and durability.
- Installation: Assess your DIY skills and time availability. While plastic gutters are generally easy to install, you might prefer professional installation for guaranteed quality and peace of mind.
Understanding the different types of plastic gutters available
Plastic gutters come in a variety of styles and materials. Understanding the different types available will enable you to make an informed decision. Consider the following options:
| Type | Description | Pros | Cons |
|---|---|---|---|
| Vinyl Gutters | Lightweight and easy to install, vinyl gutters are cost-effective and resistant to rust and corrosion. |
|
|
| Aluminum Gutters | Durable and lightweight, aluminum gutters are resistant to rust and can withstand extreme weather conditions. |
|
|
| Plastic-Coated Aluminum Gutters | Combining the durability of aluminum with the aesthetic appeal of vinyl, these gutters offer the best of both worlds. |
|
|
Pros and cons of plastic gutters
Plastic gutters offer several advantages and a few drawbacks. Weighing these pros and cons will help you determine if plastic gutters are the best choice for your home:
Pros:
- Affordable compared to other gutter materials.
- Lightweight and easy to install.
- Resistant to rust and corrosion.
- Available in various colors to suit your home’s aesthetics.
- Low maintenance requirements.
Cons:
- May not be as durable as other gutter materials.
- Can crack or warp in extreme temperatures.
- Prone to fading over time.
- Certain types may require professional installation for optimum results.
By considering the factors outlined above, understanding the different options available, and weighing the pros and cons, you can confidently choose the right plastic gutters for your home. Whether you opt for vinyl, aluminum, or plastic-coated aluminum gutters, make sure to select ones that align with your requirements and preferences. The right plastic gutters will not only protect your home but enhance its overall visual appeal.
Measuring And Planning For Your Plastic Gutter Installation
Before you start installing plastic gutters, it’s crucial to measure your space accurately and plan for proper drainage. This will ensure a seamless installation and minimize any potential issues down the line. In this section, we’ll guide you through the measuring process and how to assess the slope for optimal drainage.
Tools and Supplies Needed for the Installation Process
Before getting started, gather the necessary tools and supplies:
| Tools | Supplies |
|---|---|
|
|
Measuring the Length of the Gutter System
The first step in the measurement process is determining the length of the gutter system you’ll need. Start by measuring the length of each side of your roof where the gutter will be installed. Use a tape measure to get an accurate measurement from one end to the other.
It’s important to account for any corners or breaks in the gutter system. Measure each section individually and add them together to get the total length required. Remember to include additional length for overlaps and connections.
Assessing the Slope and Planning for Proper Drainage
Proper drainage is essential to prevent water pooling and potential damage to your home’s foundation. Before installing the gutter system, assess the slope to ensure optimal water flow.
Start by positioning a ladder near the roof edge, where you’ll begin installation. Use a level to determine the slope and angle. A slight slope of ¼ inch per 10 feet of gutter length is recommended. This will allow water to flow freely towards the downspout without any backups or clogs.
If necessary, modify the slope by adjusting the gutter hangers or brackets accordingly. It’s essential to maintain a consistent slope throughout the entire gutter system for proper drainage.
By taking accurate measurements and planning for proper drainage, you’ll set yourself up for a successful plastic gutter installation. Next up, we’ll guide you through the process of installing the gutters and ensuring a secure fit.
Preparing Your Home For Plastic Gutter Installation
Preparing your home for plastic gutter installation is an essential step in ensuring a successful and long-lasting gutter system. By properly clearing debris, cleaning the fascia board, and repairing any damaged areas, you can create a solid foundation for your new gutters. Additionally, applying a primer and sealant will optimize adhesion, ensuring your gutters stay securely in place.
Clearing Debris and Cleaning the Fascia Board
Before installing plastic gutters, it’s important to thoroughly clear any debris from the gutter area and clean the fascia board. This will not only improve the appearance of your home but also prevent any blockages or damage to your gutter system.
To clear debris from the gutter area, follow these steps:
- Place a ladder securely against your home, ensuring it’s stable and safe to climb.
- Use gloved hands or a small garden trowel to remove leaves, twigs, and other debris from the gutter.
- Dispose of the debris in a trash bag or compost pile.
- Once the gutter is clear, use a hose to flush out any remaining dirt, ensuring a clean surface for installation.
After clearing the debris, it’s time to clean the fascia board to ensure a smooth and even surface for the gutter installation. Here’s how:
- Fill a bucket with warm water and add a mild detergent or gutter cleaning solution.
- Dip a soft-bristled brush or sponge into the soapy water.
- Gently scrub the fascia board, paying attention to any stains or grime.
- Rinse the fascia board with clean water, removing any soap residue.
- Allow the fascia board to dry completely before proceeding with the installation.
Repairing any Damaged Areas on the Fascia Board
Before installing plastic gutters, it’s crucial to inspect the fascia board for any damaged or rotted areas. Repairing these areas will provide a solid foundation for your new gutter system and prevent further damage to your home.
To repair damaged areas on the fascia board, follow these steps:
- Use a screwdriver or a pry bar to remove any loose or damaged boards.
- Inspect the underlying structure for signs of rot or decay. If necessary, replace any damaged sections.
- Use a wood filler to fill in any cracks, holes, or gaps in the fascia board.
- Smooth out the wood filler with a putty knife, ensuring a flush and even surface.
- Allow the wood filler to dry completely before continuing with the gutter installation.
Applying a Primer and Sealant for Optimal Adhesion
Properly priming and sealing the fascia board is crucial for optimal adhesion between the plastic gutters and the surface. This step will enhance the longevity and durability of your gutter system.
To apply a primer and sealant, follow these steps:
- Clean the entire fascia board, ensuring it’s free from dust, dirt, and debris.
- Apply a plastic gutter primer to the fascia board using a brush or roller, following the manufacturer’s instructions.
- Allow the primer to dry completely before proceeding.
- Then, apply a weather-resistant sealant along the length of the fascia board where the gutter will be installed.
- Smooth out the sealant with a caulk gun or a putty knife, ensuring a tight seal.
By properly preparing your home for plastic gutter installation, you can ensure a successful and reliable gutter system. Clearing debris, cleaning the fascia board, repairing any damages, and applying a primer and sealant will lay the foundation for a sturdy and long-lasting gutter solution.
Installing Plastic Gutters On Your Home
If you’re looking to protect your home from water damage, installing plastic gutters is a smart choice. Not only are they durable and cost-effective, but they are also easy to install. In this guide, we’ll walk you through the process of attaching the gutter brackets to the fascia board, cutting and joining the plastic gutter sections, and securing the gutter system to ensure proper alignment. Let’s get started!
Attaching the gutter brackets to the fascia board
Before you can start installing your plastic gutters, it’s crucial to attach the gutter brackets to the fascia board. These brackets provide the necessary support to keep the gutters in place. Here’s how you can do it:
- Start by measuring the length of your gutter system and mark the positions of the brackets accordingly.
- Using a drill, pre-drill holes at the marked positions on the fascia board.
- Line up the brackets with the pre-drilled holes and secure them using screws.
- Make sure the brackets are evenly spaced along the fascia board to ensure proper support for the gutters.
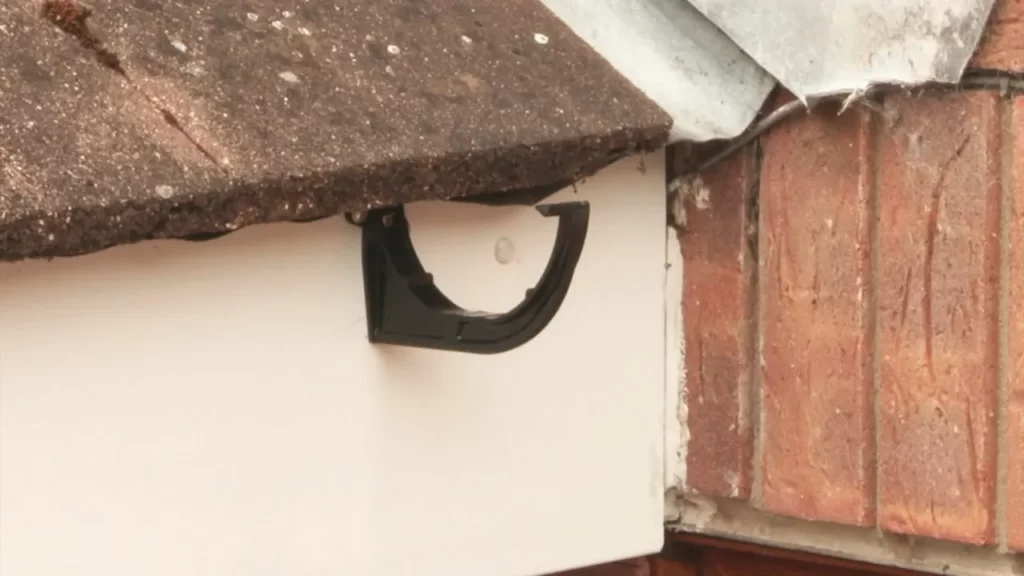
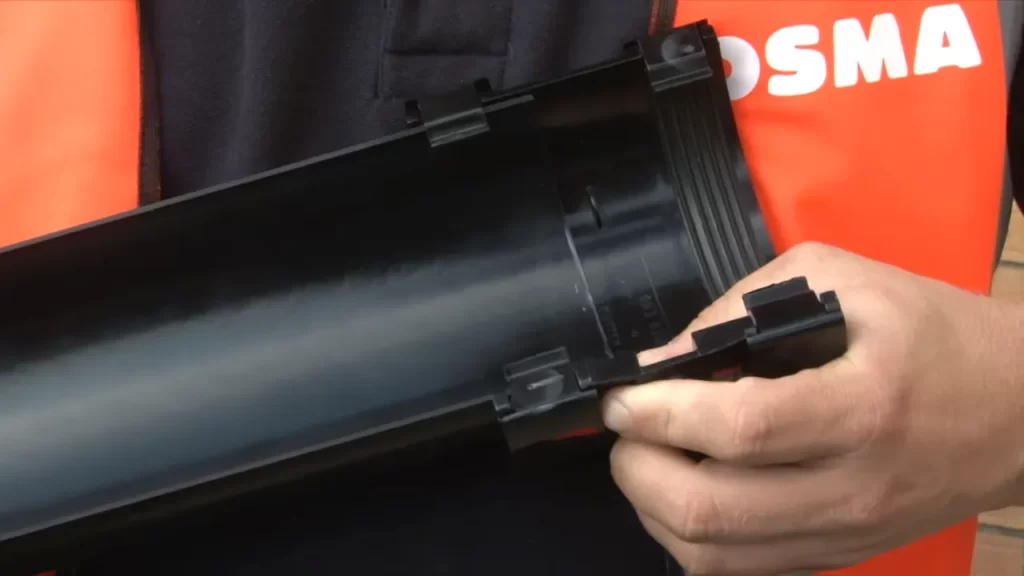
Cutting and joining the plastic gutter sections
Once the brackets are securely attached, it’s time to cut and join the plastic gutter sections. This step is crucial to ensure a seamless and watertight gutter system. Follow these steps:
- Measure the length needed for each gutter section and mark it using a pencil.
- Using a hacksaw or a specialized gutter cutting tool, carefully cut the gutter sections to the desired length.
- Smooth any rough edges using sandpaper to ensure a clean finish.
- Apply gutter sealant on the cut ends of the gutter sections.
- Join the gutter sections together, starting from the highest point and working your way down.
Securing the gutter system and ensuring proper alignment
Now that your gutter sections are securely joined, it’s time to secure the gutter system and ensure proper alignment. This will prevent any sagging or misalignment that can affect the water flow. Follow these steps:
- Attach the gutter end caps using a sealant to prevent water leakage.
- Use gutter hangers to secure the gutters to the brackets. Make sure they are evenly spaced and provide adequate support.
- Check the alignment of the gutters using a level. Adjust the brackets as necessary to achieve a straight and even gutter system.
- Finally, check for any gaps or potential leaks and seal them using gutter sealant.
With these steps, you can efficiently install plastic gutters on your home. Remember to follow manufacturer instructions and safety precautions throughout the installation process. By protecting your home from water damage, you’re ensuring its longevity and maintaining its value.
Connecting Plastic Gutters To Downspouts
After successfully installing plastic gutters, the next step is to connect them to downspouts. This crucial step ensures that rainwater is efficiently directed away from your home’s foundation. In this section, we will guide you through the process of selecting the appropriate downspout size and location, attaching the downspout outlet to the gutter system, and installing and securing the downspout to the wall or ground.
Selecting the appropriate downspout size and location
Choosing the right downspout size is essential to ensure proper drainage and prevent overflow during heavy rainfall. The size you select will depend on factors such as the size of your roof, the average precipitation in your area, and the slope of your gutters. Here’s a simple table to help you determine the appropriate downspout size:
| Roof Area | Recommended Downspout Size |
|---|---|
| Up to 600 square feet | 2″ x 3″ |
| 601 to 1200 square feet | 3″ x 4″ |
| 1201 to 2000 square feet | 4″ x 5″ |
| Above 2000 square feet | 6″ round |
Once you’ve determined the appropriate downspout size, it’s time to consider the location. Ideally, downspouts should be placed at the corners of your home to evenly distribute the water flow. Additionally, you should avoid placing downspouts near doors, windows, or walkways to prevent any water-related inconveniences.
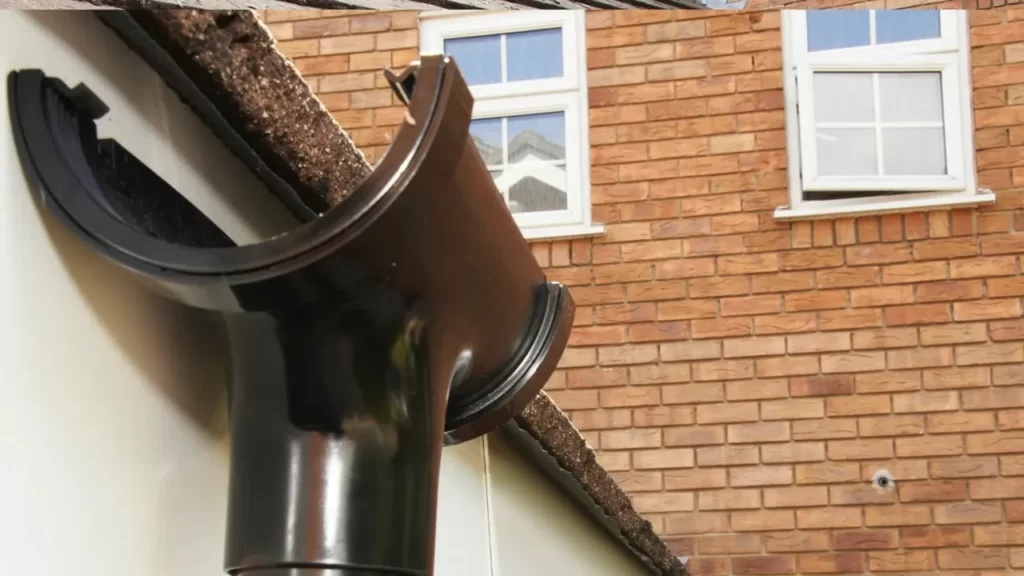
Attaching the downspout outlet to the gutter system
Now that you’ve selected the downspout size and location, it’s time to attach the downspout outlet to the plastic gutters. This process is relatively straightforward:
- Measure the desired length of the downspout from the outlet of the gutter system to the ground or drainage area.
- Cut the downspout to the measured length using a saw or snips, ensuring it aligns with the downspout outlet on the gutter system.
- Attach the downspout outlet to the gutter system by inserting it into the opening and securing it with self-tapping screws.
Installing and securing the downspout to the wall or ground
With the downspout outlet securely attached, the next step is to install and secure the downspout to either the wall or the ground. This will prevent any wobbling or detachment during heavy rains. Follow these steps to complete the installation:
- Position the downspout against the wall or directly into the ground, ensuring it is aligned with the downspout outlet.
- Use a level to ensure the downspout is straight, both vertically and horizontally.
- Secure the downspout to the wall using wall brackets or straps, ensuring they are evenly spaced and tightly fastened.
- If installing the downspout in the ground, bury it in a trench and fill the surrounding area with gravel.
By following these steps, you can successfully connect plastic gutters to downspouts, ensuring efficient rainwater drainage and protecting your home’s foundation. Remember to regularly inspect and clean your gutter system to maintain its functionality and prevent clogging.
Testing And Maintaining Your Plastic Gutter System
Once you have successfully installed your plastic gutter system, it is essential to regularly test and maintain it to ensure optimal performance. This will help prevent any potential drainage issues and keep your gutters functioning properly for years to come.
Checking for proper water flow and drainage
One of the most important aspects of maintaining a plastic gutter system is to frequently check for proper water flow and drainage to avoid any potential blockages or leaks. Here’s how you can do it:
- First, ensure that all downspouts are connected properly to the gutters, allowing water to flow freely downward.
- Next, when it rains, observe how the water flows through the gutter system. Check for any pooling or overflowing in certain areas, as this may indicate a clog or improper installation.
- If you notice any issues with water flow or drainage, it is crucial to address them promptly. Use a garden hose to flush out the gutters and downspouts to remove any debris or blockages. Additionally, you may need to adjust the slope of the gutter system to allow for proper water flow.
Cleaning and maintaining the plastic gutters regularly
To keep your plastic gutters in top condition, regular cleaning and maintenance are necessary. Follow these steps to ensure your gutters remain free from debris:
- Begin by wearing protective gloves and using a ladder to access the gutters safely.
- Remove leaves, twigs, and other debris from the gutter channels. Utilize a plastic scoop or your gloved hands to clear out any blockages.
- After clearing the gutters, thoroughly rinse them with a garden hose to remove any remaining debris.
- Inspect the gutters for signs of damage or wear, such as cracks or sagging. If any issues are present, make the necessary repairs or replacements to maintain the integrity of the gutter system.
Troubleshooting common issues with plastic gutter systems
Even with proper maintenance, plastic gutter systems may experience common issues. By troubleshooting these problems early on, you can prevent them from escalating and causing significant damage. Here are some common issues and potential solutions:
| Issue | Solution |
|---|---|
| Gutters sagging or pulling away from the house | Tighten or replace gutter hangers or brackets to provide better support. Additionally, ensure that the gutters are securely attached to the fascia board. |
| Gutters overflowing during heavy rain | Check for blockages in the gutters and downspouts. Clean them thoroughly and make sure the gutter system has the correct slope for proper water flow. |
| Leaks in the gutter seams or joints | Apply silicone caulk or gutter sealant to the affected seams or joints to prevent water from seeping through the cracks. |
Regularly testing and maintaining your plastic gutter system is crucial for its long-term functionality. By checking for proper water flow, cleaning the gutters regularly, and troubleshooting common issues, you can keep your plastic gutters in excellent condition and protect your home from potential water damage.
Enhancing The Durability And Aesthetics Of Your Plastic Gutters
When it comes to maintaining the overall appearance and durability of your plastic gutters, there are a few key steps you can take to ensure they stay in top condition. In this article, we will explore three essential ways to enhance the longevity and aesthetic appeal of your plastic gutters: adding gutter guards for debris protection, painting or choosing colored plastic gutters for curb appeal, and maintaining their appearance over time.
Adding Gutter Guards for Debris Protection
One effective way to safeguard your plastic gutters from debris accumulation is by installing gutter guards. These innovative devices act as a barrier between your gutters and falling leaves, twigs, and other unwanted debris. By preventing debris from entering your gutters, these guards ensure that water can flow freely and prevent blockages or clogs that could potentially damage your gutters.
With a wide range of gutter guard options available, it’s essential to choose one that suits your specific needs. Some guards are made of durable plastic, while others are constructed from stainless steel or aluminum. Whichever material you choose, ensure that it matches the style and color of your gutters to maintain a cohesive aesthetic.
Painting or Choosing Colored Plastic Gutters for Curb Appeal
If you want to enhance the curb appeal of your home, consider painting or choosing colored plastic gutters. While the traditional white is a popular choice, you can also find plastic gutters in a variety of colors to match your home’s exterior. By opting for a color that complements your house’s style, you can create a cohesive and visually pleasing look.
Alternatively, you can choose to paint your plastic gutters. Before doing so, ensure that your gutters are clean and dry. Apply a primer designed specifically for plastic surfaces to ensure proper adhesion of the paint. Finally, select a high-quality exterior paint suitable for plastic to achieve a long-lasting and appealing finish.
Maintaining the Appearance of Your Plastic Gutters Over Time
To preserve the appearance and functionality of your plastic gutters, regular maintenance is crucial. Here are a few simple steps you can follow:
- Regularly clean your gutters to remove any debris or buildup that may obstruct water flow.
- Inspect your gutters for cracks, leaks, or any signs of damage. Address any issues promptly to prevent further deterioration.
- Trim any overhanging branches or foliage that may come into contact with your gutters and potentially cause damage.
- Consider using a gutter shine product to restore the glossy finish of your plastic gutters and keep them looking as good as new.
By following these maintenance tips, you can ensure that your plastic gutters remain both functional and visually appealing for years to come.
Frequently Asked Questions
How Do You Install Plastic Guttering?
To install plastic guttering, first measure and cut the gutters to size. Attach the end caps and corner pieces, then secure the gutters to the fascia using brackets. Connect the gutters, making sure they slope towards the downpipes. Finally, secure the downpipes and test the system for leaks.
Do You Screw Vinyl Gutters?
Yes, you screw vinyl gutters to secure them in place. Screws provide stability and prevent the gutters from shifting or falling. Make sure to use the appropriate size and type of screws to ensure a secure installation.
Do You Glue Pvc Gutters?
Yes, PVC gutters are glued together using PVC cement for a secure connection.
How Do You Install Plastic Gutter Clips?
To install plastic gutter clips, follow these steps: 1. Start by positioning the clip at the desired location on the gutter. 2. Slide the clip onto the gutter edge, ensuring a snug fit. 3. Secure the clip by using screws or adhesive, depending on the type of clip.
4. Repeat the process for each clip, spacing them evenly along the gutter. 5. Double-check the stability and adjust as necessary.
Conclusion
To wrap up, installing plastic gutters is a practical and cost-effective solution to protect your home from water damage. With these step-by-step instructions, you can easily tackle this DIY project and enjoy the benefits of a sturdy and efficient gutter system.
Remember to choose the right materials, measure accurately, and follow safety guidelines. By taking the time to install plastic gutters correctly, you’ll ensure your home’s foundation remains secure for years to come.