
To install Pex pipe fittings, cut the pipe to the desired length and deburr the ends. Then, use a crimping tool to attach the fittings securely to the pipe.
Installing Pex pipe fittings is an essential step when it comes to plumbing projects. Whether you are a homeowner tackling a DIY plumbing job or a professional plumber looking to streamline your installation process, understanding how to properly install Pex pipe fittings is crucial.
We will provide you with a concise guide on the step-by-step process of installing Pex pipe fittings. By following these instructions, you can ensure a secure and leak-free connection for your piping system. So, let’s dive into the details of how to install Pex pipe fittings effectively and efficiently.
Understanding Pex Pipe Fittings
When it comes to plumbing projects, it’s essential to have a good understanding of the various components involved in the system. One crucial aspect of any plumbing project is the installation of Pex pipe fittings. These fittings play a crucial role in connecting and securing Pex pipes, ensuring a leak-free and efficient plumbing system.
What are Pex Pipe Fittings and their Benefits?
Pex pipe fittings are connectors that join sections of Pex pipes together or connect them to fixtures, valves, or other plumbing components. These fittings are made of durable materials like brass or poly alloy and come in various shapes and sizes to accommodate different plumbing needs.
One of the significant benefits of using Pex pipe fittings is their exceptional flexibility. Unlike rigid metal or PVC pipes, Pex pipes can bend and flex without the need for additional fittings, making them ideal for tight spaces and curved installations. This flexibility not only saves time and effort during installation but also minimizes potential leaks by reducing the number of connections needed.
Moreover, Pex pipe fittings are corrosion-resistant, which increases their longevity and durability. They are also resistant to scale buildup, ensuring a constant flow of water through the pipes. These qualities make Pex pipe fittings a reliable choice for both residential and commercial plumbing systems.
Different Types of Pex Pipe Fittings
There are several types of Pex pipe fittings available, each designed for specific plumbing applications:
| Type of Fitting | Description |
|---|---|
| Compression Fittings | Compression fittings feature a ring nut and compression sleeve that create a tight seal when compressed onto the Pex pipe. |
| Crimp Fittings | Crimp fittings require a crimp ring or clamp that is crimped onto the Pex pipe using a specialized tool, providing a secure and leak-proof connection. |
| Push-Fit Fittings | Push-fit fittings have a simple design that allows the Pex pipe to be inserted into the fitting, creating a secure connection without the need for any tools or additional components. |
Advantages of Using Pex Pipe Fittings
Using Pex pipe fittings offers several advantages over traditional plumbing systems:
- Easy Installation: Pex pipe fittings are quick and straightforward to install, reducing labor costs and minimizing project completion time.
- Flexibility: The flexibility of Pex pipe fittings allows for versatility in plumbing layouts and simplifies installation, especially in tight spaces or around obstacles.
- Leak Resistance: With fewer connections required due to its flexibility, Pex pipe fittings minimize the risk of leaks, ensuring a reliable and efficient plumbing system.
- Low Maintenance: Pex pipe fittings are highly resistant to corrosion and scale buildup, reducing the need for frequent maintenance or replacements.
- Cost-Effective: Pex pipe fittings are cost-effective, making them an affordable choice for plumbing projects without compromising on durability or performance.
By understanding the different types of Pex pipe fittings and their benefits, you’ll be better equipped to choose the right fittings for your plumbing project. Whether it’s a compression, crimp, or push-fit fitting, Pex pipe fittings provide an efficient and reliable solution for any plumbing system.

Tools And Materials Needed For Installation
Before you begin installing Pex pipe fittings, it’s important to gather all the necessary tools and materials to ensure a successful installation. Having the right equipment on hand will not only make the installation process easier but also help you complete the task in a timely manner. In this section, we will provide you with a comprehensive list of essential tools and recommended materials for a seamless installation.
List of essential tools for installing Pex pipe fittings
To install Pex pipe fittings, you will require the following tools:
- PEX Pipe Cutter: A reliable pipe cutter will help you make precise cuts on Pex pipes, ensuring a proper fit for the fittings.
- PEX Crimping Tool: This tool is essential for creating secure connections by crimping copper rings around the fittings and Pex pipes.
- Adjustable Wrench: An adjustable wrench will come in handy when tightening and loosening fittings.
- Deburring Tool: This tool helps remove any rough edges or burrs from the inside of Pex pipes, ensuring smooth water flow and minimizing the risk of leaks.
- Measuring Tape: Accurate measurements are crucial when cutting and fitting Pex pipes. A measuring tape will help you achieve precise lengths.
- Marker: Use a marker to mark the cutting points on Pex pipes, ensuring accuracy and reducing errors.
- Pipe Bending Spring: If you need to bend the Pex pipes, a pipe bending spring will help maintain the pipe’s shape and prevent kinking.
- Pipe Support Brackets: These brackets are necessary for securing Pex pipes in place, preventing any movement or potential damage.
- Teflon Tape: This tape is used to create a watertight seal between threaded connections, reducing the risk of leaks.
Recommended materials for a successful installation
In addition to the essential tools, it is recommended to have the following materials for a successful installation:
- Pex Pipes: Choose high-quality Pex piping that meets the required standards for your specific application. The size and length of the pipes will depend on your installation needs.
- Pex Fittings: Purchase Pex fittings that correspond to the type and size of your Pex pipes. Fittings may include elbows, tees, couplings, and valves.
- Copper Rings: Copper rings, also known as crimp rings or cinch rings, are used to secure Pex fittings to Pex pipes. Ensure that the size of the rings matches the size of the fittings.
- Support Brackets: Invest in sturdy support brackets that are suitable for the size and weight of your Pex pipes. These brackets will help distribute the weight and prevent sagging.
- Pipe Insulation: Consider insulating the Pex pipes to prevent heat loss, condensation, and freezing. Insulation can enhance energy efficiency and protect against potential damage.
- Thread Sealant: If you have any threaded connections, applying a thread sealant can help create a tight seal, preventing leaks.
By gathering all the necessary tools and materials mentioned above, you will be well-prepared to install Pex pipe fittings effectively. Having the right equipment and quality materials will contribute to a successful installation with minimal disruptions and maximum durability.

Step-By-Step Guide To Installing Pex Pipe Fittings
Installing Pex pipe fittings is a crucial step in any plumbing project. Whether you’re replacing old pipes or installing a new system, it’s important to understand the process to ensure a leak-free installation. In this step-by-step guide, we’ll walk you through each stage of the installation process. From preparing the workspace to conducting a pressure test, we’ll cover everything you need to know.
Preparing the workspace
Before you begin installing Pex pipe fittings, it’s essential to prepare your workspace properly. Clear the area of any obstacles or debris that may hinder your work. Ensure you have all the necessary tools and materials within reach, including Pex pipe, fittings, a Pex cutter, and a crimp ring or clamp. This will help you work efficiently and avoid any unnecessary interruptions.
Turning off the water supply
Prior to starting the installation process, you must turn off the water supply to the area where you’ll be working. Locate the main shut-off valve and turn it clockwise to close it. This step is crucial to prevent any water flow during the installation process, which could result in leaks or water damage.
Draining the water system
After turning off the water supply, it’s essential to drain any remaining water from the system. This step will prevent any water from entering the pipes while you’re working. Start by opening all the faucets and outlets connected to the water system until the water stops flowing. This will ensure that the pipes are completely drained.
Cutting and measuring Pex pipe
Once the water system is drained, it’s time to prepare the Pex pipe for installation. Measure the length of pipe you need, taking into consideration any turns or bends in the plumbing route. Use a Pex cutter to make a clean, straight cut. Remember to wear safety goggles to protect your eyes from any debris.
Choosing the right size pipe
Choosing the right size Pex pipe is crucial for a successful installation. Consider factors such as water flow rate and pressure when selecting the pipe size. Consult local plumbing codes or seek advice from a professional to ensure you’re using the appropriate pipe size for your specific application.
Measuring and marking the pipe
Before cutting the pipe, it’s essential to measure and mark the desired length. Take accurate measurements and mark them clearly to ensure a precise fit. Proper measurement and marking will help you avoid any wasted material and ensure a secure connection.
Cutting the pipe using a Pex cutter
Using a Pex cutter, make a clean, square cut at the marked location on the pipe. A clean cut ensures a proper seal and prevents any leaks or weak spots in the connection. Remember to measure twice and cut once to avoid any unnecessary errors.
Attaching the fittings
There are different types of Pex pipe fittings available, each with its own specific use. Common types include elbows, tees, couplings, and valves. Choose the appropriate fittings based on your specific plumbing needs. Insert the fitting into the end of the pipe until it reaches the stop. Ensure that the fitting is aligned correctly and snugly fits into place.
Different types of fittings and their uses
Table 1: Common Types of Pex Pipe Fittings
| Fitting Type | Use |
|---|---|
| Elbow | Used to change the direction of the pipe |
| Tee | Used to split the pipe into two or more directions |
| Coupling | Used to join two sections of pipe together |
| Valve | Used to control the flow of water |
When choosing the right type of fitting, consider factors such as the plumbing layout, water flow direction, and accessibility. Proper selection and installation of fittings ensure an efficient and reliable plumbing system.
Cleaning and deburring the pipe ends
Before inserting the pipe into the fitting, it’s important to clean and deburr the pipe ends. Use a deburring tool or a utility knife to remove any rough edges or burrs. This step will ensure a smooth connection and prevent any interference with the fitting.
Inserting the pipe into the fitting
With the pipe and fitting prepped, insert the pipe into the fitting until it reaches the stop. Make sure it slides in smoothly without any resistance. Avoid over-inserting the pipe, as it may compromise the integrity of the connection.
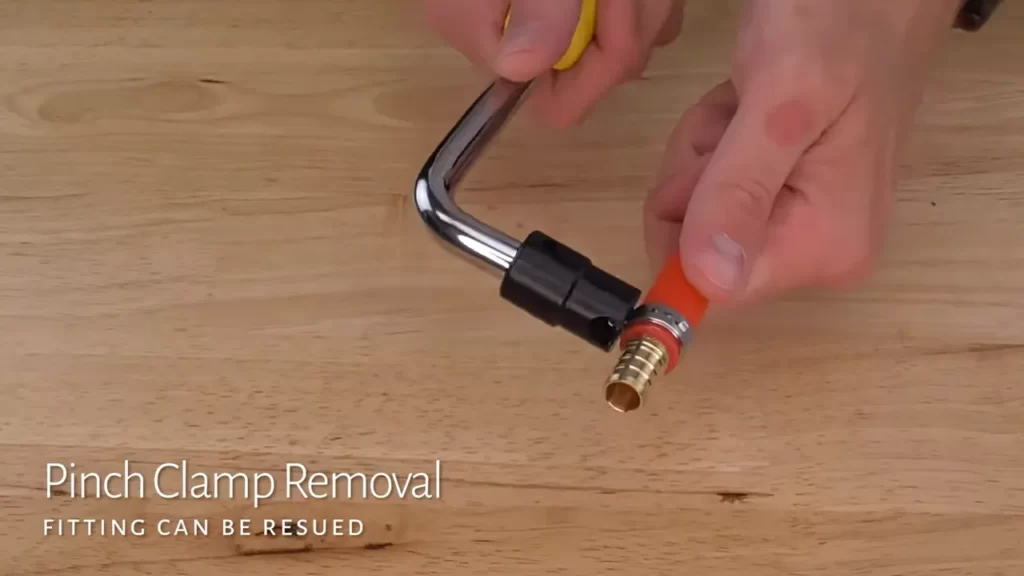
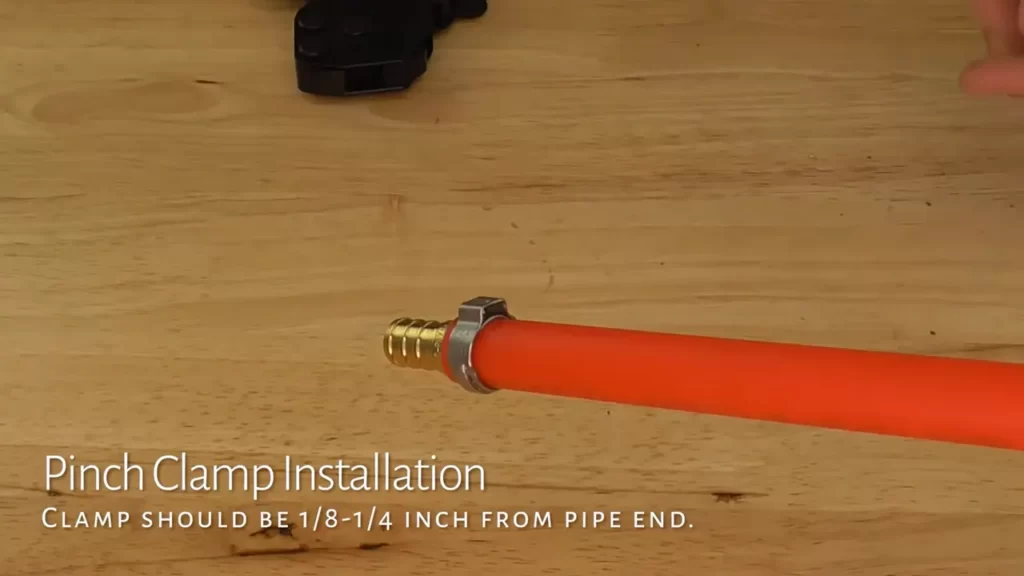
Securing the connection with a crimp ring or clamp
To create a secure and leak-free connection, it’s crucial to secure the pipe and fitting using a crimp ring or clamp. Position the crimp ring or clamp over the pipe and fitting, making sure it is centered. Use a crimping tool or clamp tool to compress the ring or clamp, creating a tight seal. Check the manufacturer’s guidelines for the appropriate crimping technique and ensure you follow it precisely.
Pressure testing and leak detection
Once the connections are made, it’s important to conduct a pressure test to ensure a leak-free installation. This step is crucial to verify that the system can hold the required pressure without any leaks. Follow these steps for conducting a pressure test:
- Close all outlets connected to the system.
- Connect a pressure gauge to the system.
- Gradually increase the pressure to the recommended level.
- Monitor the pressure gauge for any significant drops in pressure, indicating a possible leak.
Identifying and fixing any leaks
If you detect any leaks during the pressure test, it’s essential to identify and fix them promptly. Inspect the connections and fittings for any signs of water leakage. Tighten any loose connections or replace any faulty fittings. Repeat the pressure test after fixing the leaks to ensure the system is now leak-free.
Congratulations! You’ve successfully completed the step-by-step guide to installing Pex pipe fittings. By following these instructions and taking the necessary precautions, you can ensure a reliable and efficient plumbing system in your home or project.
Tips And Best Practices
When it comes to installing Pex pipe fittings, following some tips and best practices can ensure a successful and hassle-free installation. Here, we will discuss some important considerations that will help you achieve proper alignment, prevent kinks, maintain the integrity of fittings, provide adequate support, and account for expansion and contraction.
Ensuring proper alignment and orientation of fittings
Proper alignment and orientation of Pex pipe fittings are crucial for a secure and leak-free installation. Before connecting the fittings, make sure to inspect and prepare the pipe ends by cutting them cleanly and squarely. This ensures a tight and reliable connection. Align the fittings correctly, ensuring that the pipe is inserted fully into the fitting until it reaches the shoulder or mark, depending on the type of fitting used. Pay attention to the manufacturer’s guidelines to guarantee proper alignment and orientation of the fittings.
Keeping the pipe straight and free from kinks during installation
During the installation process, it’s essential to keep the Pex pipe straight and free from kinks. Kinks can restrict the flow of water and lead to reduced performance. Avoid bending the pipe too tightly or using excessive force, which can cause the pipe to collapse or create undesirable bends. Proper handling and minimizing twists and turns will help prevent kinks. Additionally, using a pipe straightener tool can aid in keeping the pipe straight and free from any deformities.
Using proper techniques for crimping or clamping the fittings
Properly crimping or clamping the fittings is crucial for a reliable and leak-free connection. Depending on the type of fitting, you will need to use either a crimping tool or a clamp tool to secure the connection. Follow the manufacturer’s instructions to ensure correct technique and apply sufficient pressure to create a tight seal. Inspect each crimp or clamp to verify that it is properly formed and securely fastened, as any defects can compromise the integrity of the connection.
Properly supporting the Pex pipe to prevent strain or damage
Supporting the Pex pipe adequately is necessary to prevent strain or damage. The pipe should be properly supported using suitable hangers or clamps at regular intervals, particularly where the pipe changes direction or crosses structural members. This prevents unnecessary stress and potential abrasion against other surfaces. Providing good support also helps maintain the shape and alignment of the pipe, ensuring optimal performance and longevity.
Considering expansion and contraction factors for Pex pipe installations
Expansion and contraction are factors that should be considered when installing Pex pipe to avoid any issues in the future. Pex piping has the ability to expand and contract with temperature changes, and failure to account for this can lead to problems like pipe buckling or joint leakage. To accommodate the movement, it is important to use appropriate expansion fittings or allow for expansion gaps when planning your Pex pipe installation. Following the manufacturer’s guidelines and considering the anticipated temperature fluctuations are essential for a successful and trouble-free installation.
Troubleshooting Common Issues
While installing Pex pipe fittings can be relatively straightforward, it’s essential to be prepared for any challenges that may arise. In this section, we will address some common issues that may occur during the installation process, such as leaks, flow and pressure problems, as well as pipe damage or breakage. By understanding how to tackle these issues, you can ensure a successful installation and avoid future problems.
Dealing with leaks and fixing faulty connections
One of the most common issues during Pex pipe fitting installation is the occurrence of leaks or faulty connections. Even with the use of proper techniques and high-quality materials, leaks can still happen. When dealing with a leak or faulty connection, it’s crucial to act swiftly to prevent any further damage. Follow these steps to troubleshoot and fix leaks:
- Start by locating the source of the leak. This may involve inspecting the connection points or areas where the water is dripping.
- If the leak is originating from a connection, check if the fitting is properly secured. Tighten the connection if needed, but be cautious not to overtighten as it can damage the fitting.
- If the leak persists, you may need to replace the faulty fitting. Ensure that you properly cut and remove the existing fitting before installing a new one. Apply Teflon tape or pipe sealant to ensure a tight seal.
- Once the new fitting is in place, carefully inspect the connection for any signs of leakage. Slowly turn on the water supply to check if the issue has been resolved.
Addressing flow and pressure issues
Another common problem that may occur when installing Pex pipe fittings is experiencing low flow or pressure. This issue can lead to ineffective plumbing systems and reduced performance. To tackle flow and pressure problems, follow these troubleshooting steps:
- Check if there are any obstructions in the pipes. Inspect for debris, dirt, or mineral buildup that may be restricting the flow. If necessary, clean the pipes to remove any blockages.
- Ensure that the pipe diameter is appropriate for the required flow rate. Using a pipe with a smaller diameter than necessary can result in reduced pressure.
- Inspect the water supply valve or manifold to ensure it is fully open. Sometimes, partially closed valves can restrict the flow and impact pressure.
- If the problem persists, it’s recommended to consult a professional plumber for further assessment and potential troubleshooting.
Handling pipe damage or breakage during installation
During the installation process, it’s possible to encounter pipe damage or breakage. This can occur due to mishandling, accidental impacts, or excessive force applied during fittings. If you come across pipe damage or breakage, here’s what you can do:
- Assess the extent of the damage. If it’s a minor crack or chip, you may be able to resolve it by using a repair sleeve or coupling. Ensure that you carefully cut and remove the damaged section before installing the repair sleeve.
- If the pipe is significantly damaged or broken, it may require a complete replacement. Cut out the damaged section and prepare the new pipe for installation. Remember to properly connect and secure it using appropriate fittings and techniques.
- Inspect the surrounding area to ensure there are no hidden damages or issues that may have contributed to the pipe damage.
- Once the pipe is repaired or replaced, perform a thorough check to ensure there are no leaks or flow problems.
By following these troubleshooting steps, you can overcome common issues that may arise during the installation of Pex pipe fittings. Remember, if you encounter any challenging situations or are unsure about how to proceed, it’s always best to consult a professional plumber for guidance.
Frequently Asked Questions
What Is The Best Way To Connect Pex Fittings?
The best way to connect PEX fittings is by using a crimp ring or a clamp ring. These methods create a secure and watertight connection between the PEX pipe and the fitting. It is important to ensure that the fittings are placed correctly and that the rings are properly tightened to prevent leaks.
Do You Have To Crimp Pex Fittings?
No, crimping PEX fittings is not necessary. PEX fittings can be connected using different methods such as crimp, clamp, or push-to-connect. Each method has its advantages and disadvantages, so it’s important to choose the right one based on your specific needs and preferences.
What Is The Most Reliable Way To Connect Pex Pipe?
The most reliable way to connect PEX pipe is by using brass fittings, such as compression or push-to-connect fittings. These fittings provide a secure and leak-free connection, ensuring the durability and longevity of the PEX plumbing system.
How Do You Install A Sharkbite Fitting On A Pex Pipe?
Installing a SharkBite fitting on a PEX pipe is simple. First, use a SharkBite depth gauge to mark the insertion depth on the pipe. Then, push the fitting onto the pipe until it reaches the mark. To ensure a secure connection, make sure the pipe end is clean, smooth, and straight.
No special tools or glues are needed. It’s that easy!
Conclusion
To ensure a successful installation of Pex pipe fittings, follow these step-by-step procedures. Begin by measuring and cutting the pipe to the desired length, then deburr the edges. Next, insert the fitting onto the pipe until it reaches the marked depth.
Lastly, use a crimping tool to secure the connection. Remember to always follow manufacturer guidelines for proper installation. With these simple yet essential steps, you can confidently install Pex pipe fittings and enjoy a leak-free plumbing system for years to come.
Happy plumbing!