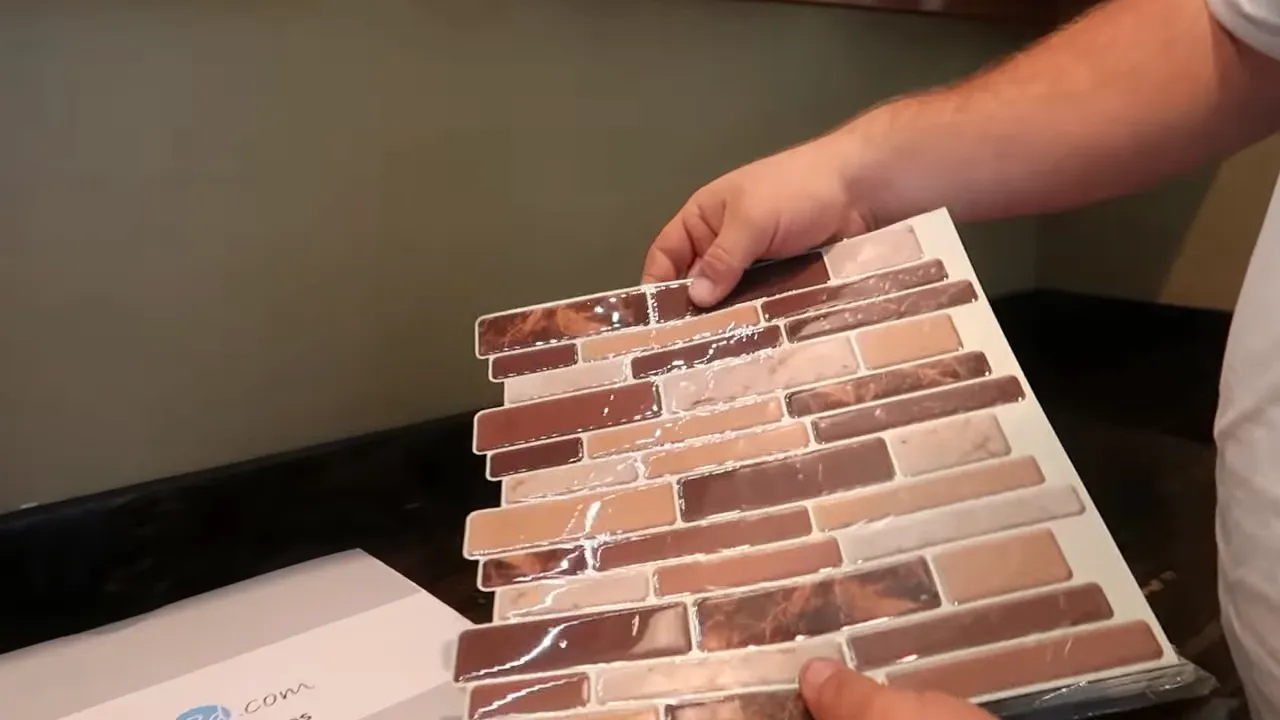
To install peel and stick backsplash, clean the surface and peel off the adhesive backing, and carefully press the sheet onto the wall, smoothing out any air bubbles. Are you looking for an easy and affordable way to update your kitchen or bathroom?
Installing a peel and stick backsplash might be the perfect solution. Whether you’re a DIY enthusiast or a beginner, this simple process can give your space a fresh and modern look without the hassle of traditional tile installation. We will guide you through the step-by-step process of installing a peel and stick backsplash, so you can achieve a stylish and professional result in no time.
Get ready to transform your space with this cost-effective and easy-to-install solution.
Benefits Of Peel And Stick Backsplash
A backsplash is an essential part of any kitchen or bathroom, not only serving as a protective barrier for your walls but also adding a touch of style to the space. When it comes to choosing the perfect backsplash, peel and stick options are becoming increasingly popular for several reasons. In this article, we will explore the benefits of peel and stick backsplash, including their ease of installation, cost-effectiveness, and versatile design options.
Easy to Install
Installing a peel and stick backsplash is a breeze, making it an ideal choice for both DIY enthusiasts and professionals. Unlike traditional backsplashes that require professional help or extensive knowledge of tiling, peel and stick backsplashes can be easily installed by anyone. All you need to do is peel off the backing and stick the tiles onto a clean and smooth surface. This makes it a quick and hassle-free process.
Cost-Effective
When compared to other types of backsplashes, peel and stick options are highly cost-effective. Traditional backsplashes often require purchasing expensive materials, hiring professionals, and spending a significant amount of time on installation. In contrast, peel and stick backsplashes are affordable and eliminate the need for professional help, saving you both time and money. Additionally, if you decide to change the design or update your kitchen in the future, peel and stick backsplashes can be easily removed without causing any damage to the walls or tiles.
Versatile Design Options
One of the standout features of peel and stick backsplashes is the wide range of design options available. Whether you prefer a sleek and modern look or a rustic and traditional style, there are peel and stick backsplashes to suit every taste. From mosaic patterns to subway tiles, you can find a variety of designs, colors, and textures to perfectly complement your existing décor. This versatility allows you to personalize your space and create a backsplash that truly reflects your aesthetic preferences.
Overall, peel and stick backsplashes offer a range of benefits, including ease of installation, affordability, and a plethora of design options. Whether you are looking to update your kitchen or bathroom, peel and stick backsplashes provide a practical and stylish solution that will transform your space with minimal effort and cost. So why wait? Give your walls a makeover today with a peel and stick backsplash!
Gather The Following Tools Before You Begin
Installing a peel and stick backsplash is a fantastic way to update your kitchen or bathroom without the hassle and cost of traditional tiling. Before you start, make sure you have all the necessary tools handy to ensure a smooth and hassle-free installation. Below are the essential tools you will need:
Measuring Tape
First and foremost, you’ll need a measuring tape to accurately measure the area where you will be installing the peel and stick backsplash. This will help you determine the amount of material needed and ensure a precise fit.
Utility Knife
A utility knife is essential for cutting the peel and stick tiles to the appropriate size. This versatile tool allows you to make precise cuts to accommodate outlets or corners, ensuring a seamless look for your backsplash.
Level
A level is necessary to ensure that your peel and stick tiles are perfectly straight and even. It will help you achieve a professional-looking installation and prevent any crooked lines or gaps.
Scissors
Scissors are handy for trimming excess material from the peel and stick tiles. You may encounter situations where you need to cut the tiles to fit around obstacles or into tight spaces. A pair of sharp scissors will make this task much easier.
Squeegee
A squeegee is an invaluable tool for smoothing out any air bubbles or wrinkles that may occur during the installation process. It helps you achieve a seamless bond between the tiles and the surface, ensuring a professional finish.
Gathering these tools before you begin the installation process will ensure a smooth and efficient peel and stick backsplash installation. Having everything handy will save you time and frustration, allowing you to complete the project with ease.
Steps To Ensure A Clean And Smooth Surface
If you’re looking to upgrade your kitchen or bathroom with a fresh and modern look, installing a peel and stick backsplash is an excellent option. Not only is it a cost-effective and easy way to transform the space, but it also allows for quick and hassle-free installation. However, before you embark on your DIY journey, it’s essential to follow a few steps to ensure a clean and smooth surface for the best results.
Clean the Wall
The first step in preparing the surface is to thoroughly clean the wall. A clean surface will help the peel and stick backsplash adhere properly and reduce the chances of it lifting or peeling over time. Use a mild detergent mixed with warm water to remove any grease, dirt, or dust that may have accumulated on the wall. Ensure that the wall is completely dry before moving on to the next step.
Remove Outlet Covers
Before applying the peel and stick backsplash, it’s essential to remove the outlet covers to ensure a seamless look. This step will also make it easier to install the backsplash around the outlets. Use a screwdriver to unscrew the outlet covers, carefully removing them from the wall. Set the covers aside in a safe place until the installation is complete.
Apply Primer (if necessary)
Depending on the condition of your wall and the type of backsplash you’re using, applying a primer may be necessary. A primer helps to create a smooth and adhesive-friendly surface, especially if the wall has imperfections or is porous. Follow the manufacturer’s instructions on the primer for the best results. Allow the primer to dry completely before moving on to the next step.
To summarize:
- Clean the wall using a mild detergent and warm water to remove grease, dirt, and dust.
- Remove outlet covers using a screwdriver to ensure a seamless installation.
- Apply primer if necessary, following the manufacturer’s instructions and allowing it to dry completely.
By taking these steps to ensure a clean and smooth surface, you’ll be well on your way to a successful peel and stick backsplash installation. Remember to carefully read and follow the manufacturer’s instructions for the specific backsplash product you’re using to achieve the best and most long-lasting results. Get ready to enjoy a stylish and updated space with your new peel and stick backsplash!
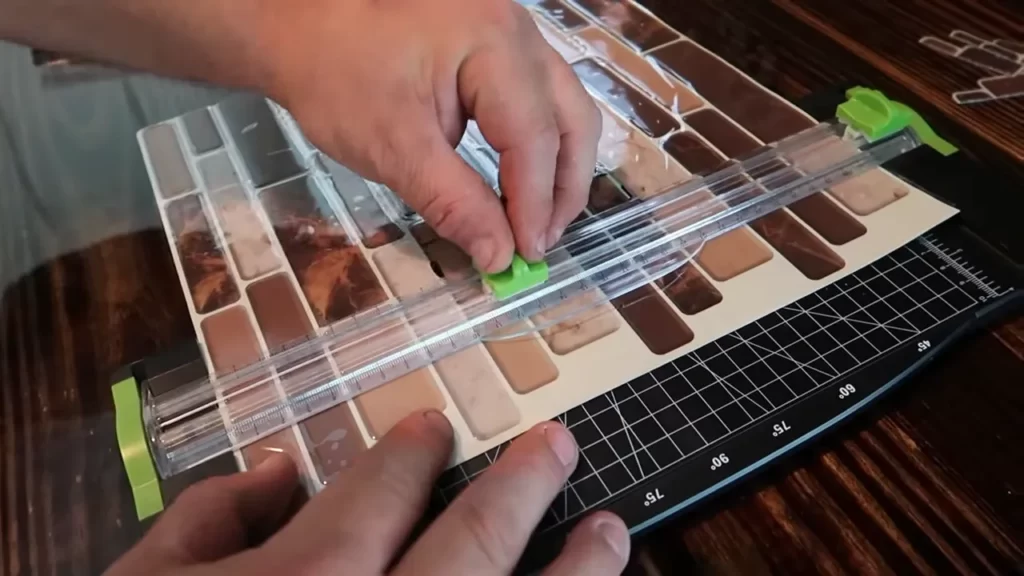
Accurately Measure And Cut The Backsplash Pieces
When it comes to installing a peel and stick backsplash, one of the most important steps is accurately measuring and cutting the backsplash pieces. This ensures a seamless and professional-looking installation. In this section, we will guide you through the process of measuring the wall, transferring the measurements to the backsplash, and cutting the backsplash to the correct size.
Measure the Wall
The first step in accurately installing a peel and stick backsplash is to measure the wall where you’ll be applying the backsplash. This will give you an idea of how much backsplash material you’ll need to purchase. To measure the wall:
- Use a tape measure to measure the height of the wall from the countertop to the bottom of the cabinets or any other area where the backsplash will end.
- Measure the width of the wall from one end to the other, taking into account any corners or obstacles that you need to work around.
Make sure to measure multiple times to ensure accuracy and write down the measurements for reference.
Transfer Measurements to the Backsplash
Once you have the measurements of the wall, you’ll need to transfer those measurements to the peel and stick backsplash material. This will help you determine the exact size and shape of each piece you’ll need to cut. To transfer the measurements:
- Place the peel and stick backsplash material on a clean, flat surface.
- Using a straightedge and a pencil, mark the height and width measurements of the wall onto the backsplash material.
By transferring the measurements directly onto the material, you can easily visualize the size and shape of each piece you need to cut.
Cut the Backsplash
Now that you have the measurements transferred, it’s time to cut the peel and stick backsplash material to the correct size. To cut the backsplash:
- Use a utility knife or scissors to carefully cut along the marked lines on the material.
- Start at one corner and make smooth, steady cuts along the entire length or width of the piece, depending on the shape you need.
Make sure to follow the marked lines closely to ensure accurate cuts. If needed, you can always trim the pieces to fit perfectly as you go along.
By accurately measuring and cutting the peel and stick backsplash pieces, you’ll be one step closer to achieving a stunning and professional-looking backsplash installation. Take your time, double-check your measurements, and make precise cuts to ensure a seamless result.
Detailed Steps For A Successful Installation
Installing a peel and stick backsplash can be a great way to instantly update the look of your kitchen or bathroom. Not only is it easy to install, but it also requires minimal mess and expertise. In this section, we’ll walk you through the detailed steps for a successful installation, ensuring that your peel and stick backsplash looks seamless and professional.
Start from the Center
When installing a peel and stick backsplash, it’s important to start from the center of your wall. This will ensure that the design is symmetrical and well-balanced. Begin by locating the center of the wall using a measuring tape and mark it with a pencil.
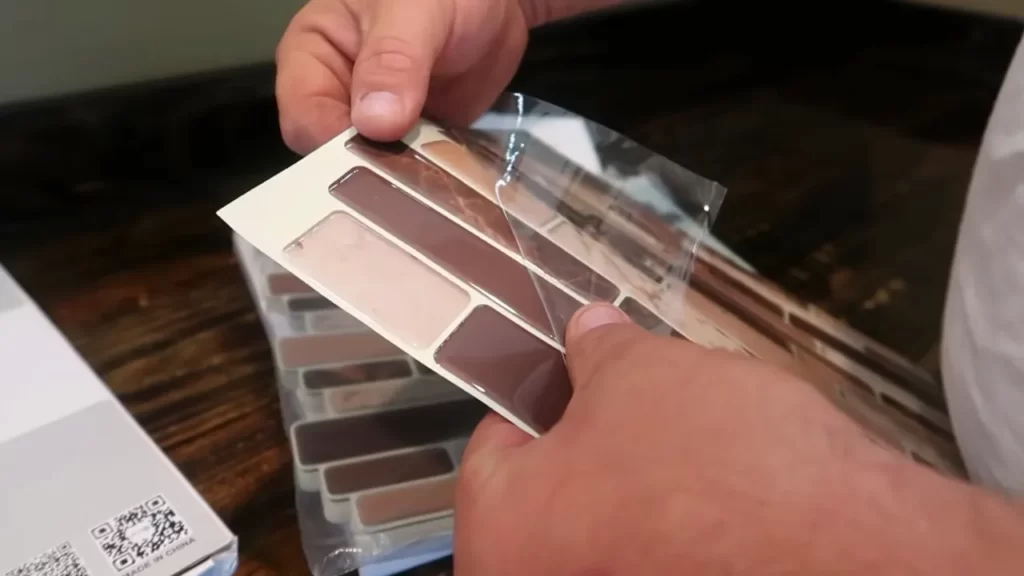
Remove the Backing and Align the Backsplash
Once you’ve marked the center of the wall, it’s time to remove the backing of the peel and stick backsplash. Carefully peel off a small section of the backing, revealing the adhesive side of the backsplash. Align the exposed adhesive side with the center mark on the wall and press it firmly.
Continue removing the backing a few inches at a time, aligning and pressing the backsplash onto the wall as you go. This step requires precision and attention to detail to ensure that the seams are seamless and the pattern is perfectly aligned.
Smooth Out Air Bubbles and Wrinkles
As you apply the peel and stick backsplash, it’s common to encounter air bubbles and wrinkles. To smooth them out, use a credit card or a plastic scraper. Starting from the center, slowly glide the card or scraper across the surface in a smooth motion, gently pushing out any trapped air or wrinkles.
Be sure to go over the entire surface of the peel and stick backsplash to ensure a smooth and even installation. This step may require a bit of patience and finesse, but the result will be a clean and professional-looking backsplash.
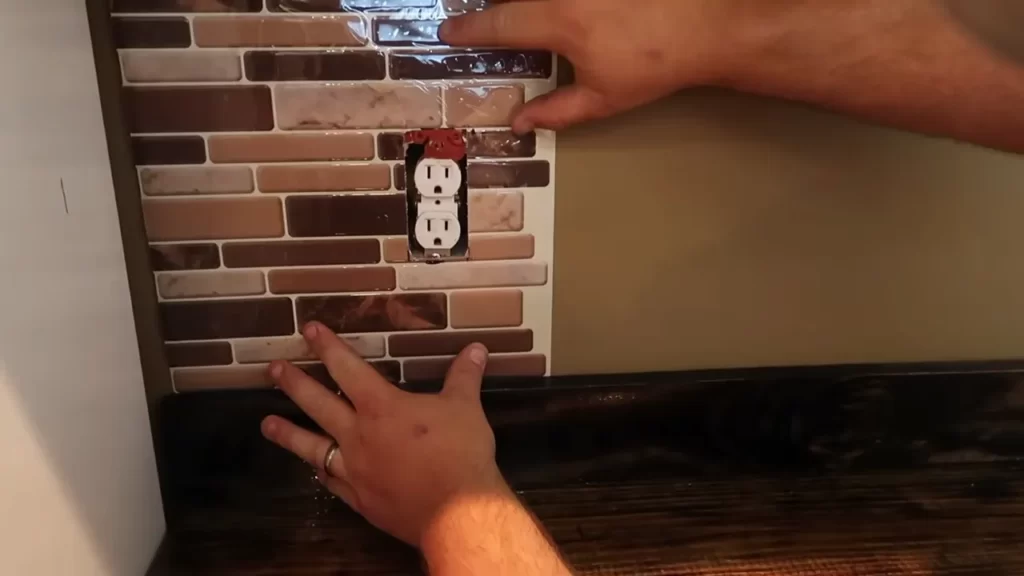
Continue to the Edges
Once you’ve reached the edges of the wall, you’ll need to trim the excess backsplash. Measure the length or width of the remaining space and transfer the measurements to the backsplash using a pencil or a marker. Carefully cut along the marked line using a utility knife or a pair of scissors.
After trimming, press the edges of the backsplash firmly onto the wall to ensure a secure bond. Take your time and make sure that all edges are properly adhered to the wall.
Congratulations! You’ve successfully installed a peel and stick backsplash. Take a step back and admire the transformation you’ve made to your kitchen or bathroom. With these detailed steps, you’ve achieved a seamless and professional-looking installation. Enjoy your new backsplash!
Ensure A Flawless Finish With These Expert Tips
Ensure a Flawless Finish with These Expert Tips
Installing peel and stick backsplash can be a fantastic way to add a touch of style and personality to your kitchen or bathroom. Not only is it a cost-effective option, but it is also a DIY-friendly project that can be completed in just a few hours. However, to ensure a flawless finish, there are a few expert tips that you should keep in mind. From planning the design layout to applying caulk for a finished look, these tips will help you achieve professional-looking results.
Plan the Design Layout
Before you start installing the peel and stick backsplash, it is important to plan the design layout. This will help you visualize how the finished product will look and prevent any unnecessary mistakes. Measure the area where you will be installing the backsplash and mark the center point. Use a level and a pencil to draw a straight vertical line from top to bottom.
This line will serve as a guide for your first row of tiles. Additionally, consider the pattern and direction in which you want the tiles to be arranged. Planning the design layout in advance will save you time and ensure a symmetrical and visually pleasing result.
Overlap Seams for a Seamless Look
To achieve a seamless look when installing peel and stick backsplash, it is important to overlap the seams. This means that each tile should overlap the one next to it, rather than simply butting up against it. Overlapping the seams will create a continuous pattern and disguise any gaps or inconsistencies.
When positioning each tile, make sure it overlaps the previous one by about 1/8 to 1/4 inch. This method will give your backsplash a professional and cohesive appearance.
Use a Blow Dryer to Help Bond the Backsplash
Peel and stick backsplash tiles rely on adhesive to stay in place. To ensure a strong bond between the tiles and the wall, you can use a blow dryer. The heat from the blow dryer softens the adhesive and helps it adhere to the wall more securely.
Simply hold the blow dryer a few inches away from the tile and move it in a circular motion. This will activate the adhesive and create a stronger bond. Using a blow dryer is especially useful for areas with irregular surfaces or corners where the tiles may not easily adhere.
Apply Caulk for a Finished Look
To give your peel and stick backsplash a polished and finished appearance, apply caulk along the edges and seams. Caulk not only fills in any gaps or spaces between the tiles, but it also provides a waterproof seal and prevents dirt and moisture from seeping in. Choose a caulk color that matches your backsplash tiles to create a seamless look. Using a caulk gun, apply a thin and even bead of caulk along the edges and wipe away any excess with a damp cloth. This final step will give your backsplash a professional and complete finish.
Keep Your Backsplash Looking Pristine With These Maintenance Tips
Keep your backsplash looking pristine with these maintenance tips. Whether you’ve just installed a peel and stick backsplash or have had one for a while, regular cleaning and proper maintenance are essential to keep it looking its best. In this section, we will discuss some easy maintenance tips to help your backsplash maintain its beauty and durability.
Regularly Clean with Mild Soap and Water
To keep your peel and stick backsplash clean and free from dirt and grime, regular cleaning is necessary. Using mild soap and water is the safest and most effective way to clean your backsplash without causing any damage. Here’s how you can do it:
- Fill a bucket or bowl with warm water.
- Add a small amount of mild dish soap.
- Dip a soft cloth or sponge into the soapy water.
- Gently scrub the backsplash, removing any stains or debris.
- Rinse the cloth or sponge with clean water and wipe away any soap residue.
- Finally, dry the backsplash with a clean, lint-free cloth to prevent water spots.
Avoid Abrasive Cleaners and Tools
When it comes to cleaning your peel and stick backsplash, it’s important to avoid using abrasive cleaners or tools that could scratch or damage the surface. Abrasive cleaners like scrub brushes, steel wool, or harsh chemicals can remove the protective coating of the backsplash and cause discoloration. Instead, stick to mild soap and water or gentle cleaning solutions specifically designed for use on backsplashes.
Consider Adding a Protective Topcoat
If you want to provide an extra layer of protection to your peel and stick backsplash, you may consider adding a protective topcoat. A topcoat can help enhance the durability of the backsplash while also making it easier to clean and maintain. There are various types of topcoats available in the market, such as polyurethane or acrylic sealants, that can be applied according to the manufacturer’s instructions. However, before applying any topcoat, ensure that you consult the manufacturer’s recommendations to avoid any adverse effects.
By following these maintenance tips, you can keep your peel and stick backsplash looking pristine for years to come. Regularly cleaning with mild soap and water, avoiding abrasive cleaners and tools, and considering the addition of a protective topcoat will help protect your backsplash from stains, scratches, and other forms of damage. Incorporate these tips into your regular cleaning routine, and your backsplash will continue to be a beautiful and functional addition to your kitchen or bathroom.
Frequently Asked Questions
Installing peel and stick backsplash is a popular and cost-effective way to give your kitchen or bathroom a fresh and updated look. If you’re considering this DIY project, you may have some questions on your mind. In this section, we’ll address some frequently asked questions about installing peel and stick backsplash, including whether you can install it over existing tile, how to remove it, whether it’s suitable for rental properties, and whether it can be applied to textured walls.
Can I Install Peel And Stick Backsplash over Existing Tile?
If you’re tired of the look of your existing tile backsplash but don’t want the hassle of removing it, you’ll be happy to know that you can install peel and stick backsplash over it! However, there are a few considerations to keep in mind.
Firstly, make sure the existing tile is in good condition and securely in place. The surface should be clean and free of dirt, grease, and any loose tiles. Secondly, consider using a primer or adhesive promoter on the tile surface to ensure better adhesion for the peel and stick backsplash. This will help prevent any potential issues with the adhesive sticking to the tile and prolong the durability of your new backsplash.
How Do I Remove Peel And Stick Backsplash?
Decided it’s time for a change or need to remove the peel and stick backsplash for any reason? Removing it is relatively easy! Simply use a hairdryer or heat gun to warm up the adhesive backing. This will soften the adhesive, making it easier to peel off the backsplash.
Start at one corner and slowly peel it away, using gentle pressure. If there are any adhesive residues left behind, you can use a mild adhesive remover and a soft cloth to clean the surface thoroughly. Remember to follow the manufacturer’s instructions when using any cleaning products.
Can I Install Peel And Stick Backsplash in a Rental Property?
Peel and stick backsplash is a great option for renters who want to add a touch of personal style to their kitchen or bathroom without making permanent changes. One of the biggest advantages of peel and stick backsplash is its easy installation and removal process, making it ideal for temporary living situations. However, it’s always a good idea to check with your landlord or property manager before making any modifications to the rental unit. They may have specific rules or guidelines regarding what can be installed in the space.
Can I Apply Peel And Stick Backsplash to Textured Walls?
Yes, you can apply peel and stick backsplash to textured walls. However, it’s important to note that the texture of the wall may affect the overall appearance and adhesion of the backsplash. The adhesive backing of peel and stick backsplash is designed to adhere to smooth and clean surfaces.
Therefore, it’s recommended to smooth out the texture as much as possible before installing the backsplash. You can use sandpaper or a wall sander to even out the texture. Additionally, using a primer or adhesive promoter can help improve the bond between the textured wall and the peel and stick backsplash.
Frequently Asked Questions
What Is The Best Way To Install Peel And Stick Backsplash?
To install peel and stick backsplash, start by cleaning the surface thoroughly. Then, measure and cut the tiles to fit the area. Next, peel off the backing and press the tiles firmly onto the wall. Finally, use a roller to ensure proper adhesion.
How Do You Prepare A Wall For Peel And Stick Backsplash?
To prepare a wall for a peel and stick backsplash, start by cleaning the surface thoroughly. Remove any dirt, grease, or debris. Ensure the wall is dry and smooth. Use sandpaper to smoothen any rough areas. Lastly, wipe the wall with a damp cloth and let it dry completely before applying the peel and stick backsplash.
Are Peel And Stick Backsplash A Good Idea?
Yes, peel and stick backsplash is a good idea. It’s easy to install, affordable, and requires no special tools. The self-adhesive design allows for quick and mess-free application. Additionally, it’s available in various styles and colors, providing a quick and temporary solution for updating your kitchen or bathroom.
Do Peel And Stick Backsplash Stay On?
Yes, peel and stick backsplash stays on when properly applied. The adhesive backing ensures it sticks securely to the surface and can withstand normal wear and tear. It is an easy and affordable option for updating your space without the need for messy and time-consuming installation.
Conclusion
Transforming your kitchen has never been easier with the simple DIY project of installing a peel and stick backsplash. By following the step-by-step instructions mentioned in this blog post, you can achieve a professional-looking backsplash without the need for messy glue or grout.
Whether you’re a seasoned pro or a beginner, this hassle-free installation process will give your kitchen a fresh and stylish new look in no time. Say goodbye to tedious renovations and hello to a quick and affordable upgrade for your space.
Level up your home decor game with a peel and stick backsplash today!