
To install a new wax ring on your toilet, simply remove the old wax ring, place the new one centered on the toilet flange, and carefully lower the toilet onto the wax ring. When it comes to installing or replacing a wax ring on your toilet, knowing the correct steps can ensure a watertight seal and prevent leaks.
Over time, the wax ring that sits between your toilet and the floor can deteriorate and cause water leakage, leading to potential damage. In this guide, we will outline the step-by-step process for installing a new wax ring on your toilet, providing you with a simple and effective solution to maintain a properly functioning toilet.
By following these instructions, you can successfully complete this task and avoid the need for costly repairs down the line.
Why Should You Replace Your Wax Ring?
Importance of a Well-Functioning Wax Ring
Ensuring your toilet functions properly is essential for maintaining a clean and sanitary living environment. One component that plays a crucial role in this is the wax ring, which provides a watertight seal between the base of the toilet and the floor. A poorly functioning wax ring can lead to a variety of problems, such as leaks, bad odors, and even damage to your flooring or subfloor. Therefore, it is important to understand the significance of a well-maintained and properly installed wax ring.
Signs that Indicate the Need for Replacement
Over time, the wax ring under your toilet can deteriorate due to wear and tear, resulting in a compromised seal. To prevent potential issues, it is crucial to be aware of the signs indicating the need for a wax ring replacement. Here are a few indicators:
- Leaking around the base of the toilet: If you notice water accumulating around the base of your toilet, it is a clear indication that the wax ring has failed to provide an effective seal. Ignoring this issue can lead to water damage, mold growth, and unpleasant odors in your bathroom.
- Unpleasant smells: A faulty wax ring can allow sewer gases to escape, resulting in unpleasant odors permeating your bathroom. This can create an unpleasant and unhygienic atmosphere, affecting the overall comfort of your home.
- Rocking or wobbling toilet: If your toilet moves or wobbles when you sit on it, it may be a sign of an improperly sealed wax ring. This instability can increase the risk of leaks and potential damage to the toilet and surrounding flooring.
- Visible wear and tear: Inspecting the wax ring can reveal signs of deterioration, such as cracks or flattening. If you notice any visible damage or if the wax ring appears worn out, it is wise to replace it to ensure a proper seal and prevent future issues.
Regularly checking for signs of a failing wax ring and promptly replacing it is essential to maintain the functionality and cleanliness of your toilet. By being proactive in this regard, you can prevent costly repairs and potential water damage in your bathroom. In the next section, we will discuss how to replace a wax ring on your toilet, ensuring a long-lasting and effective seal.
Step 1: Gather The Required Tools And Materials
Before proceeding with the installation of a new wax ring on your toilet, it’s important to gather all the necessary tools and materials for a smooth and hassle-free process. Having everything you need at hand will save you time and allow you to focus on completing the task effortlessly.
Essential tools
A few essential tools will come in handy during the installation process. Make sure you have the following items:
- A pair of gloves: Protect your hands from any mess or potential harm.
- A putty knife: This tool will help you remove the old wax ring and clean the flange.
- A wrench: Choose an adjustable wrench to aid in loosening and tightening the toilet bolts.
- A sponge or rag: Keep a sponge or rag nearby to wipe away any excess water or debris.
Having these tools ready before you start will ensure a more efficient and effective installation process.
Materials needed for the installation process
In addition to the tools mentioned above, you’ll also need the following materials:
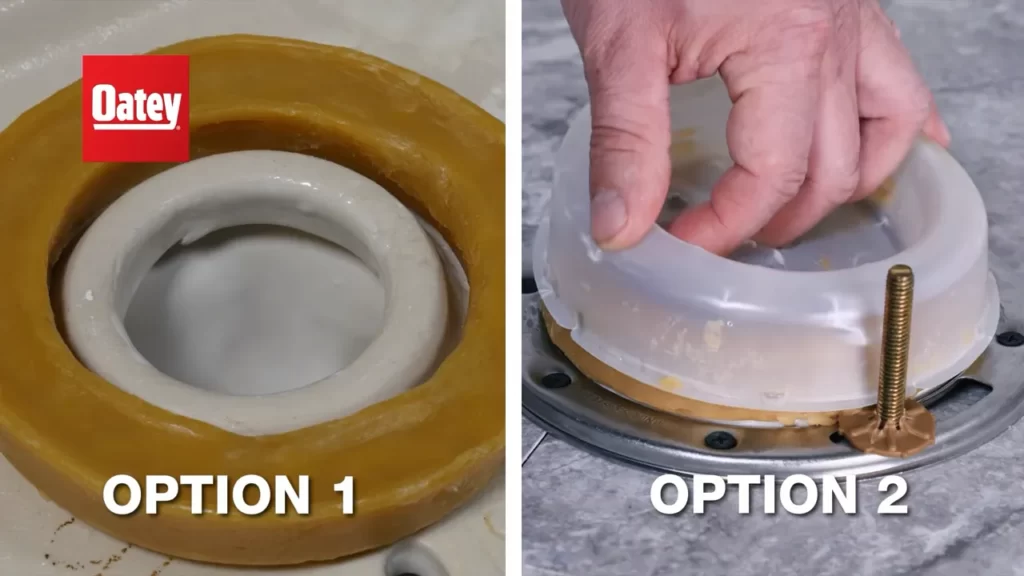
- A new wax ring: When it comes to selecting a wax ring, choose a high-quality one that fits your toilet model. This will ensure a proper seal and prevent any leaks.
- Plastic gloves: Apart from the gloves mentioned earlier, it’s a good idea to have an additional pair of plastic gloves to handle the wax ring.
- A bucket or container: Keep a bucket or container nearby to collect any water that may spill during the process.
- A replacement set of toilet bolts: If your existing bolts are rusty or damaged, it’s recommended to have a replacement set for a secure installation.
- A level: A level will assist you in determining if the toilet is properly aligned and balanced.
Gathering the necessary materials before starting the installation process will ensure a smooth and uninterrupted workflow. Take the time to check off each item from your list before proceeding with the next steps.

Step 2: Preparation Before Removing The Toilet
Before you venture into the process of replacing the wax ring on your toilet, it’s important to take the necessary precautions and prepare the area. By following a few simple steps, you’ll ensure a smooth and hassle-free installation. In this section, we will cover the essential tasks of shutting off the water supply and emptying the toilet bowl and tank.
Shutting off the water supply
The first step in preparing to install a new wax ring on your toilet is to shut off the water supply. This prevents any water from flowing into the toilet while you work, reducing the risk of leaks and potential damage. To shut off the water supply, locate the shut-off valve usually located beneath the toilet tank. Turn the valve clockwise until it is fully closed, restricting the water flow. This step is essential to ensure that you can work on the toilet without any unwanted water interruptions.
Emptying the toilet bowl and tank
After shutting off the water supply, it’s important to empty the toilet bowl and tank. Start by flushing the toilet to remove most of the water from the bowl. Next, use a sponge or a cup to scoop out any remaining water from both the bowl and tank. Alternatively, you can use a wet/dry vacuum to extract the water efficiently. Remember, a vacant toilet bowl and tank make it easier to handle and remove the toilet during the installation process.
Ensure that you dispose of the water in a proper and sanitary manner, as it may contain debris and residue. You can pour it into a bucket or drain that is suitable for wastewater disposal.
By carefully adhering to the steps of shutting off the water supply and emptying the toilet bowl and tank, you will be well-prepared to proceed with removing the toilet and replacing the wax ring. This proper preparation not only ensures a successful installation but also minimizes the risk of any unwanted complications. Now that you’ve completed the necessary preparations, let’s move on to the next step and remove the toilet.

Step 3: Properly Removing The Toilet
Removing the toilet is an essential step in the process of installing a new wax ring. This step ensures that you have a clean and stable surface to work with. Here, we will guide you through the process step by step, starting with removing the tank.
Removing the tank
Before you can detach the toilet bowl from the floor, you need to remove the tank. The tank is usually held in place by a series of bolts or screws, which can be located on the bottom or the sides of the tank. Follow these steps to remove the tank:
- Turn off the water supply to the toilet by closing the shut-off valve, which is usually located on the wall behind or near the toilet.
- Flush the toilet to empty the tank of water.
- Using a wrench or pliers, loosen and remove the nuts or screws that secure the tank to the bowl. You may need to hold the bolt head in place with a screwdriver while unscrewing the nuts.
- Carefully lift the tank off the bowl and set it aside on a stable surface. Be cautious as the tank may still contain some residual water.
Detaching the toilet bowl from the floor
With the tank removed, you can now focus on detaching the toilet bowl from the floor. Here’s how to do it properly:
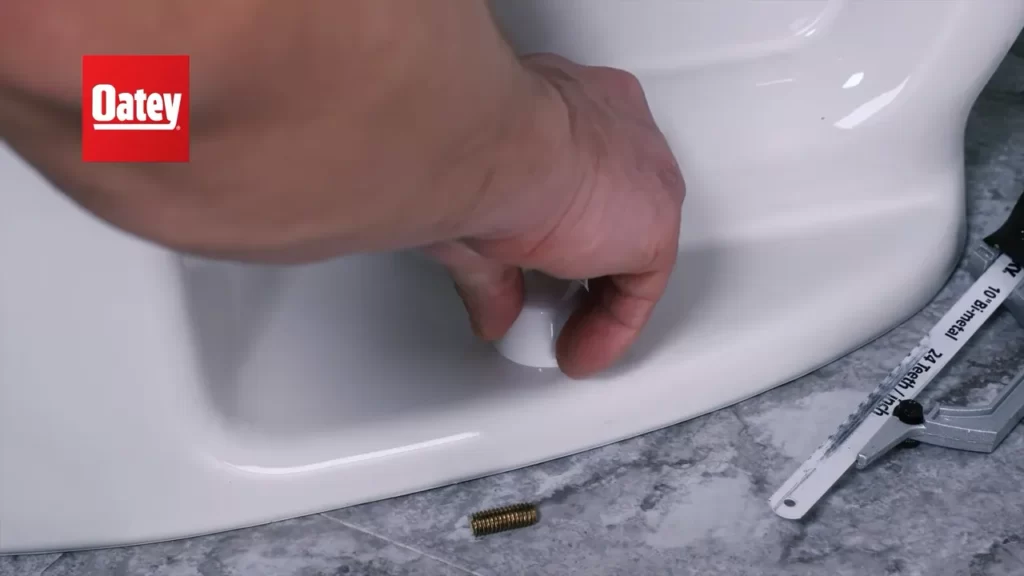
- Start by locating the bolts or screws that secure the toilet bowl to the floor. These are often covered by plastic caps or decorative caps.
- Using a putty knife or a flathead screwdriver, carefully pry off the caps to expose the bolts or screws.
- Using a wrench or pliers, loosen and remove the nuts or screws that secure the toilet bowl to the floor. You may need to hold the bolt head in place with a screwdriver while unscrewing the nuts.
- Once the nuts or screws are removed, lift the toilet bowl straight up to detach it from the floor. Be careful not to tilt the bowl excessively, as this can cause any remaining water in the bowl to spill.
- Place the toilet bowl on a towel or old newspaper to catch any water that may drain from the bowl.
By following these steps, you have successfully removed the toilet tank and detached the toilet bowl from the floor. In the next step, we will guide you through installing the new wax ring.
Step 4: Removing The Old Wax Ring
Step 4: Removing the Old Wax Ring
Inspecting the old wax ring:
Before starting the removal process, it’s important to inspect the old wax ring to assess its condition. A worn-out or damaged wax ring can lead to leaks and unpleasant odors in your bathroom. Here’s how you can assess the ring:
- Look for any visible signs of wear and tear, such as cracks or breaks.
- Check for discoloration or a flattened shape, as these can indicate an ineffective seal.
- Ensure that the ring is properly aligned with the toilet flange and centered.
- Take note of any debris or residue on the ring, as this may affect the installation of the new wax ring.
Safely and thoroughly removing the old wax ring:
Once you’ve inspected the old wax ring and identified any issues, it’s time to remove it. Follow these steps to safely and thoroughly remove the old wax ring:
- Put on a pair of disposable gloves to protect your hands from coming into contact with any debris or waste.
- Use a putty knife or a plastic scraper to gently loosen the old wax ring. Start by inserting the tool between the toilet flange and the wax ring, being careful not to damage the flange or the toilet base.
- Gently pry and lift the toilet off the flange, ensuring not to strain your back or have the toilet tip over. If needed, enlist the help of a friend or family member to safely lift the toilet.
- Place the toilet on its side on a tarp or old towel to catch any residual water or waste. Take care not to scratch or damage the toilet during this process.
- Scrape off the remaining wax residue from the toilet flange and the bottom of the toilet using a putty knife or plastic scraper. Ensure that the surfaces are clean and free of any debris before proceeding.
- Dispose of the old wax ring properly, placing it in a sealed bag and discarding it in accordance with local waste disposal regulations.
- Inspect the toilet flange for any damage or cracks. If necessary, repair or replace the flange before proceeding with the installation of the new wax ring.
By following these steps, you can safely and effectively remove the old wax ring from your toilet. Taking the time to inspect and remove the old wax ring thoroughly will ensure a proper and leak-free installation of the new wax ring.
Step 5: Preparing For The New Wax Ring
Before you proceed to install the new wax ring on your toilet, it’s crucial to properly prepare the flange and check the condition of the closet bolts. These steps will ensure a solid and leak-free installation. Follow the instructions below to complete this important preparation phase.
Cleaning the Flange
The first step in preparing for the new wax ring is to thoroughly clean the flange. This is an essential part of the process as any debris or old wax residue left on the flange can compromise the seal and lead to leaks. To clean the flange:
- Start by removing the old wax ring, if there is one, and dispose of it properly.
- Inspect the flange for any built-up residue or dirt. If you notice any, use a putty knife or scraper to gently remove it.
- Wipe the flange clean using a damp cloth or sponge to ensure there is no remaining dirt or debris.
- Inspect the flange for any cracks or damage. If you spot any issues, it’s essential to address them before proceeding with the installation. Consult a professional if necessary.
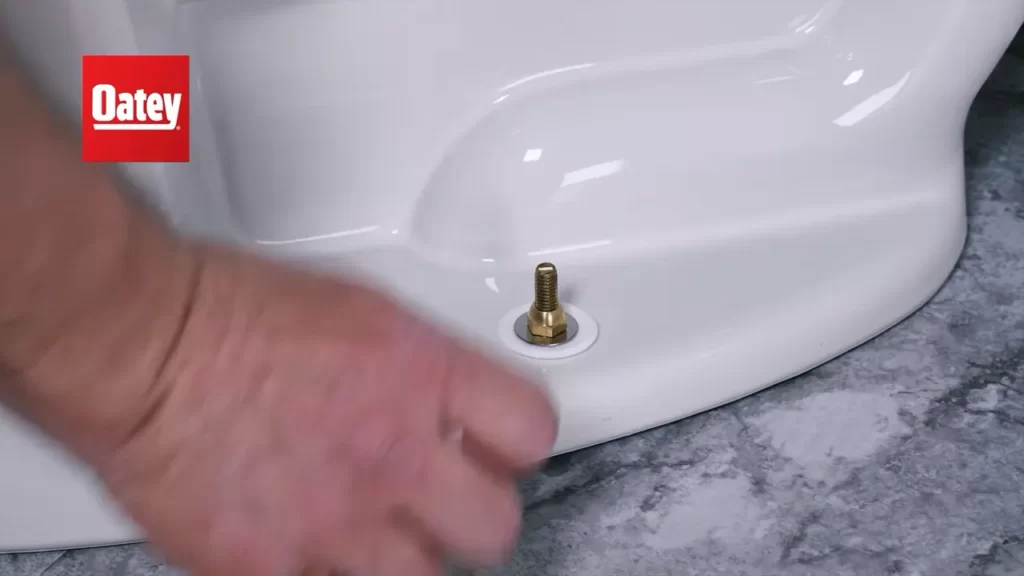
Checking the Condition of the Closet Bolts
Next, you’ll want to check the condition of the closet bolts. These bolts secure the toilet to the floor and play a crucial role in maintaining stability. Here’s how to assess their condition:
- Inspect each closet bolt to ensure they are securely fastened to the floor. Tighten them if necessary, but be careful not to over-tighten as it can cause damage.
- Check for any signs of rust or corrosion on the closet bolts. If you notice extensive rust, it’s advisable to replace them with new bolts to avoid any potential issues in the future.
- Ensure that the closet bolts are at the right height. They should be slightly protruding from the flange, but not too high to interfere with the toilet’s proper installation.
- If any closet bolts are damaged or compromised, it’s important to replace them before proceeding with the wax ring installation. Use new bolts that are compatible with your toilet model.
By cleaning the flange and checking the condition of the closet bolts, you’re setting yourself up for a successful wax ring installation. These preparatory steps go a long way in ensuring a tight seal and preventing future leaks. Once you’ve completed this important phase, you can move on to the next step: installing the new wax ring.
Step 6: Installing The New Wax Ring
Step 6: Installing the New Wax Ring
Now that you have removed the old wax ring and thoroughly cleaned the flange, it’s time to move on to the next crucial step – installing the new wax ring. This step ensures a watertight seal between the toilet bowl and the sewer pipe, preventing any leaks or odors.
Positioning the new wax ring on the flange
To begin, take the new wax ring and position it carefully on the flange. The wax ring has a cone-shaped design, with a wider base and a smaller opening at the top. Place the wax ring on the flange, ensuring that the wider base is facing down towards the sewer pipe.
Note: When positioning the wax ring, make sure it is centered on the flange and aligns perfectly with the bolt holes.
Placing the toilet bowl back onto the flange
With the wax ring positioned correctly, it’s time to place the toilet bowl back onto the flange. Carefully lift the bowl using your legs and not your back to avoid any strain. Position the bowl over the flange, ensuring that the wax ring sits securely in the flange opening.
Lower the bowl down, making sure that the toilet bolts pass through the holes on the sides of the bowl. Apply gentle pressure to compress the wax ring and create a tight seal. The bowl should rest evenly on the floor, with no wobbling or rocking.
Pro Tip: To ensure a proper seal, it’s a good idea to sit on the toilet bowl for a few seconds after placing it on the flange. This helps to evenly distribute your weight and create a secure bond between the wax ring and the flange.
Note: If you’re having trouble aligning the toilet bolts with the holes on the bowl, gently wiggle the bowl from side to side until they align properly.
Once the bowl is properly aligned and seated on the flange, you can move on to the next step of securing the toilet bowl to the floor using the nuts and washers provided with the toilet.
Follow these simple steps, and you’ll have your new wax ring installed, ensuring a watertight and odor-free toilet. Remember, a properly installed wax ring is crucial for maintaining the integrity of your bathroom plumbing and preventing any potential leaks or damage.
Step 7: Reassembling The Toilet
Step 7: Reassembling the Toilet
After successfully replacing the wax ring on your toilet, it’s time to reassemble all the components. This step will ensure that your toilet is functioning properly and leaks are prevented. Follow the instructions below to reattach the tank, connect the water supply, and ensure proper sealing:
Reattaching the Tank
The tank holds the water that flushes the toilet, so it’s essential to reattach it securely. Follow these steps to reattach the tank:
- Place the tank back onto the toilet bowl, aligning the bolt holes at the bottom of the tank with the corresponding holes on the bowl.
- Insert the tank bolts through the holes and hand-tighten the nuts underneath the bowl to hold them in place.
- Use a wrench to tighten the nuts further, ensuring they are snug but not over-tightened, as this can crack the porcelain.
- If your toilet has a trip lever or push-button flush, reattach it according to the manufacturer’s instructions.
Connecting the Water Supply and Ensuring Proper Sealing
Now that the tank is reattached, it’s time to connect the water supply and ensure proper sealing. Follow these steps:
- Connect the water supply line to the fill valve on the bottom of the tank. Hand-tighten the nut, making sure it is snug.
- Turn on the water supply valve slowly to allow the tank to fill with water.
- Check for any leaks around the fill valve and the water supply line. If you notice any leaks, tighten the connections further or replace any faulty parts.
- Once the tank is filled, flush the toilet a few times to ensure everything is working properly and there are no leaks.
Congratulations! You have successfully reassembled the toilet after installing a new wax ring. Now you can enjoy a properly functioning and leak-free toilet. As a final step, remember to clean up any excess water or debris around the toilet area for a neat and tidy finish.
Step 8: Testing For Leaks And Proper Operation
Filling the tank and checking for leaks
Once you have installed the new wax ring on your toilet, it’s time to move on to step 8: testing for leaks and proper operation. This is an important step as it ensures that your toilet is functioning correctly and there are no leaks that could potentially cause water damage in your bathroom.
Start by filling the tank of your toilet with water. To do this, locate the water shut-off valve behind the toilet and turn it counterclockwise to open it. Allow the tank to fill up completely until the water level reaches the fill line marked on the inside of the tank.
Once the tank is filled, it’s time to check for any leaks. Carefully inspect the area around the base of the toilet and the floor for any signs of water. Some common signs of leaks include puddles of water, dampness, or discoloration of the flooring. If you notice any leaks, it’s important to address them right away to prevent further damage.
Ensuring the toilet flushes correctly
Next, you’ll need to ensure that your toilet flushes correctly. This step is crucial to make sure that the waste is properly disposed of and that your toilet is functioning as it should. To test the flush, follow these steps:
- Press down on the toilet handle to flush the toilet. Observe the flushing action and listen for any unusual sounds.
- Ensure that the water level in the bowl decreases and then refills to the appropriate level. The water level should reach the fill line marked on the inside of the tank.
- Check for any slow flushing or incomplete flushing. The toilet should flush smoothly and completely without leaving any waste behind.
If you notice any issues with the flush, there are a few possible causes. It could be due to a clog in the drain pipe, a faulty flush valve, or an issue with the refill valve. If you’re unsure about how to fix the problem, it’s best to consult a professional plumber to ensure the proper operation of your toilet.
By following these steps and carefully testing for leaks and proper operation, you can ensure that your new wax ring installation is successful. Remember, it’s important to address any issues promptly to prevent further damage and to keep your toilet functioning optimally.
Maintaining A Properly Sealed Wax Ring
Regular Inspection and Maintenance
Maintaining a properly sealed wax ring is crucial for the functionality of your toilet. Regular inspection and maintenance can help you avoid potential leaks or unpleasant odors. By checking the wax ring periodically, you can address any issues and ensure a watertight seal. Here are a few steps to help you maintain a properly sealed wax ring:
Knowing When it’s Time to Replace the Wax Ring Again
Over time, the wax ring on your toilet may deteriorate or lose its effectiveness. It’s important to know how to recognize when it’s time for a replacement. Here are a few signs that indicate it’s time to replace the wax ring:
- Visible wear and tear: Inspect the area around the base of the toilet. If you notice any cracks, gaps, or unevenness, it’s a sign that the wax ring needs to be replaced.
- Water leakage: If you notice water pooling around the base of the toilet or detect a musty odor, it could be a sign of a faulty wax ring. Address the issue promptly to prevent further damage.
- Toilet wobbling: A loose or wobbly toilet can indicate an improper seal. This can lead to leaks and water damage, so it’s important to replace the wax ring as soon as possible.
By keeping an eye out for these signs, you can stay proactive in maintaining a properly sealed wax ring and avoid potential issues down the line.
Frequently Asked Questions
Do I Put The Wax Ring On The Toilet Or The Flange?
The wax ring should be placed on the toilet, creating a seal between the toilet and the flange.
Is Changing Toilet Wax Ring Easy?
Yes, changing a toilet wax ring is easy. Simply turn off the water supply, remove the toilet, scrape off the old wax ring, replace with a new one, and reinstall the toilet.
Can You Replace Wax Ring Without Replacing Toilet?
Yes, you can replace the wax ring without replacing the toilet. Ensure you turn off the water supply, remove the toilet, clean the old wax ring, and install a new one. Reattach the toilet tightly and turn the water supply back on.
Can You Use A Toilet Right After Replacing The Wax Ring?
Yes, you can use a toilet immediately after replacing the wax ring.
Conclusion
To sum it up, replacing the wax ring on your toilet is a simple task that can prevent messy leaks and costly repairs. By following the step-by-step instructions in this guide, you can confidently install a new wax ring and ensure a tight seal between the toilet and the floor.
Regular maintenance and periodic replacement of the wax ring will help keep your bathroom clean and functional. Happy plumbing!