To install new shower fixtures, turn off the water supply, remove the old fixtures, and attach the new fixtures according to the manufacturer’s instructions. In the process of updating your bathroom, installing new shower fixtures can make a significant impact.
Whether you’re looking to replace an old, outdated showerhead or upgrade the entire shower system, the installation process can be relatively straightforward and does not necessarily require professional help. By following a few simple steps, you can successfully install new shower fixtures and enjoy a refreshed and functional showering experience.
This guide will provide you with the necessary steps to complete the installation process smoothly and efficiently.
Understanding The Different Types Of Shower Fixtures
When it comes to installing new shower fixtures, it’s important to have a good understanding of the different types available. Each type of shower fixture offers its own unique benefits and features, so it’s worth considering which one will best suit your needs and preferences. In this article, we’ll explore three popular types of shower fixtures: wall-mounted showerheads, handheld showerheads, and rainfall showerheads. Let’s dive in and discover the features of each type.
Wall-mounted showerheads
Wall-mounted showerheads are the most common type of shower fixture found in bathrooms. They are attached to the wall, usually at head height, and provide a constant stream of water. These showerheads typically offer adjustable spray patterns and water pressure settings, allowing you to customize your shower experience. Some wall-mounted showerheads even include additional features like massage jets or waterfall settings for added luxury. With their ease of installation and wide variety of options, wall-mounted showerheads are a popular choice for many homeowners.
Handheld showerheads
For those who prefer versatility and control in their shower experience, handheld showerheads are an excellent choice. These showerheads are attached to a flexible hose, which allows you to hold the showerhead in your hand and direct the water wherever you need it. Handheld showerheads come with various spray patterns and settings, including settings for gentle rainfall or powerful massage. With their flexibility, handheld showerheads are perfect for rinsing hard-to-reach areas, bathing children or pets, and even cleaning the shower itself.
Rainfall showerheads
If you’re looking to create a spa-like atmosphere in your bathroom, a rainfall showerhead might be just what you need. These showerheads are designed to mimic the feeling of standing under a gentle rain shower. With a large showerhead diameter, rainfall showerheads provide a wide and even distribution of water, resulting in a relaxing and luxurious shower experience. Some models even feature LED lights or color-changing capabilities to enhance the ambiance. Upgrade your shower routine with a rainfall showerhead and enjoy a rejuvenating experience every time you step into your shower.
In conclusion, understanding the different types of shower fixtures is essential when considering a bathroom upgrade. Whether you opt for a wall-mounted showerhead, a handheld showerhead, or a rainfall showerhead, each type offers its own set of benefits and features. Choose the shower fixture that best suits your needs and preferences, and enjoy a refreshing and rejuvenating shower experience every day.

Assessing Your Existing Plumbing
Checking Water Pressure
Before installing new shower fixtures, it’s essential to assess your existing plumbing to ensure optimal performance and functionality. One important aspect to consider is the water pressure in your home. Checking the water pressure will help you determine if any adjustments or modifications are necessary.
To check the water pressure, you can use a pressure gauge that you can easily purchase at a hardware store. Simply attach the gauge to an outdoor faucet or the main water line. Turn on the water supply and observe the pressure reading on the gauge. Typically, the ideal water pressure for a shower is between 45 to 55 pounds per square inch (psi).
If the pressure is too low, it may result in weak water flow and inadequate shower performance. On the other hand, if the pressure is too high, it can cause excessive strain on your plumbing system and lead to leaks or bursts. If you find that your water pressure is outside the desired range, you may need to install a pressure regulator or make adjustments to your plumbing system to achieve the recommended pressure level.
Evaluating Existing Connections and Fixtures
Another important step in assessing your existing plumbing is to evaluate the connections and fixtures currently in place. This evaluation will help you determine if any repairs or replacements are required before installing new shower fixtures.
Start by visually inspecting the connections and fixtures for any signs of damage, such as leaks, rust, or corroded pipes. Look for water stains, mold, or mildew around the fixtures, which could indicate hidden leaks or water damage. Pay close attention to the connection points, including the pipes, valves, and faucets.
If you notice any issues with the connections or fixtures, it’s important to address them before proceeding with the installation. Depending on the severity of the problem, you may need to replace a faulty valve, repair a leaky pipe, or upgrade outdated fixtures.
To ensure a smooth installation process, it’s also crucial to verify that all the necessary connections and adapters are present and compatible with the new shower fixtures you intend to install. Inspect the size and type of connections to ensure they match the specifications of your new fixtures. This will help avoid any unexpected surprises or difficulties during the installation process.
By carefully checking the water pressure, evaluating existing connections, and fixtures, you can ensure that your new shower fixtures are installed properly and will function optimally. Taking the time to assess your existing plumbing will not only save you time and money but also ensure a satisfying shower experience for years to come.
Finding The Perfect Shower Fixture For Your Bathroom
When it comes to upgrading your bathroom, installing new shower fixtures can make a huge difference in both style and functionality. With so many options to choose from, finding the perfect shower fixture for your bathroom might seem daunting. However, by considering design and aesthetics and assessing water-saving features, you can ensure that you make a choice that not only enhances the look of your bathroom but also conserves water.
Considering design and aesthetics
Bathroom fixtures have come a long way in terms of design and aesthetics. Gone are the days of basic and boring showerheads. Nowadays, you have a wide range of options to choose from, giving you the ability to create a bathroom that matches your personal style and preferences.
When choosing a shower fixture, consider the overall design of your bathroom. If you have a modern and sleek bathroom, a contemporary showerhead with clean lines and a polished finish might be the perfect fit. On the other hand, if your bathroom has a traditional or vintage look, a rain showerhead or a classic handheld showerhead could be the ideal choice. Taking the time to think about the design and aesthetics will ensure that your new shower fixture complements the existing style of your bathroom.
Assessing water-saving features
In addition to design, it’s important to consider the water-saving features of your new shower fixture. Water conservation is not only environmentally friendly but can also help you save on your monthly water bills.
Look for shower fixtures that are labeled as WaterSense certified. These fixtures are designed to meet strict water efficiency standards set by the Environmental Protection Agency (EPA). They use up to 20% less water compared to standard fixtures without sacrificing performance.
Another water-saving feature to consider is a flow restrictor. These devices reduce the amount of water that flows through the showerhead without compromising the water pressure. By minimizing water wastage, flow restrictors can help you save water without sacrificing your shower experience.
Furthermore, consider opting for a shower fixture with a thermostatic valve. This valve allows you to set and maintain a specific water temperature, preventing the need to waste water while adjusting the temperature.
By assessing the water-saving features of different shower fixtures, you can make a conscious choice to reduce your water consumption and contribute to a greener environment.
When it comes to finding the perfect shower fixture for your bathroom, considering design and aesthetics and assessing water-saving features are essential. By focusing on these factors, you can choose a shower fixture that not only enhances the look of your bathroom but also helps you conserve water. With so many options available, take your time to explore and find the perfect shower fixture that suits your style and values.
Shutting Off The Water Supply And Draining The System
Before you start installing new shower fixtures, it is important to shut off the water supply and drain the system properly. This will prevent any unwanted water leakage and ensure a smooth installation process. In this section, we will guide you through the steps to locate the main water shut-off valve and drain excess water from the pipes.
Locating the main water shut-off valve
The main water shut-off valve is typically located near your water meter or where the water line enters your home. Finding this valve is crucial as it will allow you to turn off the water supply to your entire house. Follow these steps to locate the main water shut-off valve:
- Start by locating your water meter, which is usually installed outside your home or in a basement.
- Inspect the area around the water meter for a brass or metal valve.
- If you have trouble finding the valve, consult your home’s plumbing blueprint or contact a professional plumber for assistance.
Draining excess water from the pipes
After shutting off the main water supply, it’s important to drain the excess water from the pipes to avoid any water pressure during the installation process. Here’s how you can drain the system:
- Start by opening all the faucets in your house, including any showerheads, sinks, and outdoor spigots.
- Allow the water to flow freely until it stops completely. This may take a few minutes, depending on the size of your pipes and the amount of excess water present.
- Once the water stops, close all the faucets tightly to prevent any water from re-entering the system.
By locating the main water shut-off valve and draining excess water from the pipes, you have successfully prepared your plumbing system for the installation of new shower fixtures. In the next section, we will guide you through the process of removing the old fixtures and preparing for the installation of the new ones.
Removing The Old Shower Fixtures
Before installing new shower fixtures, it is crucial to remove the old ones. This process involves detaching the showerhead and arm, as well as disconnecting the old valve and handles. By following the steps below, you can easily remove the old shower fixtures and prepare your bathroom for the new ones.
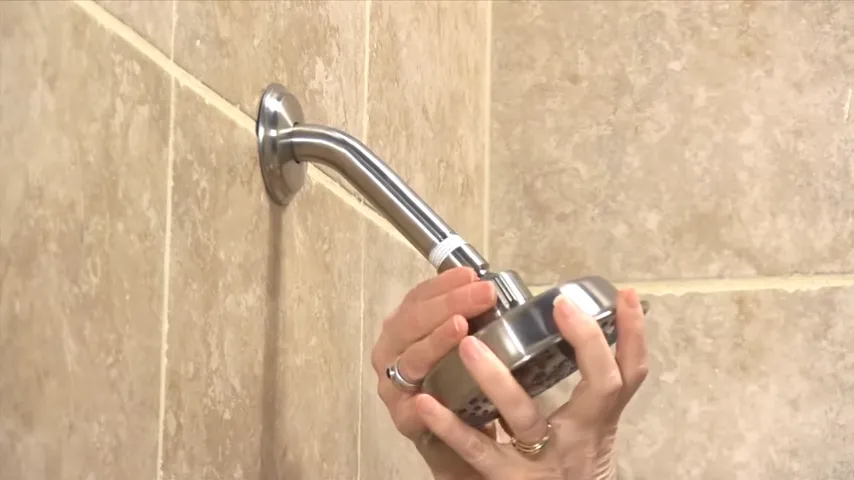
Detaching the showerhead and arm
The first step in removing the old shower fixtures is to detach the showerhead and arm. Here’s how you can do it:
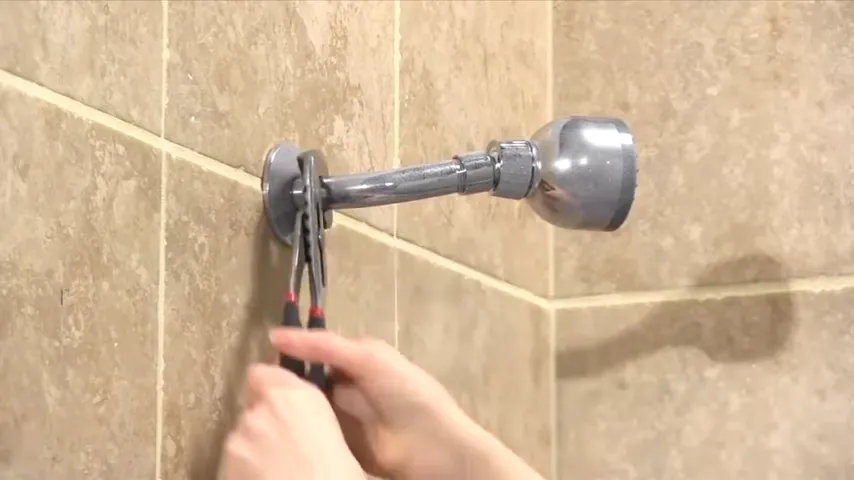
- Start by using a pair of pliers to loosen the showerhead. Grip the base of the showerhead firmly and turn it counterclockwise until it comes off.
- Once the showerhead is removed, you will see the shower arm. Loosen the shower arm in the same manner as the showerhead by gripping it with pliers and turning it counterclockwise.
- Continue rotating the shower arm until it is completely detached from the wall.
By following these steps, you can easily detach the showerhead and arm, clearing the way for the installation of new shower fixtures.
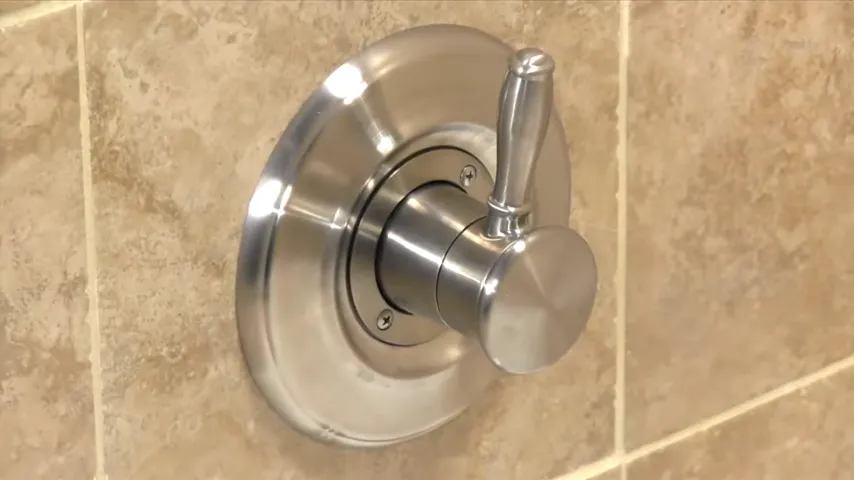
Disconnecting the old valve and handles
Next, you need to disconnect the old valve and handles. Follow the steps below:
- Locate the valve handle and the decorative cap covering the valve.
- Using a screwdriver, carefully remove the decorative cap to expose the screw holding the valve handle in place.
- Once the screw is visible, use the screwdriver to loosen and remove it.
- Gently pull the valve handle away from the wall to disconnect it.
- Repeat the same steps for any additional valve handles.
- After removing the valve handles, you can now access the old valve.
- Using an adjustable wrench, loosen the retaining nut holding the valve in place.
- Continue loosening the nut until the old valve is completely detached from the plumbing.
By carefully following these steps, you can successfully disconnect the old valve and handles, allowing you to install new shower fixtures with ease.
Cleaning And Prepping The Installation Area
Before you begin installing your new shower fixtures, it’s essential to properly clean and prep the installation area. This step ensures that the fixtures will adhere securely and function optimally. By removing any residue or buildup and measuring and marking the installation location, you’ll be one step closer to enjoying your new shower fixtures.
Removing any residue or buildup
To start, you’ll want to remove any residue or buildup that may be present on the current fixtures or the surrounding area. This could include dirt, soap scum, or mineral deposits. Here are some steps to follow:
- Use a mild cleaning solution or vinegar and water mixture to loosen and eliminate any buildup on the existing fixtures.
- Scrub the fixtures gently with a soft brush or sponge to remove the residue effectively.
- Rinse the fixtures thoroughly with clean water to ensure all traces of the cleaning solution are gone.
- Wipe the fixtures dry with a clean cloth to prevent any water spots or streaks.
Measuring and marking the installation location
Accurate measurement and marking of the installation location are critical to ensure the shower fixtures are installed in the correct position. Follow these steps:
- Start by measuring the distance between the existing plumbing connections or the desired location for the new fixtures.
- Using a tape measure, mark the measurements on the wall or the area where the fixtures will be installed.
- Double-check the measurements to ensure accuracy before proceeding with the installation.
By taking the time to thoroughly clean the installation area and accurately measure and mark the location, you’ll create the perfect foundation for installing your new shower fixtures. These preparatory steps will set you up for a successful installation and ensure that your new fixtures function flawlessly for years to come.
Attaching The Valve And Handles
Welcome to our step-by-step guide on how to install new shower fixtures! In this post, we will be focusing on the crucial process of attaching the valve and handles. This step is essential to ensure that your shower fixtures work properly and enhance your overall bathing experience. By following these simple instructions, you’ll be able to successfully complete this installation and have a functional and stylish shower in no time. Let’s get started!
Making Necessary Adjustments and Connections
Before attaching the valve and handles, it’s important to make any necessary adjustments and connections. This will help ensure that everything fits together properly and functions smoothly. Here’s what you need to do:
- Start by identifying the correct placement of your valve and handles. Refer to the manufacturer’s instructions for specific guidance.
- Measure the distance between the valve and handles to ensure they are properly aligned.
- If needed, make adjustments to the plumbing connections to match the specifications of your new fixtures.
- Tightly secure any connections with wrenches or pliers to prevent leaks. Be sure not to overtighten, as this can damage the fittings.
- Double-check that all necessary adjustments and connections have been made before moving on to the next step.
By taking the time to make these necessary adjustments and connections, you’ll ensure that your valve and handles are properly installed and functioning optimally.
Securing the Fixtures in Place
Once you’ve made the necessary adjustments and connections, it’s time to secure the fixtures in place. This step will ensure that the valve and handles are stable and won’t shift or loosen over time. Follow these steps to properly secure your fixtures:
- Use a screwdriver or Allen wrench (depending on the fixture type) to attach the valve and handles to the wall or shower enclosure. Refer to the manufacturer’s instructions for specific details.
- Ensure that the fixtures are level and aligned properly. Use a level tool to make any necessary adjustments.
- Tighten the screws or bolts securely, but be careful not to overtighten, as this can damage the fixtures or cause them to be misaligned.
- Double-check all connections and screws to ensure they are secure.
By following these steps to secure your fixtures in place, you’ll have peace of mind knowing that your shower will function properly and stay securely attached.
Attaching the valve and handles is a crucial step in installing new shower fixtures. By making necessary adjustments and connections before securing the fixtures in place, you’ll ensure a smooth and hassle-free installation process. Remember to refer to the manufacturer’s instructions for any specific details or considerations related to your specific fixtures. Stay tuned for the next steps in our guide to completing your shower fixture installation!
Connecting The Showerhead And Arm
Once you have successfully installed the shower arm, it’s time to connect the showerhead and arm for a complete shower experience. This step is crucial as it ensures proper water flow and a secure connection. Follow the steps below to complete this process.
Applying plumber’s tape and tightening the connections
To prevent any leaks and ensure a tight seal, it’s essential to apply plumber’s tape to the shower arm threads before attaching the showerhead. Plumber’s tape, also known as Teflon tape, creates a watertight seal and prevents any water from seeping through.
To apply the plumber’s tape, follow these steps:
- Wrap the plumber’s tape around the threads in a clockwise direction.
- Make sure to cover the entire threaded area, overlapping the tape as you go.
- Once the threads are fully covered, press down on the tape to secure it in place.
After applying the plumber’s tape, it’s time to connect the showerhead to the arm. Follow these steps for a secure connection:
- Hold the showerhead in one hand and the shower arm in the other.
- Align the threads of the showerhead with those of the shower arm.
- Gently twist the showerhead onto the shower arm in a clockwise direction.
- Continue twisting until the showerhead is securely attached, but avoid overtightening as it may cause damage. You can use a pair of pliers or an adjustable wrench for extra grip if needed.
Adjusting the showerhead angle if necessary
Once the showerhead and arm are connected, it’s important to check the angle and adjust it if necessary. Having the correct angle ensures that the water flows in the desired direction and provides an optimal shower experience.
If you find that the angle needs adjustment, follow these steps to change it:
- Gently hold the showerhead with one hand.
- Locate the adjustable joint or swivel point where the showerhead connects to the arm.
- Rotate the showerhead in the desired direction to change the angle.
- Test the angle by turning on the shower and adjusting further if needed.
It’s important to note that not all showerheads have an adjustable angle feature. In this case, you may need to consider purchasing a shower arm extension to achieve the desired angle.
With the showerhead and arm properly connected and adjusted, you can now enjoy a refreshing and rejuvenating shower experience!
Testing And Adjusting The Water Flow
Testing and Adjusting the Water Flow
When it comes to installing new shower fixtures, testing and adjusting the water flow is an essential step to ensure everything is working properly. By checking for leaks and proper water pressure, you can avoid any potential issues and make sure your shower provides a satisfying and relaxing experience. Additionally, fine-tuning the showerhead settings will help you customize the water flow to your liking. Let’s explore these steps in detail to ensure your shower fixtures are in perfect working condition.
Checking for leaks and proper water pressure
Before you start enjoying your new shower fixtures, it’s crucial to check for leaks and ensure the water pressure is at the optimum level. Here’s what you can do:
1. Turn on the water supply: Start by turning on the water supply to your shower. Keep an eye out for any visible leaks around the shower fixtures, such as at the connection points or the showerhead itself.
2. Inspect the connections: Take a close look at the connections between the showerhead and the shower arm, as well as any additional fixtures you’ve installed. Look for any signs of water dripping or moisture around the connections. If you spot any leaks, use an adjustable wrench or pliers to tighten the connections until the leakage stops. Be sure not to overtighten and damage the fittings.
3. Test the water pressure: Turn on the shower and let the water flow freely. Observe the water pressure and make sure it’s at a comfortable level. If the pressure is too low, you may need to adjust the water pressure regulator, located near the main water supply valve. Consult a professional if you’re unsure how to adjust the regulator properl.
Fine-tuning the showerhead settings
Once you’ve ensured that there are no leaks and the water pressure is optimal, it’s time to fine-tune the showerhead settings. This step allows you to customize your shower experience and achieve the desired water flow. Here are a few pointers to help you:
1. Adjust the showerhead angle: Start by adjusting the angle of the showerhead. This will direct the water flow to your preferred position. Simply twist or pivot the showerhead until it is pointing in the desired direction.
2. Experiment with different settings: Most modern showerheads come with adjustable settings. These can include a variety of spray patterns, such as rainfall, massage, or mist. Try out different settings to find the one that suits you best. Some showerheads also allow you to adjust the water flow rate. Feel free to experiment until you find the perfect combination.
3. Clean the showerhead regularly: To maintain optimal water flow, it’s important to clean the showerhead regularly. Over time, mineral deposits and debris can accumulate, affecting the water flow and pressure. Use a brush or toothbrush to gently scrub the showerhead and remove any buildup. This simple maintenance step will keep your showerhead functioning at its best.
By following these steps, you can easily test and adjust the water flow of your new shower fixtures. Remember to check for leaks, ensure proper water pressure, and fine-tune the showerhead settings for your ultimate shower experience. With a little attention to detail, you’ll be enjoying a revitalizing shower in no time.
Troubleshooting Common Issues
In the process of installing new shower fixtures, you may encounter some common issues that can dampen your excitement. Understanding these issues and knowing how to troubleshoot them is key to ensuring a successful and stress-free installation. Let’s explore some of the most frequent problems that you may encounter and the steps you can take to fix them.
Low Water Pressure
One of the main concerns when it comes to shower fixtures is experiencing low water pressure. This can be frustrating, as it affects the overall showering experience. Fortunately, there are a few possible causes for low water pressure, and most of them can be easily resolved.
If you find that your showerhead is providing inadequate water pressure, here are some troubleshooting steps you can take:
- Check the flow restrictor: Many showerheads come with a flow restrictor installed to conserve water. Sometimes, this restrictor can become clogged or damaged, leading to reduced water flow. To address this, unscrew the showerhead and inspect the flow restrictor. Clean or remove it if necessary.
- Examine the showerhead itself: Over time, mineral deposits can build up inside the showerhead, obstructing the water flow. To fix this, remove the showerhead and soak it in a mixture of warm water and vinegar. Use an old toothbrush to scrub away any deposits before reinstalling the showerhead.
- Check for leaks or blockages in the plumbing: Low water pressure can also be caused by leaks or blockages within the plumbing system. Inspect the pipes and connections leading to the shower to ensure there are no leaks or debris obstructing the water flow.
Leaky Connections
Another common issue that may arise during the installation of new shower fixtures is leaky connections. Leaks can result in water wastage and potential water damage if left unaddressed. To prevent leaks and ensure a watertight connection, follow these troubleshooting steps:
- Inspect the connections: First, check all the connections between the shower fixtures and the plumbing pipes. Ensure that they are properly tightened and aligned. If you notice any loose connections, use a wrench or pliers to tighten them securely without over-tightening.
- Apply plumber’s tape: If the connections are tight, but you are still experiencing leaks, applying plumber’s tape can help create a better seal. Wrap the threaded part of the connection with a few rounds of plumber’s tape before reassembling. This will provide an extra layer of protection against leaks.
- Replace damaged parts: If the connections are properly tightened, but leaks persist, there may be damaged parts that need to be replaced. Inspect the washers, O-rings, and gaskets for any signs of wear or deterioration. Replace any damaged components to ensure a leak-free connection.
By troubleshooting these common issues of low water pressure and leaky connections, you can overcome any obstacles that may arise during the installation of new shower fixtures. Remember to take your time, follow the steps carefully, and enjoy the satisfaction of a successful installation.
Maintaining Your Shower Fixtures
Regular cleaning and maintenance
Regular cleaning and maintenance of your shower fixtures is essential to ensure their longevity and optimal performance. By following a few simple steps, you can keep your shower fixtures sparkling and in top condition for years to come.
- Start by wiping down the fixtures with a soft cloth or sponge soaked in mild soapy water. This will remove any dirt or grime that may have accumulated on the surface. Be sure to rinse the fixtures thoroughly afterward to prevent soap residue from building up.
- For deep cleaning, mix equal parts white vinegar and water in a spray bottle. Spray the solution onto the fixtures and let it sit for a few minutes to dissolve any mineral deposits or soap scum. Then, scrub the fixtures gently with a soft brush or toothbrush to remove the buildup. Rinse thoroughly afterward.
- To maintain the shine of chrome or stainless steel fixtures, you can apply a small amount of baby oil or mineral oil to a clean cloth and buff the surface. This will help prevent water spots and keep the fixtures looking their best.
Replacing worn-out components as needed
Over time, certain components of your shower fixtures may wear out or become damaged. It’s important to replace these parts promptly to prevent further issues and maintain the functionality of your shower. Here are a few common components that may need replacing and how to do it:
| Component | Replacement Steps |
|---|---|
| Shower head |
|
| Cartridge |
|
By regularly cleaning and maintaining your shower fixtures and replacing worn-out components as needed, you can ensure a refreshing and enjoyable shower experience every time. Don’t overlook the care and upkeep of your fixtures, as a little effort goes a long way in keeping them in great condition.
Frequently Asked Questions
Can You Change Shower Fixtures Without Changing Valve?
Yes, you can change shower fixtures without changing the valve.
Can I Replace Shower Fixtures?
Yes, you can replace shower fixtures.
How Much Does It Cost To Have New Shower Fixtures Installed?
New shower fixture installation costs vary, but on average, expect to pay around $300 to $500. Factors such as the type and quality of fixtures, complexity of installation, and local labor rates can affect the price. Contact a professional plumber for an accurate estimate.
How Hard Is It To Install A New Shower?
Installing a new shower is not overly difficult. With basic tools and some plumbing knowledge, it can be done in a few simple steps. However, if you lack experience, it’s best to hire a professional to ensure proper installation and avoid unexpected issues.
Conclusion
Installing new shower fixtures is a relatively simple task that can transform your bathroom and enhance your daily shower experience. By following the step-by-step guide provided in this blog post, you can successfully install new shower fixtures without any hassle.
Remember to gather the necessary tools and materials, turn off the water supply, and follow the manufacturer’s instructions. With a little patience and careful attention to detail, you’ll have your new shower fixtures up and running in no time. Say hello to a refreshing shower that you’ll enjoy for years to come!