To install a Moen shower valve, turn off the water supply, remove the old valve, and connect the new valve following the manufacturer’s instructions and using the appropriate tools. Installing a Moen shower valve is a straightforward process that can be done by following a few simple steps.
By properly disconnecting the old valve and connecting the new one, you can ensure a secure and effective installation. This guide will provide you with the necessary steps to successfully install a Moen shower valve in your bathroom. So, let’s get started and learn how to install a Moen shower valve.
What Is A Moen Shower Valve And Why Is It Important For Your Bathroom?
What is a Moen Shower Valve and why is it important for your bathroom?
A Moen shower valve is a crucial component of your bathroom plumbing system, responsible for controlling the flow and temperature of water in your shower. It acts as the heart of your shower, ensuring a smooth and consistent water pressure, as well as allowing you to easily adjust the temperature to your liking.
Key components of a Moen shower valve
Understanding the key components of a Moen shower valve will help you install and maintain it effectively:
| Component | Description |
|---|---|
| Valve Body | This is the main housing of the shower valve, responsible for connecting the hot and cold water supply lines. |
| Cartridge | The cartridge is the inner part of the valve that controls the flow and temperature of water. It can be easily replaced when necessary. |
| Trim Kit | The trim kit includes the shower handle, escutcheon plate, and any decorative elements that give your shower a polished and finished appearance. |
Benefits of installing a Moen shower valve
Installing a Moen shower valve offers a range of benefits that enhance your showering experience:
- Consistent water flow and pressure: With a Moen shower valve, you can enjoy a consistent flow of water, ensuring a comfortable and refreshing shower every time.
- Precise temperature control: Moen shower valves are designed with advanced temperature control features, allowing you to adjust the water temperature to your preference with ease.
- Durability and reliability: Moen is a trusted brand known for its high-quality products. Installing a Moen shower valve ensures long-lasting durability and reliable performance.
- Easy maintenance: The cartridge of a Moen shower valve can be easily replaced if needed, making maintenance hassle-free and cost-effective.
By installing a Moen shower valve in your bathroom, you can elevate your showering experience and enjoy the convenience and comfort it offers.

Step 1: Gathering The Tools And Materials
Before you begin the installation process of your Moen shower valve, it is important to gather all the necessary tools and materials. Having everything ready and within reach will save you time and frustration during the installation. In this step, we will discuss the essential tools needed and the required materials and parts for installing a Moen shower valve.
Essential tools needed for the installation process
Here is a list of tools you will need to have on hand:
- Adjustable wrench: This tool is essential for loosening and tightening connections.
- Phillips screwdriver: A screwdriver with a Phillips head will come in handy for removing and installing screws.
- Allen wrench: Depending on the Moen shower valve model, you may need an Allen wrench to remove specific parts.
- Tape measure: Use a tape measure to ensure accurate measurements for positioning and alignment.
- Plumber’s putty: Plumber’s putty is necessary for creating a watertight seal around certain parts.
Having these essential tools readily available will make the installation process easier and more efficient.
Required materials and parts for installing a Moen shower valve
In addition to the tools mentioned above, you will also need the following materials and parts:
| Materials | Parts |
|---|---|
|
|
By collecting all the required materials and parts beforehand, you’ll be in a position to proceed smoothly through the installation process.
Now that you have gathered all the necessary tools and materials for installing a Moen shower valve, it’s time to move on to the next step.
Step 2: Preparation Before Installation
Before you begin installing your Moen shower valve, it is crucial to properly prepare the area and gather the necessary tools. Following these steps will ensure a smooth and successful installation process.
Shutting off the water supply
The first step in preparing for the installation of your Moen shower valve is to shut off the water supply. This is an essential precautionary measure to prevent any water leakage or accidents during the installation process. To do this:
- Locate the main water supply valve in your home. It is usually situated in the basement or utility area.
- Once you have located the valve, turn it clockwise to shut off the water supply. This will stop the flow of water to the shower valve.
- To ensure the water supply is completely shut off, turn on the shower faucet to drain any remaining water from the pipes.
Removing any existing fixtures or fittings
Next, you need to remove any existing fixtures or fittings that may be in the way of the installation. This includes showerheads, knobs, handles, and any other accessories connected to the shower valve. Follow these steps:
- Using a wrench or pliers, carefully loosen and remove the showerhead by turning it counterclockwise.
- If there are any knobs or handles, locate the setscrew and unscrew it using a screwdriver. Once the setscrew is removed, gently pull the knob or handle off.
- Inspect the area around the shower valve to ensure there are no other fixtures or fittings that need to be removed. If there are, repeat the appropriate steps to remove them.
Once you have shut off the water supply and removed any existing fixtures or fittings, you are ready to proceed with the installation of your Moen shower valve. By preparing the area properly, you will ensure a seamless installation process and maximize the functionality and longevity of your shower valve.
Step 3: Removing The Old Valve System
Removing the old valve system is a crucial step when it comes to installing a Moen shower valve. It is important to carefully remove the old valve to ensure a seamless installation and prevent any future issues. In this step-by-step guide, we will explain the importance of removing the old valve system and provide you with detailed instructions for a successful removal process.
Explaining the Importance of Removing the Old Valve System
Before installing a new Moen shower valve, it is essential to remove the old valve system. By doing so, you eliminate any potential problems or complications that may arise from the existing setup. Removing the old valve ensures a clean slate for the new installation, allowing for a more efficient and effective shower experience.
Avoiding the removal of the old valve system can lead to issues such as leaks, diminished water pressure, or difficulty in adjusting the temperature. Additionally, leaving the old valve in place may cause compatibility problems with the new Moen shower valve, resulting in a faulty or incomplete installation.
Step-by-Step Instructions for Removing the Old Valve System
Follow these step-by-step instructions to successfully remove the old valve system:
- Shut off the water supply: Locate the main water supply valve for your shower and turn it off to prevent any water from flowing during the removal process. This valve is usually found near the shower or in the basement.
- Remove the shower handle: Use a screwdriver or an Allen wrench to loosen and remove the screws that secure the shower handle. Once the screws are removed, carefully pull the handle away from the wall to expose the valve.
- Unscrew the escutcheon plate: Locate the escutcheon plate surrounding the valve and unscrew it using a screwdriver. The plate covers the hole in the wall where the valve is installed.
- Disconnect the water supply lines: Depending on your existing setup, you may have visible water supply lines connected to the valve. Use an adjustable wrench to disconnect these lines by turning them counterclockwise.
- Remove the old valve: Using a valve removal tool or a pair of pliers, carefully loosen and remove the old valve from the wall. Make sure to disconnect any remaining connections, such as the diverter or temperature control valve, if applicable.
Once the old valve is completely removed, you are now ready to proceed with the installation of your new Moen shower valve. Remember to inspect the area for any debris or residue from the old valve and clean it thoroughly before installing the new one. Removing the old valve system sets the foundation for a successful installation and ensures a smooth transition to upgraded showering experiences.
Step 4: Preparing The Installation Area
Before proceeding with the installation of your Moen shower valve, it is essential to properly prepare the installation area. This step involves ensuring that the area is clean and ready for installation, as well as making any necessary adjustments to the plumbing system. By following these steps, you can ensure a smooth and successful installation process.
Ensuring the area is clean and ready for installation
Before beginning any installation work, it is crucial to ensure that the installation area is clean, clear, and ready for the new Moen shower valve. Follow these steps to ensure a tidy working environment:
- Remove any existing shower fixtures, such as the showerhead, handle, and escutcheon plate. This will provide you with ample space to work on the installation without any obstructions.
- Clean the area thoroughly using a mild cleaner and a cloth. This will help remove any dirt, grime, or residue that may have accumulated over time. A clean surface ensures that the new valve will have a secure and solid foundation.
- Inspect the area for any signs of damage or wear and tear. Look for cracked tiles, loose grout, or any other issues that may need to be addressed before proceeding with the installation. If you notice any damage, make the necessary repairs or consult a professional for assistance.
Making necessary adjustments to the plumbing system
Once the installation area is clean and ready, it’s time to make any necessary adjustments to the plumbing system. This step ensures that the new Moen shower valve will function properly and efficiently. Consider the following steps to ensure a seamless integration:
- Turn off the water supply to the shower. This can usually be done by closing the main water valve located near the shower or by shutting off the water supply to the entire house.
- Remove the old valve carefully, ensuring that all connections are disconnected and any excess water is drained. It is essential to follow the appropriate safety precautions and use the right tools for this step.
- Inspect the plumbing system for any signs of leaks or damage. Address any issues found before proceeding. This ensures that the system is in good condition and will function optimally with the new valve.
- Make any necessary adjustments to the plumbing connections to ensure a proper fit for the Moen shower valve. This may involve replacing old pipes or fittings, resizing connections, or making other modifications as needed.
- Once the adjustments are made, it’s time to prepare the plumbing connections for the new valve installation. This may involve applying plumber’s tape to threaded connections or using a suitable sealant to ensure a watertight seal.
By ensuring that the installation area is clean and ready and making necessary adjustments to the plumbing system, you are setting the stage for a successful Moen shower valve installation. Following these steps will help ensure that your new shower valve functions efficiently and provides you with a luxurious showering experience for years to come.
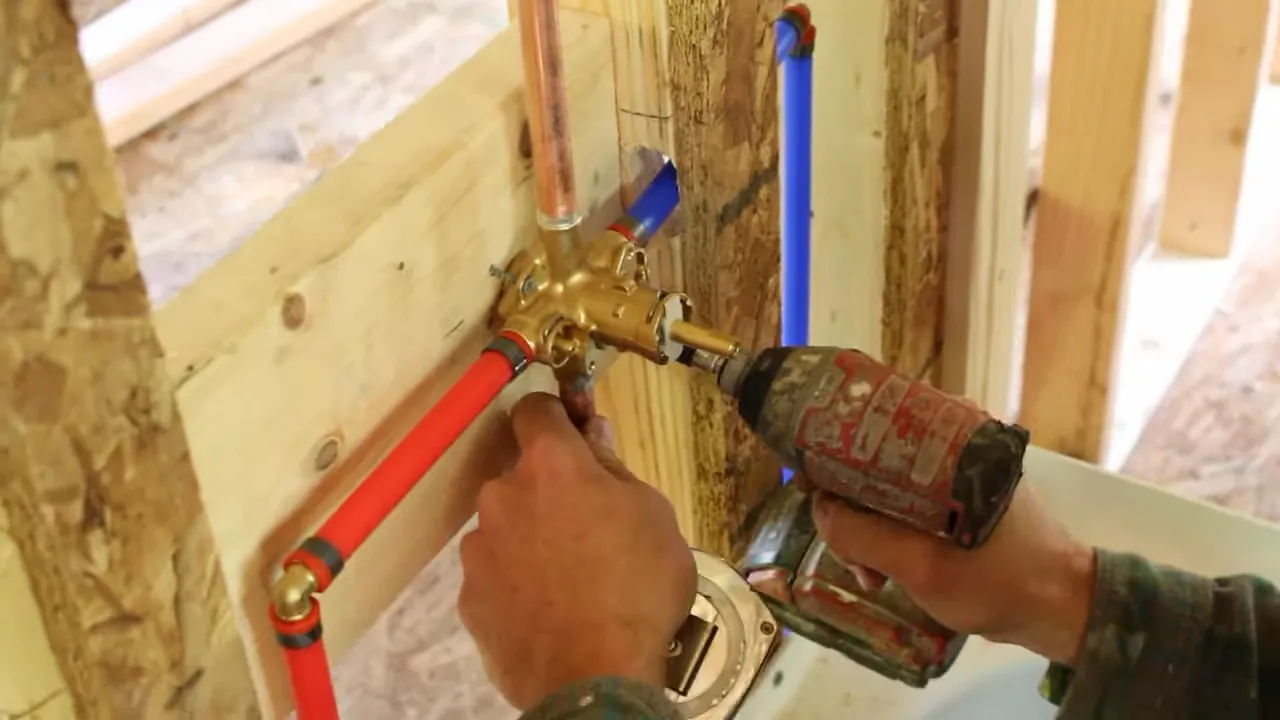
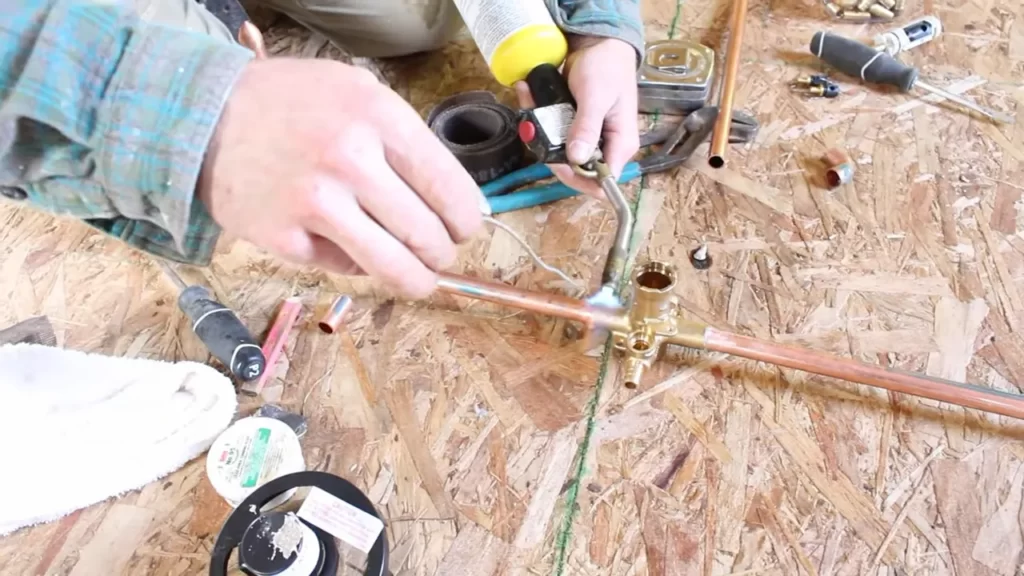
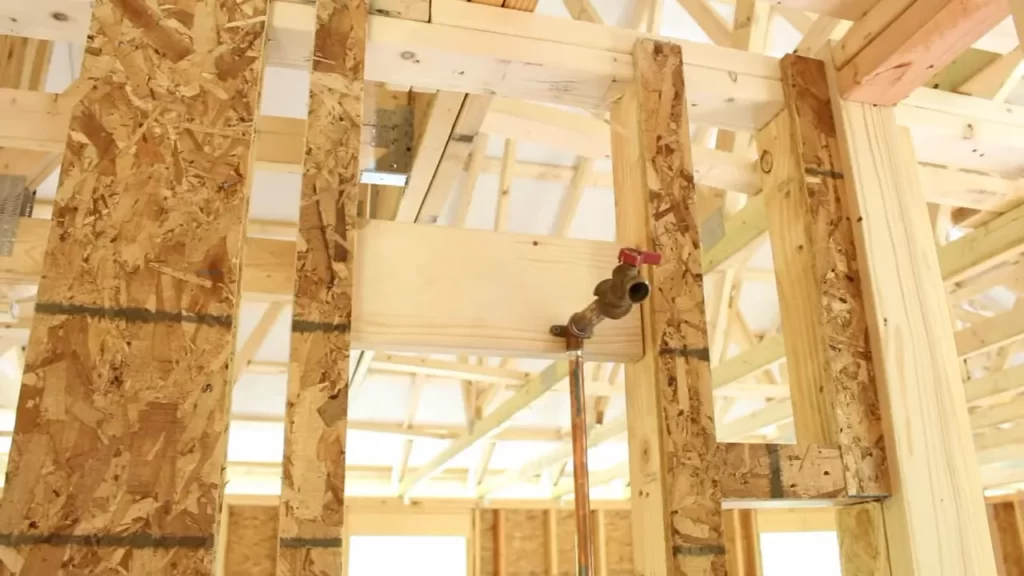
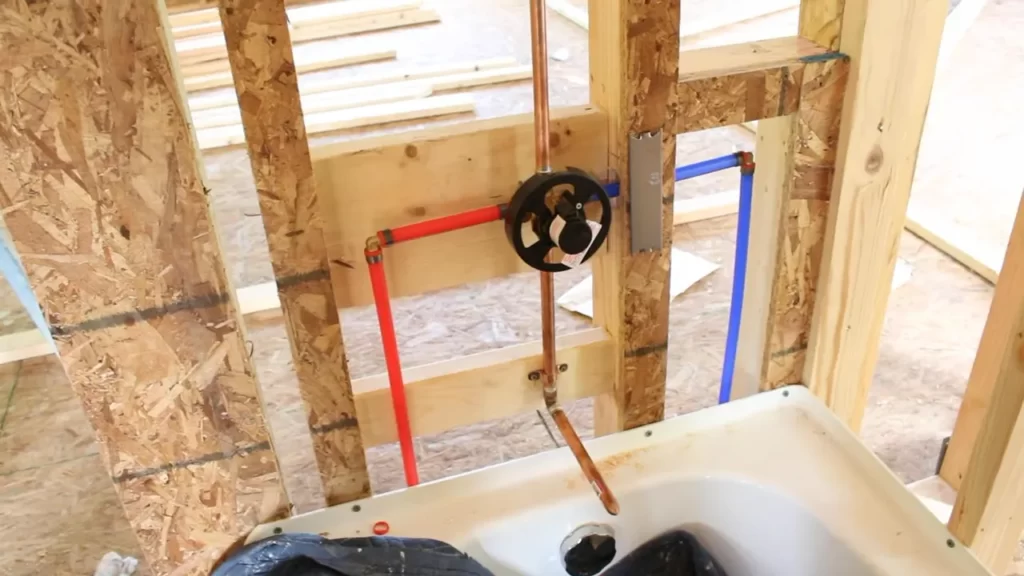
Step 5: Installing The Moen Shower Valve
Once you have successfully prepared the wall and made all the necessary connections, it’s time to move on to the crucial step of installing the Moen Shower Valve. This step involves connecting the valve to the water supply lines and adjusting the valve’s settings and positioning. Follow the instructions below to ensure a proper installation.
Connecting the valve to the water supply lines
To begin, locate the water supply lines that will connect to the Moen Shower Valve. These lines are typically located behind the shower wall or on the other side of the bathroom wall. Once you have located the supply lines, ensure that the water supply is turned off before proceeding with the installation.
Next, carefully connect the hot and cold water supply lines to the corresponding inlet ports on the Moen Shower Valve. Ensure that you use the appropriate fittings and connectors to ensure a secure and leak-free connection. It is recommended to use a wrench or pliers to tighten the connections. Be careful not to overtighten, as this could damage the valve or the supply lines.
Once the connections are securely in place, double-check for any potential leaks. Turn on the water supply and inspect the connections for any signs of water leakage. If you notice any leaks, immediately switch off the water supply and recheck the connections. Make any necessary adjustments or repairs before proceeding.
Adjusting the valve’s settings and positioning
Now that the water supply lines are connected, it’s time to adjust the Moen Shower Valve’s settings and position to ensure optimal performance. Start by adjusting the valve’s depth by turning the adjustable depth collar. This will determine how far the valve extends from the wall. Refer to the manufacturer’s instructions for the recommended depth.
Next, adjust the valve’s temperature limit stop to control the maximum water temperature. This is an important safety feature that prevents scalding. Follow the manufacturer’s instructions to set the temperature limit to your desired level.
Finally, ensure that the valve is positioned correctly in relation to the showerhead and tub spout. Ideally, the valve should be centered vertically between the two fixtures to ensure balanced water flow. Use a level to ensure the valve is perfectly aligned before finalizing its positioning.
Once you have completed these steps and are satisfied with the valve’s settings and positioning, you can proceed with the rest of the shower installation process. Remember to carefully follow the manufacturer’s instructions throughout the entire installation to ensure a successful and problem-free installation.
Step 6: Testing And Troubleshooting
Once you have successfully installed your Moen shower valve, it’s important to test it and troubleshoot any potential issues to ensure that it’s working properly. This step will help you identify and address any leaks or problems that may arise during the installation process.
Checking for leaks and proper functionality
After the installation, the first thing you should do is check for any leaks. Leaks can occur due to improper installation or damaged plumbing connections. Make sure to inspect all the connections and joints thoroughly.
If you notice any leaks, start by tightening the connections with a wrench. It’s crucial to be careful not to overtighten as it could cause damage. Once the connections are secure, test the shower valve again to see if the leak persists.
TIP: To make it easier to identify leaks, you can apply a small amount of soapy water to the connections. If you see bubbles forming, it indicates a leak that needs to be addressed.
In addition to checking for leaks, you should also test the functionality of the shower valve. Turn on the water and observe the flow and temperature control. Ensure that the water is flowing steadily and smoothly.
Adjust the temperature control to both hot and cold settings and verify that they are working correctly. Keep in mind that some models have specific temperature limits that you should be aware of.
Troubleshooting common installation issues
In case you encounter any issues during the testing process, it’s important to troubleshoot and resolve them promptly. Here are some common installation issues and their troubleshooting steps:
| Issue | Troubleshooting Steps |
|---|---|
| Low water pressure |
|
| Inconsistent water temperature |
|
| No water flow |
|
By troubleshooting these common installation issues, you can resolve them quickly and ensure that your Moen shower valve is working optimally. However, if you encounter any complex or persistent problems, it’s recommended to seek professional assistance.
Remember, thorough testing and troubleshooting is an essential step in the installation process to ensure the longevity and functionality of your Moen shower valve, providing you with a refreshing and enjoyable shower experience.
Tip 1: Proper Maintenance And Care For Your Moen Shower Valve
Proper maintenance and care are essential for ensuring the longevity and optimal performance of your Moen shower valve. By regularly cleaning, inspecting, and troubleshooting the valve, you can avoid potential issues and enjoy a smooth showering experience. In this article, we will provide you with some valuable tips to help you maintain and care for your Moen shower valve effectively.
Cleaning and maintaining the valve for longevity
Cleaning your Moen shower valve regularly is vital to prevent the buildup of mineral deposits and other debris that can affect its functionality. Here are some simple steps to help you keep your valve in top condition:
- Turn off the water supply: Before starting any cleaning procedure, ensure the water supply to the shower is completely shut off to avoid any accidents.
- Remove the valve handle and trim: Carefully remove the handle and trim to access the valve body. Refer to the manufacturer’s instructions to properly disassemble the valve components.
- Clean the valve body: Using a soft cloth or brush, gently remove any dirt, grime, or mineral deposits from the valve body. You can also use a mild cleaning solution recommended by Moen.
- Inspect the cartridge: Take a close look at the cartridge for any signs of wear or damage. If necessary, replace it with a compatible Moen cartridge to ensure optimal performance.
- Reassemble the valve: Once the cleaning process is complete, carefully reassemble the valve components following the manufacturer’s instructions. Ensure all parts are securely attached.
Regular inspections and troubleshooting
In addition to regular cleaning, performing regular inspections and troubleshooting can help you identify and address any potential issues with your Moen shower valve. Here’s what you can do:
- Check for leaks: Regularly inspect the valve connections and surrounding areas for any signs of leaks. If you notice any leaks, tighten the connections or replace any damaged seals.
- Test the valve operation: Occasionally turn on and off the shower valve to ensure smooth operation. If you experience any difficulty or unusual noises, it may indicate a problem that requires further attention.
- Seek professional help: If you encounter persistent issues or are unsure about troubleshooting certain problems, it’s always best to consult a professional plumber who specializes in Moen shower valves.
By following these essential maintenance practices for your Moen shower valve, you can prolong its lifespan, enhance its performance, and enjoy a reliable showering experience. Remember, regular cleaning, inspections, and troubleshooting are key to keeping your Moen shower valve in excellent condition.
Tip 2: Upgrading To Advanced Moen Shower Valve Features
One of the best things about Moen shower valves is their versatility and ability to adapt to different preferences. Upgrading your Moen shower valve to include advanced features can enhance your overall shower experience. In this section, we will explore some of the advanced features and options you can consider when upgrading your Moen shower valve.
Exploring advanced features and options
When it comes to upgrading your Moen shower valve, there are several advanced features and options available that can elevate your shower experience to a whole new level. Let’s take a closer look at some of the features you might want to consider:
- Thermostatic temperature control: With a thermostatic shower valve, you can set your desired water temperature and enjoy consistent, precise control every time you step into the shower. No more sudden temperature fluctuations!
- Pressure-balancing technology: If you frequently experience changes in water pressure, a pressure-balancing shower valve can ensure that the water flow remains steady and consistent throughout your shower.
- Multifunctional showerheads: Upgrading your shower valve opens up the possibility to use various types of showerheads, such as rainfall, handheld, or massaging options. Choose a showerhead that suits your preferences and customize your shower experience.
- Digital controls: Some advanced Moen shower valves offer digital control options, allowing you to control water temperature, flow, and even set personalized shower preferences with ease.
- Smart shower compatibility: If you’re a fan of smart home technology, you’ll be delighted to know that certain Moen shower valves are compatible with smart home systems. You can control your shower remotely or even integrate it with voice assistants for a truly hands-free experience.
When planning to upgrade your Moen shower valve, it’s important to consider your specific needs and preferences. Not all advanced features might be necessary for you, so choose the ones that will truly enhance your shower experience.
Remember, upgrading your Moen shower valve is a great way to ensure you have a reliable and tailored shower experience that suits your needs. Whether it’s thermostatic control, pressure-balancing technology, or the latest smart features, there’s something for everyone when it comes to upgrading your shower valve.
Tip 3: Seeking Professional Help And Diy Alternatives
When it comes to installing a Moen shower valve, there may be situations where seeking professional assistance is the best option. Additionally, there are DIY alternatives available for those who prefer to tackle the installation themselves. In this section, we will explore when to consider professional help and provide some DIY alternatives to help you install your Moen shower valve without compromising the quality and functionality of your shower.
When to Consider Professional Assistance
While a DIY approach may be suitable for some, there are instances where it’s wise to bring in a professional plumber to ensure a seamless installation of your Moen shower valve. Here are a few scenarios to consider:
- If you have limited plumbing experience:
- When dealing with complex plumbing systems:
- In the case of older homes:
Installations involving water lines and valves require specialized knowledge and skills. If you’re not confident in your abilities to complete the installation correctly, it’s best to leave it to the professionals.
If your existing plumbing system is intricate or involves multiple connections, it’s recommended to hire a professional plumber. They have the expertise to navigate through complex setups and ensure all connections are properly made.
Older homes may have unique plumbing configurations that require professional attention. Professional plumbers are familiar with the intricacies of older plumbing systems and can ensure a smooth installation without causing damage or leaks.
DIY Alternatives for Installing a Moen Shower Valve
If you’re a handy homeowner who loves tackling projects on your own, installing a Moen shower valve can be a rewarding DIY experience. Here are a few alternatives to consider:
- Gather necessary tools and materials:
- Follow the manufacturer’s instructions:
- Take your time and double-check:
- Seek guidance if needed:
Before starting the installation, make sure you have all the required tools and materials. This may include a pipe wrench, adjustable wrench, pipe tape, plumber’s putty, and the Moen shower valve kit itself. Having everything prepared in advance will streamline the process and prevent any delays.
Moen provides detailed installation instructions with their shower valve kits. Make sure to read and understand these instructions thoroughly before beginning the installation. Following the manufacturer’s guidelines will ensure a proper and secure installation.
Rushing through the installation can lead to mistakes and performance issues. Take your time to ensure each connection is tight and secure. Double-check all the steps along the way to avoid any potential leaks or malfunctions.
If you encounter any difficulties during the installation, don’t hesitate to seek guidance from online tutorials, forums, or even Moen’s customer support. There are plenty of resources available to help troubleshoot common issues and guide you through the installation process.
By following these DIY alternatives, you can successfully install your Moen shower valve while boosting your confidence in your DIY plumbing skills. However, always remember that if at any point you feel overwhelmed or uncertain, it’s best to reach out to a professional plumber to ensure a flawless installation.
Frequently Asked Questions
How Do You Install A Moen Shower Cartridge?
To install a Moen shower cartridge, first, turn off the water supply. Use a screwdriver to remove the handle and trim plate. Next, use pliers to pull out the old cartridge. Then, push in the new cartridge, aligning the notches.
Reattach the trim plate and handle. Finally, turn the water supply back on.
Can You Install A Shower Valve Yourself?
Yes, you can install a shower valve yourself. It is a simple and straightforward process. Just follow the provided instructions carefully and use the necessary tools. However, if you are not confident or have little plumbing experience, it is advisable to call a professional plumber for assistance.
How Deep Should A Moen Shower Valve Be Installed?
The Moen shower valve should be installed at a depth of around 2 3/4 inches. Ensure proper installation for optimal functioning.
Are All Moen Shower Valves Interchangeable?
Yes, all Moen shower valves are interchangeable.
Conclusion
To sum up, installing a Moen shower valve can seem like a daunting task, but with the right approach, it can be completed smoothly. By following the steps outlined in this guide, you can ensure a successful installation process. Remember to gather all necessary tools, take measurements accurately, and consult Moen’s instructions for any specific requirements.
With patience and attention to detail, you’ll be enjoying your new Moen shower valve in no time.