
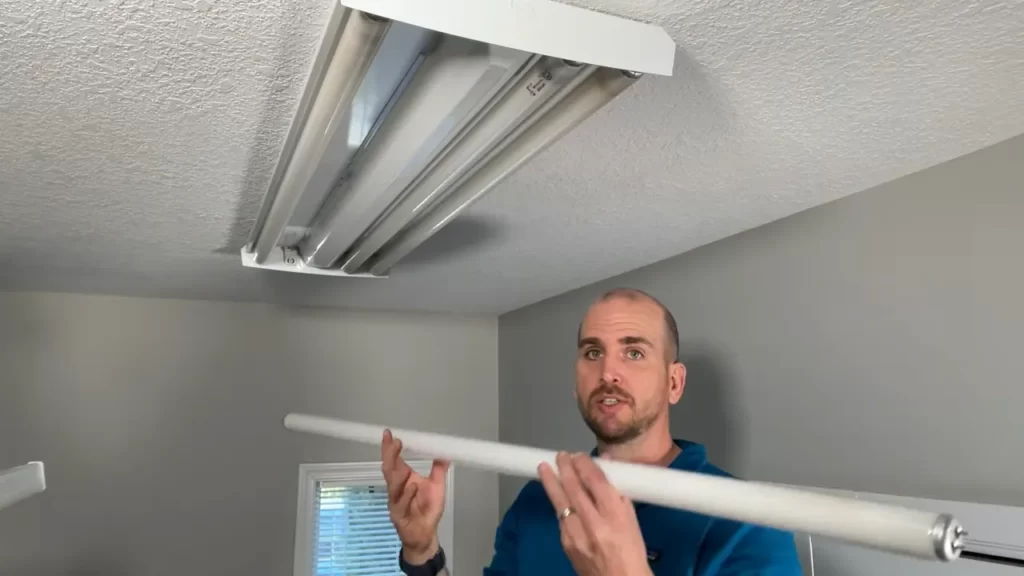
To install long light bulbs, first turn off the power supply. Then, carefully remove the old bulb and insert the new long bulb into the socket, ensuring it is properly aligned.
Factors To Consider When Selecting Long Light Bulbs
Factors to Consider When Selecting Long Light Bulbs
When it comes to selecting long light bulbs, there are several important factors to consider. These factors can make a significant difference in the performance and overall lighting experience in your home or office. By paying attention to the wattage, bulb type, and color temperature, you can ensure that the long light bulbs you choose not only fit your specific lighting needs but also provide energy efficiency and optimal lighting output.
Wattage
One of the first factors to consider when selecting long light bulbs is the wattage. The wattage refers to the amount of power the bulb consumes to produce light. It directly affects the brightness of the bulb, with higher wattage bulbs typically providing brighter illumination. However, it’s important to note that higher wattage bulbs also consume more electricity, resulting in higher energy costs. On the other hand, lower wattage bulbs are more energy-efficient but may not provide the desired brightness level. Evaluate your lighting needs and determine the appropriate wattage to strike a balance between energy efficiency and sufficient illumination.
Bulb Type
The bulb type is another crucial consideration when selecting long light bulbs. There are various bulb types available in the market, each with its unique characteristics and applications. The most common types include incandescent, compact fluorescent lamps (CFL), and light-emitting diodes (LED). Incandescent bulbs are the traditional option, known for their warm light and affordability. CFL bulbs are energy-efficient alternatives that offer longer lifespan than incandescent bulbs. LED bulbs, on the other hand, are the most energy-efficient and durable option, with the ability to produce a wide range of colors. Consider your specific lighting requirements, such as the desired color and lifespan of the bulb, to choose the appropriate bulb type.
Color Temperature
The color temperature of the long light bulb plays a vital role in creating the desired ambiance in your space. It refers to the color appearance of the light produced by the bulb, ranging from warm to cool tones. Warm light, with a lower color temperature, creates a cozy and intimate atmosphere, similar to traditional incandescent bulbs. Cool light, with a higher color temperature, produces a brighter and more vibrant illumination, resembling natural daylight. The color temperature is measured in Kelvin (K), with lower Kelvin values being warmer and higher values being cooler. Consider the mood and functionality of the space where the long light bulb will be installed to determine the appropriate color temperature that aligns with your preferences.
By taking into account these factors – wattage, bulb type, and color temperature – you can make an informed decision when selecting long light bulbs. This will ensure that the lighting in your home or office not only meets your specific needs but also provides energy efficiency and an optimal visual experience.
Safety Precautions Before Installing Long Light Bulbs
Before embarking on the task of installing long light bulbs, it is important to prioritize safety. Taking the necessary precautions will not only protect you from potential accidents but also ensure a smooth installation process. In this section, we will discuss three important safety measures to consider before installing long light bulbs.
Switching off the power
Before you get your hands dirty, take a moment to switch off the power supply to the light fixture you will be working on. This simple step can greatly minimize any potential hazards. Locate the circuit breaker box in your home and find the corresponding switch for the specific light fixture. Flip the switch to the “off” position to cut off the power supply. It is also a good practice to use a voltage tester to double-check that the power is indeed turned off before proceeding with the installation.
Using protective gloves
When dealing with long light bulbs, it is crucial to protect your hands from any potential harm or injury. Always wear a pair of protective gloves to prevent the risk of cuts or burns from broken glass or hot surfaces. The gloves will provide a barrier between your skin and any sharp edges or hot components, ensuring your safety throughout the installation process. Choose gloves that offer both dexterity and protection, allowing you to handle the bulbs with ease while keeping your hands shielded.
Removing any obstructions
Prior to installing your long light bulbs, make sure there are no obstructions that may hinder the process or pose a safety risk. Clear the area around the light fixture of any objects, furniture, or decorations that may get in the way. This will allow you to have ample space to work and maneuver during the installation. It is essential to have a clear and unobstructed path to avoid accidents and ensure a seamless installation experience.
By following these safety precautions, you can significantly reduce the risk of mishaps during the installation of long light bulbs. Remember to switch off the power, use protective gloves, and remove any obstructions before starting the installation process. Implementing these safety measures will not only protect you but also ensure a successful and hassle-free installation of your long light bulbs.
Step 1: Preparing The Area
Before diving into the installation process, it’s essential to set up your workspace properly. Taking the time to prepare the area will ensure a smooth installation and minimize the risk of accidents. In this step, you will focus on clearing the workspace and gathering the necessary tools and materials.
Clearing the Workspace
To start, ensure that the area where you’ll be installing the long light bulbs is clear of any obstructions. Remove any furniture, decorations, or objects that may hinder your movement or pose a safety hazard during the installation process. Creating a clutter-free environment will give you ample working space and make the installation process easier.
Gathering Necessary Tools and Materials
Before beginning the installation, gather all the tools and materials you will need. By having everything ready at hand, you can avoid interruptions and complete the task efficiently. Below is a list of the tools and materials you may need:
| Tools | Materials |
|---|---|
|
|
Make sure you have each of these tools and materials readily available before proceeding with the installation. Additionally, it’s helpful to have a clear understanding of the instructions provided by the manufacturer of the long light bulbs you will be installing.
Remember: Safety is of utmost importance while working with electrical fixtures. If you are unsure of any step or lack the necessary expertise, it is always recommended to seek professional assistance.
Step 2: Removing The Old Light Bulb
Before you dive into installing long light bulbs, it’s crucial to follow the proper steps to remove the old bulb. This ensures your safety and helps prevent any damage during the process. In this second step, we will guide you through the necessary actions to successfully remove the old bulb. Let’s get started!
Switching off the power
To begin, it’s vital to switch off the power supply to the light fixture. This step guarantees your safety by preventing any chances of electrical shock. Locate your circuit breaker box and flip the switch that corresponds to the specific area of your home where the light fixture is located. Wait a few moments to make sure the power is completely cut off.
Allowing the bulb to cool down
Once you’ve switched off the power, give the old bulb some time to cool down. Long light bulbs tend to emit heat during use, so it’s crucial to allow them to cool for a few minutes before proceeding. Touching or attempting to remove a hot bulb can cause burns or shattered glass, posing a safety hazard. Patience is key in this step!
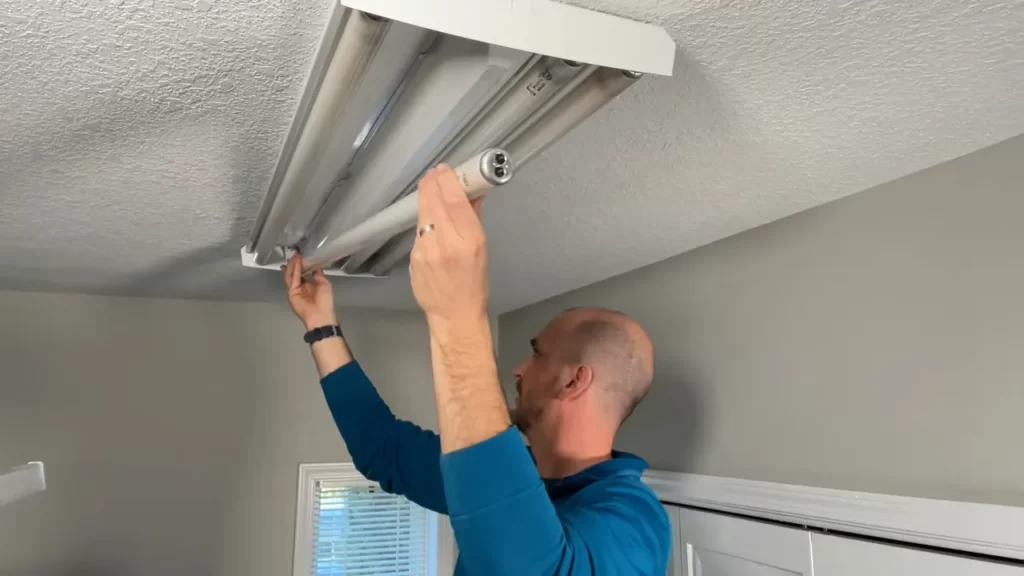
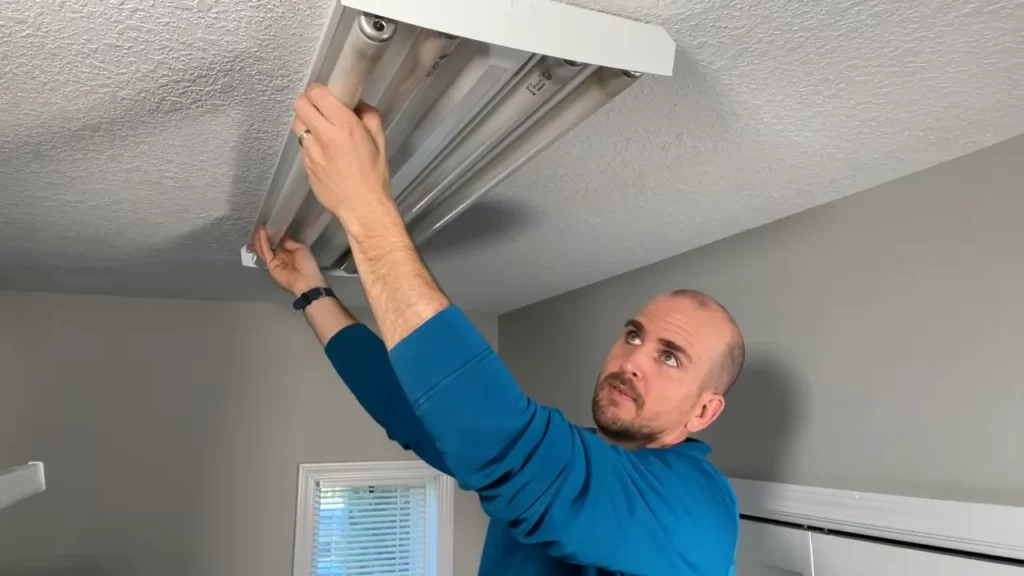
Unscrewing the old bulb
Now that the power is off and the bulb has cooled down, it’s time to unscrew the old bulb from the fixture. Put on a pair of gloves or use a cloth to protect your hands from any potential cuts from broken glass. Gently but firmly grasp the base of the bulb and rotate it counterclockwise to loosen its grip. Once it’s loose, carefully pull the old bulb out of the socket, being cautious not to apply too much pressure that might cause it to break.
Congratulations! You have successfully completed the second step of installing long light bulbs by removing the old bulb. Now you can move on to the next step, which involves inserting the new bulb into the fixture. Stay tuned for our next section, where we will guide you through the process of properly installing your new long light bulb.
Step 3: Inserting The New Long Light Bulb
Once you have checked the socket compatibility and safely handled the new bulb, it’s time to proceed with inserting the long light bulb into its designated socket. This step is crucial for ensuring proper illumination and preventing any potential hazards. Follow these simple guidelines to securely install your new long light bulb:
Checking the socket compatibility
Before inserting the new long light bulb, it’s essential to double-check that the socket is compatible with the bulb you have purchased. Verify the wattage, shape, and size specifications to ensure a seamless fit. Consult the manufacturer’s manual or the packaging of the new bulb for any specific instructions or compatibility recommendations.
Handling the new bulb carefully
When handling the new long light bulb, it’s important to exercise caution to avoid any damage or impairment. Begin by switching off the power supply to the existing light fixture. Once the power is off, carefully remove the old bulb by twisting it counterclockwise. Place it aside safely or dispose of it responsibly. Next, take the new bulb out of its packaging while being mindful not to touch the glass part directly. If your hands come into contact with the bulb, use a clean cloth to wipe off any fingerprints or dirt, as these can impact its performance.
Screwing in the new bulb securely
To securely install the new long light bulb, align the metal contacts on its base with the corresponding holes or pins in the socket. Gently insert the bulb into the socket and turn it clockwise until it feels snug and secure. Avoid using excessive force, as this could damage the bulb or the socket. Once the bulb is securely in place, restore power to the light fixture by switching it on, and enjoy the radiant glow of your newly installed long light bulb.
Step 4: Testing And Adjusting The Light Bulb
Step 4: Testing and Adjusting the Light Bulb
Once you have successfully installed your long light bulb, it is essential to test and adjust it properly to ensure optimal illumination. This step will allow you to make any necessary adjustments to the bulb’s position, ensuring that the light is distributed evenly and effectively throughout the space. In this section, we will guide you through the process of switching on the power, checking for proper illumination, and adjusting the bulb position if needed.
Switching on the Power
To begin testing the light bulb, switch on the power source by flipping the corresponding switch or pressing the appropriate button. This will supply electricity to the bulb and allow it to illuminate. Keep in mind that safety is crucial, so always make sure to follow proper electrical precautions when handling power sources.
Checking for Proper Illumination
After turning on the power, take a few moments to observe the illumination provided by the long light bulb. Ensure that the light emitted from the bulb is consistent and evenly distributed throughout the area. Check for any areas that appear dim or any spots that may be overly bright. This step will help you identify potential issues with the bulb’s positioning or any obstructions that may be affecting the light output.
If you notice uneven or insufficient lighting, it may be necessary to make adjustments to the bulb’s position or install additional light fixtures to achieve the desired illumination. Remember, proper lighting is essential for creating a comfortable and functional environment.
Adjusting the Bulb Position, if Necessary
In some cases, particularly if the light bulb is not providing adequate illumination or if the light distribution is uneven, adjusting the bulb’s position can help optimize its performance. To do this, follow these steps:
- Switch off the power source to ensure safety.
- Use caution when handling the light bulb, especially if it has been in use and may be hot.
- Gently rotate or reposition the bulb to find the most suitable angle or direction.
- Switch on the power again and observe the changes in illumination.
Repeat these steps as necessary until you achieve the desired lighting effect. Remember to always exercise caution and follow proper safety procedures when making any adjustments.
By carefully testing and adjusting your long light bulb, you can optimize its performance, ensuring that it provides the desired illumination for your space. Take the time to evaluate the light output and make any necessary changes to achieve a well-lit and comfortable environment. Remember, the proper positioning of the bulb and sufficient illumination are key elements in creating a welcoming and functional space.
Issue 1: Bulb Not Turning On
If you’ve recently installed a long light bulb and it’s not turning on, there could be a few possible reasons for this problem. In this section, we’ll walk you through the steps to troubleshoot and resolve the issue. Let’s get started!
Checking the power supply
The first thing you need to do when your long light bulb isn’t turning on is to check the power supply. Here’s how:
- Start by ensuring that the light switch is in the “on” position. It might be a simple oversight, so double-check just to be sure.
- Next, examine the circuit breaker or fuse box to see if there are any tripped breakers or blown fuses. If you find any, reset the breaker or replace the fuse accordingly.
- If the circuit breaker or fuse box seems fine, proceed to inspect the wiring connections. Make sure the wires are securely connected and not loose. Tighten any loose connections you find.
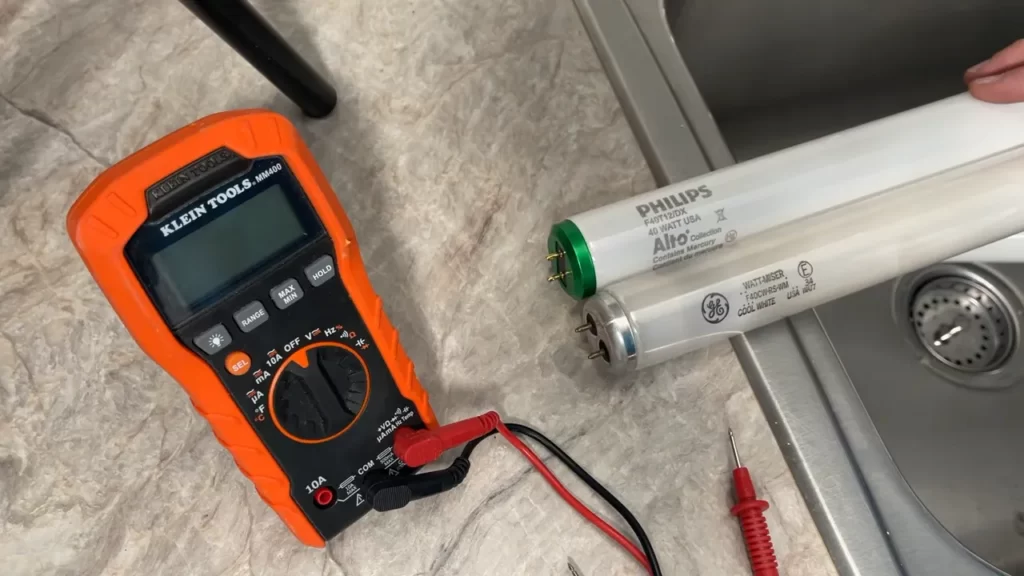
- Consider using a voltage tester to verify if there is power coming to the socket. Simply insert the tester probe into the socket and check for a reading. If there is no power, it’s recommended to consult a professional electrician.
Ensuring proper bulb installation
If the power supply check didn’t yield any results, the next step is to verify that the long light bulb was installed correctly. Follow these steps:
- Start by turning off the power to the socket from the circuit breaker or fuse box. Safety is paramount when dealing with electrical components.
- Take a moment to carefully inspect the bulb and socket. Look for any signs of damage, corrosion, or foreign objects that may be causing a poor connection. If you find any issues, replace the bulb or clean the socket accordingly.
- Ensure that the bulb is properly inserted into the socket and is secured tightly. Sometimes, an improperly installed bulb can prevent it from turning on.
- If you are using a dimmer switch, make sure the bulb is compatible with it. Some long light bulbs may not work with certain types of dimmers.
By following these steps, you should be able to troubleshoot and resolve the issue of your long light bulb not turning on. However, if the problem persists, it is advisable to seek professional assistance from a qualified electrician to ensure your safety and the proper functioning of your lighting system.
Issue 2: Flickering Or Dim Light
When it comes to installing long light bulbs, there can be various issues that may arise. In this blog post, we will focus on Issue 2: Flickering or dim light. This issue can be frustrating as it not only affects the brightness of the room but also the overall ambiance. Luckily, there are a few steps you can take to troubleshoot and resolve this problem.
Checking the wattage compatibility
One common reason for flickering or dim light is the wattage compatibility between the bulb and the fixture. It is important to verify that the wattage of the light bulb matches the recommended wattage for the socket. Using a higher wattage bulb than recommended can cause the bulb to flicker or even lead to other electrical problems. Conversely, using a lower wattage bulb may result in a dimmer light than desired. Refer to the manufacturer’s guidelines or the packaging of the bulb to determine the appropriate wattage for your fixture.
Verifying the socket connection
Another possible cause of flickering or dim light is a loose or faulty socket connection. Ensure that the bulb is securely screwed into the socket and that there are no loose connections. If the bulb seems loose, gently tighten it until it is snug. If the flickering or dimming persists, you may need to replace the socket. A loose connection can cause irregular electrical flow, resulting in the flickering or dimming effect.
In conclusion, if you are experiencing flickering or dim light after installing long light bulbs, be sure to check the wattage compatibility and verify the socket connection. Taking these steps will help ensure that your light bulbs function properly, providing the desired brightness and eliminating any unwanted flickering or dimming issues.
Issue 3: Excessive Heat Or Burning Smell
Issue 3: Excessive Heat or Burning Smell
If you’ve noticed that your long light bulbs are generating excessive heat or emitting a burning smell, it’s essential to address this issue promptly. This problem can be due to various reasons, including electrical issues and using the incorrect bulb type. In this section, we will discuss how to troubleshoot and resolve these potential causes.
Checking for Electrical Issues
First and foremost, it’s crucial to inspect your electrical connections to ensure there are no underlying issues causing the excessive heat or burning smell. Follow these steps to assess and address any potential electrical problems:
- Turn off the power: Before inspecting any electrical components, make sure to turn off the power to avoid any potential hazards.
- Inspect the wiring: Carefully examine the wiring connections for any signs of damage or loose connections. Look for exposed wires or frayed insulation, as it can result in a short circuit and excessive heat generation.
- Tighten connections: If you notice any loose wiring connections, use a screwdriver or pliers to tighten them securely. This can help improve the electrical flow and reduce the risk of overheating.
- Replace damaged wiring: If you find any damaged or worn-out wiring, it’s crucial to replace it immediately. Faulty wiring can lead to serious electrical problems and even pose a fire hazard.
- Consult an electrician: If you are unsure about your electrical abilities or encounter complex issues, it’s always best to seek professional assistance. An experienced electrician can diagnose the problem accurately and ensure the safety of your electrical system.
Verifying Correct Bulb Type
Another common cause of excessive heat or burning smell from long light bulbs is using the incorrect bulb type. Ensure that you have the right kind of bulb for your fixture by following these guidelines:
- Check the wattage: Ensure that the bulb’s wattage matches the recommended wattage specified for your fixture. Using bulbs with higher wattage than what is recommended can cause excessive heat and potential damage to the fixture.
- Inspect the base type: Verify that the bulb’s base matches the socket type in your fixture. Using mismatched bases can result in poor electrical connections and increased heat production.
- Consider the bulb’s shape: Some fixtures have specific requirements regarding bulb shape. Ensure that the bulb’s shape aligns with the design of your fixture to maintain optimal performance and prevent overheating.
- Review the fixture’s guidelines: If unsure about the appropriate bulb type, refer to the manufacturer’s guidelines or consult the instruction manual for your fixture. These resources often provide valuable information on the suitable bulbs to use.
- Replace with compatible bulbs: If you find that you have been using the wrong type of bulb, it’s crucial to replace it with the correct one as soon as possible. Using compatible bulbs ensures efficient functioning and minimizes the risk of excessive heat or burning smell.
By checking for electrical issues and verifying the correct bulb type, you can effectively resolve the problem of excessive heat or burning smell associated with long light bulbs. Remember, safety should always be your top priority when dealing with electrical components, so don’t hesitate to seek professional assistance if needed.
Cleaning The Bulbs Regularly
Cleaning the bulbs regularly is an essential step in maintaining the longevity and performance of your long light bulbs. Over time, dirt, dust, and grime can accumulate on the surface of the bulbs, obstructing their light output and reducing their lifespan. To ensure optimal brightness and efficiency, it is crucial to clean your long light bulbs on a regular basis. In this section, we will explore the best practices for cleaning your bulbs and explain why using a soft cloth and avoiding harsh cleaning agents are important steps to follow.
Using a soft cloth
One of the simplest yet most effective methods to clean your long light bulbs is by using a soft cloth. This method requires minimal tools and materials, making it convenient for everyone. To begin, ensure that the light bulbs are turned off and have cooled down completely to avoid any risk of burns.
Take a soft cloth, such as a microfiber cloth, and gently wipe the surface of the bulb. The soft cloth will help remove any dust or dirt particles without scratching or damaging the delicate coating on the bulb. It is important to use a gentle touch while cleaning to prevent any accidental breakage.
Avoiding harsh cleaning agents
While it may be tempting to use strong cleaning agents to tackle stubborn stains or grime on your light bulbs, it is important to avoid doing so. Harsh cleaning agents can contain abrasive chemicals that can damage the surface of the bulb or even pose a safety risk when in contact with the electrical components. Thus, it is best to steer clear of ammonia-based cleaners, bleach, or any other aggressive substances.
Instead, opt for mild soapy water for tougher stains. Mix a small amount of gentle dish soap with warm water and lightly dampen your soft cloth. Gently wipe the bulb’s surface with the damp cloth, taking care not to allow any moisture to seep into the electrical connection. Afterward, use a dry cloth to remove any residual moisture.
Regularly cleaning your long light bulbs using a soft cloth and avoiding harsh cleaning agents will not only help maintain their appearance but also enhance their functionality. By removing any dirt or dust that may accumulate over time, you will ensure that your bulbs shine brightly and last longer, providing you with a well-lit and visually appealing space.
Replacing Bulbs When Needed
One important aspect of maintaining proper lighting in your home or office is replacing light bulbs when they cease to function. Over time, light bulbs will eventually burn out or dim, affecting the overall illumination of a space. Replacing light bulbs promptly ensures that you can continue to enjoy optimal lighting conditions without interruption. In this article, we will discuss some guidelines for monitoring the lifespan of your bulbs and following the manufacturer’s recommendations when it comes to bulb replacement.
Monitoring Bulb Lifespan
Monitoring the lifespan of your light bulbs is crucial to avoid being caught off guard in a dark room. Some bulbs may have a longer lifespan, while others may need to be replaced more frequently. To keep track of the condition of your bulbs, it is a good idea to keep a log or use a reminder system. This way, you can monitor and plan for replacements in a timely manner.
Additionally, it is essential to be aware of the signs that indicate a bulb is nearing the end of its lifespan. Dimming or flickering light, unusual buzzing sounds, or complete failure to light up are all indications that a bulb needs to be replaced. Paying attention to these warning signs will help you stay ahead of any lighting issues and maintain a well-lit environment.
Following Manufacturer’s Recommendations
Each light bulb manufacturer provides guidelines and recommendations for the lifespan of their products. These recommendations are based on extensive testing and should be followed to ensure optimal performance and longevity of your bulbs.
When purchasing new light bulbs, carefully read and take note of the manufacturer’s instructions regarding the estimated lifespan of the bulb. They may suggest a specific timeframe for replacing the bulb, such as every 1000 hours or every six months. Adhering to these recommendations will help you maximize the lifespan of your bulbs and avoid any potential safety hazards or reduced illumination.
Moreover, it is worth noting that using a bulb longer than its recommended lifespan may result in uneven lighting, decreased efficiency, or even an increased risk of bulb failure. To maintain consistent lighting and avoid unnecessary inconvenience, it is always best to replace bulbs according to the manufacturer’s recommendations.
In conclusion, consistently monitoring your light bulbs’ lifespan and following the manufacturer’s recommendations for replacement will ensure that you maintain optimal lighting conditions in your space. By being proactive and promptly replacing bulbs when needed, you can enjoy a well-lit environment without any interruptions to your daily activities.
Ensuring Proper Ventilation
Proper ventilation is key when it comes to installing long light bulbs. Without sufficient airflow, heat buildup can occur, which can significantly reduce the lifespan of the bulbs and potentially lead to hazardous situations. In this section, we will discuss two crucial aspects of ensuring proper ventilation: avoiding heat buildup and providing adequate airflow.
Avoiding Heat Buildup
Heat buildup is a common issue when using long light bulbs, primarily due to their extended length and higher wattage. Excessive heat can not only affect the performance of the bulb but also increase the risk of fire hazards. To prevent heat buildup, follow these essential steps:
- Choose the appropriate wattage: Always check the maximum wattage recommended by the manufacturer for your light fixtures. Using bulbs with higher wattage than recommended can generate excess heat and potentially damage the fixture.
- Avoid overcrowding: Ensure that your light fixture has enough room to dissipate heat. Overcrowding the fixture with multiple long bulbs or using an oversized bulb in a small fixture can impede proper airflow, leading to heat buildup.
- Inspect the fixture: Regularly check the condition of your light fixture to ensure that it is in good working order. Damaged or malfunctioning fixtures can interfere with proper heat dissipation, increasing the risk of heat buildup.
- Replace damaged or worn-out components: If you notice any signs of wear or damage on the fixture, such as cracked sockets or loose connections, it is crucial to replace them promptly. Faulty components can impede airflow, leading to heat buildup.
Providing Adequate Airflow
Ensuring proper airflow around your long light bulbs is equally essential to maintain their optimum performance and extend their lifespan. Here are a few steps you can take to provide adequate airflow:
- Keep distance from other objects: Avoid placing objects close to the light bulbs that can obstruct airflow, such as curtains, drapes, or furniture. Leaving a clearance around the bulbs allows for better circulation of air.
- Clean the surrounding area: Regularly remove any dust or debris that might accumulate around the light fixtures. Dust can act as an insulator, trapping heat and impeding proper airflow.
- Consider the fixture design: Some fixtures are designed with built-in ventilation features, such as vents or fins, to enhance airflow. When choosing light fixtures for long bulbs, opt for designs that prioritize proper ventilation.
- Use appropriate lamp shades: If you prefer using lamp shades with your long light bulbs, select ones made of breathable materials that allow air to flow freely. Avoid tightly fitting shades that restrict airflow.
By adhering to these guidelines, you can ensure that your long light bulbs are properly ventilated, resulting in improved performance, longer lifespan, and enhanced safety.
Frequently Asked Questions
How Do You Change A Long Light Bulb?
To change a long light bulb, follow these steps: 1. Turn off the power. 2. Wait for the bulb to cool down. 3. Remove any covering or glass. 4. Carefully unscrew the old bulb. 5. Screw in the new bulb and replace the covering.
How Do You Change A Long Light Bulb With A Cover?
To change a long light bulb with a cover, follow these steps: turn off the power, remove the cover, unscrew the old bulb, and screw in the new one. Then, replace the cover, and finally, turn the power back on.
Remember to handle the bulb with care to avoid breakage.
What Is A Long Light Bulb Called?
A long light bulb is commonly known as a fluorescent tube. It is a slender, tubular-shaped bulb that provides bright and energy-efficient lighting.
Are All Long Light Bulbs The Same?
No, not all long light bulbs are the same. There are different types and sizes available for different purposes. It’s important to choose the right bulb based on your specific needs and the fixture it will be used in.
Conclusion
To sum up, installing long light bulbs is a straightforward task that can enhance the lighting experience in your space. By following the steps outlined in this guide, you can effortlessly replace your old light bulbs with longer ones. Remember to turn off the power, choose the right bulb size, and handle them with care.
With this knowledge, you can confidently bring better illumination to your home or office. Let there be light!