To install a garbage disposal drain, begin by removing the existing drain from the sink’s drainpipe. Then, connect the disposal unit to the sink’s drainpipe using a dishwasher connector kit.
Welcome to our guide on installing a garbage disposal drain. If you’re tired of dealing with food scraps and clogged sinks, a garbage disposal can be a convenient solution. Installing a garbage disposal drain involves removing the existing drain and connecting the disposal unit to the sink’s drainpipe.
We will provide you with a step-by-step guide on how to install a garbage disposal drain effectively. By following these instructions, you’ll have a fully functional and efficient garbage disposal in no time. So let’s jump in and get started!
Choosing The Right Garbage Disposal Drain
When it comes to installing a garbage disposal drain, one of the crucial decisions you need to make is choosing the right drain for your needs. With a wide range of options available in the market, it can be overwhelming to decide which one is the best fit for your kitchen. In this section, we will guide you through the factors to consider when selecting a garbage disposal drain, provide an understanding of the different types of drains, and help you determine the correct size for your drain.
Factors to consider when selecting a garbage disposal drain
Before jumping into the technicalities of choosing a garbage disposal drain, it is important to consider a few factors that will play a significant role in your decision-making process.
- Material: Ensure that you choose a drain made from durable materials such as stainless steel or brass. These materials are resistant to corrosion and will last longer, providing a reliable option for your kitchen.
- Compatibility: Check the compatibility of the drain with your specific garbage disposal unit. Different units may require specific types of drains, so it is important to choose one that is compatible with your system.
- Installation: Consider the ease of installation. Opt for a drain that comes with clear instructions and all the necessary components for hassle-free installation.
- Maintenance: Look for a drain that is easy to clean and maintain. A removable splash guard or an easy-to-access drainage system can make your cleaning routine effortless.
- Noise Reduction: If noise is a concern for you, consider choosing a drain with noise reduction technology. These drains are designed to minimize the noise produced during the garbage disposal process, providing a quieter kitchen environment.
Understanding the different types of garbage disposal drains
Now that you have considered the factors, let’s dive into the different types of garbage disposal drains available in the market:
| Type | Description |
|---|---|
| Continuous Feed | This type of drain allows you to continuously add waste while the unit is running. It is the most common type used in residential kitchens. |
| Batch Feed | A batch feed drain requires a stopper to be placed over the drain before the unit can be turned on. It provides an added level of safety as it prevents accidental operation. |
| Septic Tank-Compatible | If you have a septic tank system, you will need to choose a drain specifically designed for septic tanks. These drains contain enzymes that aid in breaking down waste efficiently. |
How to determine the correct size for your drain
Choosing the correct size for your garbage disposal drain is crucial to ensure proper functioning and avoid any clogging issues. Here’s how you can determine the correct size:
- Refer to the manufacturer’s guidelines: Check the specifications provided by the manufacturer of your garbage disposal unit. They will often recommend the appropriate drain size for optimal performance.
- Measure the opening: Measure the opening of your sink’s drain pipe to determine its diameter. This will help you choose a drain that fits perfectly.
- Consider the disposal unit’s power: Higher-powered garbage disposal units may require larger drain pipes to handle the increased waste flow. Be sure to choose a drain that can handle the disposal unit’s power.
By considering these factors, understanding the types of garbage disposal drains, and determining the correct size, you can make an informed decision and choose the right garbage disposal drain that suits your kitchen’s needs.

Gathering The Necessary Tools And Materials
Before you begin installing a garbage disposal drain, it’s important to gather all the necessary tools and materials. This will not only make the installation process easier but also ensure that you have everything you need at your fingertips. In this section, we will discuss the essential tools, required plumbing materials and fittings, as well as any additional accessories that may be needed for a seamless experience.
Essential tools for the installation process
Having the right tools is crucial for a successful garbage disposal drain installation. Here are the essential tools you will need:
- Adjustable wrench
- Plumbers putty
- Plunger
- Screwdriver set
- Tape measure
- Utility knife
These tools will help you handle various tasks throughout the installation process, such as tightening connections, applying plumbers putty, or measuring the necessary length for pipes.
Required plumbing materials and fittings
In addition to the tools mentioned above, you will also need specific plumbing materials and fittings. Here is a list of the essentials:
| Materials | Fittings |
|---|---|
| PVC pipes | Adapters |
| Drainage elbow | Escutcheon |
| P-trap | Washers |
| Pipe cement | Locking nuts |
These plumbing materials and fittings are essential for connecting the garbage disposal drain to your existing plumbing system. Make sure to choose the appropriate sizes and types that match your specific setup.
Additional accessories that may be needed for a seamless experience
In some cases, you may require additional accessories to ensure a smooth and efficient installation process. These accessories can include:
- Wire connectors for electrical connections
- Plastic zip ties for securing wires
- Teflon tape for sealing threaded connections
These accessories will help you address specific requirements during the installation, such as securing electrical connections or providing a tight seal for threaded fittings.
By gathering all the necessary tools and materials, you are setting yourself up for a successful garbage disposal drain installation. With everything you need at hand, you can confidently move on to the next step of preparing the installation area and following the installation instructions.
Preparing The Sink And Plumbing System
Before installing a garbage disposal drain, it is crucial to properly prepare the sink and plumbing system to ensure a smooth and hassle-free installation process. This involves clearing the sink of any debris or obstructions, ensuring the plumbing system is properly aligned for the installation, and making any necessary repairs or adjustments to the existing plumbing.
Clearing the sink of any debris or obstructions
Begin by clearing the sink of any debris or obstructions that may hinder the installation process. Remove any items such as silverware, dish soap bottles, or other objects that may be in the way. If there is a built-up layer of grime or dirt, it is recommended to thoroughly clean the sink and surrounding areas to provide a clean working environment.
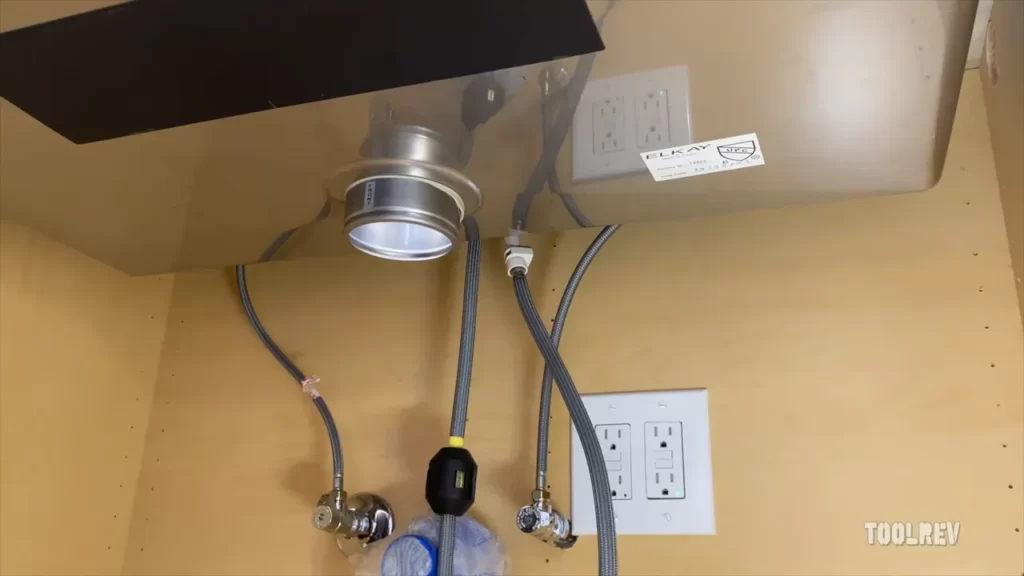
Ensuring the plumbing system is properly aligned for the installation
Proper alignment of the plumbing system is crucial for a successful garbage disposal drain installation. Start by inspecting the existing plumbing system to ensure that it is compatible with the garbage disposal unit. Check for any leaks, loose connections, or damaged pipes that may need to be addressed before proceeding with the installation.
Making any necessary repairs or adjustments to the existing plumbing
If any issues are detected during the inspection, it is important to make the necessary repairs or adjustments to the existing plumbing system. This may involve replacing damaged pipes, tightening loose connections, or sealing any leaks to ensure the proper functioning of the garbage disposal drain. It is recommended to consult a professional plumber if any significant repairs or adjustments are needed to avoid any further complications or damage to the plumbing system.
Connecting The Garbage Disposal Drain
Properly connecting the garbage disposal drain is essential for its efficient functioning. There are a few key steps you need to follow to ensure a secure and leak-free connection. In this section, we will guide you through each step, from attaching the flange to the sink opening to testing for leaks and making necessary adjustments.
Attaching the flange to the sink opening
Attaching the flange is the first crucial step in connecting the garbage disposal drain. This process involves securing the flange to the sink opening to create a watertight seal. Here’s how you can do it:
- Apply a small amount of plumber’s putty or silicone sealant around the underside of the flange.
- Insert the flange into the sink opening and press it firmly to ensure a tight fit.
- Tighten the mounting screws evenly to secure the flange in place.
- Wipe off any excess putty or sealant.
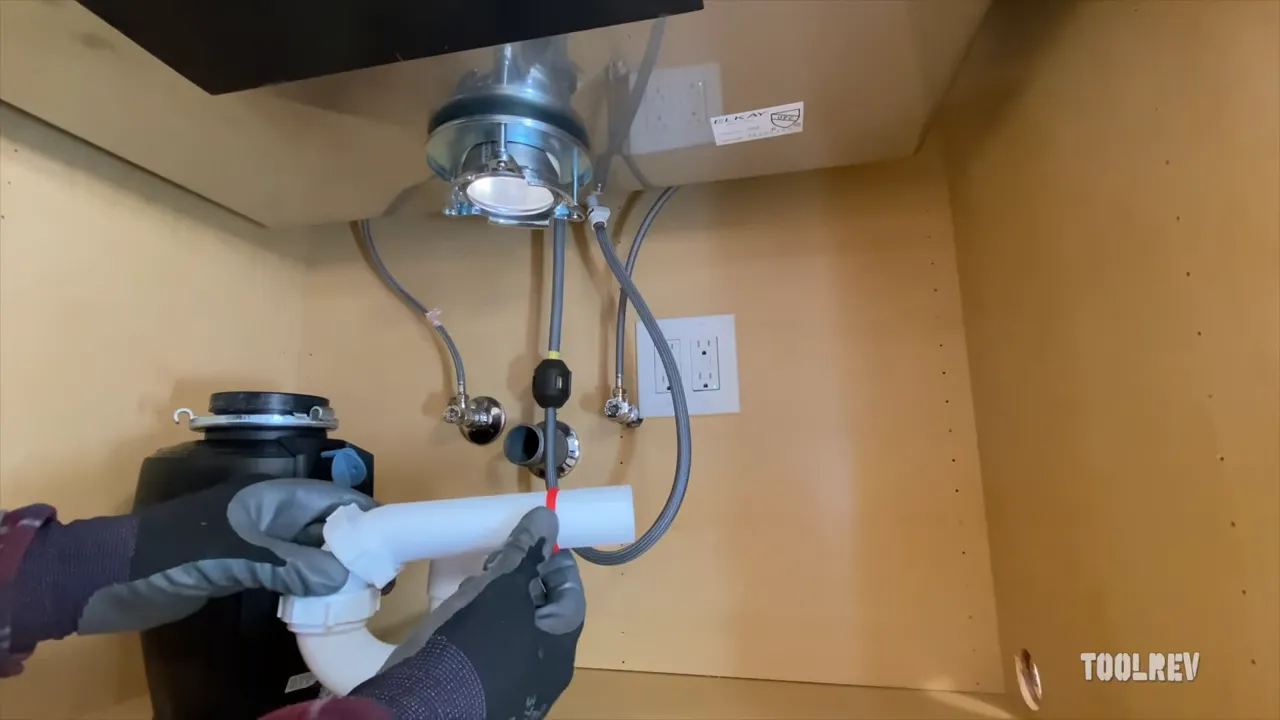
Securing the mounting assembly and connecting the drainpipe
Once the flange is securely attached, you can move on to securing the mounting assembly and connecting the drainpipe. This involves the following steps:
- Place the mounting ring over the flange and rotate it clockwise to lock it in place.
- Attach the mounting bracket to the mounting ring by aligning the tabs and twisting it until secure.
- Attach the drainpipe to the disposal unit’s outlet by sliding the provided gasket onto the pipe and connecting it to the disposal outlet.
- Secure the drainpipe to the waste tee or PVC plumbing using the appropriate fittings and tighten them firmly.
- Ensure that all connections are properly aligned and tightened to prevent leaks.
Testing for leaks and making necessary adjustments
Testing the garbage disposal drain for leaks is essential before using it. Leaks can cause water damage and impact the overall functionality of the system. Here’s what you need to do:
- Tighten any loose connections if you notice any leaks.
- Fill the sink with water and let it drain while observing for any leaks along the drainpipe or connections.
- If you detect any leaks, disassemble the connections and reassemble them, ensuring they are properly aligned and tightened.
- Repeat the test until there are no signs of leaks.
By following these steps and ensuring a secure and leak-free connection, you can successfully install a garbage disposal drain. Remember to regularly maintain and clean your garbage disposal to keep it in optimal condition. Happy plumbing!
Installing The Garbage Disposal Unit
Installing the Garbage Disposal Unit
Preparing the Garbage Disposal Unit for Installation
Before you begin installing your garbage disposal unit, it’s important to prepare it for installation properly. Here are the steps you need to follow:
1. Gather all the necessary tools and materials: To ensure a smooth installation process, make sure you have the following tools and materials on hand – a screwdriver, pliers, plumber’s putty, a bucket, electrical tape, wire nuts, and a disposal unit installation kit.
2. Turn off the power: Safety should always come first. Start by turning off the power to the kitchen area where you’ll be installing the garbage disposal unit. This will prevent any accidents from occurring during the installation process.
3. Clear out cabinet space: To make room for the garbage disposal unit, clear out the space under your sink. Remove any items that may obstruct the installation or get in the way of your workspace.
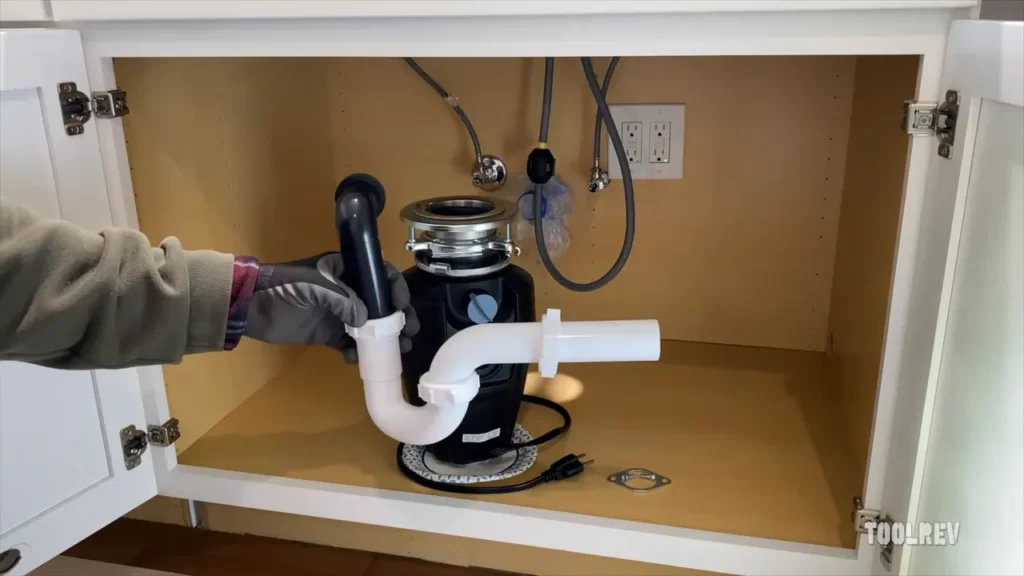
Mounting the Unit Under the Sink
Once you’ve prepared the garbage disposal unit, it’s time to mount it under the sink. Follow these steps to ensure a proper installation:
1. Locate the mounting bracket: Take the mounting bracket that came with your garbage disposal unit and place it on the side of the sink where you want to install the unit. Make sure it’s aligned correctly and mark the holes for the screws.
2. Drill pilot holes: Using a power drill, drill pilot holes into the marked spots on the sink. This will make it easier to screw the mounting bracket in place.
3. Secure the mounting bracket: Attach the mounting bracket to the sink by screwing it in tightly. Ensure that it is securely fastened as it will be supporting the weight of the garbage disposal unit.
4. Attach the disposal unit: With the mounting bracket in place, you can now attach the garbage disposal unit to it. Align the unit with the mounting bracket and twist it into position until it locks securely.
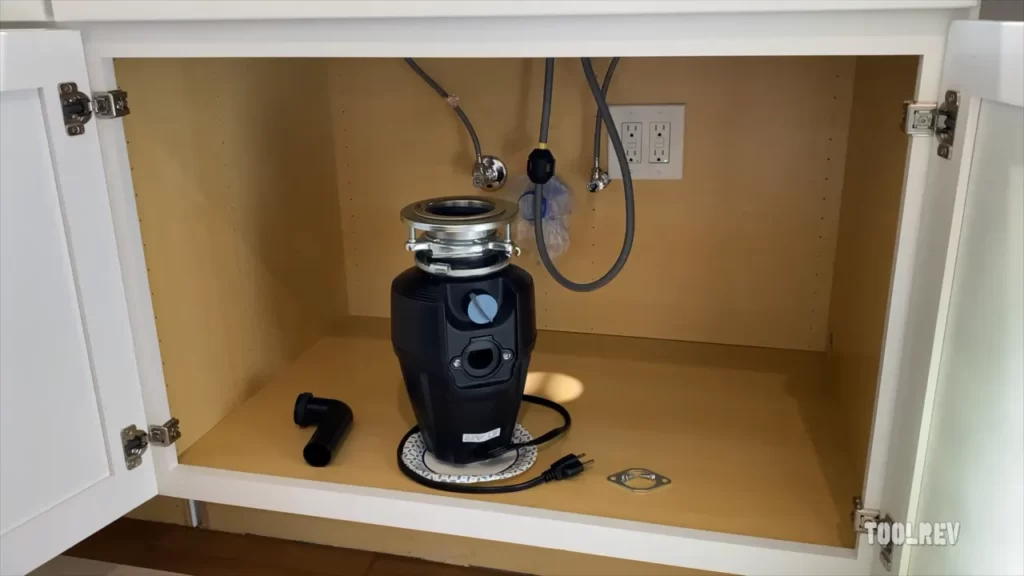
Connecting the Disposal Unit to the Drain and Electrical Supply
Now that the garbage disposal unit is securely mounted under the sink, it’s time to connect it to the drain and electrical supply. Here’s what you need to do:
1. Connect the drain: Take the rubber gasket that came with your disposal unit installation kit and slide it onto the drain flange. Position the flange over the drain opening and secure it in place using the mounting ring provided. Tighten the screws to ensure a watertight seal.
2. Connect the electrical supply: Carefully follow the manufacturer’s instructions to connect the electrical supply to the garbage disposal unit. Start by stripping the insulation from the wires and matching up the corresponding colors. Use wire nuts and electrical tape to secure the connections.
3. Test the installation: Before using your newly installed garbage disposal unit, it’s essential to test it to ensure it’s working correctly. Turn on the power, run water into the sink, and switch on the unit. Listen for any unusual noises and check for leaks. Make any necessary adjustments if needed.
By following these steps, you can successfully install your garbage disposal unit and enjoy its convenience and efficiency in managing kitchen waste. Remember to always refer to the manufacturer’s instructions for specific guidance, and if you’re unsure about any step, consult a professional plumber for assistance. Install your garbage disposal unit today and say goodbye to kitchen waste troubles!
Testing And Troubleshooting
Conducting a Test Run to Ensure Proper Functionality
After completing the installation of your garbage disposal drain, it’s essential to conduct a test run to ensure that everything is functioning as it should. This step is crucial as it helps identify any potential issues before they become major problems. To perform the test run:
- Remove any debris or objects from the sink’s drain.
- Turn on the cold water and allow it to run at a moderate flow.
- Switch on the garbage disposal unit and listen for any strange noises or grinding sounds.
- Gently feed small amounts of food waste into the disposal unit.
- Observe the drainage process. The water should flow smoothly without any blockages or leaks.
- If the disposal unit is working correctly and the drain is clear, congratulations! You have successfully installed your garbage disposal drain.
Troubleshooting Common Issues and Finding Solutions
Even when following the installation instructions carefully, there might be times when issues arise with your garbage disposal drain. Here are some common problems and their solutions:
| Problem | Solution |
|---|---|
| The garbage disposal unit hums but doesn’t work | First, ensure it is plugged in properly. If it is, locate the reset button on the bottom or side of the unit and press it. If the problem persists, check if anything is obstructing the unit. |
| The drain is clogged | Try using a plunger to dislodge the clog. If that doesn’t work, use a drain auger or a combination of vinegar and baking soda to break it up. In extreme cases, you may need to call a professional plumber. |
| The disposal unit leaks | Check if the connections between the unit and the drainpipes are secure and tightened. If not, tighten them using a pipe wrench. If the leak persists, there may be a damaged gasket or seal that needs to be replaced. |
Maintaining and Prolonging the Lifespan of Your Garbage Disposal Drain
Regular maintenance is essential to keep your garbage disposal drain in good working condition and extend its lifespan. Here are some tips to follow:
- Always run cold water while using the garbage disposal to prevent overheating and to assist with the disposal of waste.
- Avoid putting non-food items, such as plastic utensils or glass, down the drain as they can damage the disposal unit.
- Occasionally clean the disposal unit by grinding ice cubes, citrus peel, or a combination of ice and vinegar to eliminate odors and remove debris.
- Keep the disposal unit well-maintained by performing regular maintenance tasks like checking for leaks, inspecting the blades for damage, and ensuring all connections are tight.
- If you encounter any persistent issues, contact a professional plumber to examine the system.
By following these testing, troubleshooting, and maintenance steps, you can ensure your garbage disposal drain operates smoothly, providing you with a convenient waste disposal solution for years to come.
Safety Precautions And Best Practices
When it comes to installing a garbage disposal drain, following safety precautions and best practices is crucial. It not only ensures a seamless and hassle-free experience but also minimizes the risk of accidents and injuries. In this section, we will discuss the safety guidelines to follow during installation, tips for proper maintenance and care of the garbage disposal drain, as well as the common mistakes to avoid.
Safety guidelines to follow during installation
During the installation process, it is important to prioritize safety. By following these safety guidelines, you can successfully install a garbage disposal drain without any unfortunate incidents:
- Before you begin, make sure to turn off the power to the disposal unit. This can be done by switching off the circuit breaker or unplugging the unit.
- Always use the appropriate safety gear, such as gloves and safety goggles, to protect yourself from any potential hazards.
- Ensure that the area where you will be working is well-lit and free from any clutter or obstacles.
- Before starting the installation, double-check the instruction manual provided by the manufacturer. Be familiar with the specific requirements and guidelines for your particular garbage disposal unit.
- When handling the disposal unit, lift it with care and avoid putting excessive force on any fragile components or connections.
- Take extra caution when connecting electrical wires. If you are unsure, it is always best to consult a professional electrician.
- Once the installation is complete, test the unit before moving forward with using it regularly.
Tips for proper maintenance and care of the garbage disposal drain
Proper maintenance and care of your garbage disposal drain are essential for keeping it in good working condition and extending its lifespan. Consider the following tips:
- Regularly clean the garbage disposal drain by pouring a solution of warm water and dish soap down the drain. This helps remove any buildup and keeps it smelling fresh.
- Avoid disposing of hard, fibrous, or starchy materials, as they can damage the blades and clog the drain. Examples include bones, fruit pits, onion skins, and potato peels.
- Run cold water before, during, and after using the disposal unit. This helps flush out the waste efficiently and prevents clogs.
- Avoid using harsh chemicals to clean the drain, as they can damage the unit and negatively impact the environment.
- Consider periodically sharpening the blades of your garbage disposal. This can be done by grinding ice cubes or citrus peels in the unit.
Common mistakes to avoid for a seamless experience
To ensure a seamless experience with your garbage disposal drain, it is important to avoid common mistakes that can lead to complications or damage. Steer clear of the following:
- Overloading the disposal unit with excessive amounts of waste at once. This can cause strain on the motor and result in jams or clogs.
- Using hot water while the disposal unit is in operation. Hot water can cause fats and oils to liquefy and accumulate in the drain, leading to clogs.
- Ignoring strange noises or unusual vibrations coming from the disposal unit. These can be signs of underlying issues that need to be addressed promptly.
- Attempting to fix complex issues or performing repairs without the necessary expertise. When in doubt, always seek the assistance of a qualified professional.
By adhering to these safety precautions, following the proper maintenance tips, and avoiding common mistakes, you can ensure a smooth and efficient garbage disposal drain installation and enjoy its benefits for years to come.
Enhancing The Installation With Advanced Techniques
When it comes to installing a garbage disposal drain, there are various advanced techniques that can take your installation to the next level. These techniques not only improve the functionality of your garbage disposal system but also provide added convenience and efficiency. In this section, we will explore three advanced techniques that can enhance your installation experience. These techniques include installing additional features, exploring alternative methods, and taking advantage of smart technology. Let’s delve deeper into each of these techniques.
Installing additional features, such as a dishwasher connection
One way to enhance your garbage disposal drain installation is by incorporating additional features that can improve the overall efficiency of your kitchen. For instance, you can install a dishwasher connection to streamline the waste disposal process. By connecting your dishwasher directly to the garbage disposal, you can eliminate the need for a separate drain pipe, thus optimizing space utilization. This not only simplifies the installation process but also makes cleaning up after meals much more convenient.
Exploring alternative methods for installing a garbage disposal drain
Another advanced technique to consider is exploring alternative methods for installing your garbage disposal drain. Traditional installations involve connecting the drain pipe directly to the kitchen sink’s drain trap. However, there are alternative methods available that can provide better performance and flexibility. For example, you can opt for a continuous feed disposal system that allows you to continuously add waste while the unit is running. This eliminates the need for manual batch disposal and enhances the overall efficiency of your kitchen waste management.
Taking advantage of smart technology for added convenience
In this digital age, smart technology has permeated every aspect of our lives, including home appliances. Why not take advantage of it when installing your garbage disposal drain? Smart garbage disposal units offer a range of features that can significantly enhance your installation experience. These units can be controlled remotely through smartphone apps, allowing you to operate and monitor your disposal system from anywhere in your home. Additionally, they often come equipped with sensors that detect the amount of waste in the disposal, automatically adjusting grinding power accordingly. By harnessing the power of smart technology, you can ensure a more convenient and efficient garbage disposal drain installation.
Frequently Asked Questions
How Do You Attach A Drain Pipe To A Garbage Disposal?
To attach a drain pipe to a garbage disposal, first, remove the existing pipe. Then, insert the new pipe into the disposal’s outlet port and secure it with a slip nut. Tighten the nut using pliers. Finally, connect the other end of the pipe to the drain system using a slip joint connection.
What Kind Of Drain Do I Need For A Garbage Disposal?
For a garbage disposal, you need a special drain called a continuous feed drain. It works with the disposal to efficiently and safely remove food waste.
Does Drain Pipe Need To Be Lower Than Garbage Disposal?
Yes, the drain pipe needs to be lower than the garbage disposal to ensure proper drainage.
Can You Install A Garbage Disposal In Any Sink?
Yes, a garbage disposal can be installed in most sinks. However, it is important to check if your sink has the necessary plumbing and electrical connections for installation. It is also recommended to consult a professional plumber for proper installation and to ensure compatibility with your specific sink.
Conclusion
To sum up, installing a garbage disposal drain doesn’t have to be a daunting task. By following the step-by-step guide mentioned you can quickly and easily get it done. Remember to gather the necessary tools, read the manufacturer’s instructions, and take precautionary measures to ensure a smooth installation process.
With a little patience and effort, you’ll have a functioning and efficient garbage disposal drain in no time. Enjoy the convenience and cleanliness it brings to your kitchen!