To install a frameless sliding shower door, first measure and mark the area, then attach the sliding tracks and align the door panels before securing them in place. When it comes to upgrading your bathroom, installing a frameless sliding shower door can be a sleek and modern choice.
Not only does it add style and elegance, but it also maximizes space and makes your shower area feel larger. Installing a frameless sliding shower door may seem daunting, but with the right tools and some patience, you can do it yourself.
We will guide you through the step-by-step process of installing a frameless sliding shower door. So let’s get started!
Understanding The Basics
Installing a frameless sliding shower door is a great way to upgrade the look and functionality of your bathroom. Not only do these doors add a touch of elegance to your space, but they also provide a seamless and spacious feel. However, before you embark on this project, it’s essential to understand the basics of frameless sliding shower doors. In this section, we’ll discuss the different types of shower doors and highlight the advantages of choosing a frameless sliding shower door.
Different types of shower doors
When it comes to shower doors, there are various options to choose from. Here are three popular types:
| Shower Door Type | Description |
|---|---|
| Frameless sliding shower doors | These doors offer a sleek, modern look and operate smoothly on a track. They are perfect for smaller bathrooms as they don’t require additional space for door swing. |
| Semi-frameless shower doors | These doors combine the sleek appearance of frameless doors with the sturdiness of a frame. They typically have a frame around the edges and a frameless glass panel. |
| Framed shower doors | These doors are made with aluminum or composite frames that surround the glass panels. They are a budget-friendly option and provide added support and stability. |
Advantages of frameless sliding shower doors
If you’re considering a frameless sliding shower door, you’ll be pleased to know that they offer several advantages:
- Elegant and modern: Frameless sliding shower doors are aesthetically pleasing and can instantly elevate the look of your bathroom. With their clean lines and seamless design, these doors create a sleek and modern appearance.
- Maximize space: One of the key benefits of frameless sliding shower doors is their space-saving design. Unlike hinged doors, these doors don’t require extra space for the door to swing open. This makes them an excellent choice for smaller bathrooms or tight spaces.
- Easy to clean: Cleaning a frameless sliding shower door is a breeze. Since there are no metal frames or tracks to collect dirt and grime, a regular wipe-down with a mild cleaner is all it takes to keep these doors sparkling clean.
- Durability: Frameless sliding shower doors are made from tempered glass, which is much stronger and more durable than regular glass. This means they are less likely to shatter or break, ensuring your safety while providing long-lasting performance.
- Customizable: These doors can be customized to fit your specific bathroom layout and design preferences. From choosing the glass thickness to selecting hardware finishes, you can personalize every aspect of your frameless sliding shower door.
Understanding the different types of shower doors and the advantages of frameless sliding shower doors is crucial before starting your installation process. With this knowledge in hand, you’ll be well-equipped to make an informed decision and enjoy the benefits of a beautiful and functional shower enclosure.
Preparing For Installation
Installing a frameless sliding shower door can be a great way to elevate the look and functionality of your bathroom. Before you dive into the installation process, it’s important to make sure you are well-prepared. This involves accurately measuring the shower space, selecting the right shower door kit, and gathering the necessary tools and materials. In this guide, we will walk you through each step of preparing for the installation.
Measuring the shower space accurately
One of the most crucial steps in preparing for the installation of a frameless sliding shower door is measuring the shower space accurately. This will ensure that you select a door kit that fits properly and avoid any unnecessary complications during the installation process. To measure the shower space, follow these steps:
- Start by measuring the width and height of the shower opening. Use a tape measure to get precise measurements.
- Next, measure the space between the walls on either side of the shower opening. This will determine the width of the shower door kit you need to purchase.
- Take note of any obstructions or slopes in the shower space, as this may affect the type of shower door kit you should choose.
Accurate measurements are essential to ensure a seamless installation and prevent any issues that might arise from ill-fitting shower door kits.
Selecting the right shower door kit
Once you have measured the shower space accurately, it’s time to select the right shower door kit. There are several factors to consider when making this decision, including:
- The size and layout of the shower space: Choose a shower door kit that aligns with the measurements you took earlier and complements the overall design of your bathroom.
- The type of glass: Decide whether you prefer clear glass or frosted glass, depending on your privacy needs and style preferences.
- The hardware finish: Consider the existing hardware in your bathroom, such as faucets and towel bars, and choose a finish that matches or complements them.
By carefully considering these factors, you can ensure that you select a shower door kit that not only fits your shower space but also enhances the aesthetic appeal of your bathroom.
Gathering the necessary tools and materials
Before you start the installation process, it’s important to gather all the necessary tools and materials. This will save you time and prevent any interruptions during the installation. Here is a list of the essential tools and materials you will need:
| Tools | Materials |
|---|---|
| – Tape measure | – Frameless sliding shower door kit |
| – Screwdriver set | – Silicone sealant |
| – Level | – Caulking gun |
| – Pliers | – Mounting hardware |
Having all the tools and materials at hand will ensure a smooth and efficient installation process. Make sure to double-check the list and gather everything you need before you begin.
By following these steps and adequately preparing for the installation of a frameless sliding shower door, you can set yourself up for success and create a stunning addition to your bathroom.

Removing The Old Shower Door (If Applicable)
Before you can install your brand new frameless sliding shower door, you’ll need to remove the old shower door, if there is one. This process may seem intimidating at first, but with the right approach and tools, you’ll have it done in no time. In the following sections, we’ll walk you through the steps of inspecting and cleaning the existing shower door, removing screws and hinges, and removing the door panels and tracks.
Inspecting and cleaning the existing shower door
First things first, you’ll want to inspect the existing shower door to assess its condition. Look for any signs of damage or wear, such as rust, cracks, or loose screws. It’s important to thoroughly clean the door as well, removing any soap scum, mildew, or hard water stains. This will ensure a clean surface for the installation of your new frameless sliding shower door.
Removing screws and hinges
Once you’ve inspected and cleaned the shower door, the next step is to remove the screws and hinges that are holding it in place. This typically involves using a screwdriver or a drill with a suitable bit to unscrew and remove the screws. It’s important to keep track of these screws, as you may need them for the installation of your new door. Once all the screws and hinges are removed, set them aside in a safe place.
Removing the door panels and tracks
With the screws and hinges removed, it’s time to tackle the door panels and tracks. To remove the door panels, start by lifting them off the bottom track and angling them towards the inside of the shower. Be careful not to apply too much force, as you don’t want to damage the panels. Once the door panels are out, set them aside safely.
Next, locate the screws or clips that are securing the tracks to the shower walls. Depending on the construction of your shower, these may be visible or hidden behind a cover. Use a screwdriver or the appropriate tool to remove these screws or clips, allowing you to detach the tracks from the shower walls.
With the door panels and tracks removed, you can give the shower area a final clean, ensuring there is no debris left behind. This will provide a clean and smooth surface for the installation of your new frameless sliding shower door.
Now that you’ve successfully removed the old shower door, you’re one step closer to installing your new frameless sliding shower door. Stay tuned for the next section where we’ll guide you through the installation process, ensuring your new shower door is securely in place.
Installing The Bottom Track
Installing the bottom track is a crucial step in the process of installing a frameless sliding shower door. The bottom track provides stability and guidance for the door, ensuring smooth sliding and preventing it from shifting or coming off the track. In this section, we will go through the steps of marking the position for the bottom track, attaching it securely, and ensuring proper alignment for a seamless sliding experience.
Marking the position for the bottom track
Before you begin installing the bottom track, make sure you have all the necessary tools and materials. These may include a measuring tape, pencil, level, drill, screws, and the bottom track itself. Follow these steps to mark the position for the bottom track:
- Start by measuring the length of the shower opening. Ensure that you measure accurately and consider any obstructions or irregularities that may affect the placement of the track.
- With the help of a level, draw a straight line along the bottom of the shower opening where the track will be installed. This line will serve as a guide for positioning the track.
- Using the shower door manufacturer’s instructions, determine the recommended distance from the edge of the shower curb or base for the track placement. Mark these points on the previously drawn line.
Attaching the bottom track securely
Once you have marked the position for the bottom track, it’s time to securely attach it to the shower curb or base. Follow these steps:
- If necessary, cut the bottom track to fit the length of the shower opening, following the manufacturer’s instructions.
- Place the bottom track along the previously marked line, aligning it with the marks indicating the recommended distance from the edge of the shower curb or base.
- Using a drill and the appropriate screws provided with the bottom track, secure the track in place. Make sure to screw in the screws firmly, but be careful not to overtighten, as it may cause damage to the track.
- After attaching the bottom track, use a level to ensure that it is straight and level. Adjust if necessary.
Ensuring proper alignment for smooth sliding
Proper alignment of the bottom track is essential for smooth and effortless sliding of the shower door. Follow these steps to ensure proper alignment:
- Inspect the bottom track to ensure that it is positioned evenly and parallel to the shower opening. Correct any misalignment if necessary.
- Ensure that the bottom track is level and not slanted in any direction. This will prevent the door from sliding unevenly or getting stuck.
- Test the sliding motion of the shower door by sliding it back and forth along the track. Make any adjustments needed to ensure a smooth sliding experience.
By following these steps, you will successfully install the bottom track of your frameless sliding shower door. Properly installed, aligned, and secured bottom track will ensure the stability and functionality of the door, allowing you to enjoy a seamless and elegant shower enclosure.
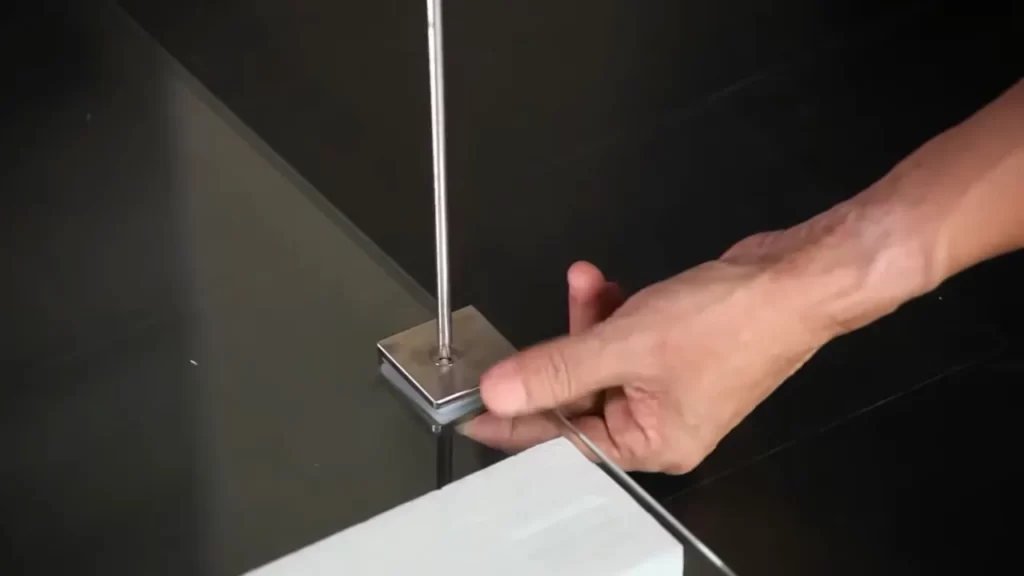
Mounting The Side Rails
Measuring and marking the position for side rails
Before installing the side rails of your frameless sliding shower door, it is crucial to accurately measure and mark the position where they will be mounted. Start by measuring the height at which you want the side rails to be installed, taking into consideration any existing fixtures or tiles in your shower area that may interfere with the placement.
Mark the desired position on both sides of the shower enclosure, ensuring the marks are level and aligned. This step is crucial to ensure the proper installation and functionality of the sliding door.
Installing the side rails using appropriate screws
Once you have measured and marked the position for the side rails, it’s time to install them using the appropriate screws. Before attaching the rails, make sure they are clean and free from any debris that may affect the installation.
Secure the side rails to the wall by using screws suitable for the type of surface you are mounting them on. If you are unsure about the appropriate screws, it is recommended to consult the manufacturer’s instructions or seek professional assistance. Insert the screws through the pre-drilled holes on the side rails and into the wall, ensuring a secure and stable connection.
Checking for level and alignment
After installing the side rails, it’s important to check for level and alignment to ensure the smooth operation of the sliding shower door. Using a level, verify that the side rails are perfectly horizontal and aligned with each other. Any slight deviation can impact the door’s ability to slide smoothly.
If you find any discrepancies, you can make adjustments by slightly loosening the screws and repositioning the side rails accordingly. Once you are satisfied with the level and alignment, tighten the screws firmly to secure the side rails in place.
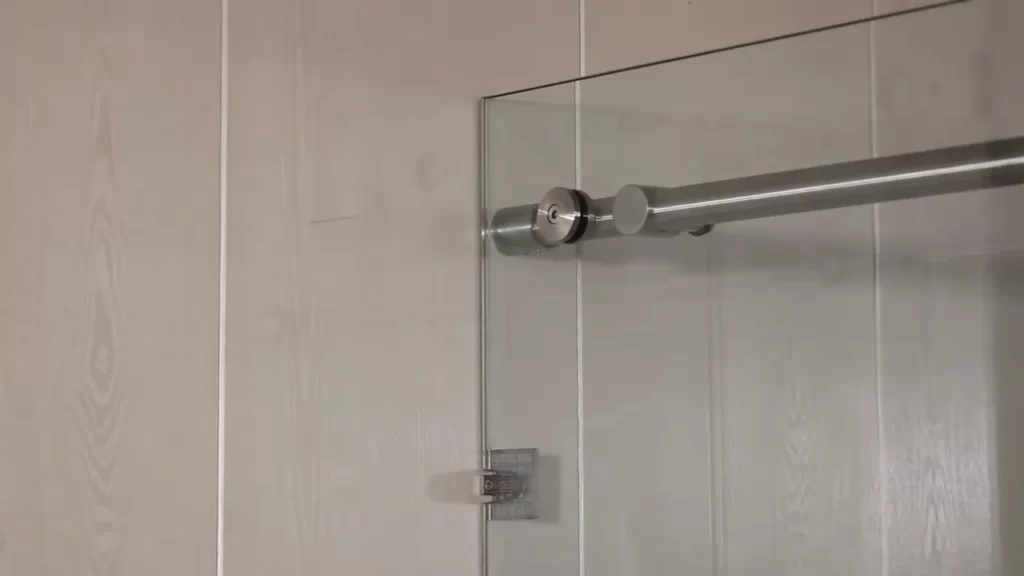
Mounting The Top Track
When it comes to installing a frameless sliding shower door, one of the crucial steps is mounting the top track. This is where the door will slide and operate smoothly, ensuring a seamless and elegant look for your bathroom. In this section, we will guide you through the process of determining the correct position for the top track, securing it using screws, and verifying its alignment and level.
Determining the correct position for the top track
To begin, determine the ideal position for mounting the top track. Consider the size and layout of your shower area, as well as the height and width of the shower door. Measure the distance from the bottom of the shower enclosure to the desired height for the top track. This will help you determine the correct position for installing the top track.
Attaching the top track securely using screws
Once you have determined the correct position, it’s time to attach the top track securely to the shower enclosure. Begin by aligning the track with the measurements you have determined. Ensure that the track is level using a spirit level. To secure the track, mark the position of the screw holes, and then drill pilot holes with an appropriate size drill bit. Use screws that are suitable for the material of your shower enclosure, such as stainless steel or brass screws. Insert the screws into the pilot holes and tighten them snugly, but be cautious not to overtighten as it may damage the enclosure.
Verifying proper alignment and level
To ensure the proper functioning of the sliding shower door, it is essential to verify that the top track is aligned and level. Carefully check that the track is straight by running a spirit level across its length. Make any necessary adjustments by loosening the screws and repositioning the track. Once you are satisfied with the alignment, tighten the screws securely. This step is crucial as it ensures that the door will slide smoothly and prevent any potential issues in the future.
By following these steps, you can successfully mount the top track of your frameless sliding shower door. This installation process will ultimately contribute to the overall appearance and functionality of your shower, providing you with a luxurious and enjoyable bathing experience.
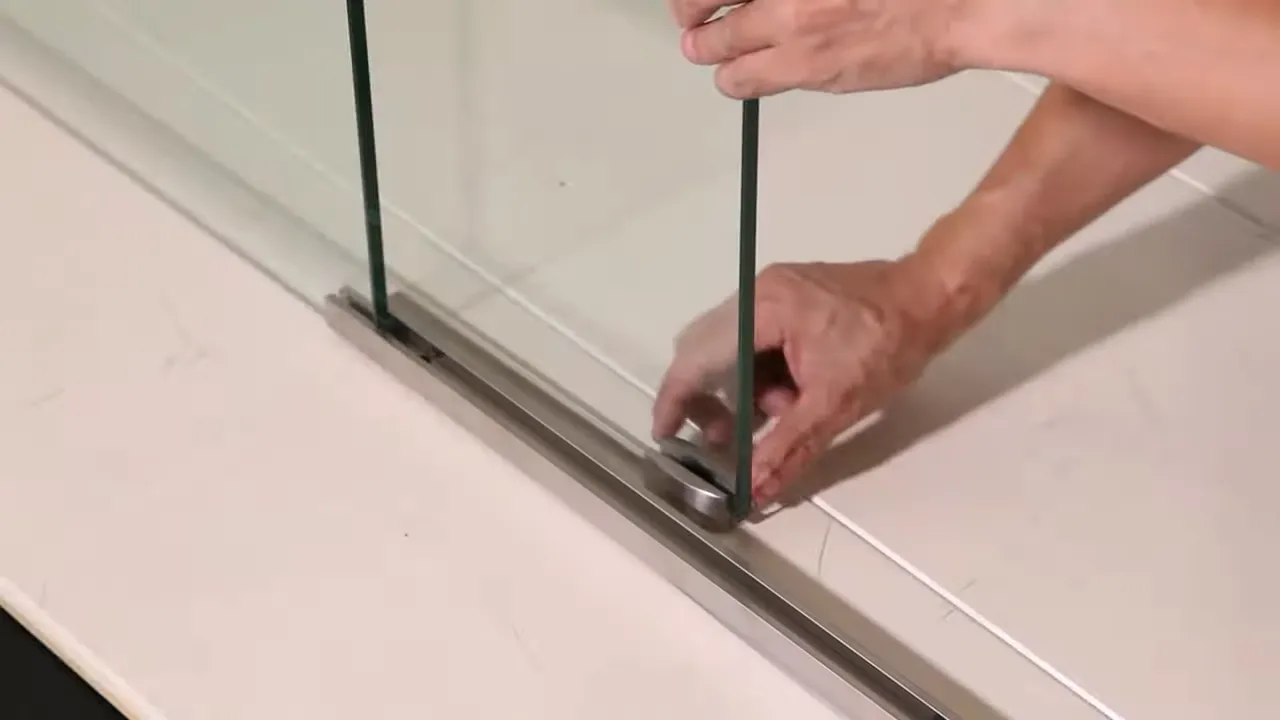
Installing The Door Panels
Once you have successfully installed the frame and side rails for your frameless sliding shower door, the next step is to attach the door panels. This crucial part of the installation process requires precision and careful adjustment to ensure a perfect fit and smooth sliding motion. In this section, we will guide you through the steps of attaching the door panels to the side rails, adjusting them for a perfect fit, and checking for smooth sliding motion.
Attaching the door panels to the side rails
To start, make sure you have the necessary tools ready, including a screwdriver and the provided screws. Place the first door panel against the side rail, ensuring that it aligns properly with the rail’s top and bottom tracks. Use the screwdriver to secure the door panel to the rail by tightening the screws at the designated attachment points. Repeat this process for the second door panel, ensuring it aligns correctly with the opposite side rail.
Adjusting the door panels for a perfect fit
Once the door panels are attached to the side rails, it’s essential to check for any gaps or misalignments. If you notice any irregularities, you can make adjustments to achieve a perfect fit. To adjust the vertical alignment of the door panels, locate the adjustment screws at the top and bottom of each panel. Loosen these screws slightly and carefully move the panels up or down as needed. Once you have achieved the desired alignment, tighten the adjustment screws to secure the panels in place.
If you encounter any issues during the adjustment process, refer to the manufacturer’s instructions or seek professional assistance to ensure proper alignment.
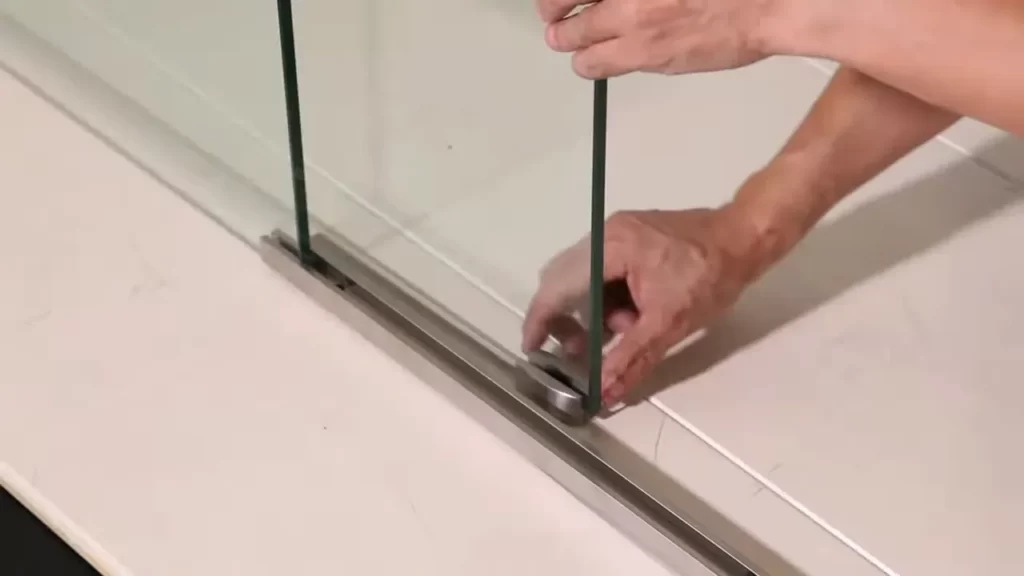
Checking for smooth sliding motion
After attaching and adjusting the door panels, it’s crucial to test the sliding motion to ensure smooth operation. Hold onto the door handles firmly and gently slide the panels back and forth along the side rails. Pay attention to any resistance or sticking points that may hinder smooth movement. If you encounter any issues, identify the problem area and make necessary adjustments to alleviate friction or misalignment. Regularly lubricating the side rails with a silicone-based lubricant can also enhance the sliding motion and prevent wear and tear.
By following these steps and paying attention to detail, you can successfully install your frameless sliding shower door and enjoy a seamless and stylish addition to your bathroom.
Installing The Door Handles
One of the final steps in installing a frameless sliding shower door is attaching the door handles. Not only do handles provide a convenient way to open and close the door, but they also add a stylish finishing touch to your shower. In this section, we will guide you through the process of choosing the right handles for your shower door, marking the position for handle installation, and attaching the handles securely to the door panels.
Choosing the right handles for the shower door
When it comes to choosing the handles for your frameless sliding shower door, there are a few factors to consider. Here are a couple of points to keep in mind:
- Style: The handles should complement the overall design of your bathroom. Whether you prefer a sleek and modern look or a more traditional style, there are a variety of handle options available to suit your taste.
- Finish: Consider the finish of the handles and how well it aligns with other fixtures in your bathroom. Popular finishes include chrome, brushed nickel, and matte black, among others. Choose a finish that enhances the aesthetic appeal of your shower door.
Marking the position for handle installation
Before attaching the handles, you need to mark the correct position for installation on your shower door. Follow these steps:
- Start by measuring the desired height for the handles on both the inside and outside panels of the shower door. This will ensure that the handles are positioned at a comfortable height for users of varying heights.
- Use a level to ensure that the marked positions are straight and aligned horizontally. This will prevent the handles from appearing crooked once installed.
- Double-check the measurements and marks to make sure they are accurate and symmetrical on both panels.
Attaching the handles securely to the door panels
Now that you have marked the positions for handle installation, it’s time to attach the handles securely to the door panels. Here’s how:
- Using a drill and the appropriate drill bit, create holes at the marked positions. The size of the holes should match the specifications of the handles’ installation instructions.
- Place the handles over the drilled holes on each panel, ensuring that they align properly and are level. If necessary, refer to the handle manufacturer’s instructions for any specific alignment guidelines.
- Secure the handles in place by tightening the provided screws or bolts. Be careful not to over-tighten, as it may cause damage to the door panels.
- Double-check the handles to ensure they are firmly attached and do not wobble.
With the handles securely attached, your frameless sliding shower door is now complete! Step back and admire your handiwork, knowing that you’ve installed a functional and visually appealing addition to your bathroom.
Adjusting And Testing The Door
Before you can fully enjoy your newly installed frameless sliding shower door, you need to make sure it is properly adjusted and tested for optimum functionality. This step is crucial to ensure smooth operation and a hassle-free showering experience. In this section, we will guide you through the process of adjusting the rollers and testing the sliding motion of the door.
Adjusting the rollers for optimum functionality
The rollers in your frameless sliding shower door are responsible for smooth and effortless sliding motion. It is important to adjust them properly to avoid any issues or misalignment. Here are the steps to adjust the rollers:
- Start by locating the adjustment screws on the rollers. These screws are usually found at the bottom or sides of the door.
- Using a screwdriver, turn the adjustment screws clockwise or counterclockwise to raise or lower the rollers. Make sure to turn them in small increments to achieve precise adjustment.
- Test the sliding motion of the door after each adjustment. If the door still doesn’t slide smoothly, continue adjusting the rollers until you achieve the desired functionality.
Testing the sliding motion of the shower door
Once you have adjusted the rollers, it’s time to test the sliding motion of your frameless sliding shower door. This step is important to ensure that the door glides effortlessly along the tracks. Follow these steps to test the sliding motion:
- Stand inside the shower and grab the door handle firmly.
- Gently push or pull the door along the tracks to check if it slides smoothly without any resistance or hitches.
- If you encounter any difficulties or rough movements, stop and identify the problem area.
Making necessary adjustments for smooth operation
If you notice any issues during the testing phase, such as sticking or misalignment, it is important to make necessary adjustments for smooth operation. Here are some common adjustments you may need to make:
- Loosen or tighten the screws on the rollers to adjust the height or alignment.
- Check the tracks for any debris or obstructions that may hinder the sliding motion. Clean them thoroughly if needed.
- If the door still doesn’t slide smoothly, you may need to consult a professional for further assistance.
By adjusting and testing your frameless sliding shower door, you can ensure smooth operation and a seamless showering experience. Follow these guidelines to address any issues and make the necessary adjustments for optimum functionality.
Sealing And Finishing Touches
Once you have successfully installed your frameless sliding shower door, it’s time to focus on the sealing and finishing touches. These final steps are crucial to ensure that your shower door is properly sealed, water-tight, and aesthetically pleasing. In this section, we will guide you through the three essential steps for sealing and adding those finishing touches to your frameless sliding shower door.
Applying waterproof sealant to prevent leakage
One of the most important steps in sealing your frameless sliding shower door is to apply a waterproof sealant. This sealant acts as a barrier to prevent water from leaking out of the shower enclosure. To apply the sealant, follow these simple steps:
- Clean the edges of the shower door and the surrounding walls thoroughly to ensure the surface is free from dirt, grime, and soap residue.
- Using a caulk gun, apply a thin and continuous bead of waterproof sealant along the edges of the shower door where it meets the walls and the shower floor. Be sure to work in small sections to ensure even application.
- Smooth the sealant using a caulk smoothing tool or your finger, ensuring that it adheres well to both the shower door and the walls. This step helps to create a watertight seal and gives a neat, finished appearance to your shower enclosure.
Installing drip rails or sweeps for water containment
In addition to the waterproof sealant, installing drip rails or sweeps is another effective way to contain water within your shower enclosure. These additions help to direct water back into the shower rather than allowing it to escape onto the bathroom floor. Follow these steps to install drip rails or sweeps:
- Measure the width of your shower door opening and purchase a drip rail or sweep that fits accordingly.
- Cut the drip rail or sweep to the correct length, if necessary, using a hacksaw or a miter saw.
- Starting at one end of the shower door, position the drip rail or sweep against the bottom edge of the door. The lip of the drip rail or sweep should face towards the inside of the shower.
- Secure the drip rail or sweep in place using screws or adhesive, following the manufacturer’s instructions. Make sure it is aligned properly and provides a tight seal against the shower floor.
Cleaning and polishing the glass for a pristine finish
To complete the installation of your frameless sliding shower door, it’s essential to give the glass a thorough cleaning and polishing. This final touch will enhance the clarity of the glass, giving your shower enclosure a pristine finish. Follow these steps for a sparkling, crystal-clear result:
- Use a mixture of mild soap or glass cleaner and warm water to clean the glass panels of your shower door. Avoid using abrasive cleaners or harsh chemicals that can damage the glass.
- Gently scrub the glass using a soft sponge or cloth, paying special attention to any stubborn stains or soap scum.
- Rinse the glass thoroughly with clean water to remove any soap residue.
- Finally, use a clean, lint-free cloth to dry the glass and then polish it with a glass cleaner to achieve that desirable shine.
By following these steps for sealing and finishing your frameless sliding shower door, you can ensure a water-tight, visually appealing, and easy-to-maintain shower enclosure. Take your time during this final phase, paying attention to every detail, and enjoy the beauty and functionality of your newly installed shower door.
Final Checklist And Maintenance Tips
Once you have successfully installed your frameless sliding shower door, it is important to go through a final checklist to ensure everything is in place and functioning properly. Additionally, proper maintenance is essential to keep your shower door looking pristine and to avoid any potential issues. In this section, we will guide you through a final checklist and provide you with maintenance tips to keep your frameless sliding shower door in top condition.
Double-checking for any loose fittings or screws
Before considering the installation complete, it is important to thoroughly inspect the shower door for any loose fittings or screws. This step is crucial to ensure the door is secure and will not pose any safety risks. Here are the key points to remember:
- Inspect all the fittings and screws in the door mechanism.
- Tighten any loose fittings with a screwdriver or Allen wrench, if necessary.
- Ensure that the door is aligned properly on the tracks and opens and closes smoothly.
- If you notice any persistent issues, it is advisable to seek professional assistance to avoid further damage or complications.
Keeping the shower door clean and well-maintained
Maintaining a clean and well-maintained shower door not only enhances the appearance of your bathroom but also prolongs the lifespan of the door. Follow these maintenance tips to keep your frameless sliding shower door looking like new:
- Clean the glass panels regularly using a non-abrasive cleaner and a soft cloth.
- Wipe down the tracks and rollers with a clean, damp cloth to remove any dirt or debris.
- Avoid using strong chemicals or abrasive materials that may damage the glass or the door mechanism.
- Regularly check for any signs of mold or mildew and address the issue promptly with a mildew remover.
- Inspect the seals and gaskets for any signs of wear and tear. Replace them if necessary to maintain a watertight seal.
Troubleshooting common issues and seeking professional help if needed
Despite proper installation and maintenance, you may encounter some common issues with your frameless sliding shower door. Here are a few troubleshooting tips:
- If the door feels stiff or difficult to slide, try lubricating the tracks and rollers with a silicone lubricant.
- If the door wobbles or feels loose, check the fittings and screws for any signs of wear or damage. Tighten or replace them as needed.
- If the door squeaks while opening or closing, apply a small amount of silicone lubricant to the moving parts to reduce friction.
- If you encounter any persistent issues that you are unable to resolve, it is recommended to seek professional help from a qualified installer or a shower door specialist.
By following this final checklist and adhering to proper maintenance practices, you can enjoy a frameless sliding shower door that operates smoothly and remains aesthetically pleasing for years to come.
Frequently Asked Questions
How Hard Is It To Install A Frameless Shower Door?
Installing a frameless shower door is not too difficult. Just follow the instructions provided, use proper tools, and take your time. It’s a straightforward process that can be completed by most DIY enthusiasts.
Can I Install A Frameless Shower Door Myself?
Yes, you can install a frameless shower door yourself. However, it is important to follow proper installation guidelines to ensure a secure and watertight fit.
How Are Frameless Shower Doors Attached?
Frameless shower doors are attached using hinges and brackets that are secured to the walls and the shower glass. They are typically attached with screws or adhesive to ensure stability and durability. The frameless design provides a sleek and modern look to the bathroom while allowing for easy cleaning and a spacious feel.
How Do You Install A Sliding Glass Shower Door?
To install a sliding glass shower door, follow these steps: 1. Measure the shower opening and purchase the appropriate door. 2. Remove any existing shower doors or tracks, and clean the area thoroughly. 3. Install the bottom track of the sliding door, making sure it is level and properly sealed.
4. Attach the side jambs and secure them to the walls. 5. Hang the sliding door panels onto the track, adjust for proper alignment, and secure them in place.
Conclusion
Finishing a bathroom renovation project with a frameless sliding shower door doesn’t have to be complicated. With the right tools and a step-by-step guide, you can easily install it yourself. Remember to measure accurately, follow the manufacturer’s instructions, and handle the door with care.
By following these simple tips, you’ll have a sleek and functional shower door that adds a touch of elegance to your bathroom. Get ready to enjoy a whole new level of relaxation and style!