To install a flush mount ceiling light, start by turning off the power at the circuit breaker. Then, remove the existing fixture, connect the new light’s wires to the corresponding ceiling wires, secure the fixture to the ceiling, and turn the power back on.
Understanding The Basics Of Flush Mount Ceiling Lights
When it comes to lighting options for your home, flush mount ceiling lights are a popular choice. These lights are installed directly onto the ceiling, giving a sleek and seamless look to any room. But before you jump into installing one, it’s important to understand the basics of flush mount ceiling lights.
Different Types of Flush Mount Ceiling Lights
Flush mount ceiling lights come in various types, each with its own unique design and functionality. Understanding these types can help you choose the right one for your needs.
1. Traditional Flush Mount Lights
Traditional flush mount lights, also known as classic flush mount lights, are the most common type. These lights have a simple and timeless design that complements any interior style. They are perfect for general lighting in entryways, hallways, bedrooms, and other areas where a low-profile light fixture is desired.
2. Modern Flush Mount Lights
If you’re looking for a more contemporary or minimalist style, modern flush mount lights are the way to go. These lights often feature sleek and clean lines, with materials like metal, glass, or acrylic. They add a modern touch to your space while providing ample illumination.
3. Semi-Flush Mount Lights
Semi-flush mount lights are a hybrid between flush mount lights and pendant lights. These lights are typically suspended from a short rod or chain, allowing them to hang slightly below the ceiling. They offer the advantage of enhanced aesthetics and can be a focal point in your room.
Benefits of Installing Flush Mount Ceiling Lights
There are several advantages to installing flush mount ceiling lights in your home. Here are some benefits that might convince you to choose this type of lighting.
1. Space-Saving Design
Flush mount ceiling lights are perfect for rooms with low ceilings or limited space. Their compact design ensures that they do not protrude too much into the room, leaving more overhead space for other decor elements.
2. Even Lighting Distribution
Flush mount lights provide uniform and evenly distributed lighting throughout the room. By dispersing light in all directions, they eliminate harsh shadows or dark spots, creating a well-lit and comfortable environment.
3. Versatility
Flush mount ceiling lights are incredibly versatile and can be used in various areas of your home. Whether it’s the kitchen, living room, bedroom, or bathroom, these lights seamlessly blend into any space, adding a touch of style and functionality.
In conclusion, understanding the basics of flush mount ceiling lights is essential before installing them in your home. By knowing the different types available and the benefits they offer, you can make an informed decision that suits your needs and preferences.
Essential Tools For Installing Flush Mount Ceiling Lights
Installing a flush mount ceiling light can give your space an instant upgrade in terms of lighting and aesthetics. Whether you’re replacing an old fixture or adding a brand new one, having the right tools is essential for a successful installation. Here are the must-have tools you’ll need:
Screwdriver
One of the most basic tools you’ll need is a screwdriver. This versatile tool comes in different types, such as a Phillips screwdriver or a flathead screwdriver. It’s crucial for loosening and tightening screws, which are commonly used to secure the mounting bracket and the light fixture itself. Make sure to choose the right size of screwdriver that matches the screws used in your flush mount ceiling light.
Wire Cutter
Another important tool for installing a flush mount ceiling light is a wire cutter. This tool is used for cutting and stripping the electrical wires, allowing you to connect the light fixture to the electrical wiring in your ceiling. When selecting a wire cutter, opt for one that is sharp and capable of cleanly cutting through different types of wires.
Voltage Tester
A voltage tester is a crucial tool to have before beginning any electrical work. This tool is used to check if there is any current present in the wires, ensuring that the power is properly turned off. It helps prevent accidents and ensures your safety during the installation process. Choose a voltage tester that is specifically designed for detecting electrical currents in wires.
With these essential tools in hand, you’ll be well-equipped to install your flush mount ceiling light. Remember to always prioritize safety and follow the manufacturer’s instructions for a successful installation.
Required Materials For Flush Mount Ceiling Light Installation
Before you begin installing a flush mount ceiling light, it’s important to gather all the necessary materials and tools. Having everything on hand will help streamline the installation process and ensure that you can complete the project without interruptions. Here are the essential materials you’ll need:
Flush Mount Ceiling Light Fixture
The first item you’ll need is the flush mount ceiling light fixture itself. This is the main component that will provide illumination in your space. When choosing a flush mount ceiling light fixture, consider the size and style that will best complement your room’s decor. Whether you prefer a sleek modern design or a traditional aesthetic, make sure to select a fixture that fits your personal taste.
Mounting Bracket
A mounting bracket is another essential component of flush mount ceiling light installation. This bracket is responsible for securely attaching the light fixture to the ceiling. It provides stability and ensures that the light remains securely in place. When purchasing a mounting bracket, make sure it is compatible with your specific light fixture to ensure a proper fit.
Wire Connectors
Wire connectors are crucial for safely connecting the electrical wiring of your flush mount ceiling light. These connectors allow you to join wires together securely, minimizing the risk of any electrical hazards. When selecting wire connectors, make sure to choose ones that are appropriate for the gauge of wire you’ll be working with. It’s also a good idea to have a variety of sizes on hand to accommodate any wiring configurations you may encounter.
Preparing For Installation
Preparing for the installation of a flush mount ceiling light involves a few important steps that will ensure a successful and safe process. By following each of these steps carefully, you can make sure that your new ceiling light is installed correctly and functions properly. In this section, we will cover how to turn off the power to the existing ceiling light and how to remove the old ceiling light fixture.
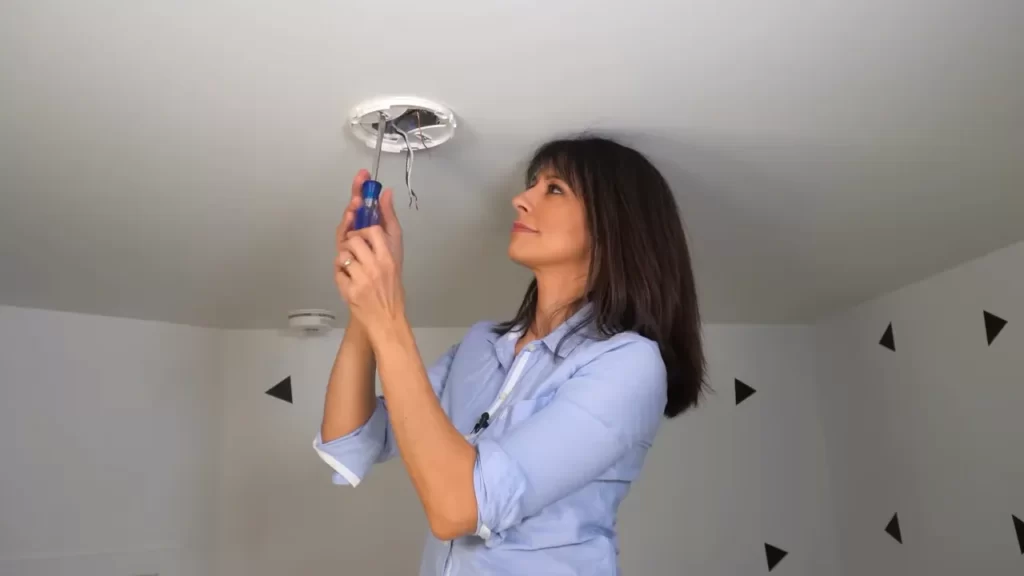
Turn Off Power to the Existing Ceiling Light
Before you begin any electrical work, it is crucial to turn off the power to the existing ceiling light. This ensures your safety and prevents any potential electrical accidents. Here’s how you can do it:
- Locate the electrical panel in your home. This is commonly found in a basement or utility room.
- Open the panel door and find the circuit breaker labeled for the ceiling light. It may be labeled “ceiling light,” “lighting,” or something similar.
- Flip the switch of the circuit breaker to the “off” position.
- Double-check that the power is off by using a non-contact voltage tester. This will confirm that there is no electrical current flowing to the ceiling light.
Remove the Old Ceiling Light Fixture
Once you have ensured that the power is off, you can proceed to remove the old ceiling light fixture. Here are the steps to follow:
- Begin by removing any screws or bolts that are securing the old fixture to the ceiling. Keep the screws in a safe place, as you may need them later.
- Gently lower the fixture from the ceiling, being careful not to damage any wires.
- Disconnect the wiring by removing the wire nuts or connectors securing the wires together. Take note of the wire colors and their locations, as this will help you when installing the new flush mount ceiling light.
- Once the wiring is disconnected, carefully remove the old fixture completely from the ceiling. Set it aside or dispose of it properly.
Now that you have turned off the power and removed the old ceiling light fixture, you are ready to move on to the next steps of installing your new flush mount ceiling light. Stay tuned for the next section, where we will cover the process of connecting the wires and mounting the new fixture.
Installing The Mounting Bracket
When installing a flush mount ceiling light, one of the first steps is to properly install the mounting bracket. The mounting bracket serves as the base for the light fixture and ensures that it is securely attached to the ceiling. In this section, we will guide you through the process of positioning and securing the mounting bracket, so you can proceed with the installation of your flush mount ceiling light confidently.
Positioning the Mounting Bracket on the Ceiling
The first step is to determine the appropriate location for the mounting bracket on the ceiling. Consider the height and position of the light fixture, making sure it provides optimal illumination for the room. Once you have marked the desired position, follow these steps to position the mounting bracket:
- Remove the existing electrical box cover or plate.
- Hold the mounting bracket against the electrical box, aligning the screw holes with the screw holes on the box.
- Ensure that the bracket is level by using a carpenter’s level. Adjust as needed.
- Mark the location of the screw holes on the ceiling using a pencil or marker.
Securing the Mounting Bracket in Place
Once you have positioned the mounting bracket correctly, it’s time to secure it in place. Follow these steps to ensure a secure installation:
- Drill pilot holes at each marked screw hole location on the ceiling.
- Insert anchors into the pilot holes. These anchors will help provide additional support and stability.
- Align the screw holes on the mounting bracket with the pilot holes and anchors.
- Secure the mounting bracket to the ceiling by inserting screws through the bracket holes and into the anchors.
- Tighten the screws using a screwdriver or drill, but be careful not to over-tighten and damage the bracket or ceiling.
Once the mounting bracket is securely in place, you can proceed with the installation of the flush mount ceiling light. This essential step ensures that your light fixture is properly supported and attached to the ceiling, promoting safety and stability. So, take the time to position and secure the mounting bracket correctly, and you’ll be one step closer to enjoying your new flush mount ceiling light fixture!
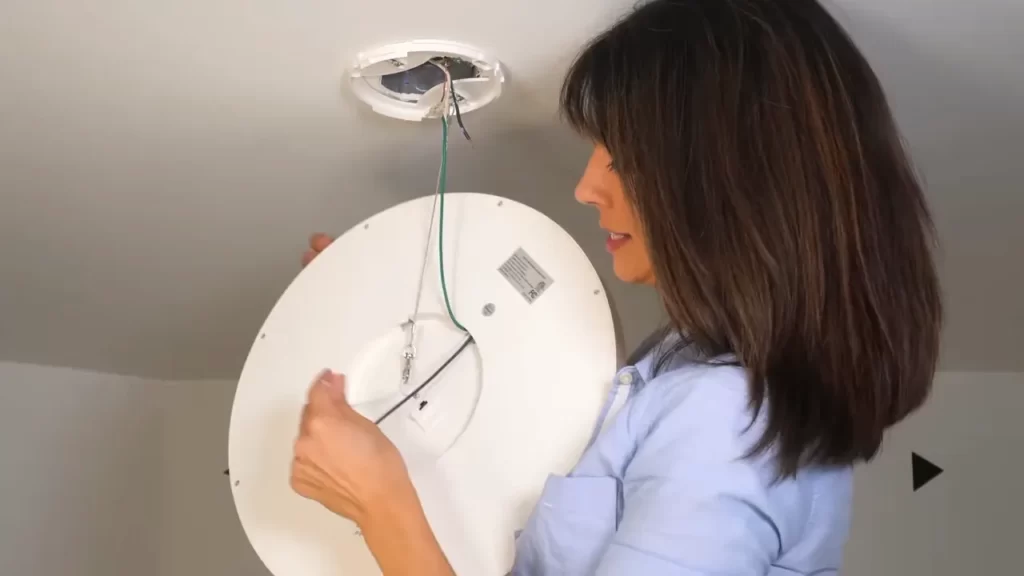
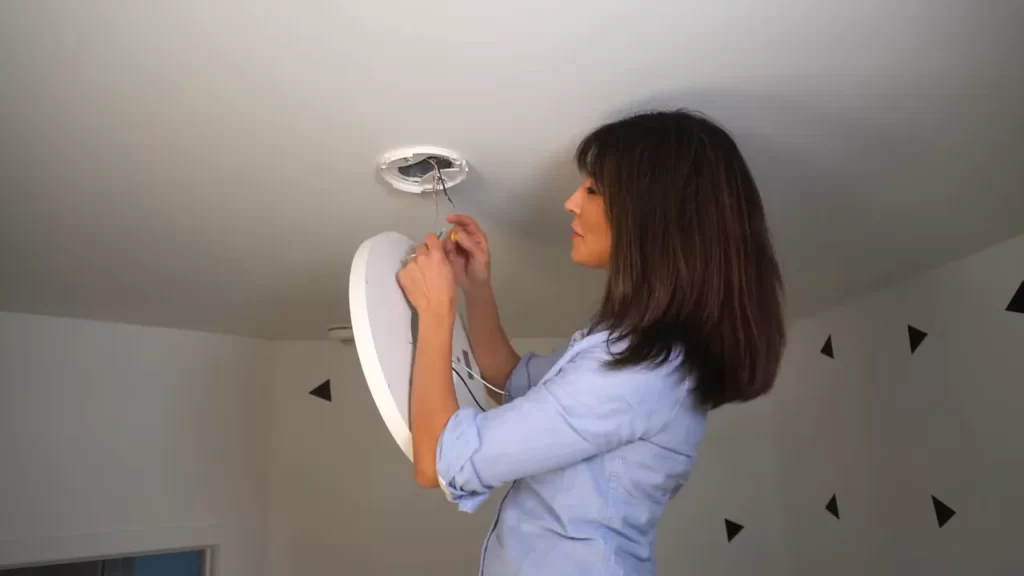
Wiring The Flush Mount Ceiling Light
When installing a flush mount ceiling light, one of the most crucial steps is wiring the light properly. By correctly connecting the wires, you ensure that the light functions safely and efficiently. In this section, we will guide you through the wiring process, step by step.
Identifying the Ceiling Wires and Fixture Wires
Before you start, it’s important to identify the different wires involved in the installation. Typically, you will find three wires coming from the ceiling: a black wire, a white wire, and a bare copper or green wire. These wires correspond to the hot, neutral, and ground connections, respectively.
Similarly, your flush mount ceiling light fixture will also have wires. Usually, you will find two wires – a black wire and a white wire. These wires correspond to the fixture’s hot and neutral connections.
To ensure a successful installation, you need to match the correct wires from the ceiling with the corresponding wires from the fixture. This ensures that the electrical current flows properly and the light works as intended.
Connecting the Wires Using Wire Connectors
Once you have identified the wires, it’s time to connect them using wire connectors. These small, plastic connectors are designed to securely join the wires together, creating a stable and reliable connection.
- Start by stripping about half an inch of insulation from the ends of the wires using wire strippers. This exposes the copper conductor inside.
- Twist together the exposed copper ends of the black wires from the ceiling and the fixture. Secure them tightly using a wire connector. Repeat this step for the white wires and the bare copper or green wires.
- After connecting the wires, gently tug on them to ensure they are firmly attached. Loose connections can cause electrical issues, so it’s important to make sure everything is secure.
It’s worth noting that some flush mount ceiling lights may come with pre-wired connectors, making the installation even easier. In such cases, all you need to do is match the corresponding wires and snap the connectors together.
Once you have connected the wires, gently push them up into the electrical box and carefully position the light fixture over the mounting bracket. Secure the fixture using the provided screws, and you’re almost done with the installation.
By carefully identifying and connecting the ceiling and fixture wires, you have successfully wired your flush mount ceiling light. The final step is to turn on the power and marvel at the beautiful illumination your new light brings to the room.
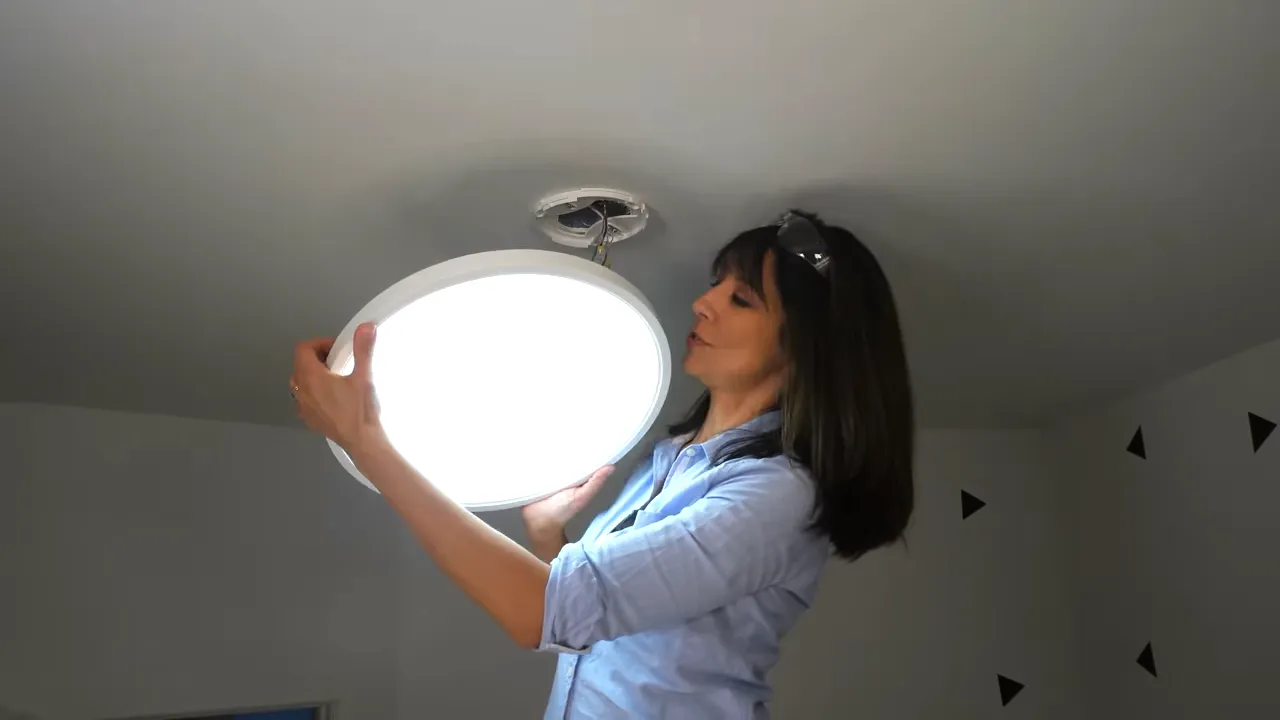
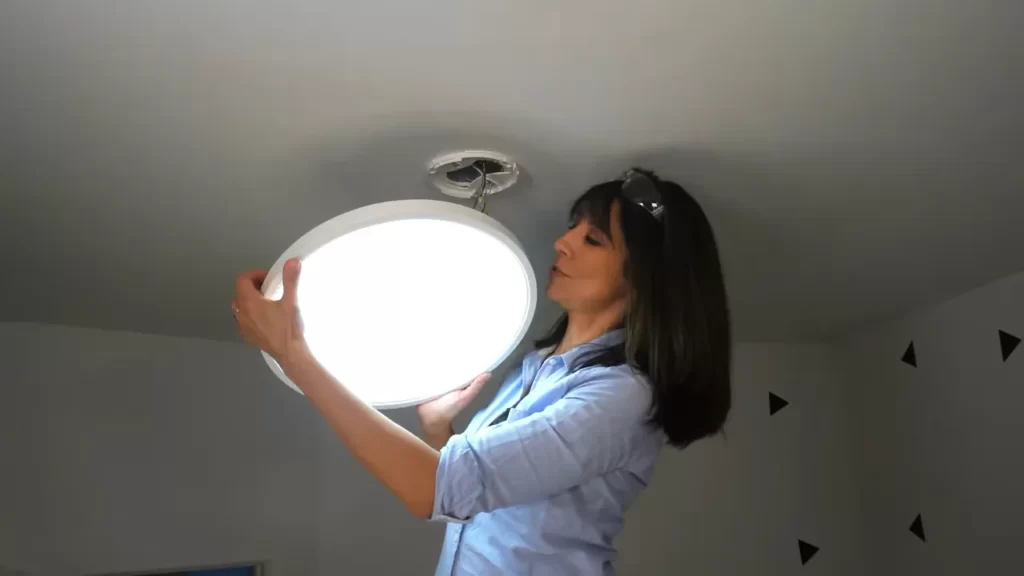
Attaching The Flush Mount Ceiling Light
Once you have prepared the mounting bracket and electrical connections for your flush mount ceiling light, it’s time to attach the light fixture itself. Follow these steps for a secure and proper installation.
Aligning the Flush Mount Ceiling Light to the Mounting Bracket
Before proceeding with attaching the light fixture, ensure that the mounting bracket is properly aligned with the electrical box on the ceiling. This will ensure that the light will hang straight and secure. To align the flush mount ceiling light to the mounting bracket:
- Hold the light fixture against the mounting bracket, aligning the screw holes on the fixture with the corresponding holes on the bracket.
- Double-check that the light fixture is level. You can use a level tool to ensure accuracy.
- Carefully secure the light fixture to the mounting bracket using the provided screws. Be sure to tighten them firmly, but avoid over-tightening as it may damage the fixture or the bracket.
Securing the Flush Mount Ceiling Light in Place
Once you have aligned the light fixture with the mounting bracket, it’s time to secure it in place to ensure it stays fixed and stable on the ceiling. Follow these steps:
- Check the manufacturer’s instructions for any additional steps or precautions specific to your light fixture model.
- Ensure that all wiring is safely tucked inside the electrical box and not protruding.
- Tighten the screws on the mounting bracket to firmly secure the light fixture. Again, be cautious not to over-tighten.
- If your light fixture has a decorative cap or cover, attach it following the manufacturer’s instructions.
By following these steps, you can confidently attach your flush mount ceiling light, ensuring a secure and professional installation. Enjoy the enhanced lighting and aesthetic appeal it brings to your space!
Testing And Finishing Touches
Once you have successfully installed your flush mount ceiling light, it’s time to move on to the testing and finishing touches. This is an important step to ensure that your light is functioning properly and is set up just the way you want it. In this section, we will cover how to restore power, test the flush mount ceiling light, adjust the light direction, and finalize the installation.
Restoring Power and Testing the Flush Mount Ceiling Light
Before testing the flush mount ceiling light, make sure to turn off the power supply at the circuit breaker to avoid any electrical accidents. Once you have done that, follow these steps:
- Locate the circuit breaker panel and find the switch that controls the power to the room where the flush mount ceiling light is installed.
- Flip the switch to restore power to the room.
- Now, go back to the flush mount ceiling light and turn it on using the switch or pull chain.
- Observe the light closely to ensure that it is working properly, with no flickering or unusual sounds.
- If there are any issues, turn off the power again and double-check the connections and wiring.
Adjusting the Light Direction and Finalizing the Installation
Once you have tested the flush mount ceiling light and confirmed that it is functioning correctly, you may want to adjust the light direction to achieve the desired effect. Follow these steps:
- Ensure that the light is turned off and the power is still off at the circuit breaker.
- Remove the cover or diffuser of the flush mount ceiling light to access the bulbs.
- Adjust the direction of the bulbs by rotating them or rearranging them as needed.
- Put the cover or diffuser back in place once you are satisfied with the light direction.
- Turn on the power at the circuit breaker and switch on the flush mount ceiling light to check if the adjusted direction meets your expectations.
Now that you have tested the flush mount ceiling light and made any necessary adjustments, you have successfully completed the installation process! Make sure to clean up any remaining debris and enjoy the newly installed flush mount ceiling light in all its glory.
Frequently Asked Questions
How Do You Replace A Flush Mount Ceiling Light?
To replace a flush mount ceiling light, first, turn off the power supply at the breaker box. Remove the old light fixture by unscrewing the mounting screws. Disconnect the wires and remove the mounting bracket. Install the new light fixture by attaching the mounting bracket and connecting the wires.
Secure the fixture with the mounting screws and restore the power.
How Do You Install A Flush Mount Recessed Lighting?
To install a flush mount recessed lighting, follow these steps: 1. Turn off the power supply and remove the existing fixture. 2. Mark the desired location on the ceiling and cut a hole for the light using a template. 3. Connect the wiring, ensuring proper grounding.
4. Secure the fixture into the hole and make electrical connections. 5. Turn on the power and test the light.
Is It Easy To Fit A Flush Ceiling Light?
Yes, fitting a flush ceiling light is easy.
How Do Flush Mount Ceiling Lights Work?
Flush mount ceiling lights work by being attached directly to the ceiling, without any gaps or hanging parts. They are typically wired to a switch and use various types of bulbs to provide lighting. These lights are commonly used in rooms with low ceilings to maximize space and provide a clean, sleek appearance.
Conclusion
Installing a flush mount ceiling light can bring a new level of elegance and functionality to any room. With the simple steps outlined in this guide, anyone can successfully install this type of lighting fixture. Remember to follow safety precautions and consult the manufacturer’s instructions for specific details.
By taking the time to carefully install the flush mount ceiling light, you can enjoy beautiful and well-lit spaces in your home for years to come. So, why wait? Get started on your installation project today and transform your space with a stunning flush mount ceiling light.