
To install a drop-in bathtub, first, remove the existing bathtub and disconnect the plumbing, then position and level the new bathtub in place.
Understanding The Basics Of Drop In Bathtubs
Different types of bathtubs
There are several types of bathtubs available on the market, each with its own unique features and installation requirements. Some popular types include:
1. Alcove Bathtubs – These are designed to fit in a three-walled enclosure and are the most common type of tub found in bathrooms. They are installed against the wall, with plumbing fixtures located at one end.
2. Freestanding Bathtubs – As the name suggests, these tubs are not attached to any walls and can be placed anywhere in the bathroom. They are often used as a focal point and can be more expensive than other types of tubs.
3. Clawfoot Bathtubs – These vintage-style tubs have claw-shaped feet and are a popular choice for those looking to add a touch of classic elegance to their bathroom. They are freestanding and often require additional plumbing work for installation.
Pros and cons of drop in bathtubs
Drop-in bathtubs offer several advantages and disadvantages compared to other types of tubs. Here are some of the pros and cons:
Pros:
– Versatility: Drop-in bathtubs can be installed in a variety of configurations, including corner installations, making them a versatile choice for different bathroom layouts.
– Customization: With a drop-in bathtub, you have the freedom to choose the surrounding materials such as tiles or stone, allowing you to match the bathtub with the overall aesthetic of your bathroom.
– Accessibility: These tubs can be easier to access for people with mobility issues as they usually have a lower step-over height compared to other types of tubs.
Cons:
– Complex installation: Installing a drop-in bathtub can be more complicated than other types of tubs as it requires framing and additional plumbing work for the surrounding deck or enclosure.
– Cost: Drop-in bathtubs can be more expensive than alcove tubs due to the additional materials and labor required for installation.
– Limited space: Depending on the size of your bathroom, a drop-in bathtub may take up more space compared to other types, so it’s important to consider your available space before choosing this option.
Why choose a drop in bathtub
There are several reasons why you might choose a drop-in bathtub for your bathroom. These include:
– Customization: A drop-in bathtub offers the flexibility to create a customized look for your bathroom. You can choose from a variety of materials, such as tiles or stone, to create a unique and personalized design.
– Durability: Drop-in bathtubs are known for their durability and longevity. The surrounding deck or enclosure provides additional support, making the tub more resistant to cracks or damage.
– Accessibility: The lower step-over height of a drop-in bathtub makes it easier to enter and exit, especially for individuals with mobility limitations or disabilities.
– Upgrade potential: If you ever decide to update your bathroom in the future, a drop-in bathtub can be easily replaced or upgraded without having to make major changes to the surrounding area.
In conclusion, understanding the basics of drop-in bathtubs is crucial before making a decision. By delving into the different types of bathtubs, weighing the pros and cons of drop-in tubs, and recognizing the reasons to choose this option, you can confidently move forward with your bathroom renovation or installation project. Remember to consider your bathroom’s layout, style preferences, and available space to ensure the drop-in bathtub is the right choice for you.
Preparing For Installation
Before you begin the installation process of a drop-in bathtub, it is important to properly prepare the space. This step ensures a smooth installation and helps prevent any potential issues down the line. In this section, we will discuss the necessary tools and materials, measuring the space, and ensuring proper ventilation and plumbing connections.
Gathering the necessary tools and materials
Prior to installing a drop-in bathtub, it is crucial to gather all the required tools and materials. This will help you complete the installation without any interruptions or delays. Here is a list of the essential items you will need:
| Tools | Materials |
|---|---|
|
|
By having all the necessary tools and materials at hand, you can streamline the installation process and avoid unnecessary trips to the hardware store.
Measuring the space for the drop-in bathtub
Prior to purchasing a drop-in bathtub, it is important to measure the space where it will be installed. This ensures a proper fit and prevents any complications during the installation. Here’s how to measure the space:
- Start by measuring the length, width, and height of the existing bathtub opening.
- Ensure that the measurements are accurate and take into consideration any irregularities or sloping of the walls.
- Check if the measurements align with the dimensions of the drop-in bathtub you intend to install.
- Make any necessary adjustments to the space, such as removing or adding framing, to accommodate the new bathtub.
By measuring the space beforehand, you can confidently choose a drop-in bathtub that fits perfectly and avoids any installation issues.
Ensuring proper ventilation and plumbing connections
Proper ventilation and plumbing connections are crucial for a functional and long-lasting drop-in bathtub. It is important to ensure that the bathroom has sufficient ventilation to prevent moisture buildup, which can lead to mold and mildew growth. Additionally, you need to ensure that the plumbing connections are compatible with the new bathtub.
Consider the following steps to ensure proper ventilation and plumbing connections:
- Check if your bathroom has a window or an exhaust fan to promote air circulation.
- If necessary, install an exhaust fan to enhance ventilation.
- Ensure that the plumbing connections, such as the drain and water supply lines, are compatible with the new drop-in bathtub.
- If needed, consult a professional plumber to make any necessary adjustments or upgrades to the plumbing system.
By paying attention to proper ventilation and plumbing connections, you can create a comfortable and functional bathroom space.
Removing The Old Bathtub (Seo-Friendly)
Before you can install a new drop-in bathtub, you’ll need to remove the old one. This process may seem daunting, but with the right guidance, you can tackle it like a pro. This section will guide you through the steps to remove your old bathtub, ensuring a smooth transition to your new one.
Disconnecting water supply and drainage pipes
The first step in removing your old bathtub is to disconnect the water supply and drainage pipes. This ensures that no water leaks or spills occur during the removal process. To do this, follow these steps:
- Locate the shut-off valves for both hot and cold water supply lines. These are usually located either in the bathroom or in the basement if you have one.
- Turn the shut-off valves clockwise until they are fully closed. This will stop the flow of water to your bathtub.
- Open the faucets in your bathtub to release the water pressure.
- Using a wrench, loosen and disconnect the water supply lines connected to the bathtub faucets. Be sure to place a bucket or towel beneath the connections to catch any remaining water.
- Next, you’ll need to disconnect the drainage pipes. Locate the P-trap, which is a curved pipe beneath the bathtub. Use a wrench to loosen the nuts connecting the P-trap to the drainage pipes.
- Once the nuts are loose, carefully remove the P-trap and any other connections between the bathtub and drainage pipes.
Removing the bathtub fixtures and accessories
Now that you have disconnected the water supply and drainage pipes, it’s time to remove the fixtures and accessories attached to your bathtub. This includes any faucets, handles, showerheads, and other decorative elements. Here’s how:
- Start by turning off the main water supply to your house. This will prevent any water flow while you are removing the fixtures.
- Using a screwdriver or an appropriate tool, remove the screws or bolts that secure the fixtures to the walls or bathtub.
- Once the fixtures are loose, gently pull them away from the walls or bathtub.
- Set aside the fixtures and accessories in a safe place for reuse or disposal.
Demolishing or cutting out the old bathtub
With the fixtures and accessories removed, it’s now time to tackle the old bathtub itself. Depending on the construction of your bathroom, you may need to demolish the bathtub or simply cut it out. Here are the steps to follow:
- If you need to demolish the bathtub, put on protective gloves and safety goggles.
- Using a sledgehammer or a heavy mallet, break the bathtub into manageable pieces. Be careful not to damage the surrounding walls, floor, or plumbing.
- Once the bathtub is broken apart, remove the debris and dispose of it properly.
- If you need to cut out the bathtub, measure and mark the cutting lines using a pencil and measuring tape.
- Using a reciprocating saw or a hacksaw, carefully cut along the marked lines, separating the bathtub from the surrounding walls and floor.
- Once the bathtub is completely cut out, remove the debris and clean the area to prepare it for the installation of the new drop-in bathtub.
By following these steps, you can successfully remove your old bathtub and prepare for the installation of a new drop-in bathtub. Remember to take your time, use caution, and consult a professional if needed. Stay tuned for the next section, where we’ll guide you through the installation process!
Preparing The Floor And Surrounding Area
Before installing a drop-in bathtub, it’s crucial to properly prepare the floor and surrounding area. This will ensure a sturdy base and prevent any water damage or leaks. In this section, we will cover three essential steps: inspecting and repairing the subfloor, installing a cement backer board, and waterproofing the area around the drop-in bathtub.
Inspecting and Repairing the Subfloor
The first step in preparing the floor is to inspect the subfloor for any damage or weakness. A solid and level subfloor is essential for a successful drop-in bathtub installation. Here’s how you can inspect and repair the subfloor:
- Start by examining the subfloor for any noticeable signs of damage such as rot, termites, or water stains. If you spot any issues, it’s important to address them before proceeding with the installation. Replace any damaged sections of the subfloor to ensure a stable and secure foundation.
- Next, check the subfloor for any unevenness or dips. Use a level to measure the floor’s surface, ensuring it is perfectly level. If you find any irregularities, use a floor leveling compound to even out the subfloor.
- Additionally, make sure that the subfloor is properly secured to the floor joists. If you notice any loose or squeaky areas, reinforce them by driving screws into the subfloor and joists.
Installing a Cement Backer Board
Once the subfloor is in good condition, the next step is to install a cement backer board. This will provide a solid and moisture-resistant base for the drop-in bathtub. Here’s how you can install a cement backer board:
- Start by measuring and cutting the cement backer board to fit the dimensions of the surrounding area. Ensure that the backer board covers the entire footprint of the bathtub, allowing for a smooth and level installation.
- Place the cut pieces of backer board on the subfloor, ensuring there is a small gap between each board for expansion. Use backer board screws to secure the boards to the subfloor, ensuring that they are evenly spaced and flush with the surface.
- After securing the backer board, reinforce the seams between each board with cement board tape. Apply a thin layer of mortar over the tape to create a seamless and watertight seal.
Waterproofing the Area around the Drop-in Bathtub
Waterproofing the area around the drop-in bathtub is essential to prevent any moisture-related issues such as mold or mildew. Here’s how you can effectively waterproof the area:
- Start by applying a waterproof membrane to the cement backer board. Use a paintbrush or roller to evenly distribute the waterproofing material, ensuring that all seams and corners are well-covered.
- Pay special attention to the areas where the drop-in bathtub will meet the walls, ensuring that the membrane extends at least six inches above the bathtub’s lip.
- Allow the waterproofing membrane to dry completely before proceeding with the installation of the drop-in bathtub. This will ensure a secure and watertight seal between the bathtub and the surrounding area.
By following these steps, you can effectively prepare the floor and surrounding area for the installation of a drop-in bathtub. This will ensure a secure and long-lasting installation, giving you peace of mind and a luxurious bathing experience.

Installing The Drop In Bathtub (Seo-Friendly)
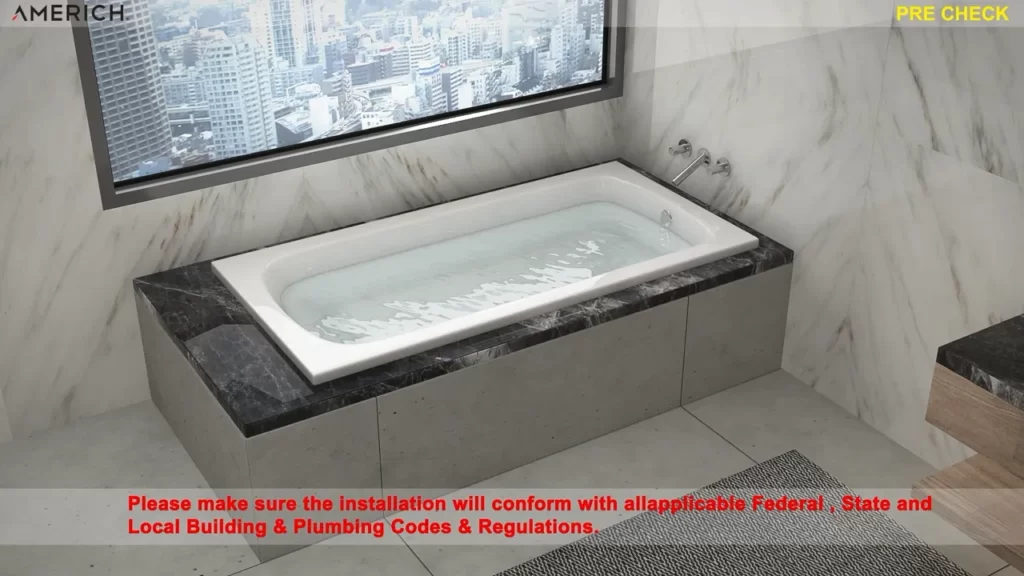
Positioning the bathtub in the designated area
Before installing a drop-in bathtub, it’s crucial to position it correctly in the designated area. Start by measuring the dimensions of the bathtub and ensure that the area is large enough to accommodate it comfortably. Consider factors like doorways, fixtures, and any obstructions that may hinder the installation process. Assessing the location beforehand will help prevent any unforeseen issues during installation.
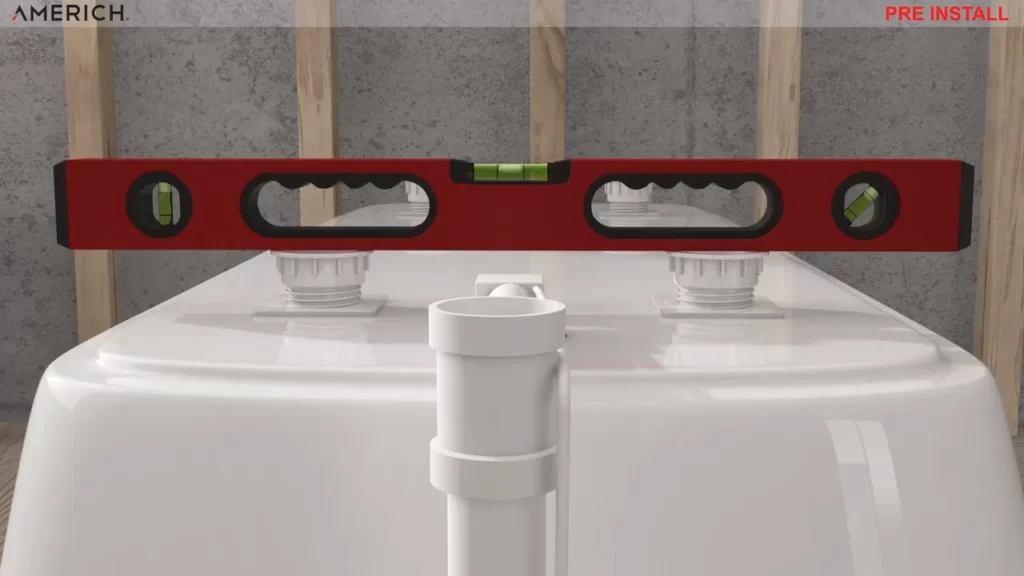
Leveling the bathtub and making adjustments
Once the bathtub is in place, the next step is to ensure it is properly leveled. Use a spirit level to check if the bathtub is balanced both horizontally and vertically. Adjustments may be required to achieve a perfectly level surface. This can be done by placing shims between the bathtub and the floor, strategically positioning them in areas that require leveling. Continually check the level as you make adjustments to ensure the bathtub is completely balanced.
Securing the bathtub to the floor and walls
Securing the drop-in bathtub is crucial to ensure stability and prevent any unwanted movement. Start by fastening the bathtub to the floor using screws or brackets, ensuring they are securely in place. Depending on the type of bathtub, additional support may be required. Check the manufacturer’s instructions for specifics on securing the bathtub to the floor.
Next, secure the bathtub to the surrounding walls. Use an adhesive suitable for the material of the bathtub, applying it to the edges where it meets the walls. Press firmly to ensure a strong bond. Additionally, use mounting brackets to further secure the bathtub to the walls. These brackets provide added stability and prevent any movement over time.
Ensure each H3 heading adheres to HTML syntax by using the correct tags:
Positioning the bathtub in the designated area
…
Leveling the bathtub and making adjustments
…
Securing the bathtub to the floor and walls
…
Connecting The Plumbing And Drainage
Installing a drop-in bathtub involves more than just placing the tub in its designated spot. Properly connecting the plumbing and drainage is crucial to ensure the bathtub functions correctly and efficiently. In this section, we will walk you through the steps of installing the drain assembly and overflow system, as well as connecting the water supply lines. Finally, we’ll share tips on how to test the plumbing connections for leaks, giving you peace of mind that your bathtub installation is flawless.
Installing the Drain Assembly and Overflow System
To begin with, it is important to gather all the necessary tools and materials before installing the drain assembly and overflow system. You’ll need a drain wrench, plumber’s putty, a drain and overflow kit, and a high-quality silicone sealant. Once you have everything ready, follow these steps:
- Apply a thin layer of plumber’s putty to the underside of the flange on the drain assembly. This will create a watertight seal when the assembly is attached to the drain opening.
- Insert the drain assembly into the tub’s drain opening, ensuring the flange is flush against the surface of the tub.
- Tighten the drain assembly using a drain wrench until it is securely in place.
- Next, attach the overflow system to the overflow opening on the tub. Follow the manufacturer’s instructions for proper installation.
- Use a high-quality silicone sealant to create a watertight seal between the tub and the drain assembly as well as the overflow system.
Connecting the Water Supply Lines
Now that the drain assembly and overflow system are properly installed, it’s time to connect the water supply lines. Here’s how you can do it:
- Locate the water supply valves, usually found near the bathtub or in the basement.
- Turn off the water supply by closing the valves.
- Use a pipe wrench to connect the hot and cold water supply lines to the corresponding valves on the bathtub.
- Tighten the connections using the pipe wrench, ensuring they are secure but not overtightened to avoid damaging the pipes.
- Once you’ve connected the supply lines, turn on the water supply and check for any leaks. If you notice any leaks, tighten the connections further or replace any faulty parts as needed.
Testing the Plumbing Connections for Leaks
To ensure your plumbing connections are leak-free, it is essential to perform a thorough test before completing the installation. Here’s how you can do it:
- Fill the bathtub with water and let it sit for a few minutes.
- Inspect the drain assembly, overflow system, and water supply lines for any signs of leakage.
- If you notice any leaks, take note of their location and tighten the connections accordingly or replace any faulty parts.
- Continue to monitor the connections over the next few hours to ensure there are no further leaks.
By following these steps and conducting a comprehensive test, you can be confident that your drop-in bathtub’s plumbing and drainage are properly connected and free from any leaks. Remember, a well-executed installation will not only provide you with a luxurious bathing experience but also give you peace of mind knowing that your bathtub is installed correctly.
Installing Bathtub Fixtures And Accessories
Choosing and Installing the Faucet and Showerhead
Choosing the right faucet and showerhead for your drop-in bathtub can greatly enhance your bathing experience. When selecting these fixtures, consider the functionality and design that best suit your needs and preferences. Here are the steps to install them:
- Start by positioning the faucet and showerhead assembly in the desired location on the deck of your bathtub. Make sure they align with the pre-drilled holes.
- Attach the hot and cold water supply lines to the corresponding connections on the underside of the faucet. Use a wrench to tighten them securely, ensuring there are no leaks.
- Connect the showerhead to the shower arm by screwing it onto the threaded end. Use plumber’s tape to create a watertight seal, wrapping it clockwise around the threads before attaching the showerhead.
- Once everything is in place, turn on the water supply to check for any leaks. If there are any, tighten the connections further until they are secure.
Attaching the Necessary Fixtures
Complete the installation of your drop-in bathtub by attaching the necessary fixtures, such as handles and spouts. These components not only enhance the aesthetic appeal of your bathtub but also provide convenient control over the water flow. Here are the steps to attach them:
- Locate the pre-drilled holes on the deck of your bathtub where the fixtures will be installed.
- Slide the handles onto the valve stems and secure them by tightening the screws or set screws provided. Ensure the handles are aligned properly and operate smoothly.
- For the spout, apply plumber’s tape to the threads on the end of the valve stem. Then, screw the spout onto the valve until it is tightly secured.
- Test the operation of the fixtures by turning them on and off. Make any necessary adjustments or tighten any loose connections as needed.
Applying Caulking or Sealant around the Bathtub Edges
To ensure the durability and water-tightness of your drop-in bathtub, it is crucial to apply caulking or sealant around the edges. This serves as a barrier against moisture, preventing leaks and potential damage. Here’s how to do it:
- Clean the edges of the bathtub thoroughly, removing any dirt, grime, or old caulking. Use a scraping tool or putty knife to ensure a clean surface.
- Insert a tube of silicone caulking or bathtub sealant into a caulk gun.
- Starting at one corner, place the tip of the caulk gun against the edge of the bathtub and apply a slow, steady bead of caulking or sealant along the joint where the tub meets the wall or surrounding tiles.
- Use your finger or a caulk smoothing tool to smooth and shape the caulking, ensuring a neat and even finish.
- Allow the caulking or sealant to dry according to the manufacturer’s instructions before using the bathtub.
By following these steps, you can successfully install the fixtures and accessories for your drop-in bathtub, providing both functionality and aesthetic appeal.
Making The Bathroom Safe And Functional
When it comes to our bathrooms, safety and functionality are key. After all, it’s a space where we relax, rejuvenate, and take care of our personal hygiene. One important aspect of creating a safe and functional bathroom is the installation of a drop-in bathtub. In this article, we will discuss a few essential steps to make your bathroom safe and functional, ensuring a worry-free bathing experience.
Installing Grab Bars and Non-Slip Mats
One of the first things to consider when installing a drop-in bathtub is adding grab bars and non-slip mats. These additions can significantly enhance safety in your bathroom by providing support and stability. Whether you have mobility issues or simply want to prevent slips and falls, grab bars and non-slip mats are must-haves.
Grab bars can be strategically placed near the bathtub and shower area, offering stability and something to hold onto when getting in and out of the tub. Ensure proper installation by securely attaching them to the wall studs or using a durable adhesive designed for bathroom use.
In addition to grab bars, non-slip mats can be placed on the floor of the bathtub to provide traction and prevent accidents. These mats usually have suction cups on the underside to keep them in place. Make sure to place them properly and replace them if they show signs of wear and tear.
Adjusting Water Temperature and Pressure
Having the right water temperature and pressure is essential for a pleasant and safe bathing experience. Before installing a drop-in bathtub, it’s important to check the water temperature and pressure in your bathroom. Adjustments may be necessary to ensure comfort and prevent scalding or other water-related accidents.
If your water temperature is too hot, consider installing a thermostatic mixing valve. This valve allows you to set the maximum water temperature, preventing accidental burns. Additionally, installing a pressure regulator can help maintain consistent water pressure, preventing any sudden surges or drops.
Ensuring Proper Ventilation and Lighting
Ventilation and lighting are crucial aspects of any safe and functional bathroom. Proper ventilation helps prevent moisture buildup, reducing the risk of mold and mildew growth. This can be achieved through the installation of an exhaust fan, which helps draw out excess humidity.
When it comes to lighting, it’s important to have ample illumination in the bathroom. Bright and well-distributed lighting reduces the chances of accidents due to poor visibility. Consider installing light fixtures above the bathtub area, near the vanity mirror, and in other key locations.
By addressing ventilation and lighting, you create a comfortable and safe environment in your bathroom that promotes well-being.
Frequently Asked Questions
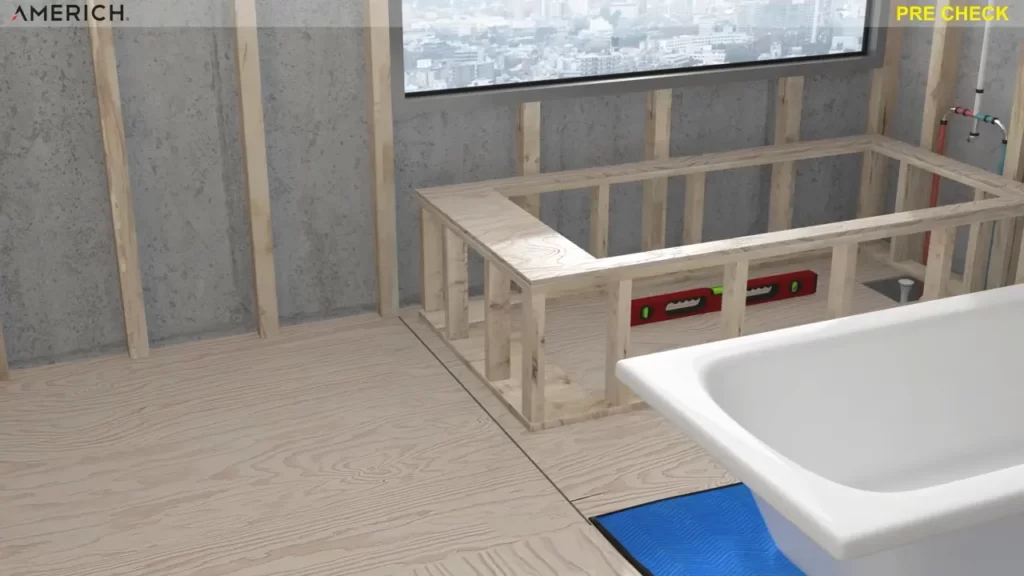
What Does A Drop In Tub Sit On?
A drop-in tub sits on a platform or framing, usually made of wood or a sturdy material.
Do You Tile Before Installing Drop In Tub?
Tile installation should typically be done before installing a drop-in tub. This ensures proper waterproofing and prevents damage to the tub or surrounding areas during tiling.
How Do You Enclose A Drop In Tub?
Enclosing a drop-in tub requires these steps: 1. Measure the tub’s dimensions and the space available around it. 2. Build a framework using studs and plywood to create a surround. 3. Install moisture-resistant materials like cement board or waterproof drywall.
4. Apply waterproofing membrane and tile or other desired finishes to the surround. 5. Seal any gaps or seams, and ensure proper drainage.
What Do You Put Under A Bathtub For Support?
For support under a bathtub, you can use a mortar bed, a bathtub support platform, or adjustable feet. These options provide stability and prevent the tub from cracking or sagging.
Conclusion
Installing a drop-in bathtub may seem intimidating, but with the right tools and steps, it can be a straightforward process. By carefully following the instructions provided in this blog post, you can successfully install a drop-in bathtub in your bathroom.
Remember to measure accurately, prepare the space, and secure the tub properly. With patience and attention to detail, you can enjoy a new and luxurious addition to your bathroom in no time.