
To install a dishwasher drain hose, disconnect the old hose from the dishwasher and sink drain, then connect the new hose using hose clamps. Next, secure the hose to the dishwasher and sink drain to ensure proper drainage.
Understanding The Importance Of A Proper Drain Hose
When it comes to the proper functioning of your dishwasher, a well-functioning drain hose plays a crucial role. The drain hose is responsible for carrying the wastewater from the dishwasher and safely disposing of it. It might seem like a small component, but it plays a significant role in ensuring that your dishwasher operates smoothly and efficiently.
Why a well-functioning drain hose is crucial for a dishwasher
A well-functioning drain hose is essential for the efficient drainage of dirty water from your dishwasher. It prevents the accumulation of water and debris, which can lead to several problems. Here are a few reasons why a properly functioning drain hose is crucial:
- Preventing leaks: A properly installed and maintained drain hose ensures that there are no leaks or spills during the dishwasher’s operation. Leaks can cause water damage to your kitchen floor and cabinets, leading to costly repairs.
- Preventing clogs: A clogged drain hose can result in water backing up into the dishwasher, causing unpleasant odors and potential damage to the machine and your kitchen. A well-functioning drain hose prevents clogs and keeps the dishwasher running smoothly.
- Protecting the dishwasher: When dirty water can’t flow out of the dishwasher properly, it can cause damage to the internal components of the machine. This can result in costly repairs or the need for replacement parts. A properly functioning drain hose protects your dishwasher and extends its lifespan.
Common issues caused by a faulty drain hose
A faulty drain hose can lead to a range of issues that can disrupt the proper functioning of your dishwasher. Here are some common problems caused by a faulty drain hose:
- Water pooling at the bottom of the dishwasher: If the drain hose is damaged or improperly installed, water may accumulate and remain at the bottom of the dishwasher after each cycle.
- Unpleasant odors: A clogged or improperly functioning drain hose can lead to the buildup of food particles and leftover debris. This can result in unpleasant odors emanating from your dishwasher.
- Inefficient cleaning: When a dishwasher’s drain hose is faulty, it may not drain dirty water adequately. This can lead to dirty dishes and inefficient cleaning performance.
- Increased utility bills: If your dishwasher is not draining efficiently due to a faulty drain hose, it may use more water and energy to complete each cycle, increasing your utility bills.
Avoid these common issues and ensure the proper functioning of your dishwasher by making sure your drain hose is in good condition and properly installed and maintained.
Assessing Your Dishwasher’S Drain Hose Compatibility
Before installing a new drain hose for your dishwasher, it is important to assess the compatibility of your dishwasher’s existing setup. This will ensure a smooth and effective installation process. In this section, we will guide you through the necessary steps to determine if your dishwasher’s drain hose is compatible with the one you wish to install.
Checking the specifications of your dishwasher model
The first step in assessing your dishwasher’s drain hose compatibility is to check the specifications of your dishwasher model. You can usually find this information in your dishwasher’s user manual or by searching for your dishwasher model online. Look for details such as the brand, model number, and any specific requirements mentioned in the manual.
Understanding the requirements for drain hose installation
Each dishwasher model may have specific requirements for drain hose installation. These requirements can include the type of drain hose connector, the length of the drain hose, and any additional accessories needed for proper installation. Understanding these requirements will help ensure that the new drain hose you choose is compatible and meets the necessary criteria.
Determining the appropriate size and material for your drain hose
When selecting a drain hose for your dishwasher, it is crucial to determine the appropriate size and material. The size of the drain hose should match the connection on your dishwasher as well as the drain pipe. It is recommended to measure the existing drain hose or consult the dishwasher’s user manual to determine the correct size. Additionally, considering the material of the drain hose is important as it can affect its durability and performance. Common materials for drain hoses include rubber, PVC, and stainless steel.
Note: It is essential to ensure that the drain hose you choose meets any specific requirements mentioned in your dishwasher’s user manual or specifications.
By thoroughly assessing your dishwasher’s drain hose compatibility and understanding the requirements for installation, you can confidently select the appropriate drain hose for your dishwasher. This will help to ensure a successful installation and optimal performance of your dishwasher’s drainage system.
Essential Tools For Dishwasher Drain Hose Installation
Installing a dishwasher drain hose can be a daunting task if you don’t have the right tools. But fear not! With the essential tools listed below, you’ll have all the equipment you need to complete the installation process seamlessly. So, let’s dive in and explore these must-have tools.
Screwdriver
A screwdriver is an indispensable tool for any DIY enthusiast or homeowner. When it comes to dishwasher drain hose installation, you’ll need a screwdriver to loosen and tighten screws. This tool is especially necessary for securing the clamps that connect the drain hose to the sink or garbage disposal.
Adjustable Wrench
An adjustable wrench is another tool you shouldn’t be without while installing a dishwasher drain hose. Its versatility resides in its ability to adjust the jaw width to fit different nut and bolt sizes. When it comes time to tighten or loosen connections, an adjustable wrench is your best friend.
Pliers
Pliers are an essential tool for gripping, bending, and turning objects with ease. During dishwasher drain hose installation, you may come across stubborn clamps or tight connections that require a little extra force. Pliers will come to the rescue, providing you with the leverage you need for a secure and leak-free installation.
So, there you have it – the essential tools you need for dishwasher drain hose installation. Make sure you have a screwdriver, adjustable wrench, and pliers on hand before starting the installation process. Armed with these tools, you’ll be well-prepared for a smooth and successful dishwasher drain hose installation.
Required Materials For Installing A Dishwasher Drain Hose
When it comes to installing a dishwasher drain hose, having the right materials on hand is essential. These materials not only ensure a proper connection, but they also help prevent leaks and ensure the smooth functioning of your dishwasher. In this section, we will discuss the key materials needed for installing a dishwasher drain hose, along with their importance in the installation process.
New dishwasher drain hose
The first and most crucial material you will need is a new dishwasher drain hose. This hose connects your dishwasher to the drainpipe or garbage disposal unit, allowing the wastewater to flow out. When selecting a new drain hose, it’s important to consider the length and diameter. Measure the existing hose or consult the dishwasher’s manual to ensure you purchase the correct size. A leaky or damaged drain hose should be replaced to avoid any potential water damage and to maintain the efficiency of your dishwasher.
Hose clamps
In addition to a new drain hose, you will need hose clamps for a secure and tight connection. These clamps are used to fasten the drain hose to the dishwasher outlet or the drainpipe, preventing any water from leaking. Hose clamps come in various sizes, so make sure to choose one that matches the diameter of your drain hose. These clamps are typically adjustable and easy to install, ensuring a reliable connection that withstands the pressure of wastewater flow.
Hose connector
A hose connector is another vital component needed for a successful dishwasher drain hose installation. This connector allows you to join different sections of the drain hose together, ensuring a seamless and continuous flow of wastewater. Similar to the drain hose, the diameter of the hose connector should match that of the drain hose to create a proper fit. A secure and watertight connection with the help of a hose connector guarantees that no wastewater spills or leaks occur during the dishwasher’s operation.
Drain hose adapter (if needed)
In some cases, a drain hose adapter may be required to connect the dishwasher’s drain hose to the household drain system. This adapter facilitates a smooth transition between different types of drainpipes or plumbing configurations. To determine if you need a drain hose adapter, consult the dishwasher’s manual or seek guidance from a professional plumber. Using the correct drain hose adapter ensures compatibility and prevents any complications or water leaks.

Preparing The Dishwasher For Drain Hose Installation
Before you can install a new drain hose for your dishwasher, it’s important to prepare the dishwasher by disconnecting the power and water supply and moving it to a location where you can easily access the back. Follow these simple steps to ensure a smooth installation process:
Disconnecting power and water supply
The first step in preparing your dishwasher for drain hose installation is to disconnect the power and water supply. This is crucial to ensure your safety during the installation process. Here’s what you need to do:
- Turn off the power: Locate the circuit breaker that powers your dishwasher and switch it off. This will prevent any electrical accidents while you’re working with the appliance.
- Turn off the water supply: Find the shut-off valve for the dishwasher’s water supply, usually located under the sink. Turn the valve clockwise to shut off the water supply.
- Double-check the power and water supply: It’s important to make sure that both the power and water supply are properly disconnected before proceeding with the next steps.
Moving the dishwasher to access the back
Once you’ve disconnected the power and water supply, you’ll need to move the dishwasher to a location where you can easily access the back. Follow these steps to move the dishwasher safely:
- Clear the area: Remove any items that might obstruct your path and make sure the floor is clear from any obstacles.
- Slide out the dishwasher: Gently pull the dishwasher forward, making sure to use proper lifting techniques if necessary. Be cautious of any water or debris that may have accumulated under the appliance.
- Adjust the leveling feet: If necessary, adjust the leveling feet at the bottom of the dishwasher to ensure stability and prevent any wobbling.
Now that you’ve successfully prepared your dishwasher for drain hose installation by disconnecting the power and water supply, and moving it to a suitable location, you’re ready to move on to the next steps of installing the drain hose.
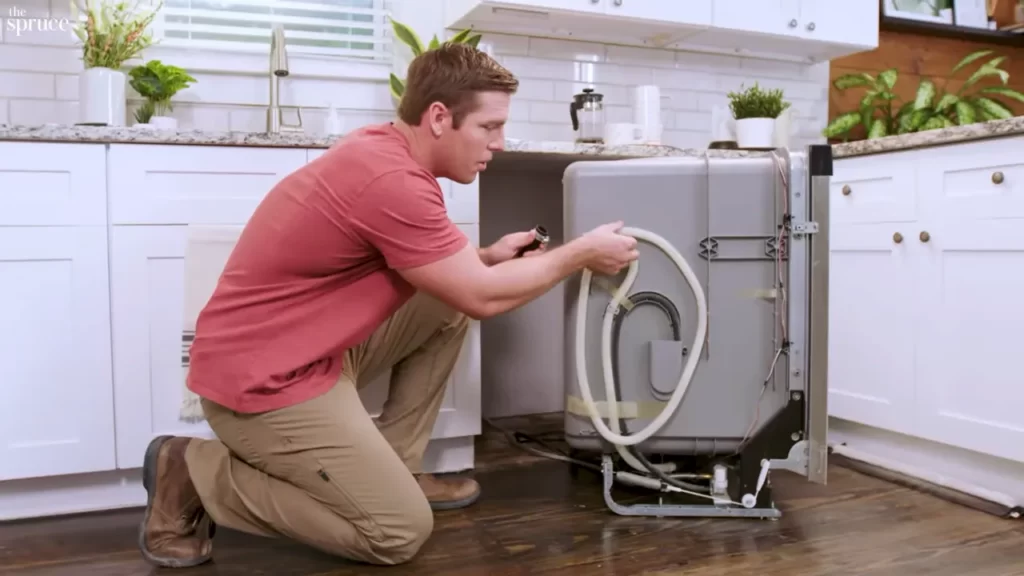
Removing The Old Drain Hose
Removing the old drain hose is a crucial step when installing a dishwasher, as it allows for the smooth transition to a new one. In this section, we will guide you through the process of loosening and disconnecting the clamps, as well as detaching the old drain hose from the dishwasher.
Loosening and disconnecting the clamps:
1. Locate the clamps securing the old drain hose to the dishwasher and the plumbing. These clamps are typically made of metal or plastic and can be found near the connection points.
2. Using pliers or a screwdriver, loosen the clamps by turning them counterclockwise. Be gentle but firm to avoid damaging the clamps or the surrounding components.
3. Once the clamps are loose, carefully slide them away from the connections, creating space to remove the old drain hose.
Detaching the old drain hose from the dishwasher:
1. Look for the connection point between the dishwasher and the drain hose, usually located at the back of the appliance. It may be secured with a hose clamp that needs to be loosened.
2. Using pliers, squeeze the hose clamp to release the pressure and slide it away from the connection point. This will loosen the grip of the clamp on the drain hose.
3. With the clamp loosened, gently twist and pull the old drain hose off the connection point. Make sure to catch any residual water that may be trapped in the hose or the dishwasher.
4. Once the drain hose is detached from the dishwasher, place a towel or a bucket underneath the hose to catch any additional water that may drip out during the process.
Now that you have successfully removed the old drain hose from the dishwasher, you can proceed to the next step of installing a new one. Remember to keep all the necessary components in a safe place for future use.
Installing The New Drain Hose
Connecting the new drain hose to the dishwasher
Once you have removed the old drain hose, it’s time to connect the new one to your dishwasher. Follow these steps to ensure a secure and proper connection:
- Start by locating the drain outlet on the back of your dishwasher. This is typically located at the bottom or the side of the appliance.
- Take the new drain hose and insert one end into the drain outlet. Make sure it fits snugly and is pushed in as far as it can go.
- If the new drain hose has a clamp, slide it over the connection point where the hose meets the drain outlet. This will help secure the hose in place and prevent any leaks.
- Tighten the clamp using a screwdriver or pliers until it feels secure. Be careful not to overtighten as this could cause damage to the hose or the dishwasher.
Connecting the new drain hose to your dishwasher is an important step in the installation process. Make sure the hose is inserted fully into the drain outlet and that the clamp is properly tightened to prevent any leaks or issues with drainage. Now that the hose is securely connected, let’s move on to the next step.
Securing the hose with hose clamps
After connecting the new drain hose to the dishwasher, it’s crucial to secure it in place using hose clamps. Here’s how you can do it:
- Ensure that the hose is positioned correctly and aligned with the drain outlet.
- Take a hose clamp and position it over the hose, making sure it is centered over the connection point.
- Using a screwdriver or pliers, tighten the clamp until it is firmly secured. Double-check that the clamp is not too loose or too tight to ensure a proper fit and avoid any potential leaks.
- If the hose has multiple connection points, repeat this process for each one, ensuring that all clamps are securely fastened.
Securing the hose with hose clamps is an important step to prevent any potential leaks or disconnections. This will ensure a smooth and reliable drainage system for your dishwasher. Now that the hose is properly secured, let’s move on to the final step to ensure the installation is complete.
Checking for proper fit and alignment
After connecting and securing the new drain hose, it’s essential to check for proper fit and alignment to ensure optimal functionality. Follow these steps:
- Inspect the connections between the drain hose and the dishwasher. Ensure that they are tight and secure, without any gaps or looseness.
- Check that the hose is properly aligned with the drain outlet and any other connection points.
- Run a short test cycle on your dishwasher to ensure that the water flows smoothly through the drain hose and that there are no leaks or obstructions.
By checking for proper fit and alignment, you can ensure that your new drain hose is correctly installed and functioning efficiently. It’s always better to identify and address any potential issues before using the dishwasher regularly.
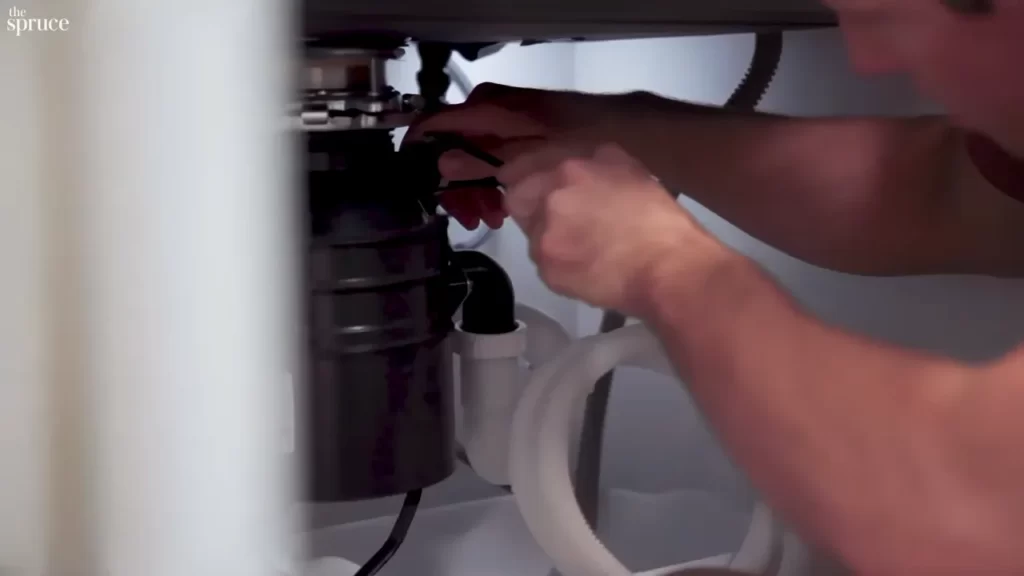
Connecting The Drain Hose To The Sink Or Garbage Disposal
Once you have installed your new dishwasher and positioned it in its designated space, the next step is to connect the drain hose to either the sink or garbage disposal. This crucial step ensures that the wastewater from your dishwasher is properly drained, preventing any potential leaks and ensuring efficient operation of your appliance. In this section, we will guide you through the process of connecting the drain hose to the sink or garbage disposal using the appropriate methods and tools.
Determining the Appropriate Connection Point
The first step in connecting the drain hose is to determine the appropriate connection point on either the sink or the garbage disposal. In most cases, dishwasher drain hoses are connected to the sink’s plumbing via a small, cylindrical spout located near the rear of the sink. If your sink does not have this feature, you will need to connect the drain hose to the garbage disposal, which typically has a dedicated dishwasher inlet.
Attaching the Drain Hose Using a Hose Connector
Once you have identified the appropriate connection point, you will need to attach the drain hose to it using a hose connector. A hose connector serves as a bridge between the drain hose and the sink or garbage disposal inlet, ensuring a secure and watertight connection. To attach the drain hose using a hose connector, follow these steps:
- Slide the hose connector onto the end of the drain hose, ensuring a snug fit.
- Push the hose connector onto the sink or garbage disposal inlet until it is fully seated.
- If necessary, tighten any clamps or screws provided with the hose connector to secure it in place.
- Check for any visible gaps or leaks around the connection point and adjust the hose connector if needed.
Securing the Connection with a Hose Clamp
After attaching the drain hose to the sink or garbage disposal using a hose connector, it is important to secure the connection with a hose clamp. A hose clamp provides additional stability and prevents the hose from detaching or leaking. To secure the connection with a hose clamp, follow these steps:
- Position the hose clamp over the hose and connection point.
- Tighten the hose clamp using a screwdriver or wrench until it is securely fastened.
- Ensure that the hose clamp is tightened enough to create a watertight seal, but not so tight that it causes damage or deformation to the hose or connection point.
- Inspect the connection for any signs of leakage and make adjustments to the hose clamp if necessary.
By following these steps, you can successfully connect the drain hose of your dishwasher to either the sink or garbage disposal. Remember to double-check all connections for leaks or gaps before running your dishwasher to ensure optimal performance and avoid potential water damage. Now that you’ve completed this essential step, you are one step closer to enjoying the convenience of a fully functional dishwasher in your kitchen.
Testing The Drain Hose Installation
After successfully installing the dishwasher drain hose, it’s important to test the installation to ensure it functions correctly and there are no leaks or issues. This step will give you peace of mind knowing that your dishwasher will effectively remove wastewater without causing any damage or inconvenience. Below are the key steps to testing the drain hose installation:
Restoring power and water supply
Before running a dishwasher cycle to test the drain hose, make sure to restore the power and water supply to your dishwasher. Ensure that the electrical connection is securely plugged in and any shut-off valves are fully open, allowing water to flow into the appliance. Double-check these connections to prevent any potential malfunctions during the testing process.
Running a dishwasher cycle to check for leaks or issues
Once the power and water supply are restored, run a dishwasher cycle to check for any leaks or other potential issues with the drain hose installation. Here’s how to do that:
- Start by loading your dishwasher with a few dishes or bowls.
- Close the dishwasher door and select a regular or normal cycle.
- Allow the dishwasher to go through the entire cycle.
- While the dishwasher is running, closely observe the drain hose to ensure that no water is leaking from the connections or any other areas.
- If you notice any leaks, stop the dishwasher immediately and check for any loose connections or damaged parts. Tighten or replace them as necessary.
- If there are no leaks present during the cycle, the drain hose installation is successful!
By taking the time to test the drain hose installation, you can catch any potential issues early on and address them before they cause further problems. This not only ensures that your dishwasher operates smoothly but also helps prolong its lifespan by preventing water damage or leaks.
Leak Detection And Prevention
When installing a dishwasher drain hose, it is essential to properly detect and prevent leaks. A leaking dishwasher can cause water damage to your kitchen floors and cabinets, leading to costly repairs. By following these steps and properly securing the hose clamps, you can ensure that your dishwasher operates efficiently without any leaks.
Identifying potential causes of leaks
Before installing the dishwasher drain hose, it is important to identify potential causes of leaks. This will help you address any existing issues and prevent future leaks. Here are some common causes to look out for:
- Worn or damaged hose: Check the condition of the dishwasher drain hose for any signs of wear or damage. This includes cracks, splits, or deterioration. If you notice any issues, replace the hose before installation.
- Loose connections: Inspect all connections between the dishwasher and the drain hose. Ensure that they are tightly secured and there are no loose or disconnected parts.
- Incorrect positioning: Improper positioning of the dishwasher drain hose can lead to leaks. Make sure that the hose is not kinked, twisted, or bent. It should be positioned in a way that allows smooth water flow.
Properly securing the hose clamps to prevent leaks
One of the crucial steps in preventing leaks is to properly secure the hose clamps. These clamps ensure a tight connection between the drain hose and the disposal or drainpipe. Follow these steps to secure the hose clamps effectively:
- Place the dishwasher drain hose onto the disposal with the open end facing the disposal or drainpipe. Ensure that it fits securely.
- Slide a hose clamp over the end of the drain hose, positioning it about 1 inch from the end.
- Tighten the hose clamp with a screwdriver or a wrench until it is snug. Make sure not to overtighten, as it could damage the hose.
- Repeat the process for any additional connections, such as the connection between the drain hose and the air gap or the drainpipe.
- After securing all the hose clamps, double-check each connection to ensure there are no leaks or loose fittings.
By taking the necessary precautions and properly securing the hose clamps, you can greatly reduce the risk of leaks in your dishwasher drain hose installation. This will help you maintain a functional and leak-free dishwasher that effectively removes wastewater without causing any damage to your kitchen.
Ensuring Proper Drainage
Proper drainage is essential for your dishwasher to function efficiently and effectively. If the drain hose is not installed correctly or is blocked, it can lead to water backup and potential damage to your dishwasher and surrounding areas. In this section, we will guide you on how to ensure proper drainage by checking for clogs or blockages in the drain hose and adjusting the hose alignment for optimal drainage.
Checking for clogs or blockages in the drain hose
To ensure proper drainage, it is crucial to check the drain hose for any clogs or blockages. Here’s a simple step-by-step process you can follow:
- Start by disconnecting the dishwasher from its power source and turning off the water supply. Safety should always be a priority.
- Locate the drain hose, which is usually attached to the back of the dishwasher.
- Inspect the hose for any visible obstructions, such as food debris or mineral build-up. If you notice any blockages, remove them using a pipe cleaner or a long, flexible brush.
- Next, detach the drain hose from the sink drain or garbage disposal. Place a bucket or a towel beneath to catch any water that may spill out.
- Flush the detached hose with warm water to clear any remaining debris. You can use a gentle stream of water or a handheld sprayer to ensure thorough cleaning.
- Once the hose is clean, reattach it securely to the sink drain or garbage disposal. Make sure it is tightly fitted to prevent any leakage.
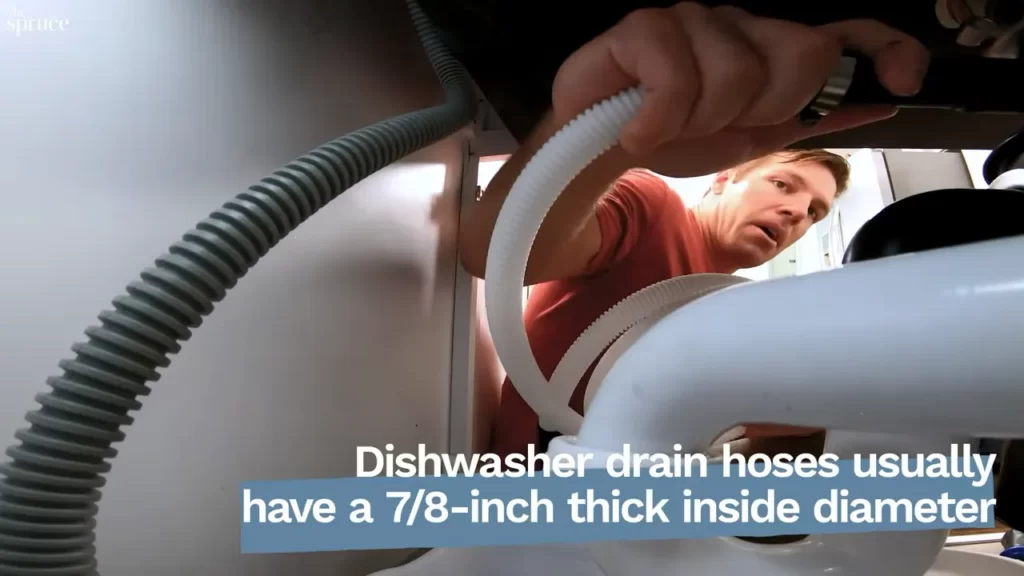
Adjusting the hose alignment for optimal drainage
In addition to checking for clogs, it is essential to ensure the proper alignment of the drain hose to optimize drainage. Follow these steps to adjust the hose alignment:
- Start by moving the dishwasher away from the wall to gain access to the back.
- Examine the drain hose to see if it is bent or kinked. These bends and kinks can restrict the flow of water and affect drainage.
- If you notice any bends or kinks, carefully straighten the hose. Avoid sharp bends that may cause stress on the hose or reduce water flow.
- Ensure that the hose has a slight downward slope, leading towards the sink drain or garbage disposal. This angle allows gravity to assist in the smooth drainage of water.
- Once you have adjusted the hose alignment, push the dishwasher back against the wall, ensuring that the hose is not pinched or twisted.
By following these steps to check for clogs or blockages in the drain hose and adjust the hose alignment for optimal drainage, you can ensure the proper functioning of your dishwasher and prevent any potential issues. Maintaining a clear and unobstructed drain hose will help your dishwasher run smoothly, allowing you to enjoy clean dishes without any worries.
Dealing With Noise Or Vibration
Addressing excess noise or vibration during dishwasher operation
Is your dishwasher making a racket during its cycles? Do you find it irritating when you can hear the vibration from the dishwasher throughout your entire kitchen? Excessive noise or vibration during dishwasher operation can be a common issue that many homeowners face. But don’t worry, because there are simple steps you can take to address this problem and enjoy a quieter and smoother dishwasher experience.
Securing the drain hose to reduce movement and noise
One of the main culprits of excess noise and vibration in a dishwasher is a loose or improperly secured drain hose. The drain hose is responsible for carrying wastewater out of your dishwasher and into the drainage system. When it is not secured properly, it can move around during the dishwasher’s operation, causing noise and vibration.
To secure the drain hose and minimize movement, follow these easy steps:
- Turn off the power: Before you start working on your dishwasher, always ensure it is powered off and disconnected from the electrical supply to avoid any accidents.
- Access the drain hose: Locate the drain hose at the back of your dishwasher. It is usually connected to a drain pump or the sink’s drainpipe. Carefully remove any clips or clamps securing the hose.
- Measure and cut: Measure the length of the drain hose and cut a piece of foam insulation or rubber matting slightly longer than the hose.
- Wrap and secure: Wrap the foam insulation or rubber matting tightly around the drain hose, starting from the connection point and moving towards the wall or cabinet. Use zip ties or wire to secure the insulation in place. This will help absorb vibrations and reduce movement.
- Reconnect and test: Reattach the drain hose to the dishwasher and secure it with clips or clamps. Ensure everything is tightly connected. Once done, turn on the power and run a test cycle to check if the noise and vibrations have been minimized.
By following these simple steps, you can effectively secure the drain hose of your dishwasher, minimizing movement and reducing noise and vibration during operation.
Remember, a properly secured drain hose not only improves the performance of your dishwasher but also prevents potential leaks and avoids damage to your kitchen cabinets or flooring. So, invest a little time into this simple fix and enjoy a quieter and more peaceful kitchen environment.
Frequently Asked Questions
How Should A Dishwasher Drain Hose Be Installed?
To install a dishwasher drain hose, first, connect it to the dishwasher’s drain outlet. Then, secure it by attaching a hose clamp. Next, route the hose to the sink drain or garbage disposal unit, ensuring there are no kinks or bends.
Finally, secure the hose at the sink or disposal unit, again using a hose clamp.
Does A Dishwasher Drain Hose Need A Loop?
Yes, a dishwasher drain hose needs a loop. The loop prevents water from flowing back into the dishwasher and protects against clogs. Make sure to create a loop higher than the dishwasher drain connection for effective drainage.
Where Do You Cut Hole For Dishwasher Drain Hose?
Cut a hole for the dishwasher drain hose in the sink cabinet, near the sink’s drain pipe. This allows the hose to be connected for effective drainage.
Do Dishwashers Come With Drain Hose Attached?
Yes, dishwashers usually come with a drain hose already attached.
Conclusion
To sum it up, installing a dishwasher drain hose may seem like a daunting task, but with the right steps and tools, it can be successfully accomplished. By following the guidelines in this blog post, you can ensure a proper installation that promotes efficient drainage and prevents any potential leaks or clogs.
Remember to always refer to your dishwasher’s manufacturer manual for specific instructions. With a little patience and attention to detail, you’ll have your dishwasher up and running in no time. Happy dishwashing!