
To install a curbless shower, first, remove the existing flooring and prepare the subfloor. Then, install the shower pan, waterproof the area, and lay the new tiles or flooring.
Benefits Of A Curbless Shower
Installing a curbless shower in your bathroom can bring numerous advantages. Not only does it enhance the accessibility for all users, but it also showcases a modern and sleek design. Furthermore, a curbless shower offers easy maintenance and cleaning, making it a practical and attractive choice for any bathroom. Let’s delve into each of these benefits in detail:
Enhanced accessibility for all users
A curbless shower is designed to provide accessible bathing for people of all ages and abilities. Without the need to step over a raised curb or threshold, it offers a safer and more convenient shower experience. This feature is particularly beneficial for individuals with mobility challenges, such as the elderly or those with disabilities.
Modern and sleek design
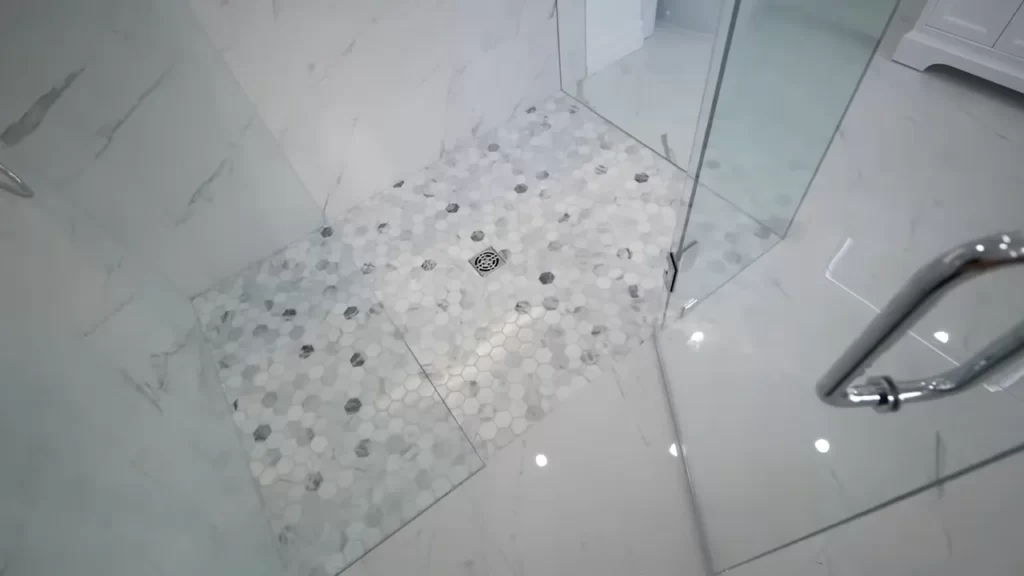
The aesthetic appeal of a curbless shower cannot be understated. By eliminating the traditional shower curb, it creates a seamless transition between the shower area and the rest of the bathroom, resulting in a sleek and modern look. This contemporary design not only enhances the overall appearance of the bathroom but also adds value to your home.
Easy maintenance and cleaning
Keeping your bathroom clean and tidy becomes a breeze with a curbless shower. Without the presence of a curb, there are no edges or corners to trap dirt, grime, or soap scum. This means less time and effort spent on scrubbing and more time to relax and enjoy your shower. Additionally, the absence of a shower curb reduces the risk of water leakage, ensuring a dry and clean bathroom floor.
Factors To Consider Before Installation
Before installing a curbless shower in your bathroom, there are several important factors you need to consider. These factors will not only ensure that the installation process goes smoothly but also guarantee a safe and functional shower space that meets your specific needs. By assessing available space and bathroom layout, ensuring proper drainage and waterproofing, and understanding local building codes and regulations, you can make informed decisions and achieve the shower of your dreams.
Assessing Available Space and Bathroom Layout
To begin with, it is crucial to assess the available space and the layout of your bathroom. This step will help you determine whether a curbless shower is a feasible option for your specific bathroom design. Take accurate measurements of the floor space and identify any obstacles or barriers that may hinder the installation process. Consider factors such as the location of existing plumbing and electrical lines, as well as any structural limitations. By thoroughly evaluating the space and layout, you can identify any modifications or adjustments that may be required in order to accommodate the curbless shower.
Ensuring Proper Drainage and Waterproofing
Drainage and waterproofing are integral components of a successful curbless shower installation. It is essential to ensure that your shower space is properly waterproofed to prevent any water leakage or potential damage to the surrounding areas. This can be achieved through the use of high-quality waterproofing materials and techniques. Additionally, proper drainage is crucial to ensure efficient water flow and prevent any pooling or stagnant water in and around the shower area. Consider installing a linear drain system that will effectively collect and redirect water, ensuring a safe and slip-resistant shower experience.
Understanding Local Building Codes and Regulations
Before proceeding with any installation, it is important to understand and comply with the local building codes and regulations in your area. These codes are in place to ensure the safety and structural integrity of the building. Familiarize yourself with the requirements regarding shower installation, including the necessary permits and inspections required. Adhering to these regulations not only ensures the legality of your project but also gives you the peace of mind that your curbless shower is installed to the highest standard and in accordance with industry guidelines.
In conclusion, before embarking on a curbless shower installation, be sure to assess the available space and bathroom layout, ensure proper drainage and waterproofing, and understand the local building codes and regulations. These factors will ensure a successful and hassle-free installation process, resulting in a functional and visually pleasing curbless shower that meets your specific needs. With proper planning and careful consideration, you can transform your bathroom into a luxurious and accessible sanctuary.
Measuring And Marking The Shower Area
When it comes to installing a curbless shower, taking accurate measurements and marking the shower area correctly is crucial. This ensures that your shower will fit seamlessly into the space and that water will drain properly, preventing any potential leaks or water damage.
Determining the desired shower size
The first step in measuring and marking the shower area is determining the desired size of your curbless shower. Consider how much space you have available in your bathroom and how you want the shower to fit into the overall layout. Measure the width and depth of the area where the shower will be installed to get an idea of the dimensions you’ll be working with.
Marking the shower area on the floor
Once you have determined the desired size of your curbless shower, it’s time to mark the area on the floor. Start by using a tape measure to measure out the dimensions you calculated earlier. Use painter’s tape or masking tape to mark the outline of the shower area directly on the floor. This will serve as a guide during the installation process and ensure that the shower is positioned correctly.
Considering slope requirements for proper drainage
Proper drainage is essential in a curbless shower to prevent water from pooling or flowing outside of the designated shower area. When marking the shower area on the floor, it’s important to consider the slope requirements for proper drainage. The shower floor should have a slight slope towards the drain to ensure that water is effectively directed towards the drain and does not collect in any one spot.
To achieve the necessary slope, you may need to use leveling compounds or mortar to build up the floor in certain areas. It is important to follow the manufacturer’s instructions for the specific products you are using and use a level to ensure that the floor is properly sloped.
By carefully measuring and marking the shower area, taking into account the desired size and slope requirements, you are setting the foundation for a successful installation of your curbless shower. This attention to detail will ensure that your shower not only looks great but also functions properly, providing you with a safe and enjoyable bathing experience.
Gathering The Necessary Tools And Materials
Before starting the installation of a curbless shower, it is essential to gather all the necessary tools and materials. Having everything prepared beforehand will save you time and ensure a smooth installation process. Below, you will find a list of essential tools, required materials, and safety equipment to make your curbless shower installation project a success.
List of essential tools for the installation
Having the right tools is crucial for any installation project. Here is a list of essential tools needed for installing a curbless shower:
| Tools |
|---|
| Measuring tape |
| Level |
| Trowel |
| Notched trowel |
| Rubber float |
| Tile spacers |
| Tile cutter |
| Grout float |
| Mixing bucket |
| Drill |
| Hammer |
| Screwdriver |
| Pliers |
Required materials for the installation
Along with the tools, you will need specific materials to ensure a proper curbless shower installation. Here is a list of the required materials:
- Waterproofing membrane
- Tiles
- Grout
- Adhesive
- Shower pan
- Shower drain
- Backer board
- Shower curb
- Sealant
Safety equipment for the installation process
Ensuring your safety during the installation process is paramount. Make sure to use the following safety equipment:
- Protective gloves
- Safety goggles
- Dust mask
- Knee pads
By gathering the necessary tools and materials and using the appropriate safety equipment, you will be fully prepared to tackle the installation of a curbless shower. This will ensure a successful outcome and a shower that will enhance both the beauty and accessibility of your bathroom.
Removing Existing Shower Components
Removing existing shower components is the first step of installing a curbless shower. It involves disconnecting old fixtures, such as shower doors and base, demolishing the existing shower curb (if applicable), and properly disposing of debris while ensuring the area is clean and ready for the installation process.
Disconnecting and removing old fixtures, including shower doors and base
Before installing a curbless shower, it is essential to disconnect and remove any old fixtures that may obstruct the installation process. This includes shower doors, as well as the shower base if necessary. Follow these steps to successfully remove these components:
- Start by turning off the water supply to the shower. Locate the shut-off valves connected to the shower and turn them clockwise until they are fully closed.
- Use a wrench to loosen and detach the shower head from the shower arm. Ensure that the water supply is fully turned off before proceeding.
- Next, remove any screws or fasteners securing the shower doors. Use a screwdriver or appropriate tool to accomplish this.
- Gently lift and remove the shower doors from their tracks. Be careful during this step to avoid any damage to the surrounding walls or glass panels.
- Inspect the shower base for any screws or adhesive holding it in place. Remove these fasteners using the appropriate tools.
- With all the screws or adhesive removed, carefully lift and remove the shower base from its position. Dispose of the base properly.
Demolishing the existing shower curb, if applicable
If your existing shower has a curb, you will need to demolish it to create a curbless shower. Follow these steps to remove the shower curb:
- Using a hammer and chisel, create a starting point by breaking the top layer of tiles on the shower curb.
- Continue breaking the tiles along the length of the shower curb until the entire top layer is removed.
- Once the top layer of tiles is gone, use a hammer and pry bar to remove the underlying material, such as cement or mortar, that is holding the curb in place.
- After successfully demolishing the shower curb, dispose of the debris properly and clean the area thoroughly, removing any loose tiles, cement, or mortar.
Properly disposing of debris and cleaning the area
After removing old fixtures and demolishing the shower curb, it is crucial to properly dispose of debris and ensure the area is clean for the installation process. Follow these guidelines:
- Collect and bag all the debris, including tiles, shower base, and any other materials from the old shower. Double-check that no hazardous or non-recyclable materials are included.
- Dispose of the debris in accordance with local regulations and guidelines. Contact your local waste management authorities if you are unsure of the proper disposal methods.
- Vacuum or sweep the area to remove any remaining dust, debris, or loose particles.
- Use a damp cloth and mild cleaning solution to clean the walls and floor where the old fixtures and curb were located. Make sure to eliminate any traces of grime or dirt.
- Allow the area to dry completely before proceeding with the curbless shower installation.
By following these steps for removing existing shower components, you can ensure a clean and clear canvas for installing your new curbless shower. Remember to take care with each step, disposing of debris responsibly, and preparing the area adequately for a successful installation.
Installing The Waterproofing Membrane
When it comes to installing a curbless shower, one of the most important steps is applying the waterproofing membrane. This ensures that your shower area remains water-tight and prevents any potential leaks or water damage. In this section, we will guide you through the process of preparing the shower area, applying the waterproofing membrane to the walls and floor, and ensuring proper seals and overlaps for complete waterproofing.
Preparing the shower area for waterproofing
Before applying the waterproofing membrane, it is crucial to properly prepare the shower area. Here are the steps you need to follow:
- Remove any existing tiles or flooring in the shower area.
- Smooth out the surface by filling any cracks or uneven areas with a suitable filler compound.
- Ensure that the surface is clean and free from any dust, debris, or oil that may affect the adhesion of the waterproofing membrane.
- If you have a concrete subfloor, make sure it is structurally sound and free from any moisture.
- If necessary, apply a primer to promote better adhesion between the subfloor and the waterproofing membrane.
Applying the waterproofing membrane to the walls and floor
Once the shower area is properly prepared, it’s time to apply the waterproofing membrane. Follow these steps:
- Start by measuring and cutting the waterproofing membrane according to the size of your shower area, ensuring an overlap of at least 2 inches at joints and corners.
- Using a suitable adhesive, apply the membrane to the walls and floor, working from the bottom up.
- Smooth out the membrane as you go to remove any air bubbles or wrinkles.
- Ensure that the membrane is securely adhered to the surface, using a roller or a trowel to press it firmly.
- Trim any excess membrane using a utility knife.
Ensuring proper seals and overlaps for complete waterproofing
To ensure complete waterproofing, it is necessary to pay attention to seals and overlaps. Here are some key points to remember:
- Apply a bead of waterproofing sealant along all edges, corners, and joints of the waterproofing membrane.
- Ensure that there is a proper overlap between adjacent sections of the membrane, using an adhesive to secure the overlap.
- Seal any penetrations or areas where the membrane meets fixtures such as drains or showerheads.
- Inspect the entire waterproofing membrane for any gaps, tears, or inconsistencies, and patch them up as needed.
By following these steps and ensuring proper seals and overlaps, you can achieve complete waterproofing for your curbless shower. This will not only provide peace of mind but also extend the lifespan of your shower area.
Installing The Shower Drain
When it comes to installing a curbless shower, one of the most crucial steps is properly installing the shower drain. A properly installed drain ensures that water flows smoothly into the drainage system, preventing any water damage and creating a safe and functional shower space. In this section, we will guide you through the process of installing the shower drain, starting with choosing the appropriate drain type and location.
Choosing the Appropriate Drain Type and Location
Before you begin installing the shower drain, it is essential to choose the appropriate drain type and location. The drain type you choose depends on various factors such as the shower design, personal preferences, and the existing plumbing system. There are different drain types available, including linear, point, and trench drains, each with its own advantages.
When selecting the drain location, consider the slope of the shower floor, the position of the existing plumbing system, and the accessibility. Generally, it is recommended to install the drain towards the edge of the shower area to ensure efficient water drainage. Take into account the location of the bathroom drainpipe and plan accordingly, ensuring that the shower drain aligns with the existing plumbing system.
Connecting the Drain Pipe to the Existing Plumbing System
Once you have chosen the appropriate drain type and location, the next step is connecting the drain pipe to the existing plumbing system. This step requires careful attention to detail to ensure a proper and secure connection. Before beginning the installation, gather the necessary tools and materials, including PVC pipes, couplings, and adhesive.
Start by measuring and cutting the drain pipe to the appropriate length. It is crucial to ensure precise measurements and accurate cutting to achieve a tight fit. Next, use an adhesive to connect the drain pipe to the existing plumbing system. Apply the adhesive to both ends of the drain pipe and the connection point, and then firmly connect the two using a coupling.
Testing for Proper Drainage and Making Necessary Adjustments
After connecting the drain pipe, it is imperative to test for proper drainage and make necessary adjustments if needed. A flawless drainage system is essential to avoid stagnant water and potential leaks. To test for proper drainage, pour a small amount of water into the shower base and observe how it flows towards the drain.
If you notice any issues such as slow drainage or water pooling in certain areas, adjustments may be required. Consider checking the slope of the shower floor, ensuring it directs water towards the drain. Additionally, inspect the connection points for any potential leaks or loose fittings. Making these necessary adjustments guarantees optimal functionality and peace of mind.
In conclusion, installing the shower drain is a crucial step in creating a curbless shower. By choosing the appropriate drain type and location, connecting the drain pipe to the existing plumbing system, and testing for proper drainage, you can ensure a safe and efficient shower space. Remember to carefully follow the installation process and make any necessary adjustments to achieve a flawless drainage system.
Creating A Sloped Subfloor
When it comes to installing a curbless shower, one of the most important steps is creating a sloped subfloor. This is essential for proper water drainage and to prevent any pooling or water damage. In this article, we will guide you through the process of installing a sloped subfloor for your curbless shower. Follow these steps to ensure a successful installation.
Installing the Subfloor Material
The first step in creating a sloped subfloor is choosing and installing the right subfloor material. It is recommended to use a waterproof material such as cement board or a pre-sloped shower pan. Here are the steps to install the subfloor material:
- Clean the existing subfloor and remove any debris or old flooring.
- Measure and cut the subfloor material according to the dimensions of your shower area.
- Start by installing the subfloor material at the outer edges of the shower area.
- Secure the subfloor material using screws or nails, ensuring a tight fit.
By following these steps, you will have a solid foundation for your curbless shower.
Building the Slope for Proper Water Drainage
Once the subfloor material is installed, the next step is to build the slope for proper water drainage. This is crucial to ensure that the water flows towards the drain and does not accumulate on the floor. Here is how you can build the slope:
- Mark the location of the drain on the subfloor material.
- Measure and mark the desired slope angle. A slope of 1/4 inch per foot is commonly recommended.
- Use a slope guide or a long straight edge to create a gradual slope from the outer edges towards the drain.
- Secure the slope guide in place and use it as a guide to apply a self-leveling compound or mortar mix to build the slope.
It is important to follow the manufacturer’s instructions when using self-leveling compound or mortar mix. Once the slope is built, allow it to dry and cure according to the recommended time.
Checking the Slope Using a Level or Measuring Tools
After building the slope, it is crucial to check its accuracy using a level or measuring tools. This step ensures that the slope is consistent and effective in draining the water towards the drain. Follow these steps to check the slope:
- Place a level or measuring tool on different areas of the sloped subfloor, including the outer edges and near the drain.
- Check if the bubble is centered on the level or if the measurements indicate the desired slope.
- Make any necessary adjustments by adding or removing the self-leveling compound or mortar mix.
- Repeat the checking process until the slope is accurate and meets the recommended slope angle.
By ensuring the slope is correct, you can be confident in the proper drainage of your curbless shower.
Creating a sloped subfloor is an essential step in installing a curbless shower. By following the steps mentioned above, you can ensure a sturdy and water-efficient foundation for your shower. Remember, precision and accuracy are key to a successful installation. Now that you have learned how to create a sloped subfloor, you are one step closer to enjoying your new curbless shower.
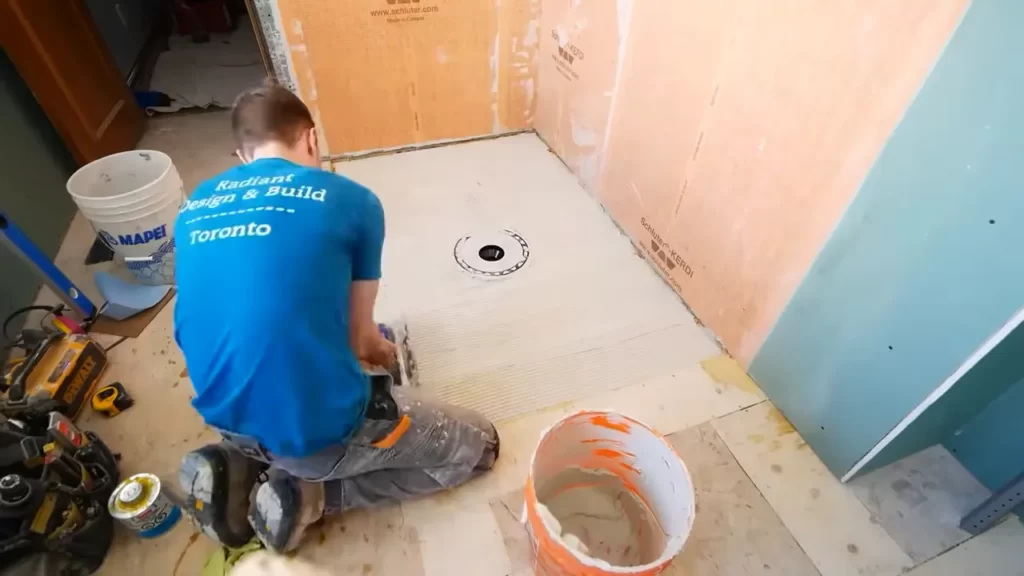
Installing The Shower Pan And Mortar Bed
When it comes to installing a curbless shower, one of the most crucial steps is the installation of the shower pan and mortar bed. The shower pan is responsible for collecting and draining the water, while the mortar bed provides stability and support for the shower base. In this section, we will take you through the process of placing the shower pan liner over the subfloor, constructing the mortar bed, and shaping it for optimum stability. Let’s get started!
Placing the shower pan liner over the subfloor
The shower pan liner acts as a waterproof barrier, preventing any leaks or water damage. It is crucial to correctly position and secure the liner to ensure its effectiveness. Here’s how you can place the shower pan liner over the subfloor:
- Start by cleaning and preparing the subfloor surface. Ensure that it is smooth, level, and free from any debris.
- Place the shower pan liner over the subfloor, ensuring it covers the entire shower area.
- Smooth out any wrinkles or folds in the liner to prevent potential leaks.
- Using a staple gun or another suitable fastening method, secure the liner to the subfloor, making sure it is taut and well-attached.
Constructing the mortar bed to support the shower base
The mortar bed is responsible for providing a stable and level surface to support the shower base. Here’s how you can construct the mortar bed:
- Mix the mortar according to the manufacturer’s instructions. Make sure it has the right consistency, similar to thick oatmeal.
- Spread a layer of mortar evenly over the shower pan liner. Start from the outer edges and work towards the drain.
- Use a trowel to create a gentle slope towards the drain, allowing proper water drainage.
- Continue adding mortar, smoothing it out with the trowel, and shaping it to match the desired slope and contour.
Smoothing and shaping the mortar bed for stability
Properly shaping and smoothing the mortar bed is crucial to ensure stability and support for the shower base. Follow these steps for a smooth and stable mortar bed:
- Once you have shaped the mortar bed, use a straightedge or level to check for any uneven areas.
- Add or remove mortar as needed to achieve a level surface.
- Smooth the surface of the mortar bed using a trowel or float, ensuring it is flat and even.
- Pay extra attention to the edges and corners, making sure they are well-shaped and free from any sharp angles.
By following these steps to place the shower pan liner and construct the mortar bed, you will be one step closer to achieving a properly installed curbless shower. This solid foundation will ensure the stability, durability, and functionality of your shower for years to come.
Finishing The Shower Base
Once the curbless shower base has been properly constructed, it’s time to focus on the finishing touches. This includes installing the tile backer board, applying thinset mortar and setting the tiles, and grouting the tiles to ensure water resistance and a seamless appearance. Follow these steps carefully to achieve a professional-looking curbless shower.
Installing the tile backer board over the mortar bed
Before you can start tiling the shower base, you need to install the tile backer board over the mortar bed. This board provides a stable, waterproof surface for the tiles to adhere to. Here’s how to do it:
- Clean the mortar bed thoroughly, ensuring it is free from debris and dust.
- Cut the tile backer board to the appropriate size using a circular saw or a utility knife.
- Apply a layer of thinset mortar to the mortar bed using a trowel, creating an even and thin coat.
- Place the tile backer board onto the thinset mortar, pressing it firmly to ensure good adhesion.
- Secure the backer board to the mortar bed using screws or nails, spaced evenly across the surface.
- Allow the mortar to cure according to the manufacturer’s instructions before proceeding to the next steps.
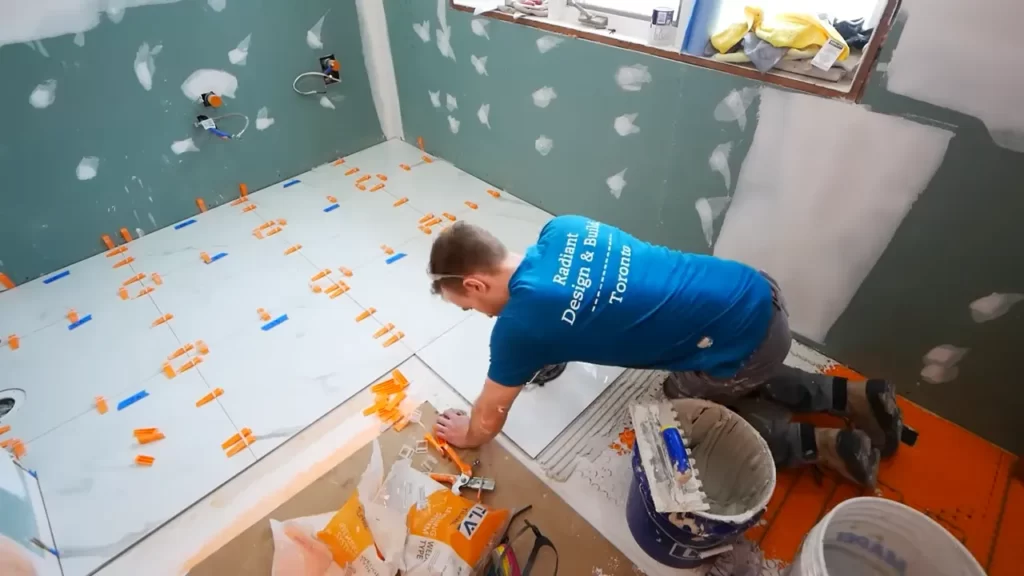
Applying thinset mortar and setting the tiles
Once the tile backer board is in place, it’s time to apply thinset mortar and set the tiles. This process requires precision and attention to detail. Here’s how to do it:
- Mix the thinset mortar according to the manufacturer’s instructions. The consistency should be similar to peanut butter.
- Using a notched trowel, apply a layer of thinset mortar to a small section of the backer board, ensuring the grooves of the trowel create a comb-like pattern.
- Place the tiles onto the thinset mortar, pressing them firmly and evenly to ensure proper adhesion.
- Use tile spacers to maintain consistent spacing between the tiles.
- Continue applying thinset mortar and setting tiles in small sections until the entire shower base is covered.
- Allow the thinset mortar to dry completely before proceeding to the next steps.
Grouting the tiles and sealing the base for water resistance
Once the tiles are firmly set, it’s time to grout the joints and seal the base for water resistance. This final step ensures that your curbless shower is not only aesthetically pleasing but functional as well. Follow these steps to complete the installation:
- Mix the grout according to the manufacturer’s instructions, making sure it reaches a consistency similar to toothpaste.
- Using a grout float, apply the grout to the joints between the tiles, working at a 45-degree angle to ensure full coverage.
- Remove excess grout from the tiles using a damp sponge, being careful not to remove too much grout from the joints.
- Allow the grout to dry for the specified time mentioned by the manufacturer.
- Once the grout is fully dried, apply a sealer to the tiles and base to prevent water infiltration and maintain cleanliness.
- Follow the sealer manufacturer’s instructions for application and drying time.
By following these steps, you can successfully finish your curbless shower base, creating a stunning and functional space within your bathroom. Remember to take your time, double-check your measurements, and seek professional help if needed. Enjoy the satisfaction of a well-installed curbless shower that will serve you for years to come.
Installing Shower Fixtures And Accessories
Once you have completed the main steps of installing a curbless shower, it’s time to focus on installing your shower fixtures and accessories. This step is essential in transforming your shower into a functional and comfortable space. In this section, we will cover how to connect the shower valve and plumbing fixtures, install the showerhead, handheld shower, and other accessories, and test all fixtures for proper functionality.
Connecting the shower valve and plumbing fixtures
Connecting the shower valve and plumbing fixtures is a vital part of the installation process. Follow the steps below to ensure a proper connection:
- Begin by attaching the shower valve according to the manufacturer’s instructions. Use a wrench to securely tighten all connections.
- Next, connect the hot and cold water supply lines to the valve. Make sure to use appropriate fittings and sealant to prevent any leaks.
- Attach any additional plumbing fixtures, such as a diverter valve or body jets, if desired. Again, refer to the manufacturer’s instructions for proper installation.
Installing showerhead, handheld shower, and other accessories
Installing the showerhead, handheld shower, and other accessories will complete the look and functionality of your shower. Follow these steps:
- Start by installing the shower arm onto the shower valve. Apply plumber’s tape to the threaded end to ensure a watertight seal.
- Attach the showerhead to the shower arm and tighten it using your hand. Avoid overtightening, as it can damage the fixtures.
- If you are installing a handheld shower, mount the holder onto the wall within easy reach. Connect the hose to the handheld shower and the diverter valve, if applicable.
- Install any other accessories you have, such as soap dishes or shelves, according to the manufacturer’s instructions.
Testing all fixtures for proper functionality and water flow
After the installation, it is crucial to test all your fixtures for proper functionality and water flow. Here’s how you can do it:
- Turn on the water supply and check for any leaks around the connections. If you find any, tighten the fittings or use plumber’s tape to create a watertight seal.
- Test the showerhead, handheld shower, and any other fixtures individually to ensure they are producing the desired water flow. Adjust the settings if necessary.
- Check the water temperature by turning on the hot and cold water separately. Make any necessary adjustments to the valve to achieve the desired temperature.
- Inspect the drainage to ensure water is properly flowing out of the shower area. Clean any debris that may be blocking the drain.
By following these steps and testing all your fixtures, you can ensure that your curbless shower is fully functional and ready to use. Take the time to double-check all connections and make any necessary adjustments before enjoying your new showering experience.
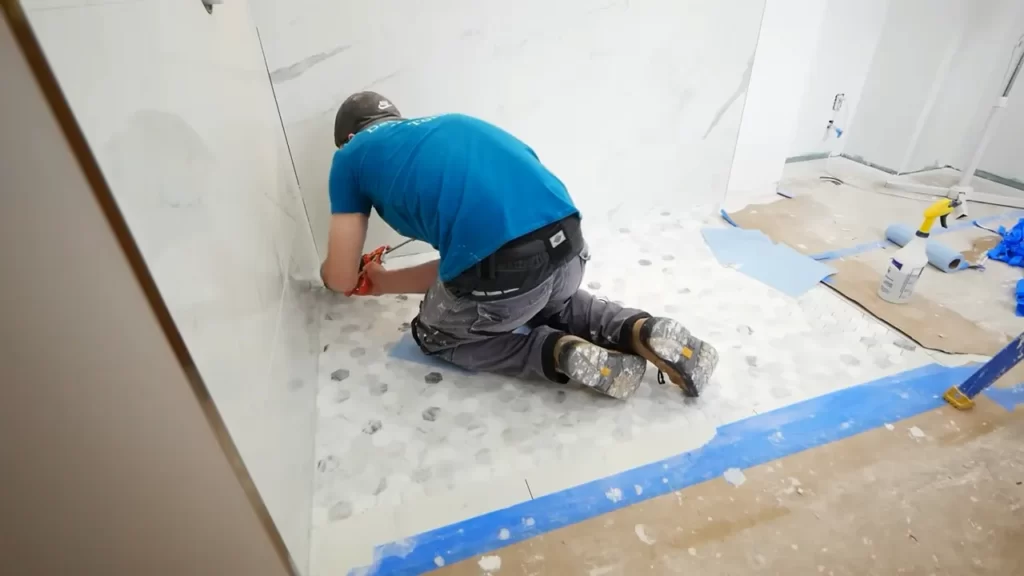
Applying Final Sealant And Caulking
Applying the final sealant and caulking is a crucial step in the installation of a curbless shower. It ensures a watertight seal and prevents moisture penetration, keeping your shower area clean and dry. In this section, we will discuss how to properly apply the sealant and caulking along tile edges and joints.
Applying sealant and caulking along tile edges and joints
When it comes to applying sealant and caulking along the tile edges and joints of your curbless shower, attention to detail is paramount. Here are the steps to follow:
- Clean the tile surfaces thoroughly using a mild detergent. This will remove any dirt, grease, or debris that could prevent the sealant from adhering properly.
- Dry the tile surfaces completely before applying the sealant. Moisture can compromise the integrity of the sealant and caulking, so ensure the tiles are completely dry.
- Choose a high-quality silicone or acrylic-based sealant that is specifically designed for damp areas. These types of sealants are more resistant to water and will provide a longer-lasting seal.
- Using a caulking gun, carefully apply the sealant along the edges and joints of the tiles. Be sure to fill any gaps or cracks to ensure a watertight seal.
- Smooth out the sealant using a caulking tool or your finger. This will help to create a neat and even finish.
- Allow the sealant to cure according to the manufacturer’s instructions before using the shower. This will ensure maximum effectiveness and durability.
Ensuring a watertight seal and preventing moisture penetration
Ensuring a watertight seal and preventing moisture penetration is essential for the longevity of your curbless shower. Here are some additional tips to keep in mind:
- Regularly inspect the sealant and caulking for any signs of wear or damage. If you notice any cracks or gaps, promptly reapply the sealant to maintain a watertight seal.
- Keep the shower area clean and dry. Excess moisture can lead to mold and mildew growth, which can compromise the effectiveness of the sealant.
- Avoid using harsh cleaning agents that can erode the sealant. Instead, use a mild detergent and a soft cloth to clean the tiles and sealant.
- Consider using a shower curtain or glass enclosure to further protect the shower area from moisture.
Cleaning and maintaining the curbless shower regularly
Regular cleaning and maintenance are essential to keep your curbless shower in top condition. Here are some tips to help you maintain your shower:
- Regularly clean the tiles and sealant using a mild detergent and a soft cloth. This will prevent the buildup of soap scum, grime, and mineral deposits.
- Periodically inspect the sealant and caulking for any signs of wear or damage. If necessary, reapply the sealant to maintain its effectiveness.
- Ensure proper ventilation in the bathroom to minimize excess moisture. Use exhaust fans or open windows whenever possible.
- Avoid using abrasive cleaners or scrub brushes that can damage the tiles and sealant. Stick to gentle cleaning methods to preserve the integrity of the shower.
By following these tips, you can ensure a well-sealed curbless shower that will provide years of enjoyment and functionality. Regular cleaning and maintenance will help you avoid costly repairs and keep your shower looking its best.
Cleaning And Preventing Mold And Mildew
One of the key aspects of maintaining a curbless shower is keeping it clean and preventing the growth of mold and mildew. Mold and mildew can not only be unsightly but also pose health risks. In this section, we will discuss some regular cleaning methods and products for the shower area, as well as ways to prevent mold and mildew growth through proper ventilation. We will also address the importance of addressing any signs of damage or leaks promptly.
Regular cleaning methods and products for the shower area
To keep your curbless shower looking sparkling clean, it is important to establish a regular cleaning routine. Here are some effective cleaning methods and products for the shower area:
- Use a mild cleaner: Start by using a mild cleaner specifically formulated for showers. Avoid harsh chemicals as they can damage the shower materials and irritate the skin.
- Scrub gently: With a soft-bristle brush or sponge, gently scrub the shower walls, floor, and fixtures. Pay special attention to any areas that are prone to soap scum or mineral buildup.
- Rinse thoroughly: After scrubbing, make sure to rinse the entire shower area thoroughly to remove any residue from the cleaner.
- Dry completely: After each use, dry the shower area thoroughly, including the walls, floor, and fixtures. This helps prevent the growth of mold and mildew.
Preventing mold and mildew growth through proper ventilation
Proper ventilation is crucial in preventing the growth of mold and mildew in your curbless shower. Here are some tips to ensure proper ventilation:
- Open windows or use an exhaust fan: Whenever possible, open windows or turn on an exhaust fan to allow fresh air to circulate in the bathroom. This helps reduce moisture levels, preventing mold and mildew growth.
- Keep the shower area dry: As mentioned earlier, drying the shower area after each use is essential. Make sure to wipe down any excess water and keep the bathroom adequately ventilated to promote drying.
- Run the exhaust fan after showering: Running the exhaust fan for at least 15 minutes after showering can help remove excess moisture from the air. Remember to close the bathroom door to maximize its effectiveness.
Addressing any signs of damage or leaks promptly
Even with regular cleaning and proper ventilation, damage or leaks can occur in your curbless shower. It is crucial to address any signs of damage or leaks promptly to prevent further issues. Here’s what you should do:
- Inspect the shower area regularly: Keep an eye out for any cracks, loose tiles, or water stains in the shower area. Addressing these signs early can prevent significant damage.
- Fix leaks immediately: If you notice any leaks, whether from the showerhead, faucet, or elsewhere, take immediate action to repair them. Leaks can lead to moisture buildup, which encourages the growth of mold and mildew.
- Consult a professional if needed: For more severe damage or leaks that you are unsure how to fix, it is best to consult a professional plumber or contractor. They have the expertise to address any underlying issues effectively.
By following these cleaning and prevention tips, you can ensure that your curbless shower remains clean, mold-free, and in excellent condition for years to come.
Troubleshooting Common Issues
While curbless showers are sleek and stylish, they’re not without their fair share of potential problems. Luckily, most of these issues can be easily identified and addressed with a little know-how. In this section, we will discuss some common troubleshooting tips to help you overcome any setbacks you may encounter during the installation or maintenance of your curbless shower.
Identifying and Addressing Potential Drainage Problems
Proper drainage is crucial for the functionality of your curbless shower. If you notice any pooling water or slow draining, it’s important to act quickly to prevent any further damage. Here are a few steps you can take to identify and address potential drainage problems:
- Check the slope of the shower floor. It should be slightly angled towards the drain to allow water to flow smoothly. If the slope is inadequate, you may need to remove and re-install the floor tiles to fix the issue.
- Inspect the drain for any debris or clogs. A blocked drain can cause water to back up and lead to overflow. Use a plumber’s snake or a drain cleaning solution to unclog the drain if necessary.
- Consider installing a linear drain system. This can help improve the drainage capacity of your curbless shower, especially if you have a large shower area or experience frequent drainage issues.
Fixing Cracked or Damaged Tiles
Cracked or damaged tiles can not only be an eyesore but also a potential hazard. Here’s how you can fix them:
- Start by removing the grout around the damaged tile using a grout saw or tile nipper.
- Carefully pry out the damaged tile using a tile chisel or putty knife. Be cautious not to damage the surrounding tiles.
- Clean the area thoroughly and apply a thin layer of tile adhesive with a notched trowel.
- Place a new tile in the adhesive, making sure it is level and properly aligned with the surrounding tiles.
- Allow the adhesive to dry completely, then reapply grout in the gaps between the tiles.
Resealing and Recaulking Areas Prone to Water Infiltration
To maintain the waterproof integrity of your curbless shower, it’s essential to regularly reseal and recaulk certain areas. Follow these steps to ensure proper resealing and recaulking:
- Inspect the areas around the shower fixtures, joints, and corners for any signs of deteriorated caulk or worn-out sealant.
- Remove the old caulk using a caulk remover tool or a combination of a utility knife and a putty knife.
- Clean the area thoroughly with a mildew cleaner or a mixture of vinegar and water.
- Apply a new bead of silicone caulk using a caulk gun, taking care to fill any gaps or cracks completely.
- Smooth the caulk with a caulk smoothing tool or your finger, removing any excess and creating a neat finish.
By following these troubleshooting tips, you can overcome common issues that may arise with your curbless shower. Remember, regular maintenance and prompt action are key to ensuring your shower remains functional and leak-free for years to come.
Frequently Asked Questions
Are Curbless Showers Hard To Install?
No, curbless showers are not hard to install. They are a popular choice for many homeowners and can be installed easily by professionals.
What Is The Downside To Curbless Showers?
The downside to curbless showers is that they may require additional waterproofing measures to prevent water leakage. Additionally, without a curb, water may spread beyond the shower area and potentially cause damage to the bathroom floor.
Do You Need A Linear Drain For A Curbless Shower?
Yes, a linear drain is necessary for a curbless shower. It helps with water drainage and prevents flooding by keeping the water contained in one area. Without a linear drain, water may spread throughout the bathroom, causing potential damage.
How Is A Curbless Shower Built?
A curbless shower is built by eliminating the traditional shower curb and creating a seamless transition from the floor to the shower area. This is achieved by using a sloping floor, waterproofing membranes, and a linear drain system to ensure proper drainage.
Conclusion
Installing a curbless shower is a great way to enhance accessibility and add a touch of modernity to your bathroom. With the right tools and following the step-by-step instructions provided in this guide, you can tackle this project successfully. By eliminating the barrier of a traditional shower curb, you can create a seamless and stylish space that is not only visually appealing but also functional for individuals with mobility challenges.
Start transforming your bathroom today and reap the benefits of a curbless shower.