
To install copper pipes, first, measure the length needed, then cut and deburr the pipe. Clean the fittings and pipe ends with a wire brush, flux the ends and fittings, attach them tightly, and finally, solder the joints.
Copper pipes are commonly used in plumbing installations due to their durability, corrosion resistance, and ability to withstand high pressure. Whether you’re a DIY enthusiast or a professional plumber, knowing how to install copper pipes is a valuable skill. The process involves carefully measuring the required length, cutting the pipe precisely, and deburring the edges to ensure a smooth fit.
Before joining the pipe and fittings, it’s essential to clean them thoroughly with a wire brush. Applying flux to the ends and fittings helps create a strong bond, which is then sealed by soldering the joints securely together.
Understanding The Basics Of Copper Pipe
The first step in installing copper pipe is understanding the basics. Copper pipe is a popular choice for plumbing and heating systems due to its durability, corrosion resistance, and heat conductivity. It is also easy to install with the right tools and materials. In this section, we will explore the different types of copper pipe, the benefits of using copper pipe, as well as the tools and materials needed for copper pipe installation.
Different Types of Copper Pipe
There are several different types of copper pipe available, each with its own specific uses and advantages. Understanding the different types will help you determine which one is best for your installation needs. Here are three common types:
| Type | Description |
|---|---|
| Type M | Thinner wall and suitable for low-pressure applications such as residential plumbing. |
| Type L | Thicker wall and suitable for medium to high-pressure applications such as water supply lines. |
| Type K | Thickest wall and suitable for high-pressure applications such as underground water service lines. |
Benefits of Using Copper Pipe
Copper pipe offers several advantages over other piping materials. Here are some key benefits:
- Durability: Copper pipe is highly durable and has a long lifespan, making it a cost-effective choice for plumbing installations.
- Corrosion Resistance: Copper is resistant to corrosion, unlike other metals, which helps to maintain water quality and prevent leaks.
- Heat Conductivity: Copper has excellent heat conductivity, making it ideal for applications such as heating systems and hot water pipes.
- Flexibility: Copper pipe is easy to bend and shape, allowing for flexible installation in tight spaces.
- Recyclability: Copper is a sustainable material that can be recycled and reused, reducing its impact on the environment.
Tools and Materials Needed for Copper Pipe Installation
Before you begin installing copper pipe, it’s important to gather the necessary tools and materials. Here is a list of what you’ll need:
- Copper Pipe: Choose the appropriate type and size of copper pipe for your installation.
- Pipe Cutter: A pipe cutter is used to cut the copper pipe to the desired length.
- Flux: Flux is a chemical compound used to clean and prepare the copper pipe for soldering.
- Solder: Solder is a metal alloy used to join copper pipes together.
- Soldering Torch: A torch is used to heat the copper pipe and melt the solder for a secure connection.
- Emery Cloth: Emery cloth is used to clean the ends of the copper pipe before soldering.
- Pipe Fittings: Pipe fittings such as couplings, elbows, and tees are used to connect and redirect the copper pipe.
- Pipe Wrench: A pipe wrench is used to tighten and secure pipe fittings.
- Measuring Tape: A measuring tape is used to accurately measure the length of copper pipe needed.
By understanding the different types of copper pipe, the benefits of using copper pipe, and the tools and materials needed for installation, you’ll be well-prepared to tackle your copper pipe project with confidence. In the next section, we will walk you through the step-by-step process of installing copper pipe.
Measuring And Preparing The Pipe Lengths
Before you can begin the installation of copper pipes in your plumbing system, it is crucial to measure and prepare the pipe lengths accurately. Proper measurement ensures a precise fit and minimizes the risk of leaks or other issues later on. In this section, we will guide you through the essential steps of measuring, cutting, and deburring the copper pipe.
Measuring the Pipe
The first step in preparing your copper pipe is to accurately measure the length you need. Here’s how to do it:
- Using a tape measure, measure the distance between the two points where the pipe will be installed.
- Ensure the measurement is taken from the center of the fitting on one side to the center of the fitting on the other side.
- Round up the measurement to the nearest inch to avoid cutting the pipe too short.
- Make a clear mark on the pipe at the desired length using a permanent marker.
Cutting the Pipe
Now that you have measured the pipe, it’s time to cut it to the correct length. Follow these steps:
- Place the copper pipe into a pipe cutter, aligning the cutting wheel with the mark you made.
- Tightly grip the pipe cutter and rotate it around the pipe in a clockwise direction.
- Continue rotating the cutter until the pipe is cleanly cut through.
- Remove any burrs or rough edges from the cut end to ensure a smooth fit.
Deburring the Cut Ends
After cutting the pipe, it is important to remove any sharp edges or burrs to prevent damage to the fittings and ensure a proper seal. Here’s how to deburr the cut ends:
- Insert a deburring tool into the cut end of the pipe.
- Gently rotate the tool inside the pipe to remove any burrs or sharp edges.
- Repeat the process on the other cut end of the pipe.
- Inspect both ends to ensure they are smooth and free of debris before proceeding with the installation.
By following these steps to measure and prepare the copper pipe lengths, you will be well on your way to a successful installation. Taking the time to measure accurately, cut cleanly, and deburr the pipe ends will ensure a secure and leak-free connection, providing efficient plumbing for years to come.
Choosing And Installing Fittings For Copper Pipe
When it comes to installing copper pipe, choosing and installing the right fittings is an essential step to ensure a successful and leak-free plumbing system. Fittings play a crucial role in connecting different sections of the pipe, redirecting the flow, and accommodating changes in direction or elevation. In this article, we will explore the different types of fittings available for copper pipe installation, compare soldering and compression fittings, and provide step-by-step instructions for installing fittings correctly.
Types of Fittings
Before diving into the installation process, it’s important to familiarize yourself with the different types of fittings commonly used for copper pipe installations. Here are some of the most commonly used fittings:
| Fitting Type | Description |
|---|---|
| Elbow | A fitting that allows the pipe to change direction by 90 degrees or 45 degrees. |
| Tee | A fitting used to create a branch from the main line, typically at a 90-degree angle. |
| Coupling | A fitting used to join two pieces of pipe together. |
| Reducer | A fitting that allows for a change in pipe diameter, usually from a larger size to a smaller size. |
| Cap | A fitting used to close off the end of a pipe. |
These are just a few examples of the fittings available for copper pipe installations. The specific fittings you’ll need will depend on the configuration and requirements of your plumbing system.
Soldering vs. Compression Fittings
When it comes to connecting copper pipes, you have two main options: soldering and compression fittings. Here’s a breakdown of each method:
- Soldering: Soldering involves heating the fitting and the pipe to create a watertight joint. It requires the use of a torch, flux, and solder. Soldering is a permanent and reliable method, ideal for high-pressure systems.
- Compression Fittings: Compression fittings utilize a compression nut and ring to create a seal between the fitting and the pipe. This method does not require any heat or soldering and is relatively easy to install. Compression fittings are a good option for DIYers and situations where the joint may need to be disassembled in the future.
Ultimately, the choice between soldering and compression fittings depends on the specific requirements of your plumbing project and your level of comfort with each method.
Installing Fittings Correctly
Proper installation of fittings is crucial to ensure a leak-free plumbing system. Follow these steps to install fittings correctly:
- Measure and cut the pipe to the desired length, allowing for a snug fit into the fitting.
- Use a pipe cutter or hacksaw to make a clean, square cut.
- Deburr the cut end of the pipe to remove any rough edges or burrs.
- If using soldering fittings, clean the pipe and fitting surfaces using an emery cloth or sandpaper.
- Apply flux to the pipe and fitting surfaces.
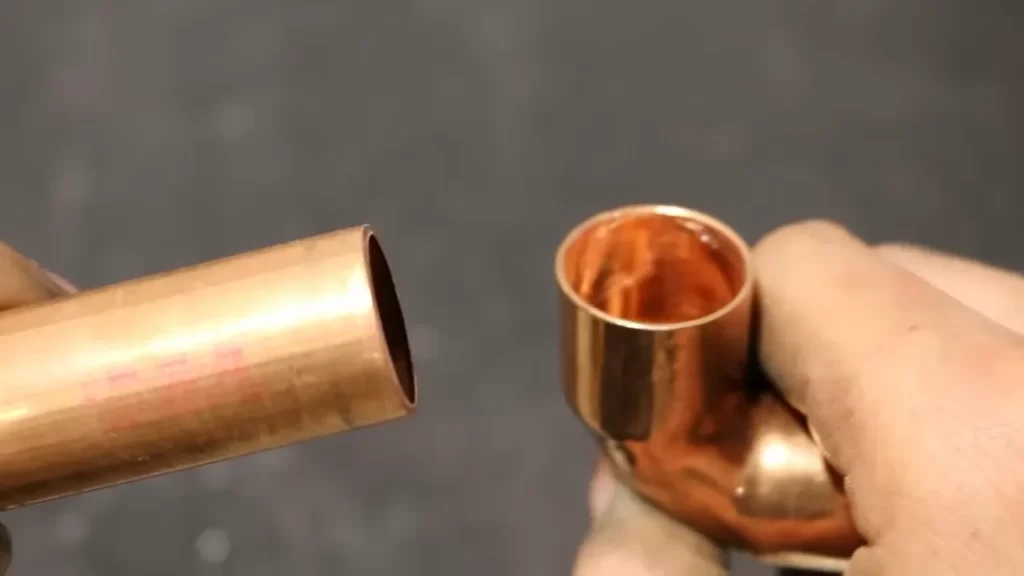
- Insert the pipe into the fitting, making sure it fits snugly.
- If using soldering fittings, heat the joint evenly using a torch until the flux bubbles and the solder melts and flows into the joint.
- If using compression fittings, tighten the compression nut securely using a wrench.
- Check for any leaks by turning on the water supply and inspecting the joint.
By following these steps, you can ensure that your fittings are installed correctly, providing a reliable and leak-free connection for your copper pipe.
In summary, choosing and installing fittings for copper pipe is an important step in any plumbing project. Understanding the different types of fittings available, comparing soldering and compression methods, and knowing how to install fittings correctly will help you achieve a successful and reliable plumbing system.
Cleaning And Fluxing The Pipe Joints
Importance of Clean Joints
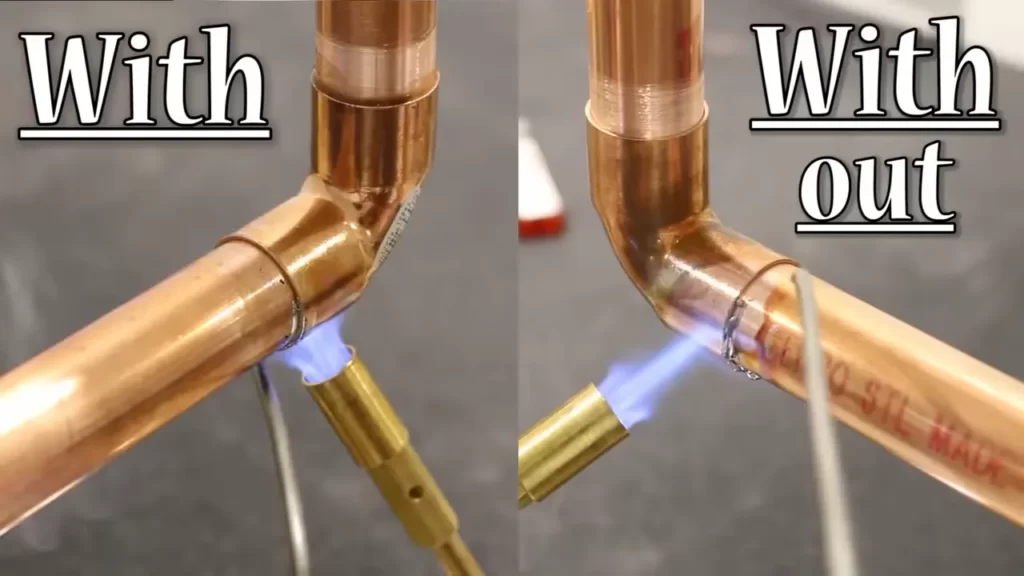
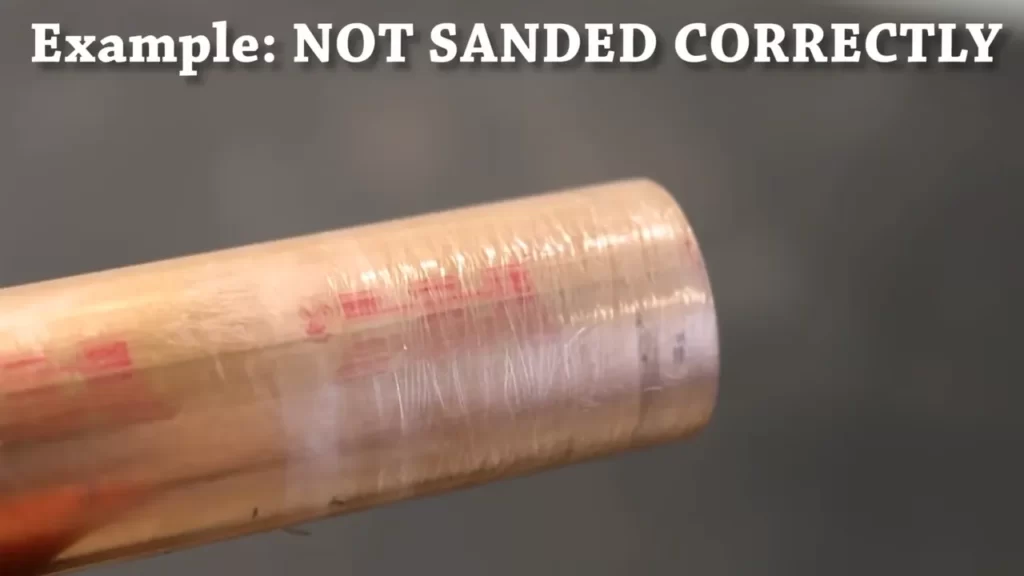
One crucial step in the installation of copper pipes is cleaning and fluxing the joints. Clean joints are essential for achieving strong and leak-free connections. When pipes are not properly cleaned, residues and contaminants can prevent the flux from adhering properly, leading to weak joints that may fail over time. It is important to understand the significance of clean joints and the impact they have on the overall durability and efficiency of your copper pipe system.
Applying Flux
After cleaning the pipe joints, the next step is applying flux. Flux is a crucial component used to create a reliable, watertight seal between the copper pipe and fittings. It is important to apply flux evenly and thoroughly to ensure proper adhesion and prevent any gaps or voids in the joint.
When applying flux, use a brush or an applicator specifically designed for this purpose. Dip the brush into the flux and apply it liberally to the outside and inside of the pipe joint, covering all areas that will come into contact with the fittings. Be sure not to apply too much flux, as excess flux can create a messy and unprofessional appearance. However, it is crucial to cover the joint completely to ensure a secure bond.
Flux works by removing any oxides from the surfaces of the copper pipe and the fittings. It also prevents new oxides from forming, ensuring a clean and even surface for soldering. Additionally, flux helps solder flow smoothly and evenly, filling any gaps and creating a strong bond between the pipe and fittings.
Before proceeding with soldering, allow the flux to dry for a few minutes. This will ensure that it is ready to melt and create a proper solder joint.
Soldering Copper Pipe
Soldering copper pipe is a crucial step in installing a copper pipe system. It ensures leak-free joints that will last for years to come. Soldering involves melting solder, a metal alloy, into the joint to create a strong bond. This technique is commonly used in plumbing and HVAC applications. In this section, we will discuss how to select the right solder and flux, provide a step-by-step guide to soldering copper pipe, and offer tips for checking for a proper soldered joint.
Selecting the Right Solder and Flux
Choosing the correct solder and flux is essential for achieving a successful soldered joint. Here are a few pointers to keep in mind:
- Solder: Opt for a solder specifically designed for copper pipe. Look for solder with a melting point that matches the temperature you plan to work with. Common options include lead-free solder or lead-based solder if permitted in your area.
- Flux: Flux helps clean the copper surfaces and promote the solder’s flow. Choose a flux compatible with the type of solder you are using. Water-based flux is ideal for residential applications, while acid-based flux is suitable for commercial or industrial settings.
Step-by-Step Guide to Soldering Copper Pipe
Soldering copper pipe requires careful attention to detail and precise execution. Follow these steps to solder copper pipe effectively:
- Clean the surfaces: Use sandpaper or a wire brush to clean the outside of the copper pipe and the inside of the fitting. Make sure to remove any dirt, corrosion, or old solder.
- Apply flux: Apply a thin and even layer of flux to both the pipe and fitting. This will help ensure a strong bond and prevent oxidation during the soldering process.
- Assemble the joint: Insert the pipe into the fitting, ensuring it fits snugly. Use a pipe cutter to ensure clean, square cuts.
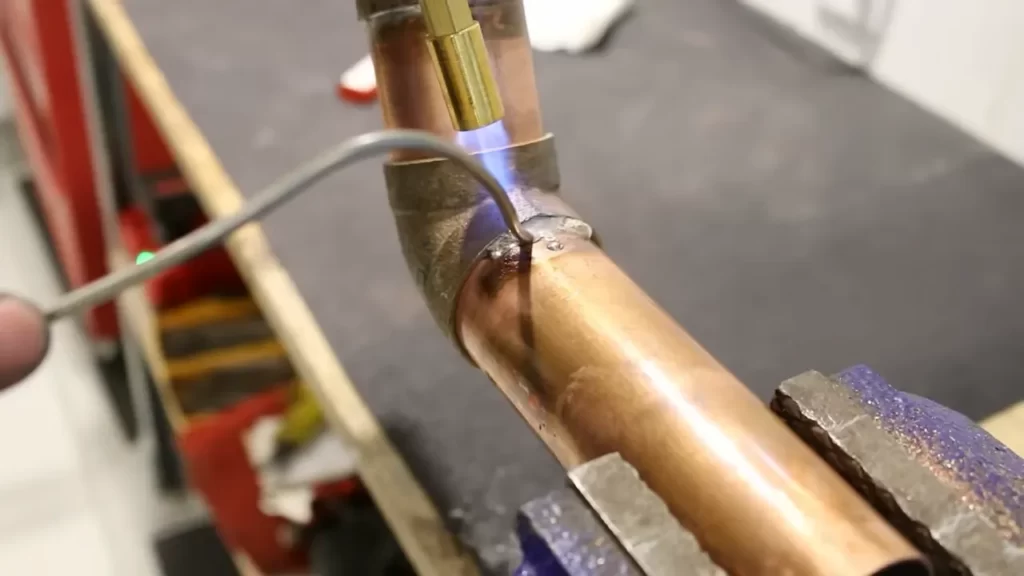
- Heat the joint: Use a propane torch to heat the joint evenly. Move the flame back and forth across the joint, avoiding direct contact with the flame on the copper pipe.
- Apply solder: Once the joint is heated, touch the end of the solder to the joint. The solder should melt and flow into the joint, forming a continuous bead around the circumference.
- Remove the heat: After the solder has flowed into the joint, remove the heat source. Allow the joint to cool naturally without disturbing it.
Checking for a Proper Soldered Joint
Ensuring the quality of your soldered joint is crucial to prevent future leaks. Here are a few steps to check the integrity of the joint:
- Visual inspection: Examine the soldered joint visually. The solder should form a smooth, continuous bead around the joint without any gaps or irregularities.
- Pressure test: Conduct a pressure test to ensure the joint is leak-free. Close the valves, pressurize the system, and monitor for any pressure drop.
- Perform a tug test: Gently tug on the pipes to check for any movement or instability. A properly soldered joint should be secure and rigid.
By following these steps and conducting thorough checks, you can ensure a reliable soldered joint that will withstand the test of time.
Compression Fitting Installation
How Compression Fittings Work
Compression fittings are a popular choice for connecting copper pipes because of their simplicity and reliability. These fittings consist of three main components: a compression nut, a compression ring (also known as a ferrule), and a compression seat. When properly installed, compression fittings create a watertight seal that can withstand high pressure.
Step-by-Step Guide to Installing Compression Fittings
Installing compression fittings may seem intimidating at first, but with the right tools and a little patience, it can be a straightforward process. Here’s a step-by-step guide to help you through it:
- Gather all the necessary materials, including a copper pipe cutter, emery cloth, Teflon tape, a wrench, and of course, the compression fittings.
- Measure and mark the copper pipe where you want to install the compression fitting. Use a copper pipe cutter to make a clean and precise cut at the marked spot. Remember to remove any burrs or rough edges using the emery cloth.
- Slide the compression nut onto the copper pipe, followed by the compression ring.
- Apply a small amount of Teflon tape to the threads of the compression seat to ensure a tight seal.
- Screw the compression seat into the compression nut, making sure it is finger-tight.
- Using a wrench, tighten the compression nut onto the compression seat. Be careful not to over-tighten, as it can damage the fitting or cause leaks.
- Double-check the tightness of the compression nut and seat to ensure a secure connection.
Testing for Leaks
Once you have installed the compression fitting, it’s important to test for any potential leaks. Follow these steps to ensure a watertight connection:
- Turn on the water supply and let it run through the newly installed compression fitting.
- Inspect the fitting and surrounding area for any signs of water leakage. Pay close attention to the connection points and joints.
- If you notice any leaks, tighten the compression nut a little more using a wrench. Be cautious not to overtighten, as it can cause damage.
- Recheck the fitting for leaks after tightening.
By following these steps, you can successfully install compression fittings for your copper pipes. Remember to take your time, ensure proper tightness, and test for leaks to guarantee a secure and reliable connection.
Pressure Testing And Inspecting
Pressure testing and inspecting are crucial steps in the installation process of copper pipes. These tests ensure that the pipes are properly installed and free from any leaks or defects. In this section, we will discuss how to conduct a pressure test to identify leaks and inspect the installation for proper fitting.
Testing for Leaks
To determine whether there are any leaks in the newly installed copper pipe system, a pressure test must be conducted. Follow these steps to perform a pressure test:
1. Close all valves: Ensure that all valves connected or attached to the copper pipe system are tightly closed.
2. Attach a pressure gauge: Connect a pressure gauge to a hose bib or other suitable connection point in the piping system.
3. Pressurize the system: Slowly introduce pressurized water or air into the system until it reaches the desired pressure. The recommended pressure for copper pipe systems is typically around 60 pounds per square inch (psi), but it may vary depending on the specific application.
4. Maintain pressure: Monitor the pressure gauge and ensure that it remains steady. If the pressure drops, there is a possibility of a leak in the system.
5. Inspect connections: Carefully examine all the connections, joints, and fittings for any signs of water or air leakage. Look for drips, bubbles, or hissing sounds, which may indicate the presence of a leak.
6. Fix any leaks: If any leaks are detected, take immediate action to address them. Tighten the fittings or replace any faulty components as necessary.
Inspecting for Proper Installation
Aside from leak detection, it is essential to inspect the overall installation of the copper pipe system to ensure its proper functioning. Here are some crucial factors to consider during the inspection:
1. Alignment: Check the alignment of the pipes and fittings. Ensure that they are straight and properly aligned without any noticeable bends or kinks. Misaligned pipes can hinder the flow of water and result in inefficiencies.
2. Secure fastening: Verify that all the pipes and fittings are securely fastened. Loose connections can lead to leaks and potential system failures. Make sure that the pipes are adequately supported and held in place by appropriate clamps or brackets.
3. Adequate slope: If the copper pipe system is being installed for drainage purposes, ensure that there is an adequate slope to facilitate proper water flow. The slope should allow water to flow freely and prevent any stagnant zones or backups.
4. Clearances: Inspect the system for any obstructions or interference that may impede proper function. Ensure that there is sufficient clearance around the pipes to avoid any potential damage or restrictions.
By conducting a pressure test and thoroughly inspecting the installation, you can identify and address any issues with your copper pipe system, ensuring its smooth operation and longevity. It is crucial to perform these steps meticulously before proceeding with any further steps in your plumbing project.
Remember, proper installation and regular maintenance are essential for the efficient functioning of your copper pipe systems in the long run.
Protecting And Insulating Copper Pipes
Protecting and insulating copper pipes is essential for maintaining the integrity and longevity of your plumbing system. By following a few simple steps, you can ensure that your copper pipes are protected from damage and well-insulated, preventing condensation and the potential for costly repairs down the line.
Using Pipe Hangers and Straps
One of the first steps in protecting copper pipes is to properly secure them using pipe hangers and straps. These devices provide support and stability, preventing the pipes from sagging or vibrating, which could lead to leaks or damage over time.
When installing pipe hangers and straps, make sure to:
- Space them appropriately along the length of the pipe, typically every 3 to 6 feet.
- Use hangers and straps that are specifically designed for copper pipes to ensure a secure fit.
- Attach the hangers and straps to a sturdy surface, such as wall studs or floor joists.
By properly securing your copper pipes with pipe hangers and straps, you can minimize the risk of damage and ensure the pipes remain in place for years to come.
Insulating Pipes to Prevent Condensation
Condensation can be a common issue with copper pipes, especially when they are exposed to cold temperatures or high humidity. This moisture buildup can not only lead to water damage but also compromises the efficiency of your plumbing system.
To prevent condensation on your copper pipes, it is crucial to insulate them properly. Here are a few steps to follow:
- Measure the diameter of the pipes to determine the correct size of insulation.
- Choose insulation materials that are suitable for copper pipes, such as foam or fiberglass sleeves.
- Slide the insulation sleeves over the pipes, ensuring a snug fit.
- Secure the insulation with tape or wire ties, making sure it is evenly distributed along the length of the pipes.
Insulating your copper pipes not only prevents condensation but also helps to maintain water temperature and improve energy efficiency. By taking these proactive steps, you can protect your plumbing system from potential issues and enjoy the benefits of a reliable and efficient water supply.
Connecting Copper Pipes To Fixtures
When installing copper pipes, connecting them to fixtures is an essential step. Whether it’s attaching pipes to faucets, toilets, or water heaters, a secure connection is crucial to ensure efficient and leak-free plumbing. In this section, we will guide you on how to connect copper pipes to these fixtures by providing step-by-step instructions and some valuable tips. Follow these instructions carefully to achieve a reliable connection that will stand the test of time.
Attaching Pipes to Faucets
When attaching copper pipes to faucets, it’s important to consider the type of faucet you have. Compression fittings are commonly used for this purpose. Here’s a step-by-step process to help you with the installation:
- Start by measuring the length of the pipe needed to reach the faucet.
- Use a pipe cutter or hacksaw to cut the copper pipe to the appropriate length. Ensure that the end of the pipe is clean and free from burrs.
- Slide a compression nut and a compression ring onto the pipe, followed by inserting the pipe into the faucet supply valve.
- Tighten the compression nut securely with a wrench to create a watertight seal. Be careful not to overtighten, as it may damage the fittings.
- Test the connection by turning on the water supply and checking for any leaks. If a leak is detected, tighten the compression nut further.
Attaching Pipes to Toilets
To connect copper pipes to toilets, the process slightly differs. Here’s what you need to do:
- Measure and cut the copper pipe to the desired length using a pipe cutter or hacksaw. Smooth any rough edges with a file.
- Apply flux to the outside of the pipe and the inside of a soldered coupling.
- Insert the pipe into the coupling and ensure it fits snugly.
- Heat the coupling using a propane torch until the flux sizzles and the solder melts.
- Allow the joint to cool, and then wipe away any excess flux.
Attaching Pipes to Water Heaters
Connecting copper pipes to water heaters also requires specific steps to ensure a secure connection. Follow these steps for a successful installation:
- Measure and cut the copper pipe to the required length using a pipe cutter or hacksaw.
- Clean the ends of the pipe and the water heater connections thoroughly with emery cloth or a pipe cleaner to remove any dirt or corrosion.
- Apply flux to the cleaned ends of the pipe and the water heater connections.
- Slide a soldered coupling onto the pipe and insert the pipe into the water heater connection.
- Heat the coupling using a propane torch until the flux sizzles and the solder melts.
- Allow the joint to cool and wipe away any excess flux.
Tips for a Secure Connection
To ensure a secure connection when attaching copper pipes to fixtures, consider the following tips:
- Always use the appropriate fittings and connectors for the specific fixture to ensure compatibility.
- Clean the pipe ends and fixture connections properly before joining them to remove any debris or corrosion.
- Apply flux to the surfaces to be soldered or use compression fittings depending on the type of connection.
- Use a suitable flame and technique when soldering to achieve a strong bond.
- Regularly inspect connections for signs of leaks or damage and make necessary repairs promptly.
By following these guidelines and utilizing the right techniques, you can confidently connect copper pipes to various fixtures, such as faucets, toilets, and water heaters. Remember to adhere to the specific instructions for each type of fixture to ensure a secure and efficient plumbing system in your home.
Troubleshooting Common Copper Pipe Installation Issues
Installing copper pipes can be a challenging task, even for experienced DIY enthusiasts. It’s not uncommon to run into a few hiccups along the way. In this section, we will discuss some of the most common copper pipe installation issues and how to troubleshoot them effectively.
Identifying and Fixing Leaks
One of the most common issues you might encounter when installing copper pipes is leaks. Leaks can occur due to various reasons, such as improper soldering or incorrectly fitted compression fittings. It’s essential to identify the source of the leak and address it promptly to prevent further damage.
Here are some steps to help you identify and fix leaks:
- Visual Inspection: Start by visually inspecting the pipe joints and fittings. Look for signs of moisture or discoloration, which can indicate a leak.
- Pressure Testing: If you suspect a leak but can’t locate it visually, performing a pressure test can help. Close all valves and cap off the ends of the pipes. Then, pressurize the system with air or water and monitor the pressure. If the pressure drops, there is likely a leak.
- Fixing Leaks: Once you’ve identified the source of the leak, you can take the necessary steps to fix it. If it’s a soldering issue, you may need to remove the faulty joint, clean it thoroughly, and re-solder it. If it’s a compression fitting problem, check if the fitting is properly tightened. You may need to disassemble and reassemble the fitting if necessary.
Handling Soldering and Compression Errors
Soldering and compression fittings are common methods used to join copper pipes. However, errors during these processes can lead to issues such as leaks or weak joints. It’s crucial to ensure proper technique and attention to detail when working with soldering and compression fittings.
Here are some tips to help you handle soldering and compression errors:
- Soldering Errors: If you encounter issues with soldering, such as incomplete joints or excessive solder, you may need to reheat the joint and correct the problem. Ensure that both the pipe and fittings are thoroughly cleaned before applying flux and solder. Proper heating and melting of the solder are crucial to creating a strong joint.
- Compression Errors: When it comes to compression fittings, it’s essential to use the correct size fitting for the pipe diameter. Incorrectly sized fittings can lead to leaks or loose connections. Make sure to tighten the compression nut securely, but avoid over-tightening, which can damage the fitting or distort the pipe.
By paying close attention to soldering and compression techniques and promptly addressing any errors, you can ensure a successful copper pipe installation without any major issues.
Frequently Asked Questions
How Do Plumbers Connect Copper Pipes?
Plumbers connect copper pipes by using soldering techniques. They clean the pipes, apply flux, heat the joint, and then melt solder into the connection. This creates a strong, watertight bond between the copper pipes.
What Is The Best Way To Connect Copper Water Pipe?
The best way to connect copper water pipes is by using soldering techniques. Soldering creates a strong and secure bond between the pipes, ensuring leak-free connections. This method involves heating the joints and applying solder to fuse the pipes together.
It is a reliable and long-lasting solution for joining copper water pipes.
How Do You Secure Copper Pipes?
To secure copper pipes, follow these steps: 1. Use pipe straps or hangers at regular intervals. 2. Use copper clips or clamps to hold the pipes in place. 3. Ensure that the pipes are properly aligned and straight. 4. Use screws or nails to secure the straps or clips to the surface.
5. Inspect regularly for any signs of movement or damage.
How Do You Install A Copper Pipe Tee?
To install a copper pipe tee, follow these steps: 1. Cut the copper pipe at the desired location, using a pipe cutter. 2. Clean the pipe and fitting ends with emery cloth. 3. Apply flux to the cleaned areas. 4. Insert the tee between the pipe sections and align them.
5. Heat the joint with a propane torch and apply solder to complete the connection.
Conclusion
Learning how to install copper pipe can seem daunting at first, but with the right tools and a step-by-step approach, it is a manageable task. By following the guidelines outlined in this blog post, you can confidently tackle any plumbing project that involves copper pipe installation.
Remember to always prioritize safety, take your time, and consult professional help if needed. Happy piping!