To install a compression valve on a copper pipe, follow these steps: clean the pipe, slide the compression nut onto the pipe followed by the ferrule, tighten the compression nut onto the valve body, and use two wrenches to secure the connection. If you need to install a compression valve on a copper pipe, the process is straightforward and can be completed in a few simple steps.
By following these instructions, you’ll be able to ensure a secure and leak-free connection. This guide will walk you through the process, from preparing the pipe to tightening the compression nut onto the valve body. With the right tools and a little patience, you’ll have your compression valve successfully installed in no time.
Understanding Compression Valves
Understanding Compression Valves
Compression valves are an essential component in plumbing systems, allowing for the control and regulation of water flow. These valves are used to connect and disconnect pipes in a secure and leak-proof manner. In this section, we will explore what compression valves are, the different types available, and the advantages and disadvantages of using them in your plumbing projects.
What are Compression Valves and Why are They Used in Plumbing Systems?
Compression valves are mechanical devices that are used to control the flow of fluids, such as water, through pipes. They consist of three main components: a valve body, a compression nut, and a compression ring, also known as a ferrule. These valves are typically made of brass or chrome-plated brass, which provides durability and corrosion resistance.
Compression valves are commonly used in plumbing systems because of their ease of installation and reliable performance. They are often used in applications where frequent disassembly and reassembly is required, such as in fixtures like faucets, toilets, and showers. Compression valves are especially popular in situations where soldering or welding is not preferred or not possible, such as in older homes with existing copper pipes.
Different Types of Compression Valves and Their Applications
There are several types of compression valves available, each designed for specific applications. Here are some commonly used compression valves:
| Compression Valve Type | Application |
|---|---|
| Angle Stop Valve | Used to control the water supply for fixtures like toilets and sinks. |
| Straight Stop Valve | Similar to angle stop valves, but designed for water supply lines that require a straight connection. |
| Compression Sleeve Valve | Used in applications where a compression fitting needs to be connected directly to a copper pipe. |
| Compression Tee Valve | Allows for the creation of a branch line off a main line, commonly used in plumbing systems. |
Advantages and Disadvantages of Using Compression Valves
Using compression valves in your plumbing projects comes with both advantages and disadvantages. Let’s take a closer look:
Advantages:
- Easy installation: Compression valves do not require soldering, making them easy to install for both professionals and DIY enthusiasts.
- Reusable: Compression valves can be easily disconnected and reused, allowing for modifications or repairs without needing to replace the entire valve.
- Wide compatibility: Compression valves can be used on various types of pipes, including copper, PEX, and CPVC.
Disadvantages:
- Leak potential: If not installed correctly, compression valves can develop leaks over time. It is crucial to ensure proper tightening and alignment of the compression nut and ferrule.
- Space limitations: Compression valves require more space compared to other types of valves, which can be a constraint in tight plumbing installations.
- Cost: Compression valves may be more expensive compared to other types of valves, especially if high-quality brass or chrome-plated brass valves are chosen.
Understanding the different types of compression valves available, their applications, as well as their advantages and disadvantages, will help you make informed decisions when it comes to installing compression valves on copper pipes.
Tools And Materials Needed
Installing a compression valve on a copper pipe is a simple and straightforward process, as long as you have the right tools and materials at your disposal. This section will provide you with a comprehensive list of the essential tools, materials, and safety precautions required for a successful installation.
Essential tools required for installing a compression valve
Before you begin the installation process, it is important to gather all the necessary tools. Having the right tools at hand will make the process much easier and ensure a more secure and reliable connection. Here is a list of the essential tools required for installing a compression valve on a copper pipe:
| Tool | Usage |
|---|---|
| Adjustable wrench | To tighten and loosen compression nuts |
| Pipe cutter | To cut the copper pipe to the desired length |
| Deburring tool | To remove any rough edges or burrs from the cut end of the pipe |
| Cleaning brush | To clean the copper pipe before installation |
| Compression valve | The main component for connecting and regulating water flow |
| Teflon tape | To provide a watertight seal |
| Pipe wrench | To hold the pipe securely in place during installation |
| Marker | To mark the pipe for accurate cutting |
List of materials needed for the installation process
In addition to the tools mentioned above, you will also need some materials to ensure a successful installation. These materials play a crucial role in providing a durable and leak-free connection. Here is a list of the materials required for installing a compression valve on a copper pipe:
- Copper pipe
- Compression fittings
- Teflon tape
- Pipe dope or thread sealant (if required)
- Plumber’s tape
- Flux
- Solder
Safety precautions to be followed during the installation
While installing a compression valve on a copper pipe is a relatively simple task, it is important to follow certain safety precautions to ensure your well-being and the longevity of the installation. Here are some safety precautions to keep in mind:
- Always wear safety goggles and gloves to protect yourself from any potential hazards.
- Make sure to turn off the water supply before starting the installation process.
- Use caution when operating the pipe cutter and other cutting tools to avoid injury.
- Ensure that the pipe is properly supported to prevent any accidental movement or damage during the installation.
- Always follow the manufacturer’s instructions for the specific compression valve you are using.
- Inspect the compression valve and fittings for any defects or damage before installation.
By following these safety precautions, you can complete the installation process with confidence and minimize the risk of accidents or damage.
Preparing The Copper Pipe
Preparing the copper pipe is an essential step when installing a compression valve. This ensures that the valve fits securely and functions properly. In this section, we will look at how to measure and mark the section of the copper pipe for installation, cut the pipe to the desired length, and deburr the cut end to ensure a smooth surface.
Measuring and marking the section of the copper pipe for installation
Before you can install the compression valve, you need to determine the exact section of the copper pipe where it will be installed. To do this:
- Use a measuring tape to measure the length of the compression valve.
- Mark the measured length on the copper pipe using a permanent marker or a piece of chalk.
It’s important to ensure accurate measurements and markings to avoid any fitting issues during installation.
Cutting the pipe to the desired length
Once you have marked the section of the copper pipe for installation, it’s time to cut the pipe to the desired length. Follow these steps:
- Place the pipe cutter around the copper pipe, ensuring that the blade lines up with your mark.
- Tighten the pipe cutter’s blade gently until it creates a slight groove on the surface of the pipe.
- Rotate the pipe cutter around the pipe, gradually tightening the blade with each rotation.
- Continue rotating and tightening the blade until the pipe is cleanly cut.
Be careful not to apply excessive force or cut too close to your mark to prevent any damage to the adjacent sections of the pipe.
Deburring the cut end of the pipe to ensure a smooth surface
After cutting the copper pipe, it’s crucial to deburr the cut end to ensure a smooth surface. This will help prevent any leaks or irregularities when installing the compression valve. Follow these steps:
- Use a deburring tool or a round file to remove any burrs or rough edges from the cut end of the pipe.
- Gently run the deburring tool or file around the edge, applying light pressure to remove any imperfections.
- Continue deburring until the cut end is smooth and free from any sharp edges or obstructions.
By deburring the cut end, you create a seamless connection point for the compression valve, ensuring a tight and leak-free fit.
Preparing the copper pipe is a crucial step in installing a compression valve. By measuring and marking the section, cutting the pipe to the desired length, and deburring the cut end, you set the foundation for a successful installation. With a properly prepared copper pipe, you can proceed confidently with the next steps of the installation process.
Applying Teflon Tape To Threads
The proper application of Teflon tape to the threads of a compression valve is crucial for ensuring a tight seal and preventing leaks. Understanding the purpose of Teflon tape and knowing the proper technique for wrapping it around the valve threads can greatly improve the success of your installation. In this section, we will discuss the importance of Teflon tape and provide step-by-step instructions on how to apply it correctly.
Understanding the purpose of Teflon tape in the installation process
Teflon tape, also known as plumber’s tape or thread seal tape, is a thin, white tape that is used to create a watertight seal between threaded pipes and fittings. It is made from polytetrafluoroethylene (PTFE), a material that is non-reactive, durable, and resistant to high temperatures and chemical corrosion. The main purpose of Teflon tape is to lubricate the threads and provide an additional barrier against leaks.
Proper technique for wrapping Teflon tape around the valve threads
Applying Teflon tape correctly is essential to ensure a proper seal. Follow these steps for the proper technique:
- Start with the end of the Teflon tape at the beginning of the valve threads.
- Hold the end of the tape against the pipe and wrap it around the threads in a clockwise direction.
- Overlap the tape by about 50% as you wrap it around the threads.
- Wrap the tape snugly, without stretching or tearing it.
- Continue wrapping until you reach the end of the threads, making sure to cover all the exposed threads.
- Once you reach the end, tear the tape cleanly and press it down to secure it in place.
By following these steps, you can ensure that the Teflon tape is properly applied to the valve threads, creating a secure and leak-free connection.
Tips for ensuring a tight seal with the compression valve
Here are a few additional tips to help you achieve a tight seal with the compression valve:
- Clean the valve threads and pipe thoroughly before applying the Teflon tape. Any dirt, debris, or grease can compromise the effectiveness of the tape.
- Make sure the valve threads and pipe are dry before applying the tape. Moisture can interfere with the tape’s ability to adhere properly.
- Avoid over-tightening the compression valve as it can damage the threads or cause leaks. Tighten the valve securely, but be careful not to exert excessive force.
- Use the appropriate size of Teflon tape for your valve threads. A tape that is too thin may not provide sufficient sealing, while a tape that is too thick can lead to difficulties in tightening the compression valve.
By properly applying Teflon tape to the threads and following these tips, you can ensure that your compression valve installation is successful and leak-free.
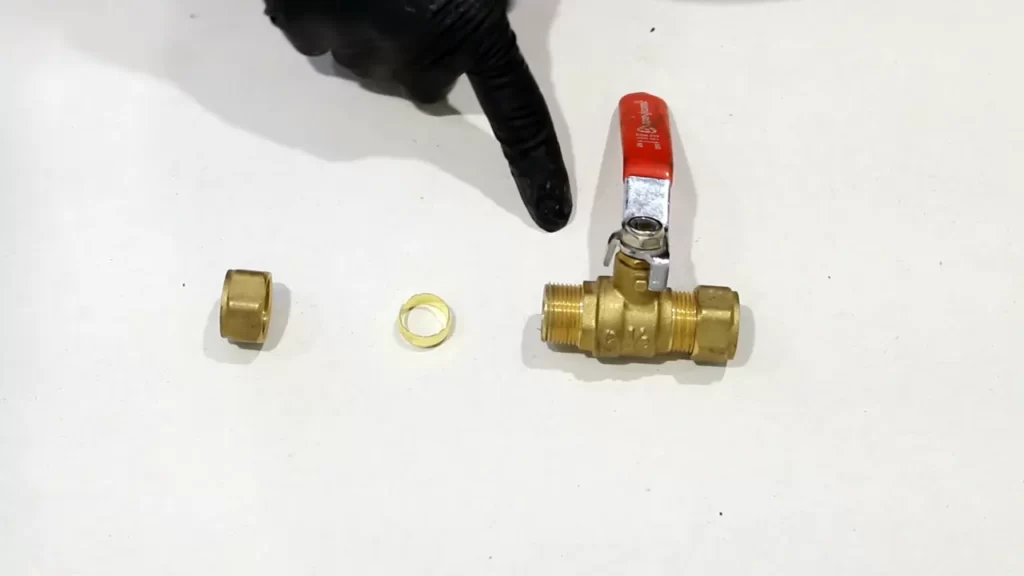
Preparing The Compression Fittings
When it comes to installing a compression valve on a copper pipe, the first step is preparing the compression fittings. This involves disassembling the compression fittings, inspecting them for any defects or damages, and preparing the compression nut and ferrule for installation.
Disassembling the Compression Fittings and Removing any Packaging Materials
The first thing you need to do is disassemble the compression fittings and remove any packaging materials. This is important to ensure that there are no obstructions or debris that could affect the proper functioning of the fittings.
Inspecting the Fittings for any Defects or Damages
Before installing the compression fittings, it is crucial to inspect them for any defects or damages. Look for any cracks, dents, or other signs of wear and tear that could compromise the integrity of the fittings.
Note: If you notice any defects or damages, it is advisable to replace the fittings with new ones to guarantee a secure and leak-free installation.
Preparing the Compression Nut and Ferrule for Installation
Once you have disassembled and inspected the compression fittings, it is time to prepare the compression nut and ferrule for installation. These components play a critical role in creating a tight and reliable seal between the compression valve and the copper pipe.
- Start by sliding the compression nut over the copper pipe, with the threaded end facing towards the open end of the pipe.
- Next, insert the ferrule onto the pipe, making sure it sits flush against the end of the pipe.
- Tightly screw the compression nut onto the valve body, ensuring a snug fit without over-tightening.
Note: It is essential to tighten the compression nut firmly but not excessively, as overtightening can damage the fittings or cause leaks.
By following these steps and properly preparing the compression fittings, you are setting the foundation for a successful installation of a compression valve on a copper pipe.
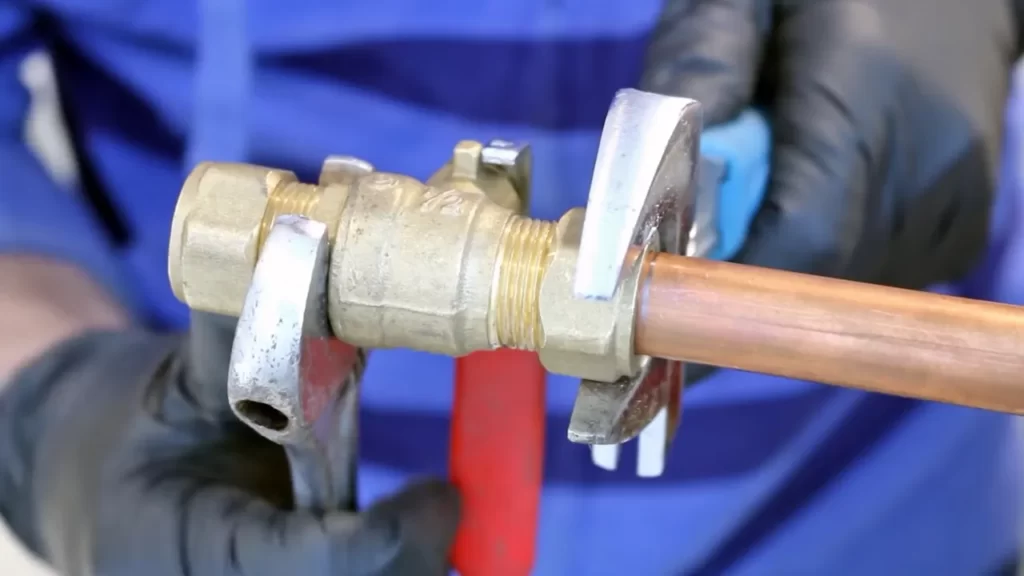
Attaching The Compression Valve To The Pipe
Installing a compression valve on a copper pipe is a straightforward process that can be completed with a few basic tools. Once you have prepared the copper pipe and gathered the necessary materials, you can proceed to attach the compression valve. In this section, we will guide you through the step-by-step process of attaching the compression valve to the pipe, including sliding the compression nut and ferrule onto the copper pipe, inserting the pipe into the compression fitting, and hand-tightening the compression nut to secure the valve in place.
Sliding the compression nut and ferrule onto the copper pipe
The first step in attaching the compression valve is to slide the compression nut and ferrule onto the copper pipe. This creates a tight seal between the pipe and the valve, preventing any leaks in the future. To do this, follow these steps:
- Ensure that the end of the copper pipe is clean and free from any debris or burrs.
- Take the compression nut and slide it onto the pipe with the threaded side facing towards the end of the pipe.
- Next, take the compression ferrule and slide it onto the pipe, ensuring that it rests against the compression nut.
By sliding the compression nut and ferrule onto the copper pipe, you are setting the stage for a secure and leak-free connection with the compression valve.
Inserting the pipe into the compression fitting
After sliding the compression nut and ferrule onto the copper pipe, the next step is to insert the pipe into the compression fitting. The compression fitting is the component of the valve that will provide the necessary pressure to create the seal. Follow these steps to insert the pipe into the compression fitting:
- Take the compression fitting and ensure that it is properly aligned with the compression nut and ferrule.
- Gently push the pipe into the compression fitting until it reaches the stop in the fitting.
Ensuring that the pipe is correctly inserted into the compression fitting will ensure a secure and leak-free connection with the valve.
Hand-tightening the compression nut to secure the valve in place
Now that the pipe is inserted into the compression fitting, the final step is to hand-tighten the compression nut to secure the valve in place. This will provide the necessary pressure to create a watertight seal. Follow these steps to hand-tighten the compression nut:
- Using your hands or an adjustable wrench, tighten the compression nut clockwise until it is snug against the compression fitting.
- Avoid over-tightening, as this can damage the compression fitting or cause leaks.
- Check for any signs of leaks by turning on the water supply and monitoring the area around the compression valve.
By hand-tightening the compression nut, you are ensuring that the compression valve is securely in place, ready to perform its intended function.
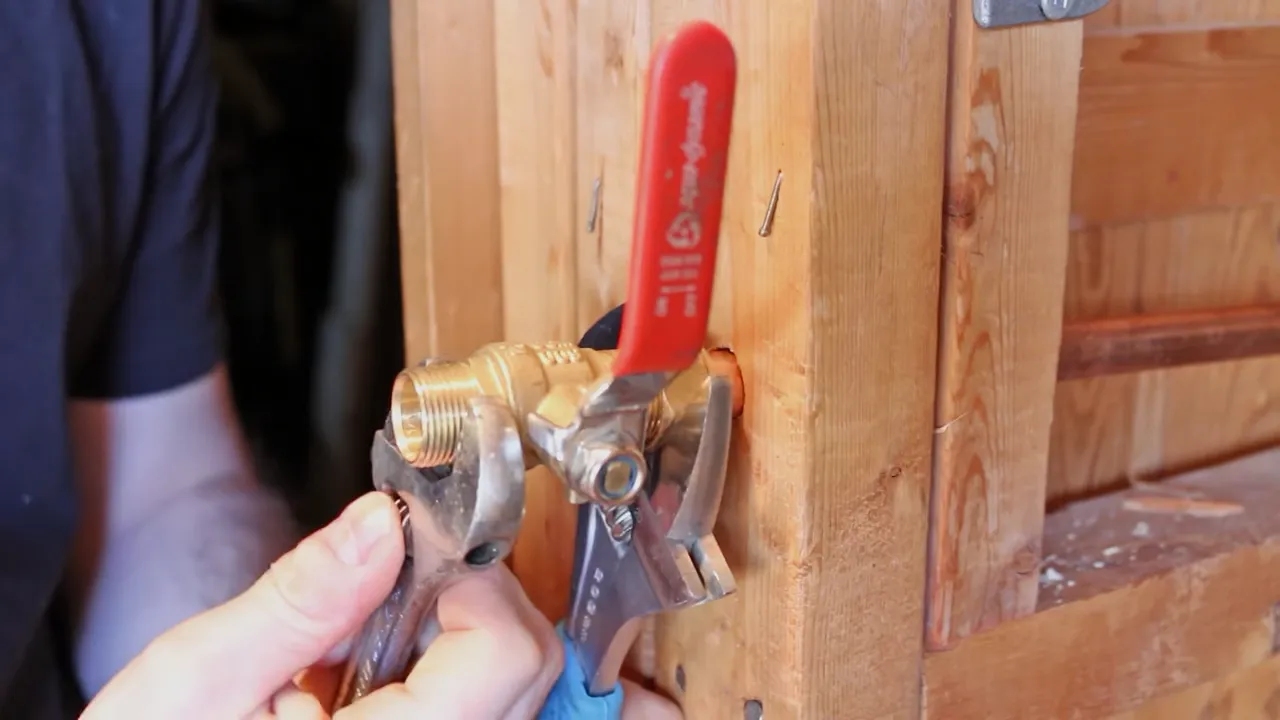
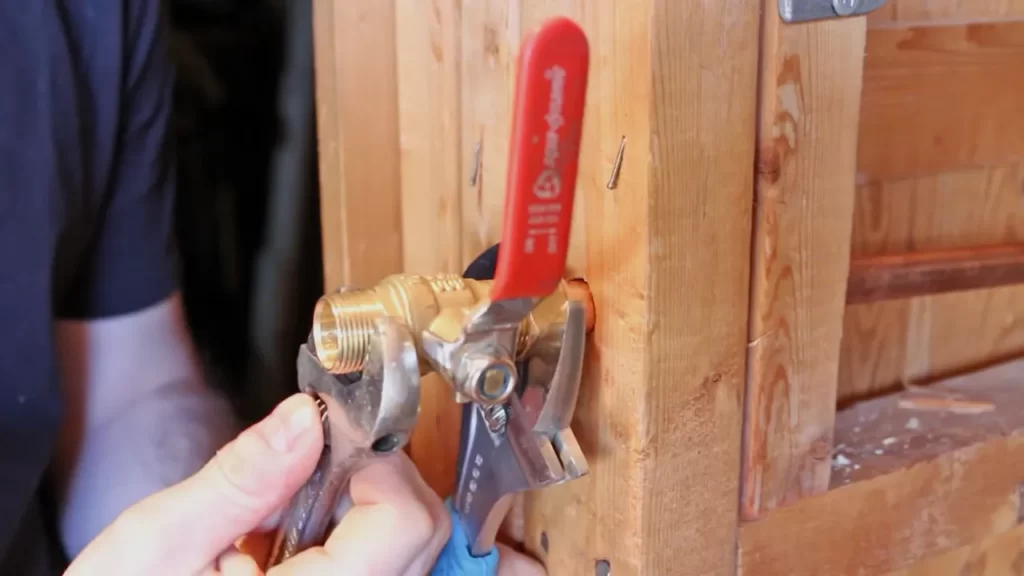
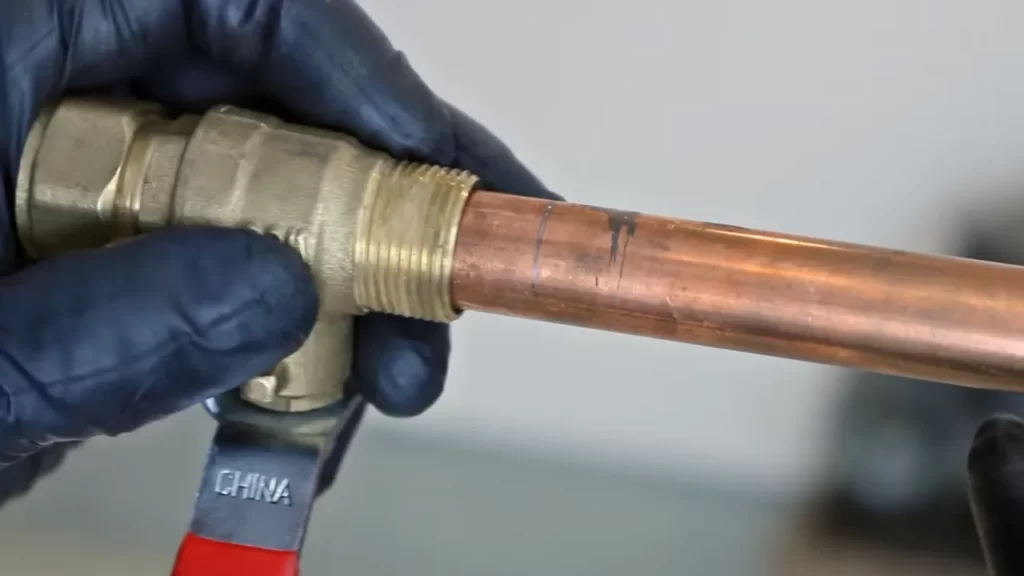
Using A Wrench To Tighten The Compression Valve
Using a wrench to tighten the compression valve is an essential step in the installation process that ensures a secure and leak-free connection. By following the proper technique and taking necessary precautions, you can ensure that the compression nut is tightened appropriately and the valve is in the closed position.
Ensuring the valve is in the closed position before tightening
Before using a wrench to tighten the compression valve, it is crucial to ensure that the valve is in the closed position. This prevents any water flow during the installation and allows for a smooth tightening process. To close the valve, turn it in a clockwise direction until it is fully closed. Ensuring the valve is closed is vital to avoid any potential water leakage during the installation.
Proper technique for using a wrench to tighten the compression nut
When using a wrench to tighten the compression nut, it is important to use the proper technique to achieve a secure and leak-free connection. Follow these steps:
- Start by placing the adjustable wrench on the compression nut. Ensure that the wrench is positioned correctly to provide maximum grip and leverage.
- Next, apply steady pressure in a clockwise direction to tighten the compression nut. Avoid over tightening, as this can damage the fittings or cause leaks.
- Use controlled, smooth movements to gradually tighten the compression nut until it feels snug. Make sure not to force it too tight.
- Check for any signs of leakage around the compression fitting. If you notice any leaks, stop tightening immediately and make the necessary adjustments.
Remember, the goal is to achieve a tight connection without causing damage to the fittings. If you encounter any difficulties or are unsure about the tightening process, it’s always wise to consult a professional plumber for assistance.
Testing the tightness of the valve and making any necessary adjustments
After tightening the compression valve with a wrench, it is crucial to test its tightness and make any necessary adjustments. To do this, follow these steps:
- Turn on the water supply and observe the valve for any signs of leakage. If there are no leaks, proceed to the next step.
- Carefully inspect the connection for any leaks or drips. If you notice any, use the wrench to slightly tighten the compression nut until the leakage stops.
- Repeat the process of testing and tightening until the valve is secure and completely leak-free.
By testing the tightness of the valve and making any necessary adjustments, you can ensure a reliable and durable installation. A properly tightened compression valve will provide effective control of water flow and prevent any potential leaks in the future.
Checking For Leaks And Functionality
Tips for conducting a thorough leak test after the installation
After successfully installing a compression valve on your copper pipe, it is crucial to conduct a thorough leak test to ensure its functionality. Checking for leaks is an essential step in any plumbing project, and this holds true for installing compression valves as well. By following a few simple tips, you can ensure that your installation is leak-free and the valve is functioning properly.
First, visually inspect the compression valve and surrounding pipe joints for any signs of leakage. Look for any visible drips, puddles, or wet spots that could indicate a leak. Pay special attention to the connections between the valve and the pipe, as well as the compression nut and ferrule.
To further enhance your leak test, consider using a soap-water solution. Apply this solution directly onto the compression valve and pipe connections while the water is flowing through the system. If you notice any bubble formation or a sudden change in the solution’s appearance, it could indicate a potential leak.
Additionally, try applying gentle pressure to the valve by turning it slightly in both directions. This test will help you identify if the valve is properly sealed and can withstand movement without causing any leaks. Take note of any leaks or drips that occur during this test.
Troubleshooting common issues such as leaks or poor valve performance
In some cases, despite your best efforts, you may encounter issues with leaks or poor valve performance. Here are a few troubleshooting tips to help you address these problems:
1. Inspect the compression nut and ferrule: Ensure that the compression nut is snugly tightened onto the valve. Check if the ferrule is in place and not loose. A loose ferrule will lead to leaks, so tighten it if necessary.
2. Check for damaged components: Examine the valve, compression nut, ferrule, and pipe for any signs of damage. Even a small defect can compromise the valve’s performance. If you notice any issues, consider replacing the damaged parts.
3. Reassemble the compression valve: If you suspect that the valve was not correctly assembled, try disassembling and reassembling it. Make sure that each component fits snugly and that the compression nut is tightened adequately.
4. Use Teflon tape or pipe compound: Apply Teflon tape or pipe compound to the threads of the valve before installation. This can help create a better seal and prevent leaks.
5. Consult a professional: If you have exhausted these troubleshooting steps and are still experiencing issues, it is advisable to seek the assistance of a professional plumber. They have the expertise to identify and resolve complex valve problems.
Final checks to ensure the compression valve is functioning properly
To ensure that the compression valve is functioning properly, perform the following checks:
1. Turn the water supply back on: Once you have conducted the leak test and addressed any issues, turn the water supply back on and monitor the system for any additional leaks.
2. Check for smooth water flow: Open and close the compression valve, ensuring that the water flows smoothly without any obstruction or irregularities.
3. Monitor water pressure: Observe the water pressure in your system while the compression valve is open. If you notice significant changes in pressure or any abnormalities, it may indicate a problem with the valve.
4. Verify valve control: Test the functionality of the compression valve by opening and closing it multiple times. Ensure that it operates smoothly and effectively regulates the water flow.
Remember, thorough checks for leaks and functionality are essential to prevent any potential plumbing issues down the line. By following these tips and performing the necessary checks, you can have peace of mind knowing that your compression valve installation is reliable and leak-free.
Additional Tips And Considerations
When it comes to installing compression valves on copper pipes, there are a few additional tips and considerations that can help ensure a successful installation. By following these recommendations, you can maximize the efficiency and longevity of your plumbing system.
Recommended maintenance practices for compression valves
Maintaining compression valves is essential to prevent leaks and ensure smooth operation. Here are some recommended maintenance practices:
- Inspect the valve regularly to detect any signs of wear or damage.
- Tighten any loose fittings or connections to prevent leaks.
- Apply a high-quality lubricant, such as plumber’s grease, to the compression ring and nut to ensure smooth movement.
- Always follow the manufacturer’s instructions for maintaining the valve.
Potential challenges and how to overcome them during the installation
While installing compression valves on copper pipes is generally straightforward, there are some potential challenges that you may encounter. Here are a few common challenges and tips on how to overcome them:
If the pipe end is not perfectly square or smooth, it may cause leaks. To overcome this, use a pipe cutter or file to ensure a clean and precise cut. Additionally, consider using a deburring tool to remove any burrs or rough edges.
If the compression nut is over-tightened, it can lead to leaks or damage to the valve. To avoid this, make sure to tighten the nut only until it is snug and then give it a quarter turn using a wrench. Be careful not to overtighten.
In some cases, the compression valve may not sit flush against the fitting. This can be due to dirt, debris, or uneven surfaces. To address this, clean the fitting and valve thoroughly before installation. If necessary, use a sandpaper or emery cloth to smooth any rough areas.
Making informed decisions about when to use compression valves in plumbing projects
Compression valves are a versatile option for various plumbing projects, but it’s important to make informed decisions about when to use them. Consider the following factors to help you decide:
- The specific application: Compression valves are suitable for both residential and commercial plumbing systems. Assess the specific needs of your project and consult with a professional if necessary.
- The material of the pipe: Compression valves are compatible with copper pipes, but they may not be suitable for other materials such as PVC or PEX. Ensure that the valve is compatible with the pipe material you are using.
- The level of difficulty: If you are a DIY enthusiast with basic plumbing skills, compression valves can be a good choice. However, for complex installations or if you are unsure, it is advisable to consult a professional plumber.
By considering these factors and following the recommended tips and maintenance practices, you can confidently install compression valves on copper pipes and enjoy a reliable and leak-free plumbing system.
Frequently Asked Questions
How Do You Install A Compression Ball Valve On A Copper Pipe?
To install a compression ball valve on a copper pipe, first make sure the pipe is clean and smooth. Then, slide the compression nut and ferrule onto the pipe. Insert the valve and tighten the nut with a wrench. Test for leaks by turning on the water supply.
Is It Ok To Use Compression Fittings On A Copper Pipe?
Yes, it is perfectly acceptable to use compression fittings on copper pipes. Compression fittings are commonly used to connect copper pipes as they provide a secure and leak-free connection. They are easy to install and offer versatility in terms of connecting different pipe sizes and materials.
How Do You Attach A Valve To A Copper Pipe?
To attach a valve to a copper pipe, follow these steps: 1. Cut the copper pipe to the desired length. 2. Clean the ends of the pipe and the valve with a pipe cleaner or sandpaper. 3. Apply flux to the pipe and valve.
4. Heat the pipe and valve with a torch until the flux starts to bubble. 5. Immediately insert the valve onto the pipe, ensuring a tight fit. Allow it to cool and solidify.
How Do You Replace A Compression Fitting On A Copper Pipe?
To replace a compression fitting on a copper pipe: 1. Turn off the water supply. 2. Use a wrench to loosen and remove the compression nut. 3. Slide the old fitting off the pipe. 4. Slide the new fitting onto the pipe.
5. Tighten the compression nut with a wrench.
Conclusion
To summarize, installing a compression valve on a copper pipe is a relatively simple process that can help regulate water flow and prevent leaks. By following the step-by-step instructions outlined in this blog post, you should be able to successfully complete the installation on your own.
Remember to follow all safety precautions and take your time to ensure a proper seal. With the right tools and a little patience, you’ll have your compression valve up and running in no time. Happy plumbing!