
Installing a compression valve is a simple process. To install a compression valve, follow these steps: 1) Turn off the water supply.
2) Remove the old valve, if present. 3) Wrap plumber’s tape around the threads of the new valve. 4) Hand tighten the valve onto the pipe. 5) Use a wrench to tighten the valve a quarter turn. 6) Turn on the water supply and check for leaks.
Compression valves are commonly used in plumbing systems to control the flow of water. Whether you need to replace a faulty valve or install a new one, knowing the proper installation process is essential. This article will guide you through the steps to install a compression valve, ensuring a secure and leak-free connection. By following these instructions, you can easily install a compression valve and have it operational in no time. So, let’s get started with the installation process and have your plumbing system back in working order.
Benefits Of Installing A Compression Valve
Installing a compression valve in your plumbing system can provide several benefits. This small yet powerful component can prevent leakage and drips, control water flow effectively, and even extend the life of your entire plumbing system. Let’s take a closer look at each of these advantages.
Prevent leakage and drips
One of the primary benefits of installing a compression valve is its ability to prevent leakage and drips. Leakage can cause significant damage to your property, leading to costly repairs and even harmful mold growth. With a compression valve in place, you can ensure a tight seal between pipes, minimizing the risk of leaks and drips. This not only saves you money in the long run but also promotes water conservation, which is crucial for environmental sustainability.
Control water flow effectively
Another advantage of compression valves is their ability to control water flow effectively. By simply adjusting the valve, you can regulate the volume of water passing through the pipes. This is particularly useful in scenarios where you want to limit the water flow, such as when filling a container or using appliances that require specific water pressure. The ability to control water flow ensures convenience and efficiency in your daily activities.
Extend the life of your plumbing system
Installing a compression valve can also contribute to the longevity of your entire plumbing system. By providing a secure and leak-free connection, it helps to prevent any unnecessary strain on the pipes. This, in turn, reduces the likelihood of corrosion, pipe damage, and long-term issues that can lead to costly repairs or replacements. When you invest in a compression valve, you’re investing in the overall health and durability of your plumbing system, providing peace of mind for years to come.
In conclusion, the benefits of installing a compression valve are numerous. Not only does it prevent leakage and drips, but it also allows you to control water flow effectively and extend the life of your plumbing system. Whether you’re a homeowner or a professional plumber, considering the installation of a compression valve is a wise choice for optimizing the functionality and durability of your plumbing system.
Keywords: compression valve, prevent leakage and drips, control water flow, extend the life of plumbing system
Necessary Tools And Materials
Before you can install a compression valve, you will need to gather a few essential tools and materials. Having these items on hand will make the installation process much smoother and more efficient. Here are the necessary tools and materials you will need:
Adjustable wrench
An adjustable wrench is a versatile tool that will come in handy during the installation of a compression valve. This tool allows you to tighten and loosen nuts and bolts of various sizes, ensuring a secure connection. When choosing an adjustable wrench, opt for one with a comfortable grip and a wide opening range to accommodate different sizes of compression valve fittings.
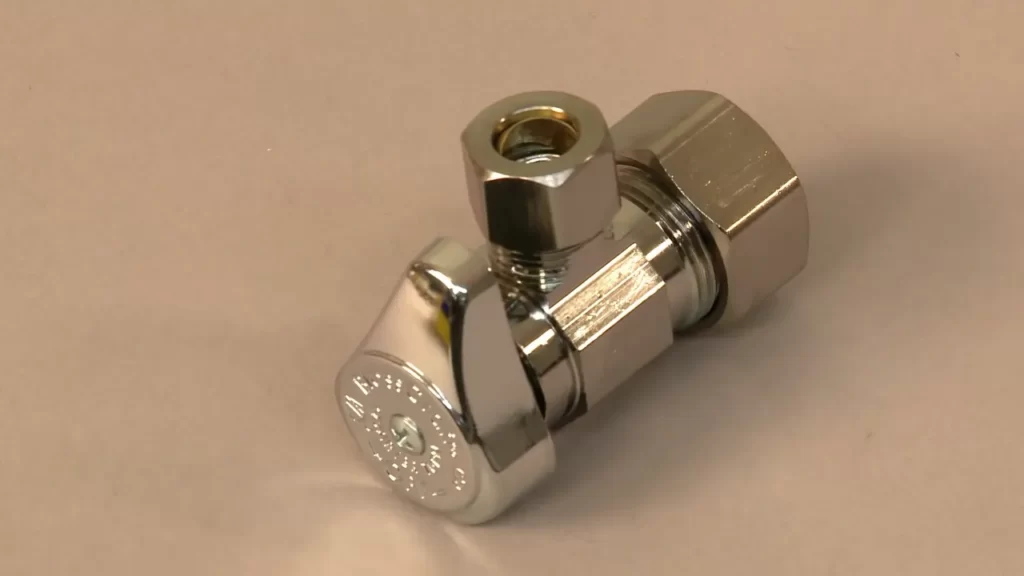
Compression valve
The compression valve itself is the key component of the installation process. This valve is responsible for regulating the flow of water or gas through the pipe. When selecting a compression valve, consider factors such as size, material, and intended use. It is important to choose a valve that is compatible with your specific piping system.
Pipe cutter
A pipe cutter is an essential tool for installing a compression valve. This tool allows you to cut the pipe to the desired length, ensuring a precise fit. When choosing a pipe cutter, look for a durable and ergonomic design that can effectively cut through different types of pipe materials.
Teflon tape
Teflon tape, also known as plumber’s tape, is a must-have material for ensuring a leak-free connection. This thin, white tape is wrapped around the threads of the compression valve fitting before it is tightened. The tape acts as a sealant, preventing water or gas from escaping through the threaded connection. Make sure to use high-quality Teflon tape for optimal results.
By having these necessary tools and materials ready, you’ll be well-prepared to install a compression valve efficiently and effectively. With the right tools and a little know-how, you can ensure a proper installation that will provide reliable performance for years to come.
Assessing The Plumbing Situation
Before installing a compression valve in your plumbing system, it is essential to thoroughly assess the plumbing situation. By doing so, you can ensure that the valve will be installed in the most suitable location and that there are no existing leaks or damages that could hinder its effectiveness.
Locate the Area Where the Compression Valve Will be Installed
In order to properly install a compression valve, it is crucial to pinpoint the exact area where it will be placed in your plumbing system. This can typically be done by identifying the specific pipe or fixture that requires the valve.
To locate this area, start by surveying your plumbing system. Look for the presence of any pipes or fixtures that you believe may necessitate the installation of a valve. Once you have identified the area, ensure that you have easy access to it and that there is enough space to maneuver during the installation process.
Check for Any Existing Leaks or Damage
Before proceeding with the installation of a compression valve, it is vital to check for any existing leaks or damages within your plumbing system. Addressing these issues in advance will help prevent further complications or potential failures once the valve is installed.
To assess your plumbing system for leaks or damages, inspect all visible pipes and fixtures. Look for signs of water leakage, such as water stains, drips, or dampness. Additionally, pay close attention to any unusual sounds, such as hissing or gurgling, as they may indicate a plumbing issue.
If you discover any leaks or damages, it is important to repair them before installing the compression valve. This will help maintain the integrity and efficiency of your plumbing system and prevent any further problems down the line.
Keep in mind that if you are unsure about how to assess the plumbing situation or detect leaks and damages, it’s always advisable to consult a professional plumber. They have the knowledge and expertise to accurately assess your plumbing system and provide the necessary repairs or installations.
Shutting Off The Water Supply
Find the main water shut-off valve
Before you begin the installation process, it is vital to locate the main water shut-off valve. This valve controls the flow of water into your entire house, so it needs to be turned off to prevent any water from flowing while you work. The shut-off valve is typically located near the water meter or where the main water supply enters your home.
Turn off the water supply to the area where the valve will be installed
Once you have located the main shut-off valve, you need to turn off the water supply specifically to the area where the compression valve will be installed. This step ensures that there is no water pressure in the pipes, making it safer and easier to work with.
To turn off the water supply to the desired area, follow these simple steps:
- Identify the shut-off valve that corresponds to the specific area you will be working on. It could be located near the fixture or appliance you are installing the valve for, or it might be a separate shut-off valve for that specific area.
- Turn the valve clockwise to shut off the water supply. You may need to use a wrench or pliers if the valve is difficult to turn. Ensure that the valve is fully closed to prevent any water leakage.
Remember, shutting off the water supply is crucial to avoid any water damage and to ensure a successful installation of a compression valve. Take your time to locate the main shut-off valve and turn off the water supply to the specific area, and you will be ready to move on to the next step of the installation process.
Preparing The Pipe
Before installing a compression valve, it is crucial to properly prepare the pipe. This involves measuring and marking the area where the pipe will be cut, as well as making a clean cut using a pipe cutter. By following these steps, you can ensure a secure and leak-free connection between the compression valve and the pipe.
Measure and mark the area where the pipe will be cut
The first step in preparing the pipe for a compression valve installation is to measure and mark the area where the pipe will be cut. This is essential in order to ensure the proper fit of the valve and prevent any leaks in the future.
To do this, start by determining the location where the compression valve will be installed. Measure the length of the valve and add a few extra inches to allow room for adjustments. Once you have the correct measurement, use a tape measure to mark the pipe at the desired cutting point.
Use a pipe cutter to make a clean cut
Once you have marked the pipe, it’s time to make a clean cut using a pipe cutter. This tool is specifically designed to cut through various types of pipes cleanly and accurately, ensuring a smooth and precise edge.
To use a pipe cutter, position the tool around the marked cutting point on the pipe. Tighten the cutter’s blade onto the pipe, making sure it is secure. Begin rotating the cutter around the pipe in a clockwise direction, applying gentle pressure. Continue rotating until the blade has cut through the pipe completely.
After making the cut, inspect the pipe to ensure that it has a smooth, even edge. Any rough or jagged edges should be smoothed out using a deburring tool or sandpaper. This will help to prevent any damage or interference when installing the compression valve.
By properly preparing the pipe before installing a compression valve, you can ensure a secure and reliable connection. Remember to measure and mark the cutting area accurately and use a pipe cutter to make a clean and precise cut. These simple steps will go a long way in achieving a successful compression valve installation.
Applying Teflon Tape
When it comes to installing a compression valve, one important step is applying Teflon tape. Teflon tape is a thin, white tape that is used to create a watertight seal between threaded connections. This helps prevent leaks and ensures a secure connection. In this section, we will walk you through the process of applying Teflon tape properly to the threaded end of the pipe.
Wrap Teflon tape around the threaded end of the pipe
The first step is to wrap the Teflon tape around the threaded end of the pipe. Start by holding the end of the tape against the threads, making sure it is at a slight angle. This will help in ensuring that the tape wraps smoothly around the pipe without overlapping or bunching up.
Begin wrapping the Teflon tape in a clockwise direction around the pipe. Apply slight tension to the tape as you go to ensure a tight and secure wrap. Continue wrapping the tape around the threads until you have covered the entire threaded section of the pipe.
Ensure the tape covers the threads completely
It is crucial to make sure that the Teflon tape covers the threads completely. This will help in creating a proper seal and preventing any leaks. Gaps or exposed threads can result in water leakage and compromise the functionality of the compression valve.
Take a moment to inspect the wrapped tape and ensure there are no gaps or exposed threads. If you notice any areas where the tape is not covering the threads completely, unwrap it and start again. It is better to be thorough and take the time to properly apply the Teflon tape than to risk potential leaks.
Once you are satisfied that the tape covers the threads completely, you can proceed with installing the compression valve. The Teflon tape will enhance the sealing properties of the compression valve and provide a secure and leak-free connection.
In conclusion, applying Teflon tape properly is an essential step in installing a compression valve. By following these instructions, you can ensure that the tape wraps smoothly around the threaded end of the pipe and covers the threads completely, creating a watertight seal. This will help in preventing any leaks and ensuring a secure connection.
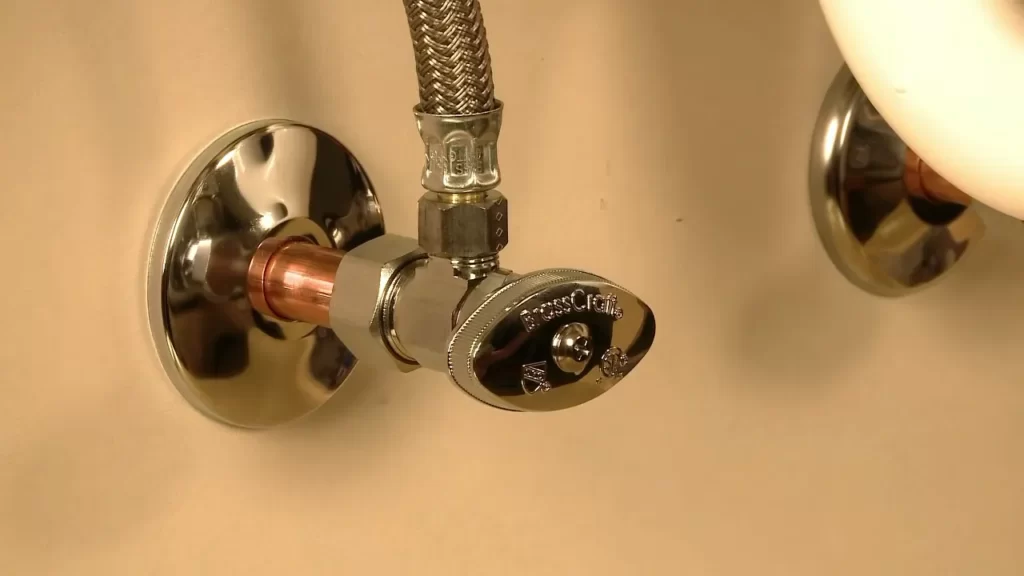
Installing The Compression Valve
If you are looking to install a compression valve onto a pipe, you’ve come to the right place. The compression valve is an essential component that helps regulate the flow of water or gas in a plumbing system. In this guide, I will walk you through the step-by-step process of installing a compression valve onto a pipe, ensuring that you have all the necessary tools and knowledge to complete the task successfully.
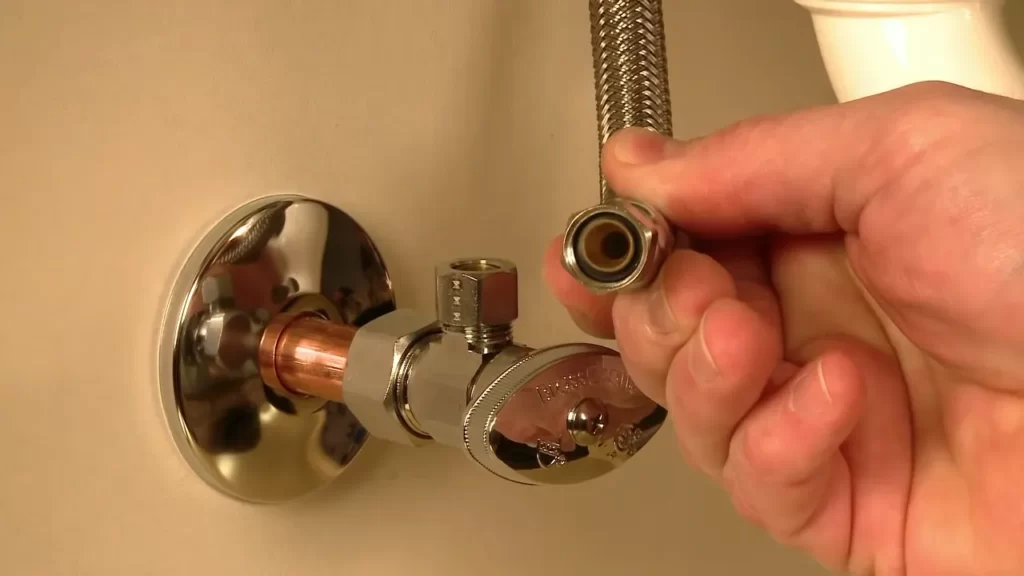
Step 1: Insert the compression valve onto the pipe
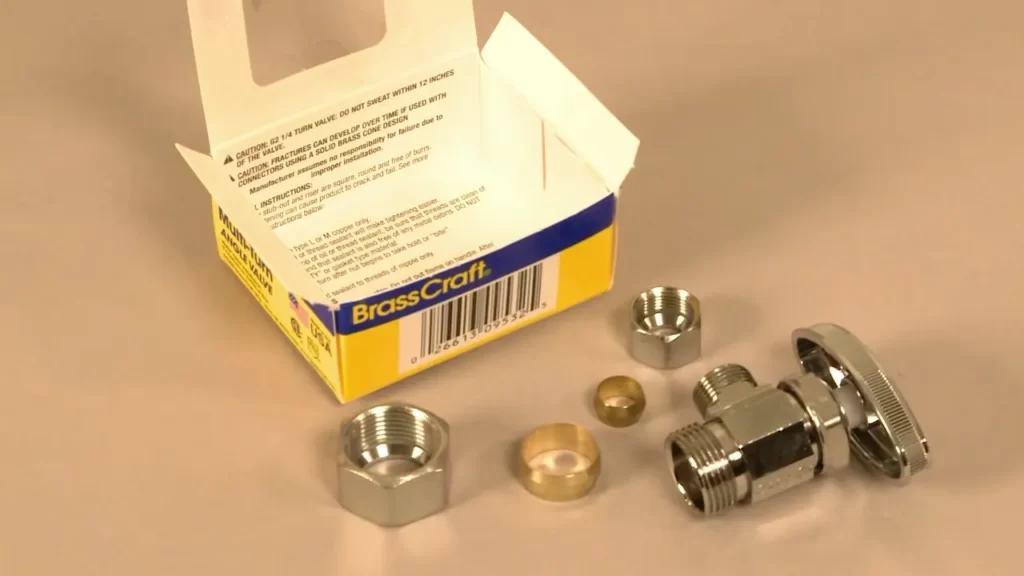
To begin the installation process, you need to insert the compression valve onto the pipe. Start by ensuring that the pipe is clean and free from any debris or corrosion. Taking your compression valve, locate the compression nut and slide it onto the pipe. Make sure that the compression nut is facing the end of the pipe where you want to install the valve.
Next, you will need to slide the compression ring onto the pipe. This ring is crucial for creating a tight seal between the pipe and the valve. Place the compression ring onto the pipe, ensuring that it is positioned right behind the compression nut.
Step 2: Tighten the nut using an adjustable wrench
Now that you have the compression valve, nut, and ring in place, it’s time to secure them tightly onto the pipe. Grab an adjustable wrench and position it onto the compression nut. Use the wrench to turn the nut clockwise, applying steady pressure until it is snugly tightened against the compression ring.
It is important not to over-tighten the nut, as this can lead to damage to the valve or pipe. Check the manufacturer’s instructions for the recommended torque specifications, and ensure that the nut is tightened to the appropriate level. This will help prevent leaks and ensure a proper seal.
Once you have tightened the nut, give it a gentle tug to ensure it is secure. The compression valve should now be firmly attached to the pipe, ready for use.
Conclusion
Installing a compression valve onto a pipe is a relatively simple process that can be completed by following these step-by-step instructions. By ensuring that the compression nut is tightened correctly and that the compression ring is in place, you can have peace of mind knowing that your plumbing system is equipped with a reliable and efficient valve. Now that you have successfully installed the compression valve, you can move on to the next stage of your plumbing project with confidence.
Testing For Leaks
Turn on the water supply
After installing a compression valve, the next step is to test for leaks to ensure a proper seal and prevent water damage. Before starting the testing process, make sure the water supply is turned on. Locate the main valve, usually found near the water meter or outside your house, and turn it clockwise to open it fully. This will allow water to flow into your plumbing system and provide the necessary pressure for testing.
Check for any leaks around the compression valve
Once the water supply is turned on, it’s time to check for leaks around the compression valve. Start by visually inspecting the area surrounding the valve. Look for any signs of water dripping or water stains on the pipes or fittings. Leakage may occur due to improper installation or damage to the valve or pipes.
If there are no visible leaks, proceed to the next step, which involves a more thorough examination. Use a dry cloth or paper towel to wipe all parts of the compression valve, including the joints, threads, and connections. Pay close attention to areas where the valve connects to the pipe or other fittings.
Inspect the cloth or paper towel for any signs of water. If you notice any wetness or dampness, it could indicate a leak. It’s crucial to address any leaks promptly to prevent further damage and ensure the valve is working correctly.
If there are no leaks, congratulations! You have successfully installed and tested the compression valve. However, if you do find any leaks, don’t panic. It’s not uncommon for a compression valve to have minor leaks during the initial testing stage. In this case, you can try tightening the valve slightly using a wrench or pliers. Be careful not to overtighten, as this can damage the valve or fittings. If the leaks persist, it is recommended to consult a professional plumber for further assistance.
Dealing With Leaks
Once you have installed a compression valve, it is essential to ensure that it does not leak. Leaks can cause significant damage to your plumbing system and result in costly repairs. In this section, we will discuss two important steps to take to deal with leaks effectively: tightening the compression nut and reapplying Teflon tape.
Tightening the compression nut
One of the main reasons for leaks in compression valves is a loose compression nut. To address this issue, follow these simple steps:
Reapplying Teflon tape
If tightening the compression nut does not resolve the leak, you may need to reapply Teflon tape. Teflon tape provides an additional seal to prevent leaks around the threads of the valve. Here’s how you can do it:
By following these two steps – tightening the compression nut and reapplying Teflon tape – you should be able to effectively deal with leaks in your compression valve. It’s important to address any leaks promptly to prevent any further damage to your plumbing system.
Replacing A Damaged Compression Valve
Removing the old valve
If you’re experiencing leaks or reduced water pressure in your plumbing system, it may be time to replace your damaged compression valve. Removing the old valve is the first step in this process. Here’s a step-by-step guide on how to do it:
- Shut off the water supply: Before you start any work, make sure to turn off the water supply to the affected area. This will prevent any water from flowing through the pipes while you’re working.
- Locate the valve: Take a look underneath your sink or in the wall where the valve is installed. You should see a compression nut and a compression sleeve attached to the valve. These components will need to be removed.
- Loosen the compression nut: Using an adjustable wrench, loosen the compression nut by turning it counterclockwise. It may require some force, so be sure to hold onto the valve with your other hand to prevent it from moving.
- Remove the compression sleeve: Once the nut is loose, slide the compression sleeve off of the valve. You may need to use pliers to grip and pull it off if it’s stuck.
- Unscrew the valve: With the compression nut and sleeve removed, you can now unscrew the old valve. Turn it counterclockwise until it comes loose from the pipes.
- Inspect the pipes: Take a moment to inspect the pipes for any signs of damage or build-up. If you notice any issues, now is the time to address them before installing the new valve.
Installing a new compression valve
Now that you’ve successfully removed the old valve, it’s time to install a new one. Follow these steps to ensure a proper installation:
- Clean the pipes: Before installing the new valve, clean the pipes thoroughly to remove any debris or residue. This will help to maintain a tight seal and prevent future leaks.
- Wrap the threads: Take some plumber’s tape and wrap it around the threads of the new valve. This will create a watertight seal when you attach it to the pipes.
- Screw in the new valve: Carefully align the new valve with the pipes and start screwing it in clockwise. Use your hands initially, and then use an adjustable wrench to tighten it securely. Be careful not to overtighten, as this could damage the valve or the pipes.
- Slide on the compression sleeve: Once the valve is securely in place, slide the compression sleeve onto the valve.
- Tighten the compression nut: Finally, use your adjustable wrench to tighten the compression nut onto the valve. Again, be sure not to overtighten, as this could cause damage.
With the new compression valve installed, you can now turn on the water supply and test for any leaks. If you notice any issues, double-check your installation to ensure everything is tight and secure. Replacing a damaged compression valve is a relatively simple DIY task that can save you time and money in the long run.
Frequently Asked Questions
How Tight Should A Compression Valve Be?
A compression valve should be tightened until it is snug enough to prevent leaks, but not overly tight, as it may damage the valve or the pipes. It is important to strike a balance between ensuring a secure connection and avoiding excessive force.
How Do You Install A Compression Fitting With An Insert?
To install a compression fitting with an insert, follow these steps: 1. Cut the copper pipe cleanly. 2. Slide the nut, then the compression sleeve onto the pipe. 3. Insert the pipe into the fitting body until it reaches the stop.
4. Tighten the nut firmly by hand. 5. Use two wrenches to tighten the nut an extra 1/4 turn. That’s it!
How Do You Connect A Compression Fitting?
To connect a compression fitting, start by ensuring the pipe end is clean and smooth. Slide the compression nut, then the compression ring onto the tubing. Insert the tubing fully into the fitting and tighten the nut until it forms a watertight seal.
Can I Replace A Soldered Shut Off Valve With Compression?
Yes, you can replace a soldered shut off valve with a compression valve.
Conclusion
To conclude, learning how to install a compression valve can greatly enhance your plumbing skills and save you money on plumber fees. By following the steps outlined in this blog post, you can easily and successfully install a compression valve in your home.
Remember, proper installation is crucial for the valve to function efficiently and prevent leaks. So don’t hesitate to put your newfound knowledge into practice and enjoy the benefits of a properly functioning plumbing system.