To install a catch basin, 1) dig a hole at the desired location and ensure it is deep enough to accommodate the basin, 2) place the basin inside the hole, making sure it is level with the ground surface, and 3) connect the basin to the drainage system using the appropriate pipes and fittings. Installing a catch basin is a straightforward process that helps to efficiently collect and remove excess water from your property.
By following a few simple steps, you can ensure proper installation of a catch basin, preventing water damage and maintaining the overall integrity of your drainage system. We will outline the steps required to install a catch basin and provide some useful tips to help you with the process.
So, let’s get started and learn how to install a catch basin effectively.
Choosing The Right Location
When it comes to installing a catch basin on your property, choosing the right location is of utmost importance. The location will determine the effectiveness of the catch basin in collecting and diverting stormwater runoff, preventing potential flooding and water damage. In this section, we will explore the factors to consider when selecting the location for your catch basin installation.
Factors to consider when selecting the location for your catch basin installation
Before starting the installation process, it is crucial to evaluate a few key factors to ensure that you choose the optimal location for your catch basin. These factors will include evaluating the flow patterns and drainage needs of your property, as well as ensuring accessibility for maintenance and repairs.
Evaluating the flow patterns and drainage needs of your property
To determine the ideal location for your catch basin, it is essential to evaluate the flow patterns and drainage needs of your property. Here are a few key points to consider:
- Identify areas prone to pooling: Take note of any areas on your property where water tends to accumulate or pool during heavy rain. These are prime locations to install a catch basin to ensure effective drainage.
- Consider the slope of your property: A sloping property allows for gravity to assist in water flow. Installing catch basins at low points along the slope will help divert water away from vulnerable areas.
- Assess the proximity to water sources: Locate the catch basin near water sources that are prone to flooding, such as gutters, downspouts, or near the foundation of your home. This will prevent water from seeping into basements or causing other water damage.
Ensuring accessibility for maintenance and repairs
In addition to considering the flow patterns and drainage needs, it is crucial to ensure easy accessibility for maintenance and repairs. Here’s what you need to keep in mind:
- Allow sufficient space for equipment: Ensure that there is enough space around the catch basin for maintenance equipment, such as vacuum trucks or drain cleaning tools, to access and service the unit effectively.
- Position the catch basin away from obstructions: Avoid installing the catch basin near trees, buildings, fences, or other obstructions that may impede access or hinder maintenance activities.
- Consider visibility and safety: Opt for a location that is easily visible to allow for regular inspections and monitoring. It is also important to ensure the catch basin is situated away from traffic or potential hazard areas for safety purposes.
Taking these factors into account as you choose the location for your catch basin installation will help ensure optimal functionality, ease of maintenance, and ultimately, effective management of stormwater runoff on your property.

Essential Tools And Materials
Installing a catch basin is a crucial step in ensuring proper drainage for your property. Whether you are dealing with excess rainwater or runoff from the gutters, a catch basin can help prevent water from pooling and causing damage. Before you begin the installation process, it is important to gather all the necessary tools and materials. In this section, we will discuss the essential tools and materials required for a successful catch basin installation.
A list of tools and materials you’ll need for the installation:
To ensure a smooth installation process, it is important to have the right tools and materials at hand. Here’s a comprehensive list of what you’ll need:
| Tools | Materials |
|---|---|
|
|
Key features to look for when selecting a catch basin:
Choosing the right catch basin is crucial for effective drainage. Here are some key features to consider:
- Size: Ensure that the catch basin is the appropriate size to accommodate the expected water flow.
- Durability: Look for a catch basin made from durable materials such as polyethylene or concrete to withstand weather conditions.
- Grate Type: Consider the type of grate that will suit your needs, whether it’s a round or square grate or one designed to prevent debris from entering.
- Outlet Capacity: Check the outlet capacity of the catch basin to ensure it can handle the anticipated volume of water.
- Accessibility: Opt for a catch basin design that allows easy access for maintenance and cleaning purposes.
Understanding the different types of pipes and fittings required:
In addition to the catch basin itself, you will need various types of pipes and fittings to connect the catch basin to the desired drainage system. Here is a breakdown of the most common types:
- PVC Pipes: PVC pipes are widely used due to their durability and affordability. They come in various sizes and can be easily cut and connected using PVC fittings.
- PVC Fittings: PVC fittings allow for smooth connections between pipes, ensuring leak-free joints. Common types include elbows, tees, couplers, and adapters.
By understanding the different types of pipes and fittings required, you can ensure proper connectivity and functionality of your catch basin system.
In conclusion, having the necessary tools, materials, and knowledge about catch basins and their installation process is essential for a successful project. By gathering the right tools, selecting the appropriate catch basin, and understanding the various pipe and fitting types, you can ensure a well-functioning drainage system for your property.
Measuring And Marking
Accurately measuring the area where the catch basin will be installed
One of the most crucial steps in installing a catch basin is accurately measuring the area where it will be placed. This ensures that the catch basin will be positioned correctly and effectively collect excess water. To begin, you will need a tape measure, marker or chalk, and a straightedge.
First, measure the length and width of the area where the catch basin will be installed. Use the tape measure to determine the dimensions precisely. Take multiple measurements to ensure accuracy, as small variations can affect the fit of the catch basin.
Once you have measured the length and width, multiply these two values to find the total area of the catch basin. This will help you decide on the size of the catch basin you will need. Remember to consider the depth of the catch basin as well, as this will affect its capacity to hold water.
Using the marker or chalk, draw a rectangle on the ground to represent the dimensions of the catch basin. Make sure the lines are straight and clearly visible, as these marks will guide you during the installation process.
Marking the location and dimensions of the catch basin
In addition to marking the dimensions of the catch basin, it is crucial to mark its precise location. This will ensure that the catch basin is installed in the right spot, optimizing its efficiency in draining excess water.
Start by marking the center point of the catch basin area you have measured. This can be done by measuring the length and width and finding the midpoint of each side. Alternatively, you can use a measuring tape to measure the diagonals of the marked rectangle and find their intersection, which will be the center.
Once you have found the center point, mark it on the ground with a visible symbol, such as an “X” or a small circle. This will serve as a reference point for positioning the catch basin during the installation process.
Next, use the straightedge to connect the corners of the marked rectangle to the center point. This will create an accurate outline of the catch basin’s location on the ground, allowing you to visualize its position before proceeding with the installation.
Determining the proper slope for optimal drainage
Proper drainage is essential for the effective functioning of a catch basin. To ensure optimal drainage, it is crucial to determine the proper slope for the area where the catch basin will be installed.
Start by identifying the lowest point in the surrounding area where the excess water will flow towards. This can often be the street or a nearby drainage system. Once you have identified the lowest point, use a leveling instrument or a simple water level to measure the elevation difference between this point and the catch basin area.
Based on the estimated distance and the desired slope, you can calculate the drop per foot required for proper drainage. Typically, a minimum slope of 0.25 inches per foot is recommended for catch basins. This ensures that water flows freely towards the catch basin and does not accumulate or cause flooding.
Once you have calculated the required drop per foot, use a marker or chalk to mark the desired slope on the ground, starting from the location of the catch basin and extending towards the lowest point. This slope will guide the excavation process and help ensure that the catch basin is positioned correctly for optimal drainage.
Digging The Pit
Outlining the necessary steps for digging the pit to accommodate the catch basin.
When it comes to installing a catch basin, one of the crucial steps is digging the pit to accommodate the basin. This step sets the foundation for proper installation and ensures effective drainage. Here, we will outline the necessary steps to dig the pit effectively.
- Start by marking the desired location of the catch basin. This can be done using spray paint or stakes to ensure accuracy during excavation.
- Use a shovel or an excavator to begin digging the pit. The size of the pit will depend on the size of the catch basin you have selected. It is important to refer to the manufacturer’s instructions to determine the exact dimensions.
- For accurate measurements, use a measuring tape or a ruler to check the depth and width of the pit as you dig. Make sure the pit is deep and wide enough to accommodate the catch basin.
- As you dig, it is essential to keep safety in mind. Wear appropriate protective gear, such as gloves and boots, and be cautious of any potential hazards such as utility lines or underground pipes.
- Regularly check the depth and width of the pit with your measuring tape or ruler to ensure it aligns with the required dimensions.
- Once the pit has been dug to the required size, remove any loose dirt or debris using a shovel or a broom. This will help create a clean and stable base for the catch basin.
By following these steps, you can ensure that the pit is adequately prepared to accommodate the catch basin. This will contribute to a successful installation and optimal functionality of the drainage system.
Ensuring the pit is deep enough and wide enough for proper installation.
Proper installation of the catch basin depends on the depth and width of the pit. It is crucial to ensure that the pit meets the required dimensions to accommodate the catch basin effectively. Here are some guidelines to ensure the pit is deep and wide enough:
- Refer to the manufacturer’s instructions to determine the specific depth and width requirements for your catch basin.
- Use a measuring tape or a ruler to check the depth and width of the pit as you dig. This will help you determine if any adjustments are necessary.
- If the pit is not deep enough, continue digging until the desired depth is achieved.
- If the pit is not wide enough, use a shovel or an excavator to widen it accordingly. Having a wide enough pit ensures proper placement of the catch basin and allows for sufficient flow of water.
Remember, it is crucial to follow the manufacturer’s guidelines and instructions for the specific catch basin you are installing. By ensuring the pit is deep and wide enough, you lay the groundwork for a successful installation that will effectively manage drainage.
Removing any obstacles or debris from the excavation area.
Before installing the catch basin, it is essential to remove any obstacles or debris from the excavation area. This helps create a clean and stable base for the catch basin, ensuring its proper functionality. Here are the necessary steps to remove obstacles or debris:
- Inspect the excavation area for any large rocks, tree roots, or other obstructions that may hinder the installation process.
- Use a shovel or a pry bar to carefully remove any large rocks or obstacles. Ensuring a clear and even surface allows for secure and stable placement of the catch basin.
- Clear away any loose dirt, leaves, or debris using a broom or a shovel. A clean excavation area prevents potential clogging and ensures unobstructed water flow into the catch basin.
- Dispose of the removed obstacles and debris responsibly to maintain a safe and tidy work environment.
By removing any obstacles or debris from the excavation area, you create an optimal environment for installing the catch basin. This step promotes smooth water flow, reduces the risk of clogging, and enhances the overall performance of the drainage system.
Creating A Stable Base
A catch basin is an essential component of any drainage system. It effectively collects excess water, preventing it from pooling or causing damage to the surrounding area. However, in order for a catch basin to function optimally, it must be installed on a stable base. In this section, we will discuss the steps involved in creating a stable base for your catch basin installation.
Preparing the base of the pit to provide stability for the catch basin
The first step in creating a stable base for your catch basin is to prepare the pit. Start by digging a hole that is slightly larger than the dimensions of the catch basin. Ensure that the depth of the pit allows for proper installation and effective drainage.
Next, clear the pit of any debris or loose soil. This will provide a clean and solid foundation for the catch basin. It is important to remove any rocks, roots, or other obstructions that may affect the stability of the base.
Compacting the soil and adding a layer of gravel for improved drainage
After the pit has been cleared, it is crucial to compact the soil within the pit. This can be done using a hand tamper or a compactor machine. The goal is to create a firm and level surface that will support the catch basin.
Once the soil has been compacted, the next step is to add a layer of gravel. This layer will not only provide additional stability but also improve drainage. Spread a 2 to 3-inch layer of gravel evenly across the base of the pit. Ensure that the gravel is firmly packed and level.
Leveling the base to ensure proper alignment of the catch basin
Before proceeding with the catch basin installation, it is essential to level the base. This will ensure that the catch basin sits properly and functions effectively. Use a level tool to check the surface and make necessary adjustments.
If the base is not level, the catch basin may not align correctly with the piping system, resulting in inadequate drainage. Make sure to take the time to level the base properly to avoid any potential issues in the future.
By following these steps to create a stable base, you will ensure that your catch basin is installed correctly and functions efficiently. A stable base is crucial for the long-term performance of your drainage system, and it is worth the extra effort to ensure its durability.
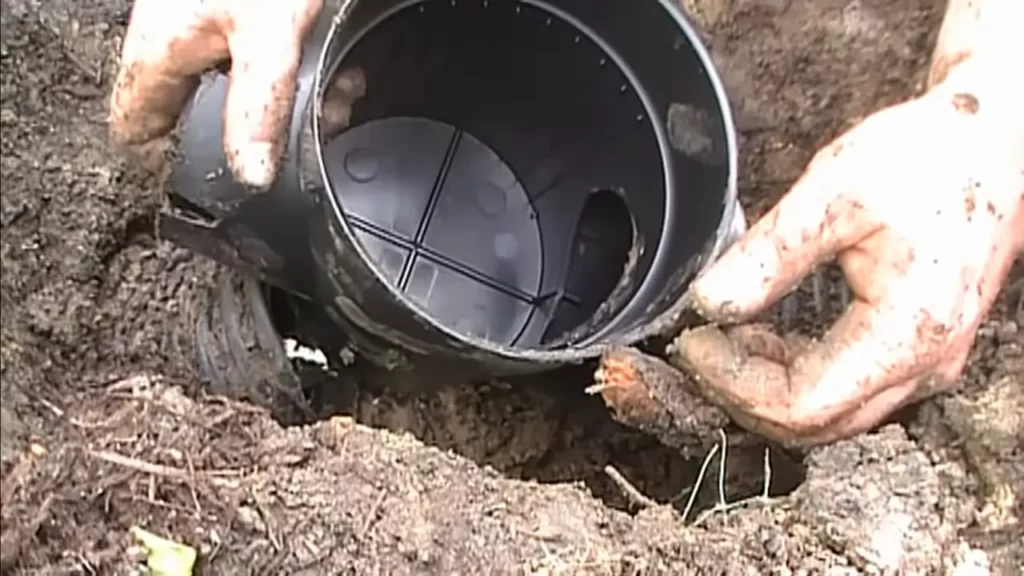
Connecting The Pipes
When it comes to installing a catch basin, connecting the pipes properly is crucial to ensure the smooth flow of water and prevent any leakage or blockage. In this section, we will guide you through the steps of connecting the incoming and outgoing pipes to the catch basin, selecting the appropriate fittings and sealants, and testing the connection to ensure there are no leaks.
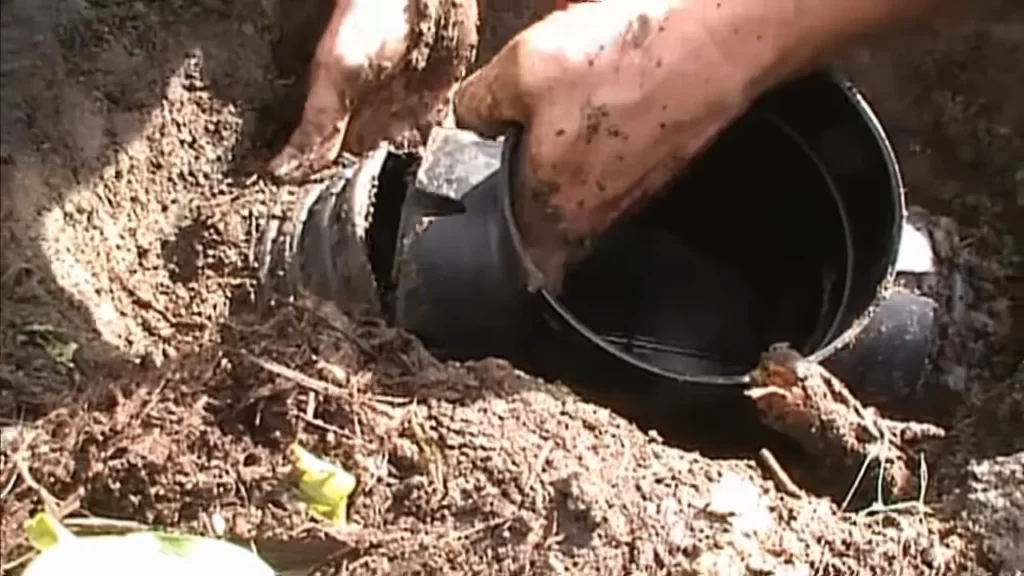
Connecting the incoming and outgoing pipes to the catch basin
1. Before connecting the pipes, make sure the catch basin is positioned in the desired location and properly aligned with the drainage system. This will ensure an efficient water flow.
2. Begin by measuring the length of the incoming and outgoing pipes that need to be connected to the catch basin. Cut the pipes to the required length using a saw or pipe cutter. Make sure the ends of the pipes are clean and smooth.
3. Apply PVC primer to the outside of the pipe ends and the inside of the fitting sockets. This will help to remove any dirt or debris and ensure a secure connection.
4. Apply PVC glue or adhesive to the primed areas of the pipe and fitting sockets. Insert the pipe into the fitting socket and twist it a quarter turn to ensure a proper bond. Hold the connection firmly for a few seconds to allow the glue to set.
5. Repeat the above steps for connecting the outgoing pipe to the catch basin.
Selecting the appropriate fittings and sealants for a secure connection
1. When selecting fittings for connecting the pipes to the catch basin, make sure they are compatible with the type and size of the pipes you are using. PVC fittings are commonly used for their durability and resistance to corrosion.
2. Consider using rubber gaskets or couplings to ensure a watertight seal. These fittings are flexible and can accommodate slight variations in pipe diameter, allowing for a secure connection.
3. Additionally, using thread sealant tape or pipe dope can further enhance the connection between the pipes and fittings. Apply a thin layer of sealant to the threaded ends of the pipes and tighten the fittings using a wrench.
Testing the connection to ensure there are no leaks
1. Once the pipes are connected to the catch basin, it is crucial to test the connection for any potential leaks. Fill the catch basin with water and allow it to settle.
2. Observe the connection points closely for any signs of leakage. Inspect the fittings, joints, and pipe connections for drips or water seepage. If any leaks are detected, tighten the fittings or apply additional sealant as necessary.
3. Repeat the testing process until the connection is completely leak-free. This will ensure a proper installation and efficient drainage system.
In conclusion, connecting the pipes properly is a critical step in installing a catch basin. By following the above steps and selecting the appropriate fittings and sealants, you can ensure a secure connection that minimizes the risk of leaks or blockages. Remember to test the connection thoroughly to ensure a reliable and efficient drainage system.
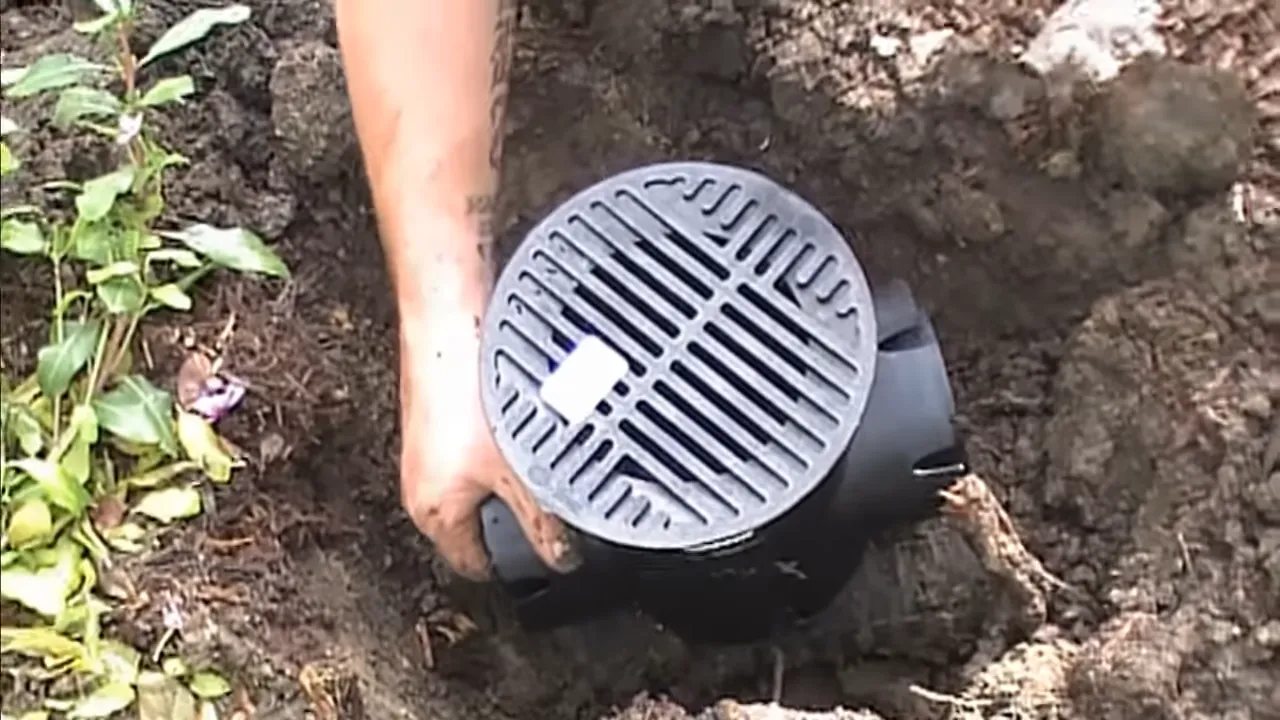
Placing The Catch Basin
Placing the catch basin in the correct position is crucial for efficient drainage. Here’s how you can ensure the catch basin is properly placed:
Positioning the catch basin in the excavated pit.
The first step in installing a catch basin is to prepare an excavated pit that is large enough to accommodate the basin. Once the pit is ready, carefully position the catch basin in the center of the pit, ensuring that there is enough clearance around the edges.
A common mistake during this step is not checking the depth of the pit. It is important to ensure that the catch basin is placed at the correct depth according to the drainage system’s requirements. This will prevent any water overflow or ineffective drainage.
Ensuring the basin is level and aligned with the drainage pipes.
Once the catch basin is in position, it is important to check that it is level and aligned with the drainage pipes. A basin that is not level can cause improper water flow and drainage issues. To check the level, use a carpenter’s level on various points of the catch basin. Adjust its position if necessary until it is perfectly level.
To ensure alignment with the drainage pipes, use a measuring tape to confirm that the openings of the basin are properly aligned with the pipes. Misalignment can lead to disruptions in the flow of water, which can result in potential blockages and maintenance issues in the future.
Backfilling the pit with soil to secure the catch basin in place.
Once the catch basin is level and aligned with the drainage pipes, it is time to secure it in place by backfilling the pit with soil. Start by filling the space around the basin with **compacted soil**, taking care to avoid any direct contact with the basin itself.
It is essential to do this step in small increments, ensuring the soil is compacted as you go. This prevents any settling of the catch basin and ensures its stability over time. Additionally, consider using **landscaping fabric** to separate the soil and prevent any fine particles from clogging the drainage system.
Continue filling and compacting the soil until the pit is completely filled and the catch basin is securely placed. Remember to leave enough space for the final layer of topsoil and sod, ensuring a seamless integration of the catch basin with your landscape.
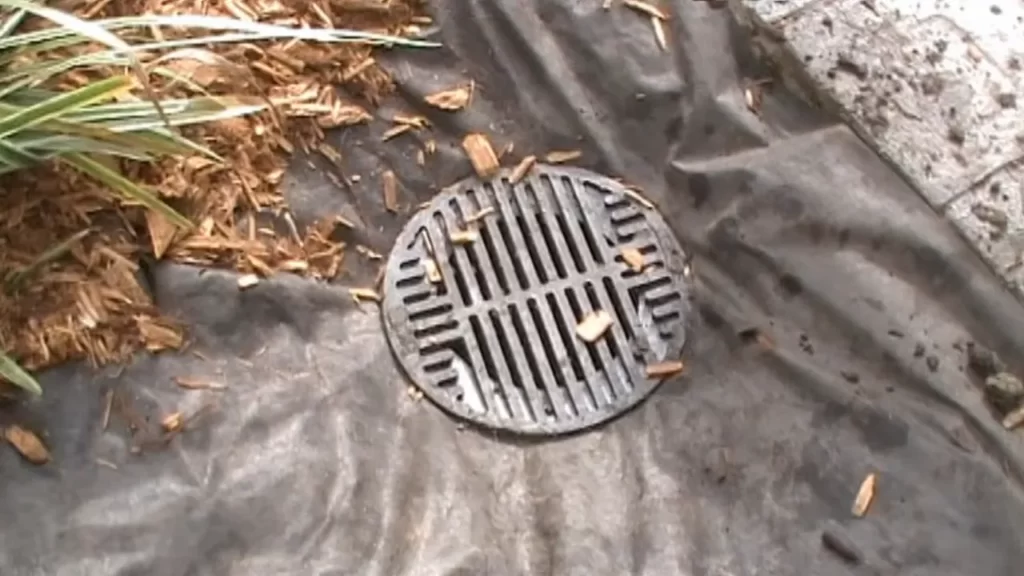
Proper Grate Installation
Installing the appropriate grate for a catch basin is crucial to its overall functionality and effectiveness. The grate serves as a barrier, preventing debris and particles from entering the catch basin while allowing water to flow freely. This ensures that the catch basin operates optimally, preventing flooding and water damage.
Installing the appropriate grate for the catch basin
When selecting a grate for your catch basin, it is important to choose one that is suitable for the specific application. Consider factors such as anticipated water flow, expected debris volume, and the surrounding environment. Different grates are designed to accommodate various conditions, so selecting the right one will ensure optimal performance.
For areas with heavy foot or vehicular traffic, choose a grate with a higher load-bearing capacity to withstand the weight. Additionally, consider the openness of the grate and the size of the openings. Grates with smaller openings are better suited for areas with fine debris, while larger openings are more suitable for areas with larger debris or heavy rainfall.
Ensuring proper fit and alignment
Once you have selected the appropriate grate for the catch basin, it is important to ensure proper fit and alignment during installation. Improper fit or misalignment can result in gaps or obstructions, reducing the effectiveness of the catch basin and potentially causing clogs or flooding.
To ensure proper fit, measure the dimensions of the catch basin opening and compare them to the dimensions of the grate. The grate should cover the entire opening without any gaps. If necessary, you may need to trim or adjust the grate to achieve a perfect fit.
When aligning the grate to the catch basin, make sure it sits flush against the opening. Use a level to ensure it is perfectly horizontal or sloped according to the designated drainage direction. This will allow for proper water flow and prevent pooling or stagnation.
Securing the grate to prevent shifting or movement
Securing the grate is essential to prevent shifting or movement, particularly in high-traffic areas. Without proper security measures, the grate may become dislodged, creating a safety hazard and compromising the function of the catch basin.
There are various methods to secure the grate, depending on the type of catch basin and grate design. Common methods include using bolts or screws to fasten the grate to the catch basin frame or employing security features such as locking devices or tamper-resistant screws.
During installation, ensure that the grate is securely attached with no loose or wobbly parts. Periodically inspect the grate to identify any signs of wear or damage, and replace as necessary to maintain proper functionality.
By carefully selecting and installing the appropriate grate, ensuring proper fit and alignment, and securing it effectively, you can enhance the overall performance and longevity of your catch basin. This will help prevent clogs, flooding, and costly repairs, ensuring the continued functionality of your drainage system.
Finishing Touches
Once you have successfully installed the catch basin, it’s time to give attention to the finishing touches. These final steps will not only help to ensure the functionality of the catch basin but also restore the landscape to its original condition. Follow the guidelines below to complete the installation process:
Backfilling any remaining gaps around the catch basin
After placing the catch basin into the excavated hole and connecting the necessary pipes, it’s important to backfill any gaps that still exist around the basin. This is crucial for the proper functioning and stability of the catch basin. Take the following steps to backfill the gaps:
- Begin by filling the gaps around the catch basin with the excavated soil. Use a shovel or a small hand tamper to compact the soil firmly.
- Make sure to fill the gaps evenly and avoid leaving any air pockets. Compacting the soil in layers will help ensure stability.
- Continue filling the gaps until the catch basin is surrounded by compacted soil, creating a secure base.
Restoring the landscape to its original condition
With the catch basin securely installed and the gaps backfilled, it’s time to focus on restoring the landscape to its original condition. This step will not only enhance the aesthetic appeal of your surroundings but also help the catch basin blend seamlessly into its environment. Follow these guidelines to restore the landscape:
- Smooth out the soil and ensure it is level with the surrounding area. Use a rake or shovel to remove any excess soil or debris.
- Consider adding a layer of topsoil, which will promote healthy vegetation growth and help prevent erosion.
- If there were any plants or grass displaced during the installation, carefully replant or reseed these areas to restore the natural beauty of the landscape.
Conducting a final inspection for any necessary adjustments
The last step in the catch basin installation process is conducting a final inspection to ensure everything is in place and functioning correctly. Below are the key points to cover during the inspection:
- Verify that the catch basin is properly connected to the drainage system, with all pipes securely fastened.
- Check for any leakage or signs of water infiltration around the catch basin or pipe connections.
- Test the functionality of the catch basin by pouring water into the grate and observing how efficiently it drains.
- If any issues or necessary adjustments are identified during the inspection, address them promptly to ensure the catch basin works optimally.
By completing these finishing touches, you can rest assured that your catch basin is not only installed correctly but also integrated harmoniously into its surroundings. Now you can enjoy the benefits of an effective drainage system while maintaining the beauty of your landscape.
Regular Cleaning And Inspection
Regular cleaning and inspection is crucial to ensure the proper functioning and longevity of your catch basin. By developing a maintenance schedule, removing debris and sediment to prevent clogs, and inspecting the catch basin for any signs of damage or wear, you can effectively keep your drainage system in top condition. Let’s explore each of these tasks in detail:
Developing a maintenance schedule for cleaning the catch basin
Creating a regular maintenance schedule allows you to stay on top of cleaning your catch basin and prevents any potential issues from escalating. Depending on the level of usage and environmental factors, you may need to clean the catch basin every three to six months. A well-maintained catch basin can save you from costly repairs in the future.
Removing debris and sediment to prevent clogs
Debris and sediment tend to accumulate in catch basins over time, posing a risk of clogs and drainage problems. Regularly removing this buildup is essential for proper functioning. To begin, ensure you wear protective gloves and use appropriate tools, such as a shovel and bucket, to gather and dispose of the debris. Make sure to clear the inlet and outlet pipes of any obstructions as well.
Inspecting the catch basin for any signs of damage or wear
Regular inspections help identify any potential issues with the catch basin, such as cracks, corrosion, or deterioration. Inspect the surface of the catch basin for cracks or any signs of sinking. Additionally, check the grates, inlet, and outlet pipes for any obstructions or damage. If you notice any issues, it’s crucial to address them promptly to prevent further damage to the catch basin and the surrounding infrastructure.
By adhering to a regular cleaning and inspection routine, you can ensure the efficient functioning of your catch basin and avoid costly repairs and inconveniences. Remember, prevention is always better than cure when it comes to maintaining catch basins.
Resolving Issues And Repairs
Resolving Issues and Repairs: Catch basins play a crucial role in maintaining proper drainage in residential and commercial areas. However, like any other infrastructure, catch basins may encounter issues that require immediate attention. Understanding how to identify and troubleshoot these problems can save you time, money, and potential damage to the surrounding environment. In this section, we will discuss common problems with catch basins and their solutions, as well as provide guidance on when to seek professional assistance for repairs.
Identifying common problems with catch basins and their solutions
When it comes to catch basins, some common problems may arise. Here are a few issues you might encounter and their potential solutions:
- Clogging: Catch basins can become clogged over time with debris, leaves, and silt. This can lead to poor drainage and even flooding during heavy rainfall. To resolve this issue, regularly clean the catch basin by removing the accumulated debris. Use a small shovel or a scoop to scoop out the dirt and debris. Dispose of the waste materials properly to prevent further clogging.
- Leakage: Leaking catch basins can cause water to seep into the surrounding areas, leading to erosion and potential damage to structures. To address this problem, inspect the catch basin for any visible cracks, loose fittings, or damaged components. Replace or repair these parts accordingly. Applying a rubber sealant or epoxy can help to seal any small cracks or leaks.
- Improper drainage: If you notice that water is not draining efficiently from the catch basin, it could be a sign of improper installation or blockage within the drainage system. Check if the catch basin is properly connected to the drain pipe and ensure that the drainage system is clear of any obstructions. If necessary, adjust the slope of the surrounding landscape to encourage better water flow towards the catch basin.
Troubleshooting issues such as clogs, leaks, or improper drainage
Dealing with clogs, leaks, or improper drainage in catch basins requires proactive troubleshooting. Here are some steps you can take to resolve these issues:
- Inspect the catch basin: Carefully examine the catch basin for any visible signs of clogs, leaks, or improper drainage. Use a flashlight to get a clear view of the interior components.
- Clear clogs: If you find any blockages, use a plumbing snake or a high-pressure hose to remove them. Be cautious not to damage the internal structure of the catch basin.
- Check for leaks: Conduct a thorough inspection of the catch basin and its connections, looking for any signs of leaks or cracks. Tighten loose fittings and replace damaged components as needed.
- Ensure proper drainage: Observe the flow of water in and out of the catch basin. If you notice any areas of stagnation or slow drainage, investigate and clear any potential obstructions in the drainage system.
Knowing when to seek professional assistance for repairs
While some catch basin issues can be resolved with basic troubleshooting, certain repairs may require the expertise of a professional. Consider seeking professional assistance in the following scenarios:
- If you are unable to identify the cause of the problem.
- If the catch basin is severely damaged or corroded.
- If the issue persists despite your efforts to troubleshoot and resolve it.
- If you lack the necessary tools or skills to perform the repairs.
Remember, addressing catch basin issues promptly can help prevent more significant problems in the future. By being proactive and knowing when to seek professional help, you can maintain an effective and efficient drainage system for your property.
Enhancing The Functionality
Installing a catch basin is a practical way to prevent pooling water and potential flooding in your property. While the catch basin itself is effective at collecting rainwater and diverting it away from your property, there are additional features you can implement to further enhance its functionality. Incorporating these additional features will not only improve the effectiveness of the catch basin but also help to prolong its lifespan and reduce maintenance requirements.
Implementing additional features to improve the effectiveness of the catch basin
There are a few key features you can consider implementing alongside your catch basin to enhance its overall efficiency.
- Using filters or screens: Debris clogging up the catch basin can hamper its performance by causing blockages and reducing the flow of water. To prevent this, installing filters or screens at the inlet point of the basin can help trap leaves, trash, and other debris before it enters the system. This simple addition can significantly reduce the amount of maintenance required and help to ensure the catch basin operates at its optimal capacity.
- Installing an overflow pipe: During heavy rainfall situations, the volume of water entering the catch basin may exceed its capacity. To prevent overflow and potential damage, installing an overflow pipe is crucial. This pipe allows excess water to flow out of the system and safely away from your property. By redirecting the excess water, you can avoid flooding and prevent any potential damage to the catch basin itself.
Using filters or screens to prevent debris from entering the basin
One of the most effective ways to protect your catch basin from debris is by installing filters or screens. These simple yet highly efficient additions act as a barrier, preventing leaves, twigs, and other debris from entering the basin and obstructing the flow of water. By incorporating filters or screens into your catch basin installation, you can minimize blockages and reduce maintenance requirements. Regular cleaning and clearing of the filters or screens will help to ensure the catch basin operates efficiently and effectively at all times.
Installing an overflow pipe for heavy rainfall situations
Heavy rainfall can pose a challenge for catch basins, as the amount of water entering the system may exceed its capacity. To prevent overflow and potential flooding, it is essential to install an overflow pipe. This additional feature provides an outlet for excess water to flow out of the catch basin and away from your property. By incorporating an overflow pipe into your catch basin installation, you can confidently handle heavy rain events without the risk of water damage.
In conclusion, by implementing additional features such as filters or screens and overflow pipes, you can effectively enhance the functionality of your catch basin. These features work together to prevent debris from entering the system and prevent overflow during heavy rainfall situations. By ensuring the catch basin operates at its optimal capacity, you can protect your property from potential flooding and prolong the lifespan of the catch basin itself.
Frequently Asked Questions
Should I Drill Holes In Catch Basin?
Drilling holes in a catch basin is not recommended. It can compromise its function and lead to water leakage or debris clogging. It’s best to consult with a professional for proper drainage solutions.
What Is The Difference Between A Lawn Basin And A Catch Basin?
A lawn basin is designed to collect and distribute water evenly across a lawn, while a catch basin is used to capture and remove excess water from a specific area. Lawn basins help with irrigation, while catch basins prevent flooding.
What Is The Difference Between A Catch Basin And A French Drain?
A catch basin is a collection point for stormwater runoff, while a French drain is a porous trench filled with gravel that helps redirect and disperse excess water. Catch basins collect water, while French drains guide water away to prevent flooding.
Can You Install A Catch Basin In A French Drain?
Yes, you can install a catch basin in a French drain. Installing a catch basin helps to collect excess water and debris, preventing clogs and allowing proper drainage. It is a beneficial addition to the French drain system.
Conclusion
To sum up, installing a catch basin is a crucial step in ensuring proper drainage and preventing water damage. By following the step-by-step guide provided, you can confidently take on this task. Remember to assess the location, gather the necessary tools, and carefully install the catch basin.
With proper maintenance and regular inspections, your catch basin will effectively manage stormwater runoff for years to come. Safeguard your property and contribute to a cleaner environment with this simple yet essential installation.