
To install a butcher block island, measure the space, assemble the island, secure it to the floor, and seal the wood for protection. Looking to add functionality and style to your kitchen?
Installing a butcher block island can be a great solution. Whether you need extra counter space or a prep area, a butcher block island provides a durable and attractive option. But before you dive in, it’s important to understand the installation process.
In this guide, we will walk you through the steps of installing a butcher block island in your kitchen. From measuring the space to sealing the wood, we’ve got you covered. So let’s get started on creating a functional and beautiful addition to your kitchen with a butcher block island installation.
Step 1: Gather The Necessary Tools And Materials
Before you embark on installing a butcher block island in your kitchen, it’s crucial to gather all the essential tools and materials. Having everything ready will streamline the installation process and ensure a smooth and successful outcome. Below, you’ll find a comprehensive list of the required tools and materials, along with an explanation of why each item is essential for the job.
List of Required Tools and Materials:
1. Butcher Block Island:
The centerpiece of the installation process is, of course, the butcher block island itself. Ensure you have selected the right size, style, and finish that complements your kitchen decor and matches your needs.
2. Measuring Tape:
A measuring tape is an essential tool for accurate measurements. You need to measure the available space in your kitchen to determine the dimensions of the butcher block island.
3. Pencil:
A simple pencil will allow you to mark measurements and guidelines on the kitchen floor, ensuring precise placement of the butcher block island. Having a pencil handy will facilitate the installation process.
4. Level:
A level is indispensable to ensure the countertop of the butcher block island is perfectly balanced and flat. Checking the level at different stages of the installation will give you peace of mind that everything is aligned correctly.
5. Wood Screws:
To secure the butcher block island firmly to the floor, you will need high-quality wood screws. Make sure to choose screws that are the appropriate length and weight capacity for your specific island.
6. Power Drill:
A power drill will come in handy for drilling pilot holes and driving the wood screws into the floor. Opt for a reliable drill that provides enough power and control to make the installation a breeze.
7. Screwdriver:
In addition to the power drill, a screwdriver will be necessary for any manual screwing or fine-tuning during the installation process. Having both tools will give you flexibility and convenience.
8. Wood Glue:
Wood glue is a crucial adhesive that ensures a sturdy and long-lasting installation. Applying wood glue, especially in areas where the butcher block island connects with other surfaces, will enhance its stability.
9. Drop Cloth:
A drop cloth or protective covering is essential to keep your kitchen floor clean and protected during the installation process. Spills and debris may occur, so it’s wise to have a drop cloth ready.
10. Cleaning Supplies:
Once the installation is complete, you’ll want to give your new butcher block island a thorough clean. Having the appropriate cleaning supplies on hand will make this task efficient and ensure the island looks its best.
By gathering all the necessary tools and materials before starting the installation process, you are setting yourself up for success. This upfront preparation will ensure a smooth workflow, minimize potential interruptions, and lead to a beautifully installed butcher block island in your kitchen.
Step 2: Measure And Plan The Installation Area
Proper measurement and planning are crucial steps in installing a butcher block island. Taking precise measurements ensures that the island fits perfectly in the available space and is aesthetically pleasing. In this step, we will guide you on how to accurately measure the space for the butcher block island, discuss considerations for the placement and layout, and provide tips for ensuring proper functionality and accessibility.
How to Accurately Measure the Space for the Butcher Block Island
Measuring the space is the first and most essential part of planning for the installation of a butcher block island. To achieve accurate measurements, follow these steps:
- Clear the area: Start by removing any obstacles or furniture that may obstruct your access to the space.
- Take horizontal measurements: Use a measuring tape to determine the length and width of the area where you plan to install the island. Record these measurements meticulously.
- Consider vertical measurements: If your butcher block island will have overhead cabinets or shelves, measure the height from the floor to the desired height of the island’s surface.
- Account for clearances: It’s important to leave ample space around the island for proper functionality. Consider leaving at least 36 inches of clearance on all sides to allow for comfortable movement while cooking and entertaining.
Considerations for the Placement and Layout of the Island
Choosing the right placement and layout for your butcher block island is essential to ensure optimal workflow and aesthetic appeal. Here are a few considerations to keep in mind:
- Proximity to existing appliances: Consider the placement of your island in relation to existing appliances like the stove, sink, and refrigerator. Placing the island in close proximity to these appliances can enhance the efficiency of your kitchen.
- Traffic flow: Take into account the natural traffic flow in your kitchen. Ensure that the island’s placement doesn’t hinder movement around the space, especially during busy cooking sessions.
- Balance and symmetry: Strive for a harmonious visual balance by aligning the island with other aspects of your kitchen, such as countertops, cabinets, or windows.
- Lighting considerations: Evaluate the lighting in your kitchen and ensure that the island doesn’t block any natural or artificial light sources. Consider adding pendant lights above the island for both functionality and aesthetics.
Tips for Ensuring Proper Functionality and Accessibility
While measurement and placement are crucial, ensuring proper functionality and accessibility is equally important. Follow these tips to optimize the functionality of your butcher block island:
- Leave enough workspace: Ensure there is enough countertop space on the island for food preparation, serving, and other kitchen tasks.
- Consider storage options: Incorporate drawers, shelves, or cabinets into the island’s design to provide additional storage space for utensils, cookware, and other kitchen essentials.
- Account for seating: If you plan to include seating at the island, factor this into your layout. Leave ample legroom for comfortable seating and consider the appropriate height for stools or chairs.
- Accessibility for all: Ensure that the island’s height and features accommodate individuals with different mobility needs. If necessary, choose a design that allows for wheelchair accessibility.
- Allow for electrical outlets: If you intend to use small appliances or charge electronic devices on the island, ensure there are sufficient electrical outlets conveniently placed.
By following these measurement, placement, and functionality tips, you can create an inviting and practical butcher block island that enhances the functionality and visual appeal of your kitchen space.
Choosing The Right Butcher Block Island
When it comes to adding functionality and a touch of natural beauty to your kitchen, a butcher block island is the perfect choice. Not only does it provide extra workspace, but it also adds warmth and character to your culinary space. However, with so many options available in the market, choosing the right butcher block island can be a challenging task. Let’s explore the factors to consider when selecting the ideal butcher block island for your kitchen, the different types and sizes available, as well as the pros and cons of each type of butcher block material.
Factors to consider when selecting the ideal butcher block island for your kitchen
Before making a decision, there are several factors that you should take into account:
- Size: Measure the available space in your kitchen to determine the suitable size of the butcher block island. Consider the dimensions of the island, including its length, width, and height. Ensure that it fits comfortably in your kitchen without obstructing the flow of traffic.
- Material: Butcher block islands are typically made from several different types of wood, such as maple, oak, cherry, and walnut. Each material has its unique characteristics in terms of durability, grain pattern, and color. Consider your personal preference and the overall design of your kitchen when choosing the material.
- Style: Butcher block islands come in various styles, ranging from traditional to contemporary. Consider the existing decor and style of your kitchen to select an island that complements the overall aesthetic.
- Functionality: Determine how you intend to use the butcher block island. Do you need additional storage space? Would you like it to have built-in features such as a sink or a stove? Considering the intended functionality will help you choose an island that meets your specific needs.
- Maintenance: Different butcher block materials have varying maintenance requirements. Some may require regular sealing or oiling to maintain their quality and prevent damage. Consider the time and effort you are willing to invest in maintenance when choosing the material.
Different types and sizes of butcher block islands available in the market
Butcher block islands come in a variety of types and sizes to suit different kitchen layouts and preferences. Here are some common options:
| Type | Description |
|---|---|
| Freestanding | These islands are movable and can be placed anywhere in the kitchen. They often feature additional storage shelves or drawers. |
| Fixed | Fixed islands are attached to the kitchen floor or wall, providing a more permanent and stable solution. They can also incorporate various built-in features. |
| Block Size | Butcher block islands come in different sizes, including small, medium, and large. Consider the available space in your kitchen and the intended use of the island to determine the optimum size. |
Pros and cons of each type of butcher block material
Here are the pros and cons of some common types of butcher block materials:
- Maple: Maple is a popular choice for butcher block islands due to its durability and resistance to scratches. It has a light color and a tight grain pattern, giving it a classic and timeless appearance.
- Oak: Oak is a strong and sturdy material that adds a rustic charm to your kitchen. It has a prominent grain pattern and can be stained to achieve various shades.
- Cherry: Cherry wood provides a rich and warm tone to your kitchen. It develops a beautiful patina over time and is known for its durability.
- Walnut: Walnut features a luxurious, dark brown color and a distinct grain pattern. It adds sophistication and elegance to any kitchen, but it tends to be more expensive than other materials.
Consider the pros and cons of each material in terms of appearance, durability, and maintenance to make an informed decision that suits your preferences and lifestyle.

Step 3: Prepare The Installation Area
Now that you have gathered all the necessary tools and materials for installing your butcher block island, it’s time to prepare the installation area. This step is crucial as it ensures a smooth and successful installation process. In this step, you will need to clear the existing countertop or kitchen island, remove any appliances, cabinets, or fixtures that may hinder the installation process, and clean and level the installation area.
Clearing the Existing Countertop or Kitchen Island:
Before you can begin installing your butcher block island, you need to clear the existing countertop or kitchen island. This means removing any items or objects that are currently on the surface. Clearing the area will not only provide you with a clean slate to work with but will also prevent any potential roadblocks during the installation process. Ensure that the surface is free from all items before proceeding to the next step.
Removing any Appliances, Cabinets, or Fixtures that may Hinder the Installation Process:
Once the surface is clear, you will need to remove any appliances, cabinets, or fixtures that may obstruct the installation process. This step is essential as it allows you to have unrestricted access to the installation area. If there are any cabinets or fixtures attached to the existing countertop or kitchen island, carefully detach them to make room for the butcher block island installation.
Cleaning and Leveling the Installation Area:
With the surface cleared and any hindrances removed, the next step is to clean and level the installation area. This ensures a stable and secure foundation for your butcher block island. Start by thoroughly cleaning the surface using a mild cleaner and a soft cloth. Remove any dirt, debris, or residue that may be present. Once the surface is clean, use a level to check for any unevenness. If there are any discrepancies, use shims or adjust the legs of the island accordingly to achieve a level surface.
In conclusion, step 3 of installing your butcher block island involves clearing the existing countertop or kitchen island, removing any appliances, cabinets, or fixtures that may hinder the installation process, and cleaning and leveling the installation area. By following these steps diligently, you are ensuring a proper and successful installation process for your butcher block island.
Preparing The Butcher Block Island
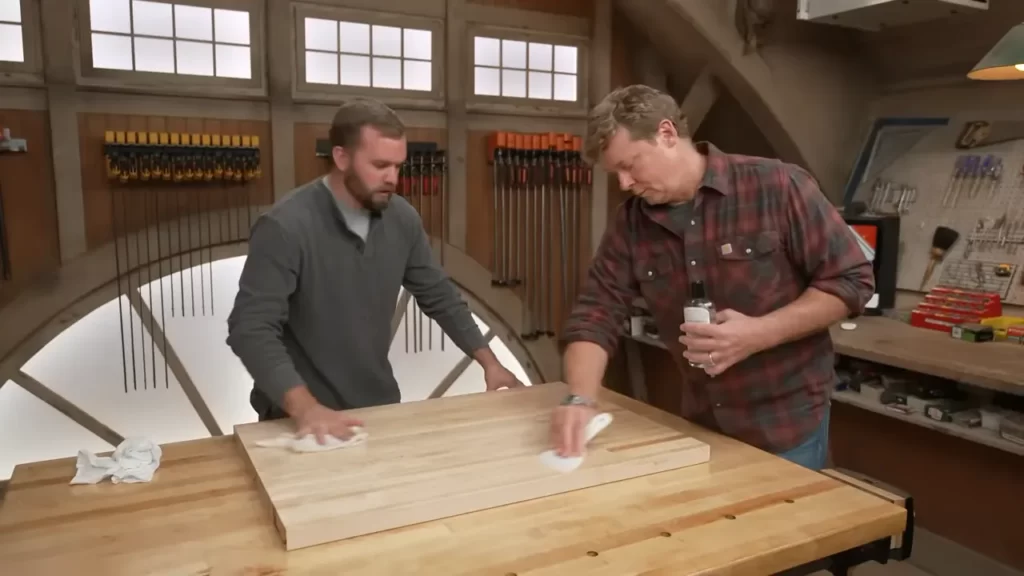
If you’re planning to add a butcher block island to your kitchen, you’re in for a treat. This versatile and durable countertop material not only adds a touch of warmth and beauty to your space but also provides a functional workspace for meal prep and entertaining. But before you can start enjoying your new butcher block island, there are a few important steps you need to take to prepare the surface. In this guide, we’ll walk you through the process of inspecting the butcher block island, sanding and smoothing the surface, and applying a finish or sealer to protect the wood from moisture and stains.
Inspecting the Butcher Block Island for Any Defects or Damage
Before you begin any work on your butcher block island, start by inspecting it for any defects or damage. Carefully examine the surface for cracks, dents, or scratches that may have occurred during shipping or handling. It’s essential to address these issues before moving forward to ensure the longevity and beauty of your butcher block island.
Sanding and Smoothing the Surface of the Butcher Block
Once you’ve inspected your butcher block island and addressed any defects or damage, it’s time to move on to sanding and smoothing the surface. This step is crucial to achieving a polished and even finish. Start by using a medium-grit sandpaper and rubbing it gently in a circular motion over the entire surface of the butcher block. Gradually switch to a finer-grit sandpaper to achieve a smooth and velvety texture.
Remember to sand the edges and corners of the butcher block as well, ensuring that the entire surface is evenly sanded. Take your time and be patient with this step, as it will significantly impact the final appearance of your butcher block island.
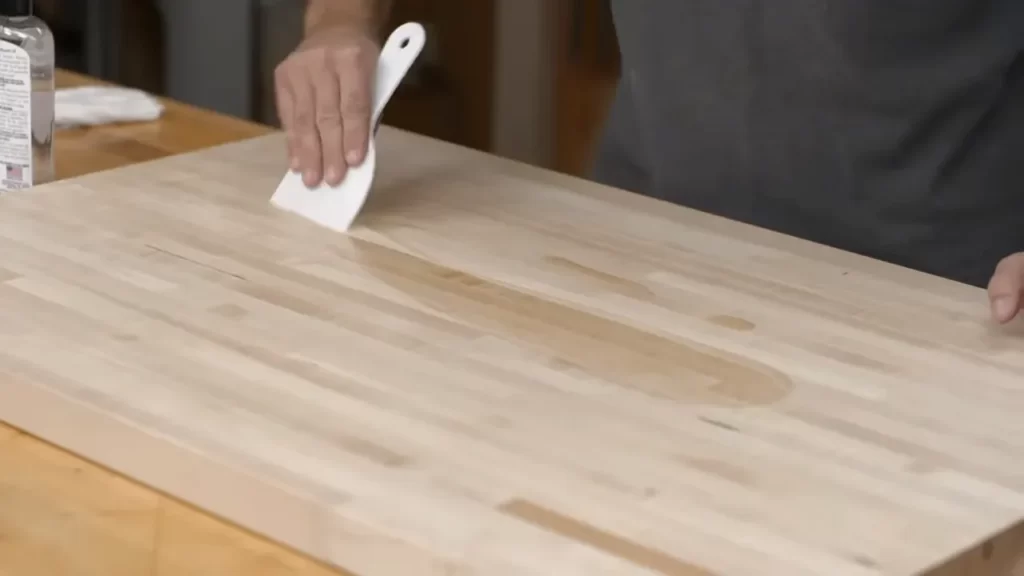
Applying a Finish or Sealer to Protect the Wood
Once you’ve sanded and smoothed the surface of your butcher block island, it’s time to apply a finish or sealer to protect the wood from moisture and stains. There are several options available, including mineral oil, beeswax, or a specialized butcher block conditioner. Whichever product you choose, carefully follow the manufacturer’s instructions for application.
Using a clean cloth or brush, apply the finish or sealer evenly across the entire surface of the butcher block, working in the direction of the wood grain. Allow the product to penetrate the wood for the recommended amount of time before wiping off any excess. This step will help seal the wood, protect it from potential damage, and enhance its natural beauty.
By following these steps—inspecting for defects, sanding and smoothing the surface, and applying a finish or sealer—you’ll ensure that your butcher block island is ready for use and will stand the test of time. Now, you can enjoy the beauty and functionality of your newly installed butcher block island in your kitchen.
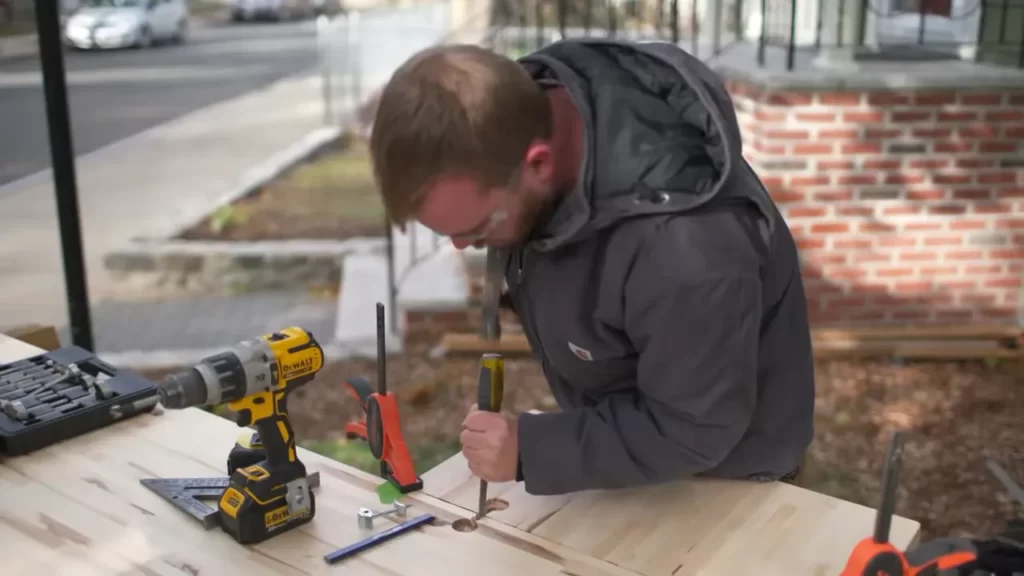
Step 4: Install The Butcher Block Island
Guided instructions on how to properly position and secure the island in place
Installing a butcher block island is an exciting project that can add functionality and beauty to your kitchen. Once you have built the base or support structure for your island (as outlined in Step 3), it’s time to move on to Step 4: installing the butcher block island. This step requires careful positioning and secure fastening to ensure a sturdy and reliable work surface. Follow these guided instructions to successfully complete this step:
- Begin by placing the butcher block island on top of the base or support structure. Make sure the island is centered properly and aligns with the surrounding countertops and cabinetry.
- Use a level to ensure that the island is perfectly horizontal. Place the level on top of the island and adjust its position until the bubble is centered in the level’s vial. This will help you achieve stability and prevent any wobbling.
- Once the island is in the desired position, secure it to the base or support structure using appropriate tools and techniques. Depending on your specific island design, this may involve using screws or brackets to fasten the island to the base, or using adhesive to bond the two together. Refer to the manufacturer’s instructions or consult a professional if you are unsure about the best method for your particular situation.
Using appropriate tools and techniques to fasten the butcher block to the base or support structure
Properly securing the butcher block to the base or support structure is crucial for a stable and durable island. Here are some essential considerations when it comes to using the right tools and techniques:
- Tools: Depending on the method you choose, you may need a drill, screws, brackets, adhesive, or a combination of these tools. Ensure that you have the appropriate tools readily available before you begin installation.
- Fastening: Follow the recommended fastening method for your specific butcher block island design. If using screws, pre-drill pilot holes to prevent splitting the wood. Make sure to align the holes with the base or support structure for proper fastening.
- Adhesive: If using adhesive, apply it evenly across the contact surface of the base and the butcher block. Use a suitable adhesive recommended for wood surfaces and press the two surfaces together firmly for proper bonding.
Making necessary adjustments to ensure stability and levelness
After securing the island to the base, it’s important to make necessary adjustments to ensure stability and levelness. This will provide a comfortable and safe working surface when utilizing the island for various kitchen tasks. Follow these steps to achieve stability:
- Check the levelness by placing a level on top of the butcher block island. If the bubble is not centered, make adjustments by inserting shims or adjusting the fasteners until the island is level in all directions.
- Ensure stability by applying pressure to different areas of the butcher block. If you notice any movement or wobbling, further tighten the fasteners or adjust the adhesive as needed. This will help eliminate any potential hazards when using the island.
By properly positioning, fastening, and making necessary adjustments, you can ensure that your butcher block island is securely installed and provides a stable surface for all your kitchen needs. With these steps completed, you are one step closer to enjoying your new and functional addition to your kitchen.
Finishing Touches And Maintenance
Once you have successfully installed your butcher block island, it’s time to focus on the finishing touches and ongoing maintenance to ensure its longevity and beauty. By applying a final coat of finish or sealer, you can enhance both the appearance and durability of your butcher block. Additionally, regular cleaning and proper care are essential to protect the butcher block from stains and water damage. In this section, we will discuss the steps to apply the final coat of finish, tips for maintaining and caring for the butcher block island, as well as how to regularly clean and protect it.
Applying a final coat of finish or sealer to enhance the appearance and durability of the butcher block
To enhance both the appearance and durability of your butcher block island, applying a final coat of finish or sealer is crucial. Here is a step-by-step guide to help you with the process:
- Clean the butcher block thoroughly using a mild soap and warm water. Ensure that the surface is completely dry before proceeding.
- Sand the surface of the butcher block using fine-grit sandpaper. This will remove any rough spots or imperfections and create a smooth surface.
- Wipe away any dust resulting from sanding using a microfiber cloth.
- Apply the final coat of finish or sealer using a brush or lint-free cloth. Be sure to follow the manufacturer’s instructions and apply an even layer, covering the entire surface of the butcher block.
- Allow the finish to dry completely before using the butcher block. This will typically take a few hours, but it’s best to refer to the specific product instructions for accurate drying times.
By applying a final coat of finish or sealer, you not only enhance the natural beauty of the wood but also provide an additional layer of protection against moisture and stains.
Tips for maintaining and caring for the butcher block island
Proper maintenance and care are essential to keep your butcher block island in pristine condition. Here are some tips to help you:
- Regularly oil the butcher block using food-grade mineral oil or butcher block conditioner. This helps to moisturize the wood and prevent it from drying out.
- Avoid placing hot pots or pans directly on the butcher block surface. Always use trivets or pot holders to protect the wood from heat damage.
- Use cutting boards when chopping or slicing food on the butcher block to prevent scratches and knife marks.
- Wipe up spills immediately to prevent staining. Mild soap and warm water can be used for cleaning, but avoid harsh chemicals that may damage the finish.
- Regularly inspect the butcher block for any signs of wear or damage. If any issues are found, address them promptly to prevent further deterioration.
By following these simple tips, you can ensure the longevity and beauty of your butcher block island for years to come.
How to regularly clean and protect the butcher block from stains and water damage
Cleaning and protecting your butcher block from stains and water damage is crucial for its maintenance. Here’s a straightforward process to follow:
- Start by wiping down the surface of the butcher block with a damp cloth to remove any loose debris.
- Mix a solution of mild soap and warm water in a bucket or bowl.
- Dip a clean cloth or sponge into the soapy water and wring out any excess moisture.
- Gently scrub the surface of the butcher block, paying special attention to any stains or spills. Avoid using abrasive scrubbers or brushes that may damage the wood.
- Rinse the cloth or sponge thoroughly to remove any soap residue, then wipe down the butcher block again to ensure it is clean.
- Dry the surface of the butcher block with a clean towel to prevent any moisture from seeping into the wood.
- Apply a thin layer of food-grade mineral oil or butcher block conditioner to the surface of the butcher block, using a clean cloth or brush. Allow the oil to penetrate the wood for at least 10-15 minutes before wiping off any excess.
Following these steps regularly will help to keep your butcher block clean, protected, and free from stains or water damage.
Step 5: Enjoy Your Newly Installed Butcher Block Island
Congratulations! You have successfully installed your beautiful butcher block island in your kitchen. Now it’s time to enjoy the benefits and advantages that come with this fantastic addition. But before you start, let’s take a look at some suggestions for styling and decorating your kitchen with the new butcher block island.
Suggestions for styling and decorating the kitchen with the new butcher block island
1. Enhance with Natural Elements
Bring a touch of nature into your kitchen by choosing decor that complements the warm and organic feel of your butcher block island. Consider adding potted plants, fresh flowers, or even a small herb garden to bring life and freshness to your space.
2. Integrate Complementary Colors
When it comes to styling, choose colors that harmonize with the warm wood tones of your butcher block island. Neutral earth tones, such as beige, taupe, or soft greens, work well to create a cohesive and inviting atmosphere. Add pops of color through kitchen accessories like dishware, utensils, or even decorative canisters.
3. Play with Textures
To add depth and visual interest, incorporate different textures into your kitchen design. Try mixing smooth finishes with rough elements like woven baskets, metal accents, or textured fabrics. This will create a balanced and visually appealing space.
Utilizing the additional workspace and storage provided by the island
Create an Ample Workstation
Your butcher block island serves as an additional workspace, so make the most of it! It provides a spacious surface for meal preparation, whether you’re chopping vegetables or rolling out dough. With this extra space, you can involve more people in the cooking process or enjoy the freedom to experiment with new recipes.
Increase Storage Options
Make use of the storage features that come with your butcher block island. Utilize the built-in cabinets, drawers, or shelves to keep your essential kitchen items organized and within reach. Store pots, pans, cooking utensils, and even small appliances to free up valuable cabinet space in the rest of your kitchen.
Benefits and advantages of having a butcher block island in the kitchen
Having a butcher block island in your kitchen brings numerous benefits that enhance both functionality and aesthetics.
1. Durable and Long-lasting
A butcher block island is designed to withstand heavy use, making it a durable addition to your kitchen. With proper care and maintenance, it can last for years, providing you with a reliable and beautiful surface for all your cooking needs.
2. Versatile and Multi-functional
Butcher block islands offer versatility in their use. From extra countertop space to additional seating, you can adapt your island to suit your specific needs. It can serve as a breakfast bar or a casual dining area, allowing you to enjoy meals with your family or entertain guests while cooking.
3. Adds Warmth and Character
The natural beauty of the butcher block wood brings warmth and character to your kitchen. Its unique grain patterns and rich colors provide an inviting atmosphere while adding a touch of rustic charm to your space.
With all these benefits, it’s no wonder that a butcher block island has become a popular choice among homeowners. So sit back, relax, and enjoy your newly installed butcher block island in your kitchen!
Frequently Asked Questions
How Do You Attach A Butcher Block Island Countertop?
To attach a butcher block island countertop, start by ensuring your base cabinets are level and secure. Place the countertop on the cabinets, aligning it properly. Screw through the cabinets into the underside of the countertop, using wood screws. Be sure to evenly distribute the screws.
How Do You Secure A Butcher Block For A Kitchen Island?
To secure a butcher block for a kitchen island, you can use brackets or angle irons to attach it to the base securely. Make sure to align the holes in the block with the holes in the base for a snug fit.
Alternatively, you can use adhesive or screws to ensure stability.
What Do You Use To Attach Butcher Block Countertops?
To attach butcher block countertops, you typically use a combination of adhesive and screws. The adhesive helps to secure the countertop to the base, while the screws provide additional support. This ensures that the countertop stays in place and is sturdy for use.
Can You Install Butcher Block Yourself?
Yes, you can install butcher block yourself. It’s a DIY project that requires careful planning and basic woodworking knowledge. Measure and cut the block to fit your space, secure it with screws, and apply a food-safe finish. Detailed instructions and tools are needed for a successful installation.
Conclusion
Installing a butcher block island can be a practical and stylish addition to your kitchen. With these simple steps, you can transform your space into a functional and beautiful area for food preparation. Remember to measure accurately, choose the right materials, and follow the instructions carefully.
By following these guidelines, you’ll have a stunning butcher block island that will enhance your kitchen’s aesthetic appeal and functionality. Enjoy the process and the end result!