
To install a bathtub door, measure and mark the desired height of the door on the bathtub wall. Then, drill holes into the wall, attach the door frame to the wall, and install the door panels into the frame.
Factors To Consider Before Purchasing
Before installing a bathtub door, it’s essential to consider a few important factors to ensure that you choose the right one for your bathroom. These factors can greatly influence the functionality, aesthetics, and longevity of your bathtub door. Here are three key factors that you should take into account before making a purchase:
Material and Durability
The material of your bathtub door plays a significant role in both its durability and visual appeal. While there are various materials to choose from, some popular options include glass, acrylic, and tempered glass. Glass doors create a sleek and modern look, while acrylic doors provide a more affordable option. However, durability should not be compromised for aesthetics. It is crucial to select a material that is sturdy enough to withstand daily use and can withstand the moisture and humidity in a bathroom without deteriorating over time.
Size and Fit
Another important factor to consider is the size and fit of the bathtub door. It’s crucial to measure the dimensions of your bathtub accurately to ensure a proper fit. A door that is too big or too small can lead to inefficiencies and potential leaks. Additionally, consider the size of your bathroom and the space available for the door to swing open and close comfortably. Taking accurate measurements and considering the available space will help you select a bathtub door that fits perfectly and enhances the overall functionality of your bathroom.
Style and Design
The style and design of your bathtub door can play a significant role in enhancing the overall aesthetic appeal of your bathroom. Consider the existing decor and style of your bathroom when choosing a door design. Whether you prefer a sleek frameless design or one with a frame, make sure it complements your bathroom’s overall look. Additionally, consider features such as handles, hinges, and finishes that can further enhance the style and functionality of the door. A well-designed and visually appealing bathtub door can elevate the ambiance of your bathroom and create a more enjoyable bathing experience.
By carefully considering the material and durability, size and fit, as well as the style and design, you can make an informed decision when purchasing a bathtub door. Taking these factors into account ensures that the door not only meets your practical requirements but also enhances the overall aesthetics of your bathroom.
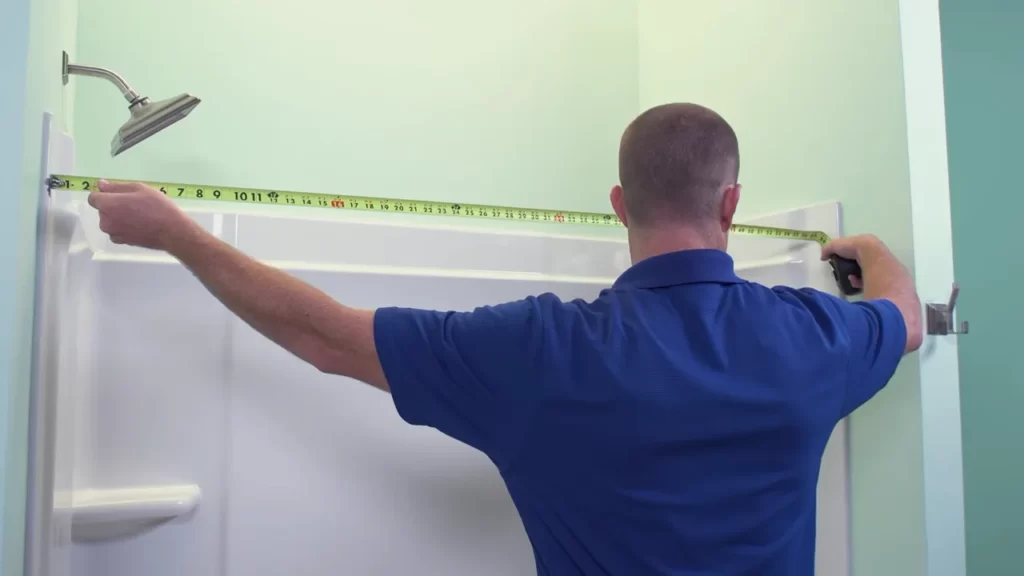
Measuring The Bathtub Opening
Installing a bathtub door can be a great way to upgrade your bathroom and improve both its functionality and aesthetics. However, before you start the installation process, it’s crucial to measure the bathtub opening accurately. Taking accurate measurements will ensure that your bathtub door fits perfectly and functions properly. In this guide, we’ll walk you through the steps of measuring the bathtub opening, so you can confidently proceed with the installation. Let’s get started!
Tools Required
Before you begin measuring the bathtub opening, make sure you have the following tools handy:
- Tape measure
- Pencil or marker
- Level
Having these tools ready will help you take precise measurements and ensure a smooth installation process.
Taking Accurate Measurements
Now that you have the necessary tools, it’s time to take accurate measurements of your bathtub opening. Follow these steps:
- Start by measuring the width of the bathtub opening. Use the tape measure to determine the distance between the two walls or existing shower enclosure. Repeat the measurement at both the top and bottom of the opening to account for any discrepancies.
- Next, measure the height of the bathtub opening. Place the tape measure vertically from the top of the opening to the bottom, ensuring that it is centered and level.
- Record the measurements in a safe place. It’s a good idea to write them down or take a picture to refer back to during the installation process.
Remember, accuracy is key when it comes to measuring the bathtub opening. Taking precise measurements will help you choose the right size and ensure a seamless installation.
Re-checking Measurements
Once you have recorded the initial measurements, it’s important to re-check them to confirm their accuracy. Double-checking your measurements will help you avoid any mistakes and ensure a perfect fit for your bathtub door.
Here are a few tips for re-checking your measurements:
- Use the level to ensure that the walls are plumb and level. If they are not, take additional measurements at different points to account for any irregularities.
- Compare the width and height measurements to ensure they are consistent. If there are any discrepancies, remeasure the opening to obtain accurate dimensions.
By re-checking your measurements, you can catch any errors or variations that may have occurred during the initial measurement process. This step will help you achieve a precise fit for your bathtub door.
Now that you have accurately measured the bathtub opening and re-checked the measurements, you are ready to proceed with the installation process. Stay tuned for our next guide on installing the bathtub door!
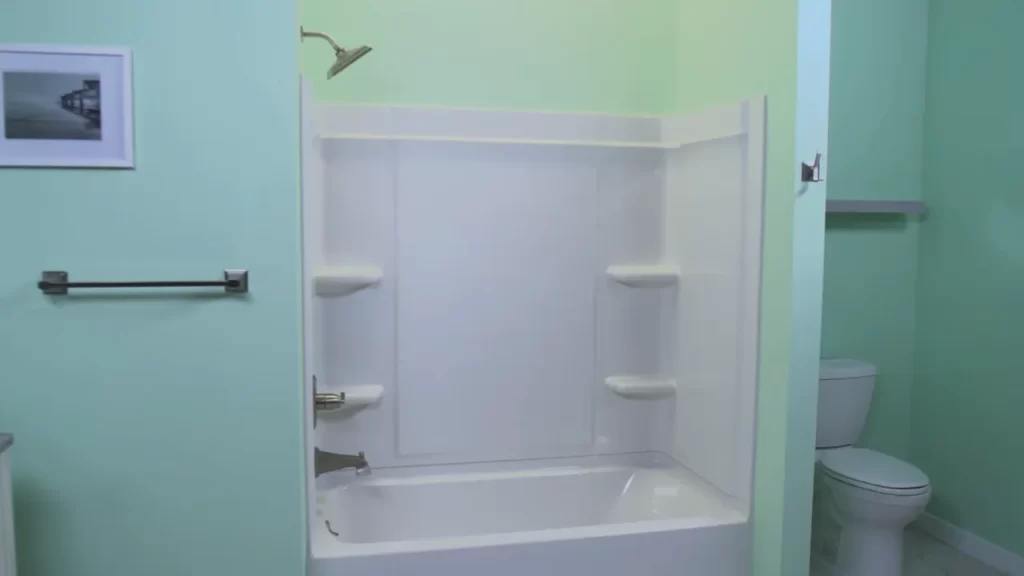
Clearing The Bathtub Area
Before installing a bathtub door, it’s crucial to ensure that the bathtub area is clear and ready for the installation process. Taking the time to prepare the space properly will not only make the installation easier but also help ensure the longevity and effectiveness of the bathtub door. In this section, we will discuss the necessary steps to clear the bathtub area, including removing obstacles, cleaning the bathtub surface, and ensuring proper ventilation.
Removing Obstacles
Prior to the installation process, it is important to remove any obstacles or objects that may obstruct the bathtub door installation. This includes toiletries, bath mats, shower curtains, and any other items that may interfere with the installation process. By removing these obstacles, you create a clear space for the installation, making it easier to work and reducing the risk of damage to the bathtub door or surrounding items.
Cleaning the Bathtub Surface
Next, it is essential to thoroughly clean the surface of the bathtub before installing the bathtub door. This ensures that there are no dirt, grime, or soap scum residues that could affect the installation or compromise the adhesion of the door. To clean the surface, use a non-abrasive cleaner and a soft cloth or sponge. Pay special attention to the areas where the bathtub door will be installed, removing any buildup that could hinder the installation process.
Ensuring Proper Ventilation
In addition to clearing and cleaning the bathtub area, it is important to ensure proper ventilation during and after the installation process. Adequate ventilation allows for proper drying of the area, reducing the risk of mold or mildew formation. Open windows or run an exhaust fan to promote airflow and expedite the drying process. This step is vital to maintain a clean and healthy environment in your bathroom.

Gathering The Necessary Tools And Supplies
Before you can start the installation process for your bathtub door, it’s important to gather all the necessary tools and supplies. By having everything prepared and organized, you’ll be able to complete the installation smoothly and efficiently.
List of Tools:
To install a bathtub door, you will need the following tools:
- A screwdriver (either Phillips or flathead, depending on the type of screws used)
- A drill with appropriate drill bits
- A level for ensuring the door is installed straight
- A measuring tape for accurate measurements
- A pencil for marking the positions
- A putty knife for removing any old caulk or sealant
- A caulking gun for applying new caulk or sealant
- A rubber mallet or hammer for adjusting and aligning the door
- A wrench for tightening any bolts or screws
List of Supplies:
In addition to the tools, gather the following supplies:
- A bathtub door kit, which typically includes the door panels and all necessary hardware
- Screws or bolts to secure the door panels in place
- Shims or spacers for leveling the door
- Silicone caulk or sealant for sealing the edges of the door
- Clean, lint-free cloths for wiping away any excess caulk or sealant
Make sure to check the instructions provided with your specific bathtub door kit, as it may include additional tools or supplies that are required for installation.
Now that you have gathered all the necessary tools and supplies, you are ready to move on to the next step of installing your bathtub door. Stay tuned for our next blog post, where we will guide you through the installation process step by step.
Removing The Existing Shower Curtain Or Sliding Doors
If you’re looking to give your bathroom a fresh new look, installing a bathtub door can be a great option. But before you can install your new bathtub door, you’ll need to remove the existing shower curtain or sliding doors. In this step-by-step guide, we’ll walk you through the process of removing both shower curtains and sliding doors, so you can get started on your bathroom makeover in no time.
Step-by-step Guide for Shower Curtain Removal
- Start by removing the shower curtain rings or hooks from the curtain rod. Simply slide them off and set them aside.
- Next, carefully remove the curtain from the rod by sliding it off. If the curtain is attached using clips, unclip them one by one.
- Once the curtain is off, check if there’s a curtain liner behind it. If so, remove the liner in the same manner as the curtain.
- Now that the curtain and liner are removed, inspect the curtain rod for any screws or brackets holding it in place. Use a screwdriver or wrench to remove any screws or brackets as needed.
- With the curtain rod removed, clean the area and ensure there’s no residue left behind. This will provide a clean surface for your new bathtub door installation.
Step-by-step Guide for Sliding Door Removal
- The first step in removing sliding doors is to locate the screws or brackets that hold the doors in place.
- Using a screwdriver or wrench, carefully remove the screws or brackets securing the top track of the sliding doors.
- Once the top track is removed, lift the sliding doors out of the bottom track. You may need another person to help you with this step, as the doors can be heavy.
- With the doors removed, inspect the bottom track for any screws or brackets. Remove them using a screwdriver or wrench.
- After removing the screws or brackets, clean the area thoroughly to remove any dirt or residue. This will ensure a smooth and clean surface for your new bathtub door installation.
By following these step-by-step guides for shower curtain and sliding door removal, you’ll be one step closer to installing your new bathtub door. Remember to take your time and be careful during the removal process to avoid any damage. Once the old shower curtain or sliding doors are removed, you can move on to the exciting part of installing your new bathtub door and transforming your bathroom into a beautiful oasis.
Mounting The Bathtub Door Frame
Properly mounting the bathtub door frame is essential for a secure and efficient installation. In this section, we will guide you through the steps involved in preparing the frame and securing it in place. By following these instructions, you can ensure a successful installation that will provide you with a functional and stylish bathtub door.
Preparing the Frame
Before you begin mounting the bathtub door frame, it is crucial to properly prepare the frame. This includes gathering all the necessary tools and materials needed for the installation. Here’s a step-by-step guide on how to prepare the frame:
- Start by carefully unpacking the bathtub door frame and inspecting all the components. Ensure that all the parts are included and in good condition.
- Refer to the manufacturer’s instructions to familiarize yourself with the specific requirements for your bathtub door frame. This will help you understand the assembly process and any additional steps that may be necessary.
- Clean the area where the frame will be mounted. Use a mild detergent and warm water to remove any dirt, grease, or residue. This will ensure a clean surface for the frame to adhere to.
- Measure the opening of your bathtub to determine the correct size for the frame. Carefully mark the measurements on the wall or the bathtub surround to guide you during the installation process.
Securing the Frame in Place
Once you have prepared the frame, it’s time to secure it in place. Follow these steps to ensure a strong and sturdy mounting:
- Begin by positioning the pre-assembled frame against the wall or the bathtub surround, aligning it with the marked measurements.
- Use a level to check that the frame is plumb and level. Make any necessary adjustments by shimming or repositioning the frame.
- Once the frame is properly aligned, mark the mounting holes on the wall or the bathtub surround.
- Remove the frame and drill pilot holes at the marked locations. Ensure that the holes are the appropriate size and depth for the mounting hardware.
- Place the frame back into position and align the mounting holes with the pilot holes.
- Secure the frame in place by inserting the appropriate screws or anchors through the mounting holes and into the pilot holes.
- Tighten the screws or anchors using a screwdriver or an appropriate tool. Verify that the frame is securely fastened and does not wobble.
- Finally, double-check the alignment and levelness of the frame before proceeding with further installation steps.
By following these instructions, you can successfully mount the bathtub door frame, ensuring a secure and stable installation. With the frame securely in place, you can now move on to the next steps of the installation process, such as attaching the door panels and hardware.
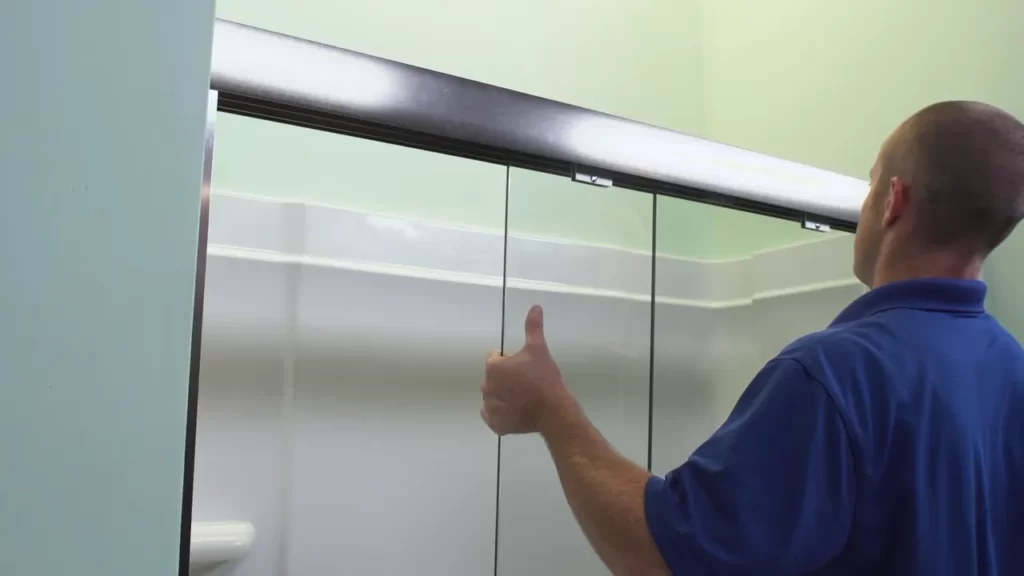
Attaching The Door Panels
Once you have successfully measured and marked the placement for your bathtub door, it’s time to attach the door panels. This step is vital to ensuring a sturdy and functional installation. In this section, we will guide you through the process of properly aligning the door panels and securing them to the frame.
Proper Alignment of Door Panels
Before securing the door panels to the frame, it is crucial to ensure proper alignment. Improper alignment can result in difficulty in opening or closing the door, potential leaks, and overall dissatisfaction with the final outcome. Follow these steps to achieve the correct alignment:
- Start by placing the door panels on a flat surface, such as a workbench or the floor.
- Carefully inspect the panels for any defects or damage.
- Ensure that the panels are level and flush with one another. This can be done by using a level tool.
- Measure the distance between the panels at various points to double-check their alignment. Adjust if necessary.
- Once satisfied with the alignment, move on to securing the panels to the frame.
Securing the Panels to the Frame
Now that the panels are properly aligned, it’s time to securely attach them to the frame. Here’s a step-by-step guide:
- Apply a bead of waterproof adhesive to the edges of the door panels that will come into contact with the frame. This adhesive will help create a watertight seal.
- Place the panels against the frame, ensuring that they align correctly with the markings you made earlier.
- Use the provided screws or clips to secure the panels to the frame. Make sure to follow the manufacturer’s instructions for proper installation.
- Tighten the screws or clips firmly, but be careful not to overtighten, as it could damage the panels or frame.
- Double-check the alignment of the panels and make any necessary adjustments before fully tightening the screws or clips.
- Once all the screws or clips are tightened, wipe away any excess adhesive or debris with a clean cloth.
By following these steps for proper alignment and secure attachment of the door panels, you can ensure a successful installation of your bathtub door. Remember to refer to the manufacturer’s instructions specific to your door model, as each installation process may vary slightly.
Installing The Door Handles And Seals
Once you have successfully installed the framework and glass panels for your new bathtub door, the next step is to install the door handles and seals. This crucial step will not only provide the finishing touch to your bathtub door but also ensure a tight seal, preventing any water leakage. In this section, we will guide you through the process of choosing the right handles and seals for your bathtub door, as well as the proper placement and installation process.
Choosing the Right Handles and Seals
When it comes to choosing handles for your bathtub door, it is important to consider both functionality and style. The handles should be easy to grip and operate, allowing you to open and close the door effortlessly. Additionally, they should complement the overall aesthetic of your bathroom. Whether you prefer a sleek and modern design or a more traditional look, there are a variety of handle options available to suit your taste.
Similarly, selecting the right seals is essential for achieving a watertight enclosure. Seals help prevent water from leaking out of the bathtub and onto the floor, keeping your bathroom dry and safe. There are different types of seals available, including vinyl, rubber, or magnetic seals. It is recommended to choose a seal that is specifically designed for bathtub doors to ensure a proper fit and optimal performance.
Placement and Installation Process
Once you have chosen the handles and seals for your bathtub door, it’s time to proceed with the placement and installation process. Here is a step-by-step guide to help you complete this task:
- Start by determining the ideal height for the door handles. Typically, the handles are placed at a comfortable height, allowing easy access without excessive bending or stretching. Use a measuring tape to ensure accurate placement.
- Mark the desired handle locations on both sides of the glass panel. Use a level to ensure that the marks are perfectly aligned.
- Next, it’s time to install the handles. Follow the manufacturer’s instructions to attach the handles securely to the glass panels. This may involve drilling holes and using screws or other mounting hardware.
- Once the handles are installed, it’s time to focus on the seals. Measure the length of the seals and trim them if necessary to fit the width of the glass panels.
- Carefully attach the seals to the edges of the glass panels, making sure they are aligned properly and provide a snug fit.
- Test the door handles and seals by opening and closing the bathtub door. Ensure that the handles are secure and the seals effectively prevent any water leakage.
By following these steps, you can expertly install the door handles and seals for your bathtub door. Remember to take your time and double-check the measurements and alignment to achieve a professional and secure installation.
Checking For Proper Functionality
Checking for Proper Functionality
Once you have successfully installed your bathtub door, it is essential to check for proper functionality to ensure that it operates smoothly and serves its intended purpose. This step is crucial to avoid any potential issues in the future. In this section, we will discuss two essential aspects of checking for proper functionality: opening and closing the door, and ensuring smooth sliding or swinging.
Opening and Closing the Door
The first step in checking for proper functionality is to test the door’s opening and closing mechanism. To do this, gently push or pull the door to see if it moves smoothly without any resistance or sticking points. Ensure that the door opens and closes fully without any obstructions. If you notice any issues during this step, it is important to address them promptly to prevent future inconvenience.
Ensuring Smooth Sliding or Swinging
Proper sliding or swinging motion is crucial for the smooth operation of a bathtub door. Let’s take a look at how you can ensure it:
- Inspect the rollers or hinges: If your bathtub door slides, check the rollers for any signs of damage, such as cracks or wear and tear. Replace them if necessary. For swinging doors, inspect the hinges for any loose screws or misalignment.
- Apply lubrication: Lubricating the rollers or hinges can significantly improve the door’s sliding or swinging motion. Use a silicone-based lubricant and apply it to the moving parts according to the manufacturer’s instructions.
- Check for alignment: Misalignment can hinder the smooth operation of a bathtub door. Examine the tracks or hinges to ensure they are properly aligned. If you notice any misalignment, adjust them accordingly to achieve proper alignment.
By following these steps, you can ensure that your bathtub door functions correctly and provides a seamless experience every time you use it.
In conclusion, checking for proper functionality is an essential step after installing a bathtub door. By testing the opening and closing mechanism and ensuring smooth sliding or swinging, you can identify and address any issues early on, ensuring a hassle-free experience in the long run. Don’t overlook this crucial step, as it will help you enjoy your bathtub door for years to come.
Examining For Leaks And Waterproofing Issues
Before installing a bathtub door, it is crucial to examine the area for any potential leaks or waterproofing issues. Proper inspection and addressing these issues will help ensure that your bathtub door installation is successful and prevents any water damage to your bathroom.
Inspecting the Seals and Gaskets
One of the first steps in examining for leaks is to inspect the seals and gaskets around your bathtub. These seals and gaskets play a vital role in preventing water from leaking out of the enclosure. Here’s how you can inspect them:
- Visually examine the seals and gaskets for any signs of wear or damage. Look for cracks, gaps, or shrinkage that may compromise their effectiveness.
- Run your fingers along the seals to feel for any soft spots, which could indicate deterioration.
- Check for proper alignment of the seals and gaskets. They should be snugly fitted and free from any misalignment.
If you notice any issues with the seals or gaskets, it’s important to replace them before proceeding with the bathtub door installation. This will ensure that they provide a watertight seal, preventing any leaks from occurring.
Applying Waterproofing Solutions
In addition to inspecting the seals and gaskets, applying waterproofing solutions can provide an extra layer of protection against leaks. Here are a few popular options:
| Waterproofing Solution | Pros | Cons |
|---|---|---|
| Waterproof Sealants |
|
|
| Waterproof Membranes |
|
|
| Waterproof Tape |
|
|
When applying waterproofing solutions, it is essential to follow the manufacturer’s instructions carefully. Make sure to clean and dry the area before applying the solution to ensure maximum adhesion and effectiveness. Additionally, consider using a caulk gun or brush to evenly apply the waterproofing solution along the joints and gaps.
By taking these steps to examine for leaks and address any waterproofing issues, you can ensure a secure and watertight bathtub door installation. Remember, a thorough inspection and proper waterproofing measures will help safeguard your bathroom from potential water damage.
Making Adjustments And Fine-Tuning
Once you have successfully installed your bathtub door, it’s time to make adjustments and fine-tune the door to ensure a perfect fit. This step is essential to avoid any issues with the functionality and appearance of the door. In this section, we will discuss troubleshooting common issues that may arise during the installation process and guide you on how to adjust the frame or door panels to achieve the desired results.
Troubleshooting Common Issues
During the installation of a bathtub door, it’s not uncommon to encounter a few hurdles along the way. However, with proper troubleshooting, you can overcome these issues and ensure a smooth installation process. Here are some common issues that you may face:
- The door doesn’t close properly: If you find that the door doesn’t close properly or there are gaps between the door panels, the first thing you should check is if the door is aligned correctly. You can do this by adjusting the hinges or rollers using the provided wrench or screws. Make sure the door is level and parallel to the bathtub edge.
- Water leaks: If you notice water leaks around the edges of the door, it may indicate a faulty installation. Inspect the rubber seals and gaskets to ensure they are properly aligned and in good condition. If necessary, replace any damaged or worn-out parts. Additionally, check if the door panels are correctly aligned with the bathtub walls to prevent water from seeping through.
- Stiff door operation: If the door panels are difficult to open or close, it may be due to misalignment or tight hinges. Loosen the screws on the hinges slightly and adjust the door panels until they glide smoothly. Remember to tighten the screws afterward to secure the position.
Adjusting Frame or Door Panels
If you encounter any of the issues mentioned above or simply want to make minor adjustments to fine-tune your bathtub door, here’s how you can adjust the frame or door panels:
1. Hinge adjustments:
- Check the hinges for any looseness or misalignment. Tighten the screws slightly with the provided wrench to secure the hinges.
- If the door is not opening or closing properly, adjust the hinges by loosening the screws and moving the door panels slightly up or down until they align correctly.
2. Roller adjustments:
- If your bathtub door has rollers, inspect them for any signs of wear or damage. Replace any worn-out rollers to ensure smooth operation.
- Use the wrench to adjust the position of the rollers. Loosen the screws and move the rollers up or down as needed to align the door panels.
3. Frame adjustments:
- If the frame of the bathtub door is not properly aligned, use a level to check for any discrepancies. Adjust the screws or brackets holding the frame in place to ensure a level and secure installation.
- Make sure the frame is parallel to the bathtub edge and vertically straight for a seamless appearance.
Remember to test the door’s functionality after making the adjustments. Open and close the door multiple times to ensure it operates smoothly without any issues. Regular maintenance and cleaning will also help prolong the lifespan of your bathtub door.
Cleaning And Maintenance Tips
Proper cleaning and maintenance of your bathtub door are crucial for maintaining its appearance and functionality over time. By following these easy steps, you can keep your bathtub door looking like new and prevent any potential issues from arising.
Cleaning the Bathtub Door Regularly
Regular cleaning is essential to remove any dirt, grime, or soap scum that may accumulate on your bathtub door. Here’s a simple step-by-step guide to help you clean your bathtub door effectively:
- Mix a solution of warm water and a mild detergent.
- Dip a soft sponge or cloth into the solution and gently scrub the surface of the bathtub door.
- Rinse off the detergent with warm water.
- Dry the surface thoroughly with a clean, lint-free cloth to prevent water spots.
Note: It’s important to check the manufacturer’s instructions for any specific cleaning recommendations that may differ from these general instructions.
Avoiding Harsh Chemicals
When cleaning your bathtub door, it’s crucial to avoid using harsh chemicals that can damage the door’s finish or cause discoloration. Instead, opt for gentle, non-abrasive cleaners that are specifically formulated for cleaning glass or bathroom fixtures.
Tip: You can also make your own natural cleaning solution by mixing equal parts of white vinegar and water. This solution is effective, inexpensive, and environmentally friendly.
Additionally, avoid using abrasive scrubbing tools like steel wool or abrasive pads, as these can scratch the surface of the bathtub door.
Note: Always test any new cleaning product on a small, inconspicuous area of the bathtub door before applying it to the entire surface.
By following these cleaning and maintenance tips regularly, you can ensure that your bathtub door remains clean, shiny, and free from any damage that may compromise its functionality or appearance.
Enjoying Your New Bathtub Door
Benefits of Installing a Bathtub Door
Installing a bathtub door in your bathroom not only adds convenience but also offers several benefits that enhance your overall bathing experience. Here are some of the key advantages you can enjoy when you choose to install a bathtub door:
- Better Accessibility: With a bathtub door, you can easily enter and exit your bathtub without the need to step over a high wall or ledge. This is especially beneficial for individuals with limited mobility or seniors who may have difficulty lifting their legs over a traditional bathtub wall.
- Enhanced Safety: Traditional shower curtains can be prone to mold and mildew growth, making your bathroom environment less hygienic. A bathtub door, on the other hand, provides a sealed enclosure that prevents water from escaping and reduces the risk of slips and falls due to wet floors.
- Increased Privacy: If you prefer a more private bathing experience, a bathtub door offers a superior solution compared to shower curtains. The solid enclosure provides better coverage, shielding you from prying eyes or interruptions from others in the household.
- Improved Aesthetics: A bathtub door can significantly enhance the visual appeal of your bathroom. They come in various elegant designs, finishes, and glass options, allowing you to choose a style that complements your existing décor and adds a touch of sophistication to your bathing space.
- Easy Maintenance: Cleaning and maintaining a bathtub door is much simpler compared to shower curtains. Most bathtub doors feature glass that is treated to resist water spots and soap scum buildup, making it easier to keep your bathroom looking fresh and sparkling.
Enhancing the Bathroom Aesthetics
Installing a bathtub door not only offers practical benefits but also enhances the overall aesthetics of your bathroom. With its sleek design and modern features, a bathtub door can transform your bathing space into a stylish retreat. The wide range of options available allows you to choose a bathtub door that seamlessly blends with your existing bathroom décor. Whether you prefer a frameless glass door for a minimalist look or a semi-frameless design for added sturdiness, you have the freedom to customize your bathtub door based on your personal style and preferences.
When it comes to selecting the right bathtub door, it’s important to consider factors such as the size of your bathroom, the placement of your bathtub, and your budget. Additionally, you can also opt for features like built-in towel bars or shelves to add functionality and convenience to your bathing space.
In conclusion, the installation of a bathtub door not only enhances your bathing experience through improved accessibility, safety, and privacy, but also elevates the overall aesthetics of your bathroom. With its easy maintenance and customizable options, a bathtub door proves to be a worthwhile investment that adds long-term value to your home.
Frequently Asked Questions
Can You Install A Door On A Bathtub?
Yes, a door can be installed on a bathtub.
How Do You Install A Shower Door Over A Bathtub?
To install a shower door over a bathtub, first, measure the opening. Then, choose the right door according to the measurements. Next, follow the manufacturer’s instructions and assemble the door. Finally, secure the door in place using the provided hardware.
Can I Install A Shower Door Myself?
Yes, you can install a shower door yourself. Just follow the instructions carefully, use proper tools, and take safety precautions. Make sure to measure accurately, align the door correctly, and secure it tightly. Consider seeking professional help if you lack experience or encounter difficulties.
How Is A Shower Door Attached?
Shower doors are attached using hinges or tracks. Hinges attach the door to the wall, allowing it to swing open and closed. Tracks are used for sliding doors, with the door fitting into the track to slide open and closed smoothly.
Conclusion
Installing a bathtub door can be a simple and straightforward process that can greatly enhance your bathroom’s functionality and aesthetics. By following the step-by-step instructions outlined in this blog post, you can confidently install a bathtub door on your own.
Remember to carefully measure and assemble the components, and take your time during the installation process. With a little effort and patience, you can transform your bathroom into a modern and stylish space that meets your specific needs. Happy remodeling!